# Django REST Framework
# REST in Action
REpresentational State Transfer
Uniform Interface and Easy Access
HTTP Methods:
- POST
- GET
- PUT
- DELETE
These are also known as Http VERBS. The URL and URI are also known as nouns.
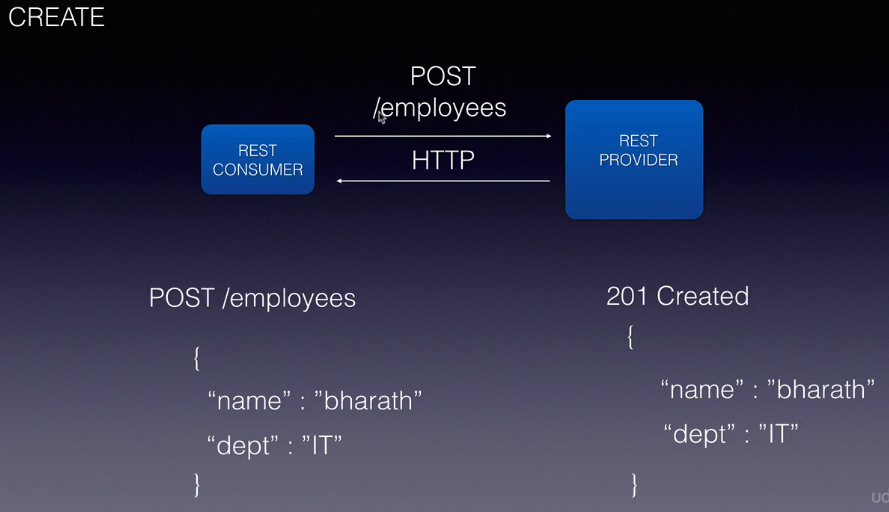
/employees is called a collection resource, /employees/1 would be an item resource.
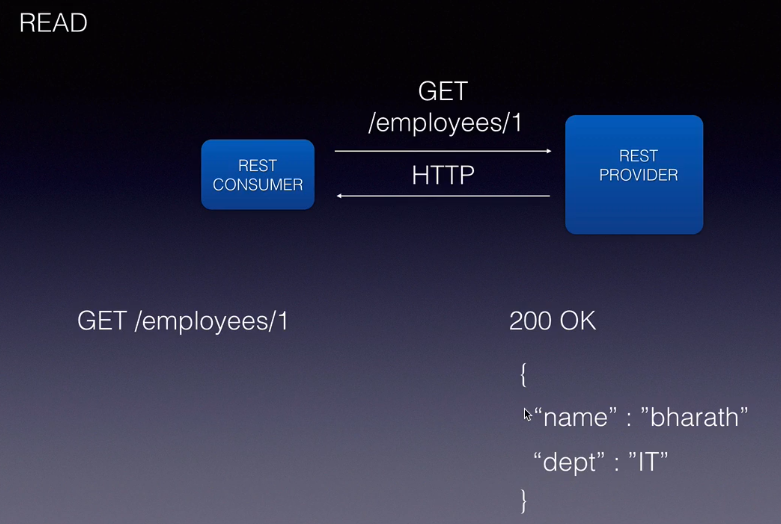
GET /employees would get all the employees back, not just the resource.
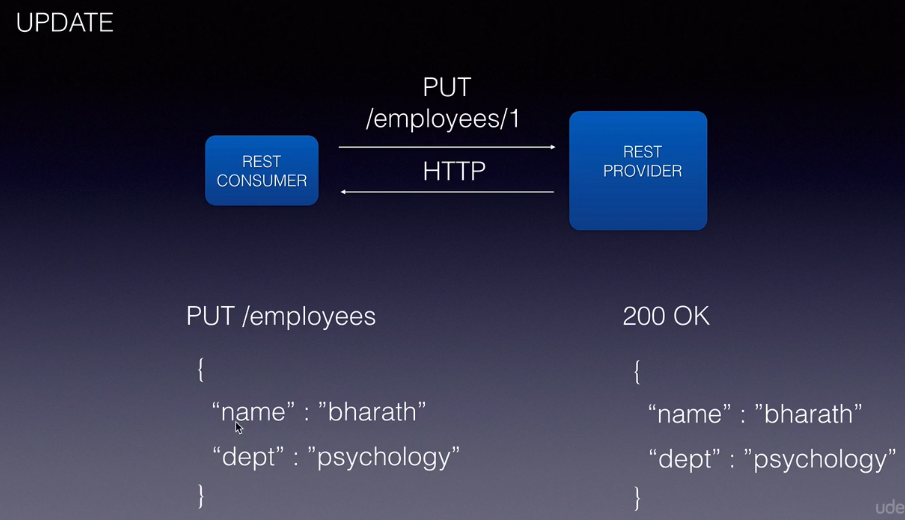
To UPDATE we use a PUT Method on the collection resource on the item resource with a unique identification
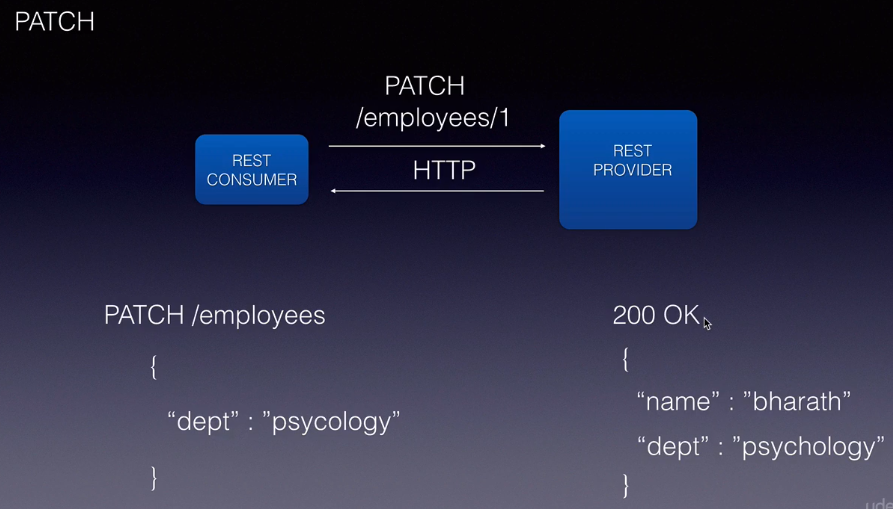
PUT does not make partial updates, for this we would use PATCH.
To DELETE we use the DELETE verb of course.
# Why REST?
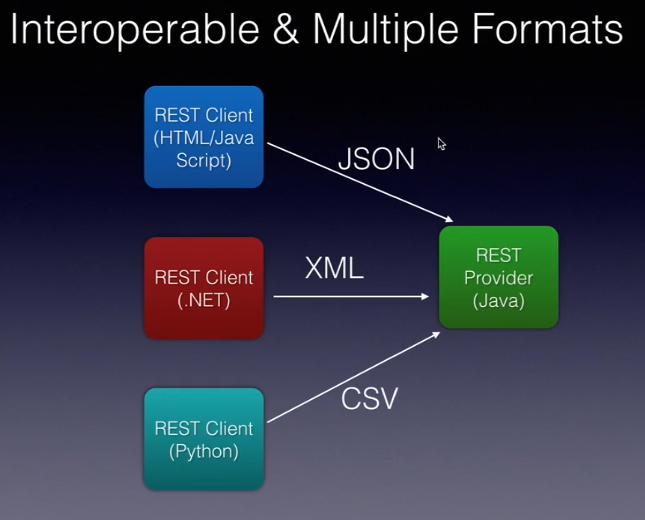
Interoperability and Multiple formats
Stateless
The state will be maintained on the client instead on our application.
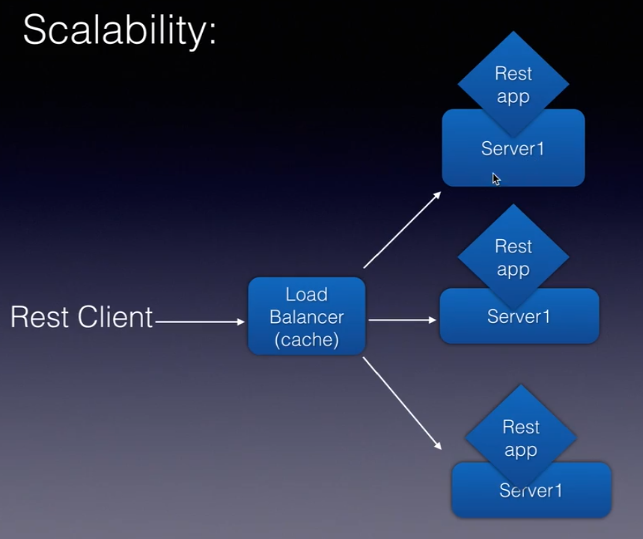
Scalability
# Why Django REST Framework?
Class Based Views and Function Based Views
Class: CRUD operations
class StudentViewSet(viewsets.ModelViewSet):
    query = Student.objects.all()
    serializer_class = StudentSerializer
2
3
Functions: for custom business logic
def student_list(request):

    if request.method == 'GET':
        students = Student.objects.all()
        serializers = StudentSerializers(student, many=True)
        return Response(serializer.data)

    elif request.method =='POST':
        serializer = StudentSerializer(data=request.data)
        if serializer.is_valid():
            serializer.save()
            return Response(serializer.data, status=status.HTTP_201_CREATED)
        return Response(serializer.errors, status=status.HTTP_400_BAD_REQUEST)
2
3
4
5
6
7
8
9
10
11
12
13
Serializers
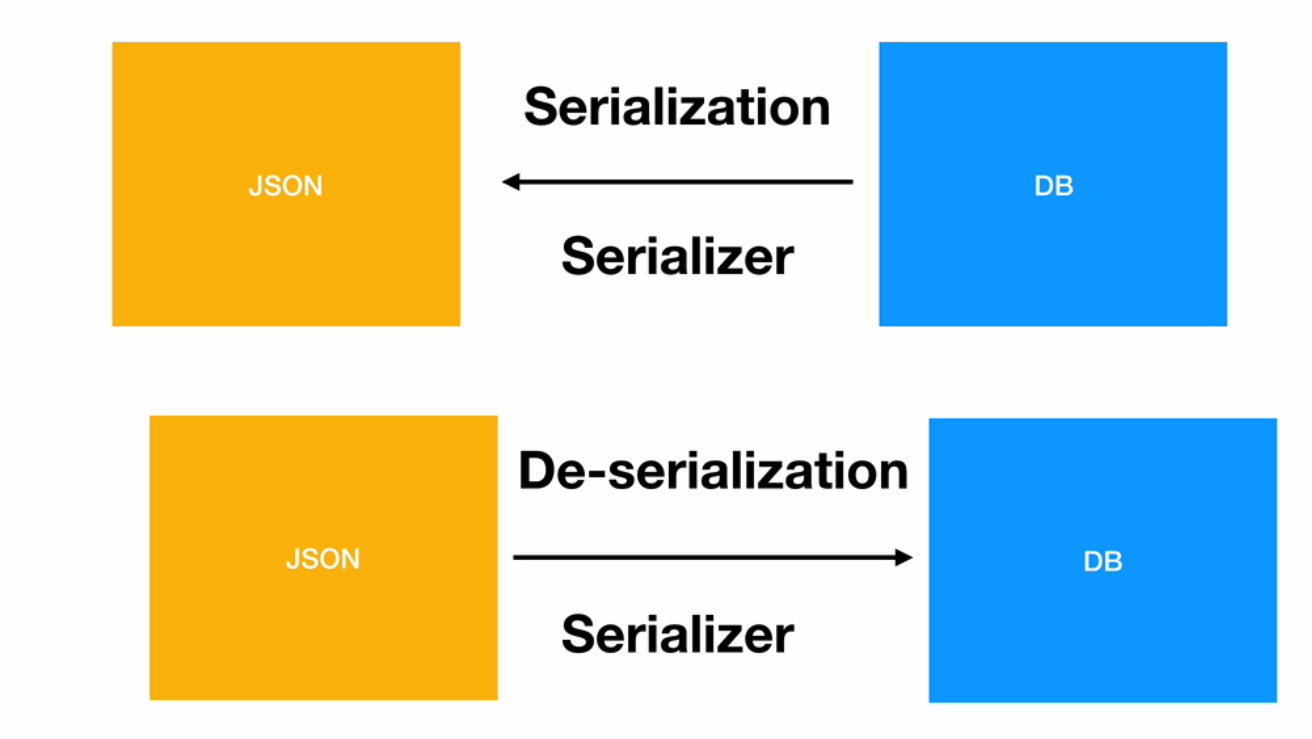
Serializers are classes that are responsible for converting the data in the varios format into python objects so it can be consumed by the database, and deserialization is converting the python objects into Json, XLM, etc so the client can consume.

ORM
Object Relational Mapping: perform database operations without writing SQL code.
Web Browsable API
Security
Authentication
Authorization
OAuth
Documentation
To execute scripts on windows from the virtual env:
Set-ExecutionPolicy Unrestricted -Scope Process
# Free MySQL Instance on Cloud - CleverCloud
# Installation
pip install django

pip install djangorestframework
2
3
MySql and MySql Workbench
- Download
- Install
- Configure
- Workbench
- Root Password
TIP
For now only need to install MySql Server and Workbench
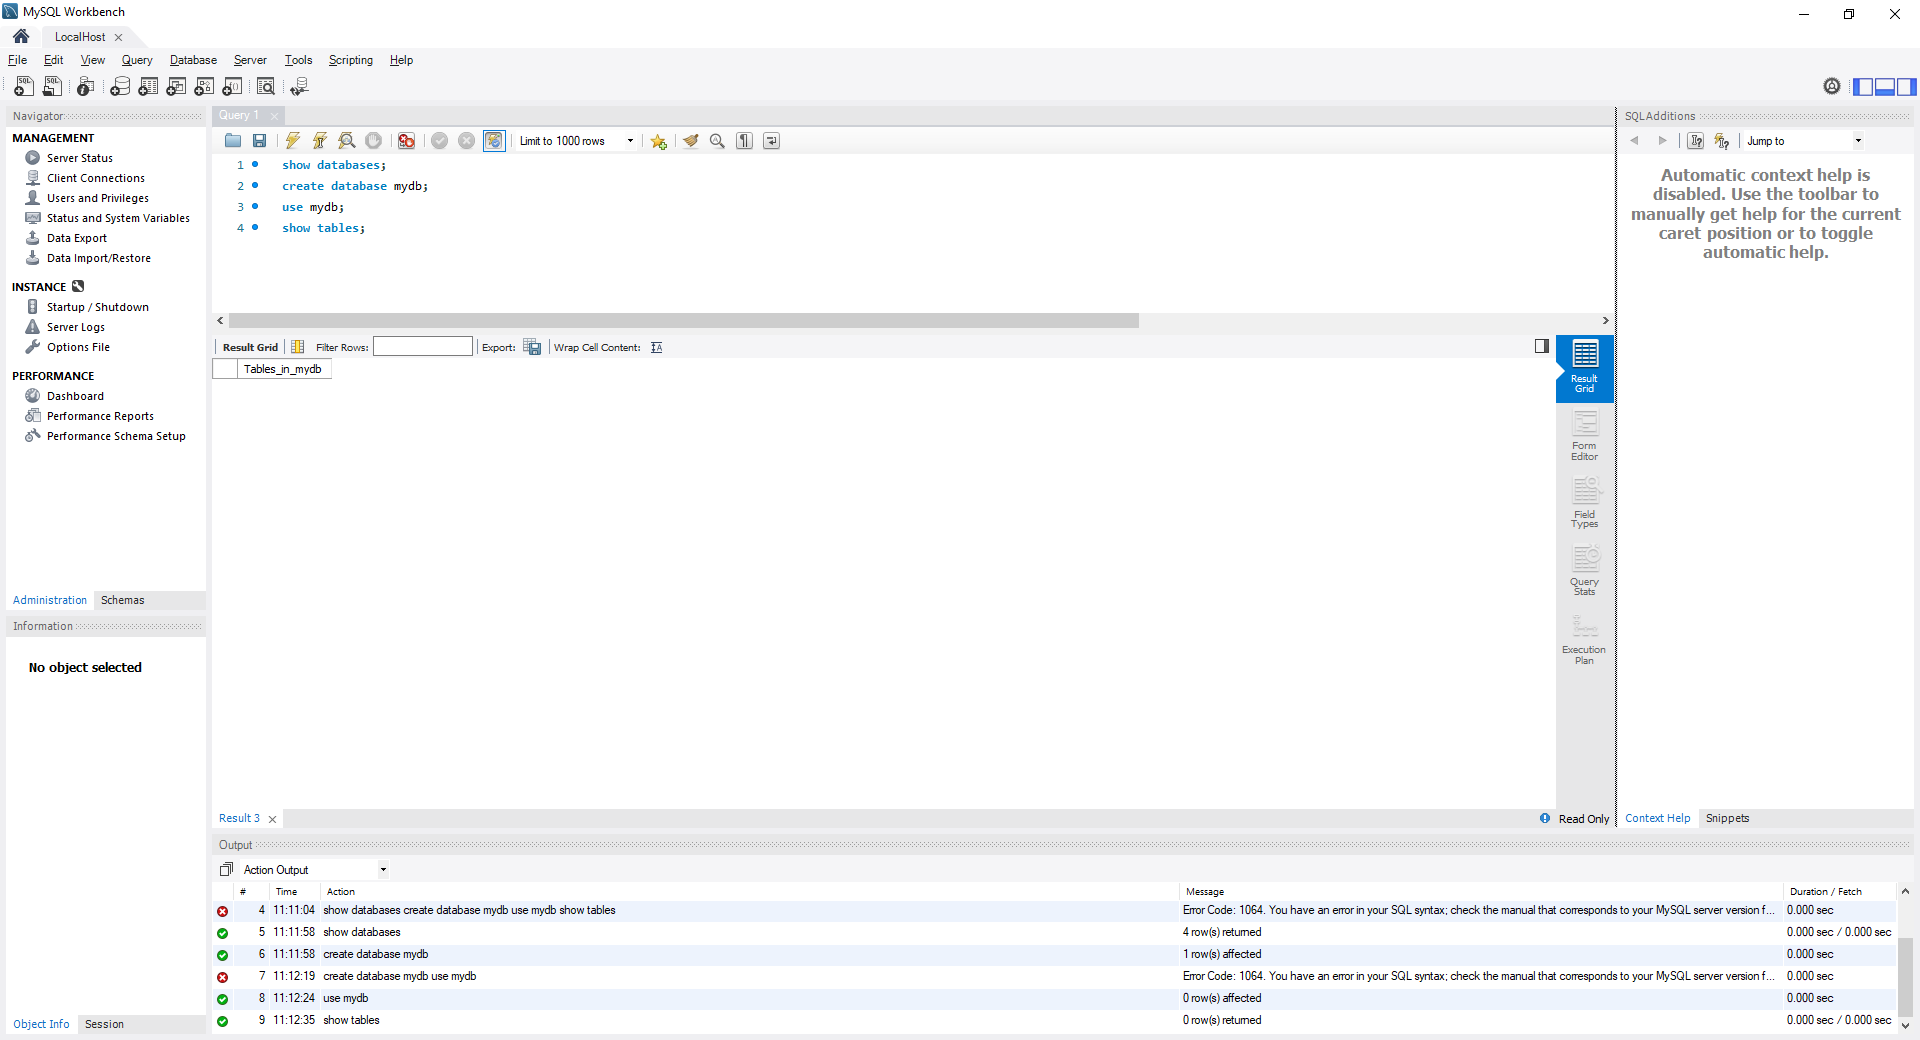
show databases;
create database mydb;
use mydb;
show tables;
2
3
4
For Python:./dev
pip install mysqlclient

or

python -m pip install mysqlclient
2
3
4
5
# First Project
# Create Virtual Environment
python -m venv env

Set-ExecutionPolicy Unrestricted -Scope Process

env/Scripts/activate
2
3
4
5
# Create a Project
mkdir djangorest
cd djangorest/
django-admin startproject firstProject
2
3
# Create an App
python manage.py startapp firstApp
Add the new App and the REST Framework to the installed apps:
Go to settings.py at the firstProject folder (same level as the firstApp).
INSTALLED_APPS = [
    'django.contrib.admin',
    'django.contrib.auth',
    'django.contrib.contenttypes',
    'django.contrib.sessions',
    'django.contrib.messages',
    'django.contrib.staticfiles',
    'rest_framework',
    'firstApp'
]
2
3
4
5
6
7
8
9
10
# Create a View
Go to views.py under the firstApp and create a function based view:
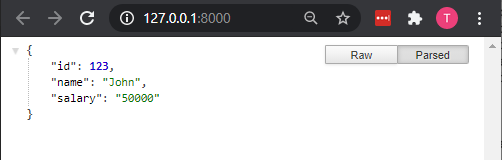
from django.http import JsonResponse


def employee_view(request):
    emp = {
        'id': 123,
        'name': 'John',
        'salary': '50000'
    }
    return JsonResponse(emp)
2
3
4
5
6
7
8
9
10
With this the dictionary will be serialized as Json when returned to the client.
# Configure the URL and TEST
Go to url.py and add the path:
from django.contrib import admin
from django.urls import path
from firstApp import views

urlpatterns = [
    path('admin/', admin.site.urls),
    path('', views.employee_view)
]
2
3
4
5
6
7
8
then:
python manage.py makemigrations

python manage.py migrate

python manage.py runserver
2
3
4
5
The server running on the browser:
# Create App level URLs
Copy the urls.py from the project and paste it in the app folder.
we don't need from django.contrib import admin at this level.
So leave only this:
from django.urls import path
from firstApp import views

urlpatterns = [
    path('emps/', views.employee_view)
]
2
3
4
5
6
Now go to the urls.py on the project folder and make these alterations: include the include function on the import from the django.urls
Project Level URL
from django.contrib import admin
from django.urls import path, include
from firstApp import views

urlpatterns = [
    path('admin/', admin.site.urls),
    path('firstApp/', include('firstApp.urls'))
]
2
3
4
5
6
7
8
App Level URL: http://127.0.0.1:8000/firstApp/emps/
from django.urls import path
from firstApp import views

urlpatterns = [
    path('emps/', views.employee_view)
]
2
3
4
5
6

# Create a Model Class
Now we are going to fetch the information from the database.
First we go to the models.py and create a new model.
Where thedef __str__ will return the string version.
from django.db import models

# Create your models here.


class Employee(models.Model):
    id = models.IntegerField(primary_key=True)
    name = models.CharField(max_length=20)
    sal = models.DecimalField(max_digits=10, decimal_places=3)

    def __str__(self):
        return self.id+self.name+self.sal
2
3
4
5
6
7
8
9
10
11
12
# Configure the database and run migrations
First we go to settings.py and change the database to mysql, as well as the name of the database that is being created,
DATABASES = {
    'default': {
        'ENGINE': 'django.db.backends.mysql',
        'NAME': 'employeedb',
        'USER': 'root',
        'PASSWORD': 'test1234'
    }
}
2
3
4
5
6
7
8
then, lunch the mysql workbench and create the database:
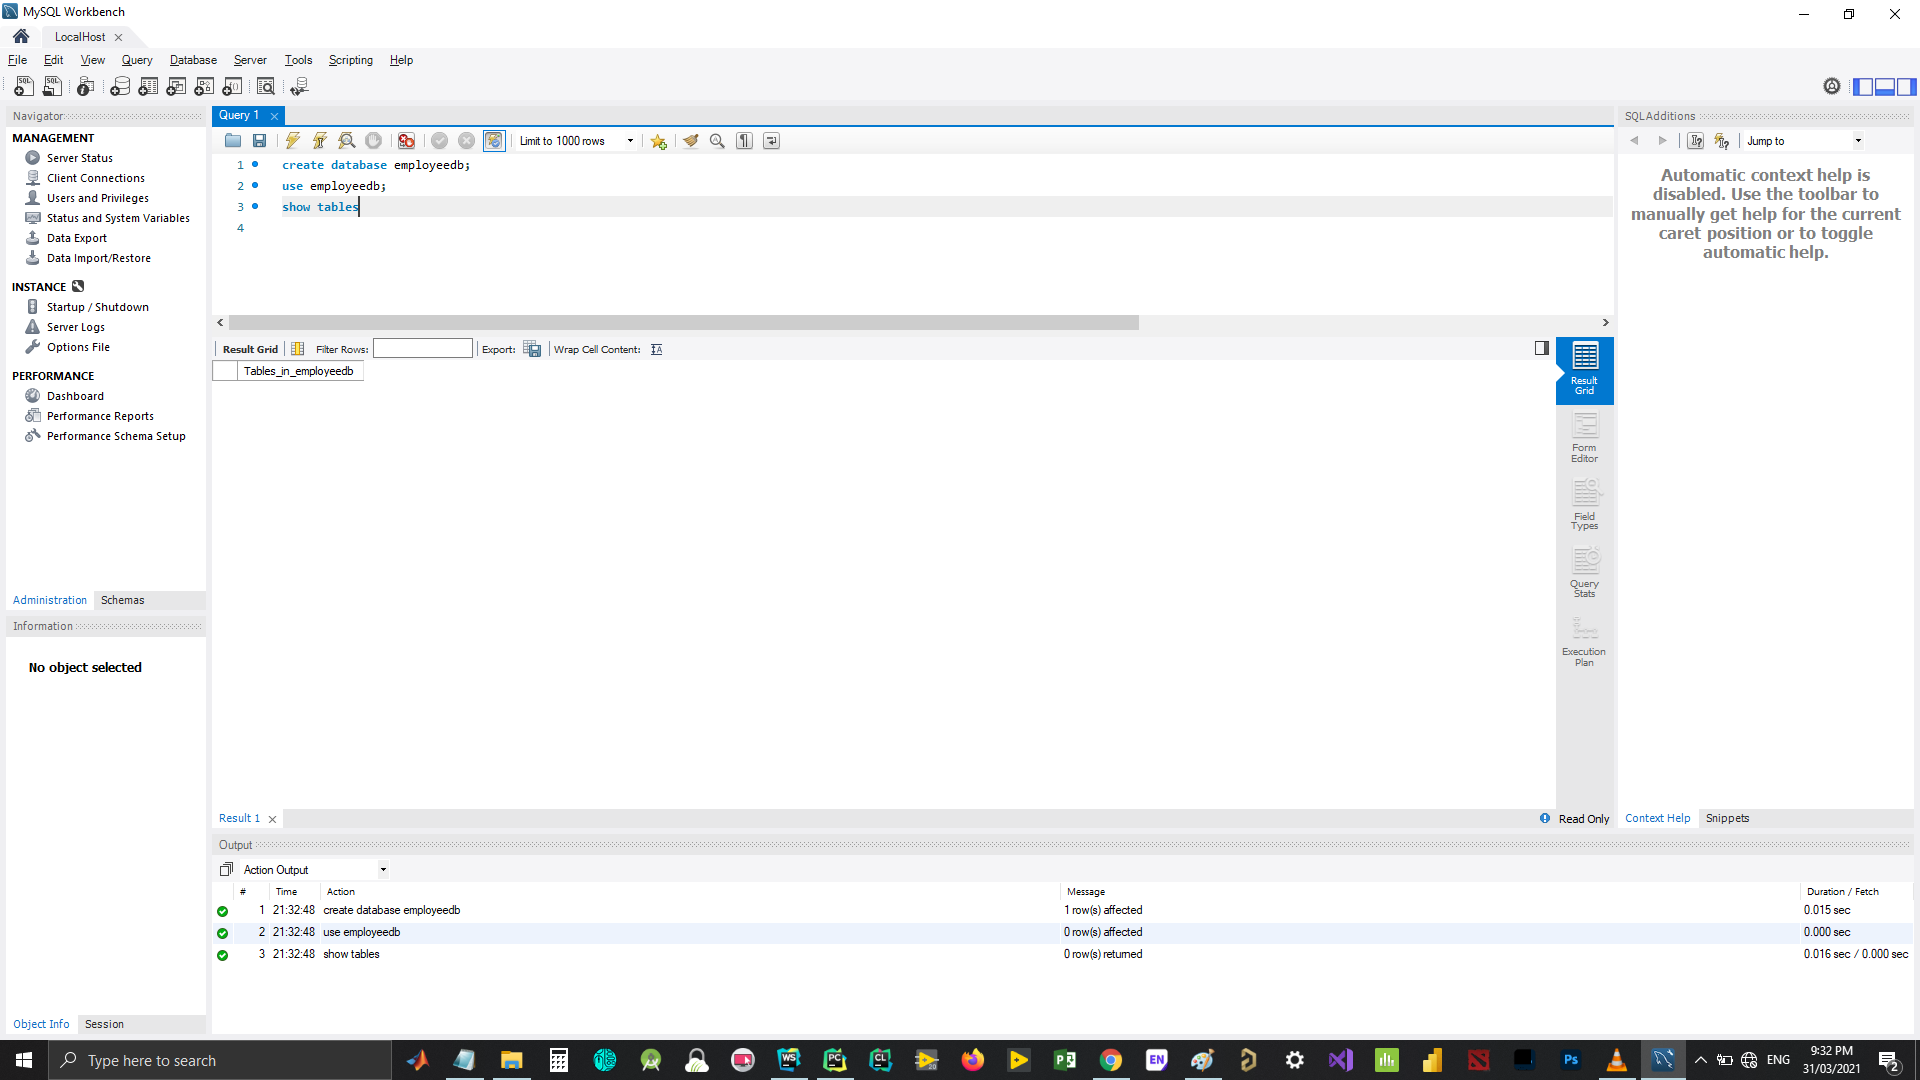
create database employeedb;
use employeedb;
show tables
2
3
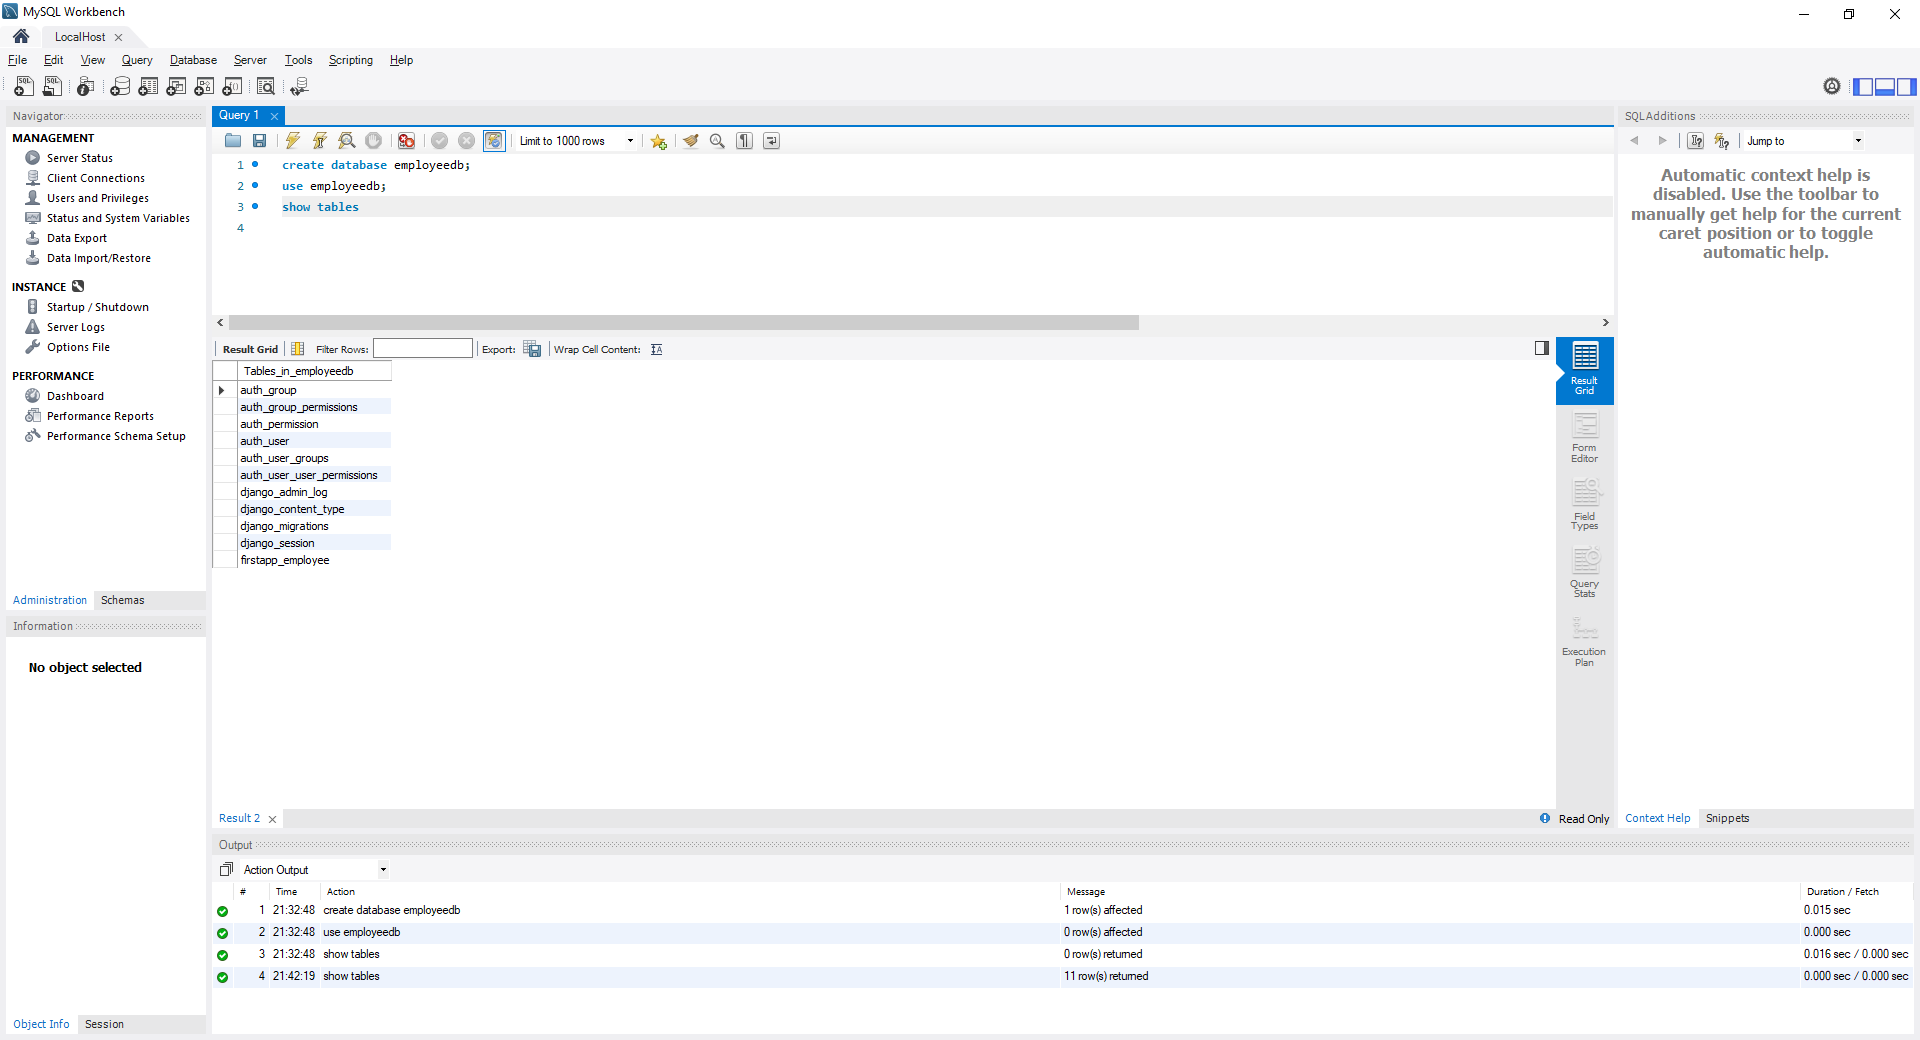
now go to the console, stop the server and python manage.py make migrations an then python manage.py migrate. If we show tables again we should see a lot of tables.
TIP
Remember to install pip install mysqlclient
outcome:
(env) PS C:\Users\Thiago Souto\Documents\DJANGO\Django Rest Framework\01-Django REST\firstProject>p
ython manage.py makemigrations
Migrations for 'firstApp':
  firstApp\migrations\0001_initial.py
    - Create model Employee
(env) PS C:\Users\Thiago Souto\Documents\DJANGO\Django Rest Framework\01-Django REST\firstProject>p
ython manage.py migrate
Operations to perform:
  Apply all migrations: admin, auth, contenttypes, firstApp, sessions
Running migrations:
  Applying contenttypes.0001_initial... OK
  Applying auth.0001_initial... OK
  Applying admin.0001_initial... OK
  Applying admin.0002_logentry_remove_auto_add... OK
  Applying admin.0003_logentry_add_action_flag_choices... OK
  Applying contenttypes.0002_remove_content_type_name... OK
  Applying auth.0002_alter_permission_name_max_length... OK
  Applying auth.0003_alter_user_email_max_length... OK
  Applying auth.0004_alter_user_username_opts... OK
  Applying auth.0005_alter_user_last_login_null... OK
  Applying auth.0006_require_contenttypes_0002... OK
  Applying auth.0007_alter_validators_add_error_messages... OK
  Applying auth.0008_alter_user_username_max_length... OK
  Applying auth.0009_alter_user_last_name_max_length... OK
  Applying auth.0010_alter_group_name_max_length... OK
  Applying auth.0011_update_proxy_permissions... OK
  Applying auth.0012_alter_user_first_name_max_length... OK
  Applying firstApp.0001_initial... OK
  Applying sessions.0001_initial... OK
2
3
4
5
6
7
8
9
10
11
12
13
14
15
16
17
18
19
20
21
22
23
24
25
26
27
28
29
And the database now has all the tables:
if we select the firstApp table we can see the id, name and sal that we have created.

# Use the model in the view and test
Now we are going to fetch the data from the database, instead of the static shown below from the views.py file.
#static
def employee_view(request):
    emp = {
        'id': 123,
        'name': 'John',
        'salary': '50000'
    }
    return JsonResponse(emp)
2
3
4
5
6
7
8
We start by importing the employee model.
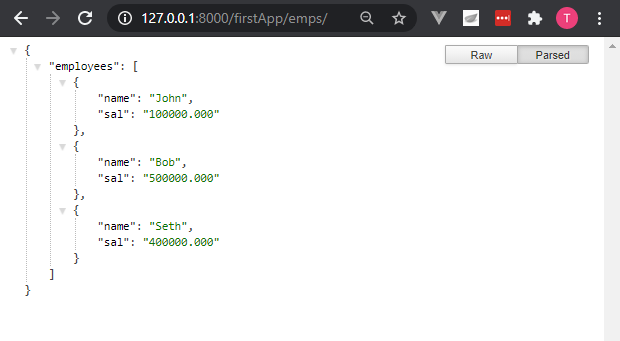
To fetch all the records on the database we use data = Employee.objects.all();. Now, this will be a query set and we cannot return a query set, we need to return a dictionary. So we use ``
def employee_view(request):
    emp = {
        'id': 123,
        'name': 'John',
        'salary': '50000'
    }

    data = Employee.objects.all();
    response = {'employees': list(data.values('name', 'sal'))}

    return JsonResponse(response)
2
3
4
5
6
7
8
9
10
11
Because there is not data on the database lets insert some:
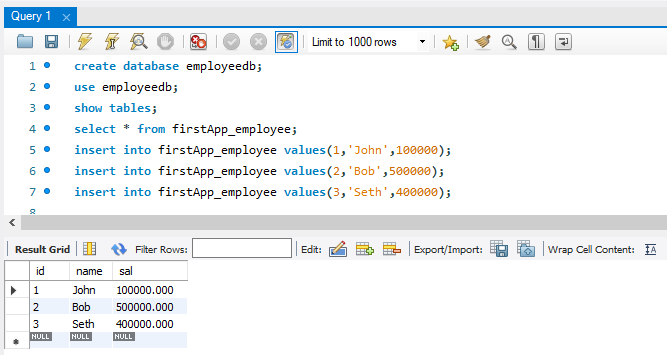
now if we run the server again we have:
# Function Based Views and Serializers
Until now, we have used the Django module to send the data as can be seen below.
from django.http import JsonResponse
from firstApp.models import Employee


def employee_view(request):
    emp = {
        'id': 123,
        'name': 'John',
        'salary': '50000'
    }

    data = Employee.objects.all();
    response = {'employees': list(data.values('name', 'sal'))}

    return JsonResponse(response)
2
3
4
5
6
7
8
9
10
11
12
13
14
15
Now we will take a look at the Django REST Framework.
# DRF Components
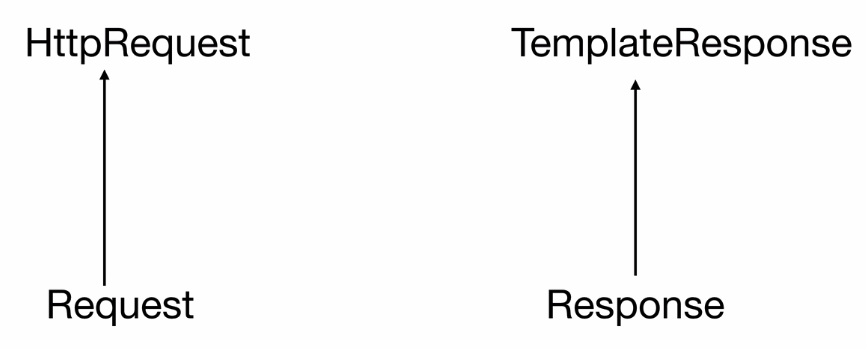
The request class is responsible for handling the incoming request to our restful API, and the response class on the other hand is responsible for handling the response and sending it back to the client.
Status Code:
status.HTTP_201_CREATED

status.HTTP_400_BAD_REQUEST

status.HTTP_204_NO_CONTENT
2
3
4
5
Django REST Framework provides 2 wrappers @api_view witch is a decorator used for function based views and APIView which is a class, which should be inherited by the class based views.
We need to mark all our function based views with the @api_view.

A class inheriting the APIView
class StudentDetail(APIView):
    def get_object(self, pk):
        try:
            return Student.objects.get(pk=pk)
        except Student.DoesNotExist:
            raise Http404
...
2
3
4
5
6
7
A decorator
@api_view(['GET','POST'])
def student_list(request):

    if request.method =='GET':
        students = Student.objects.all()
        serializer = StudentSerializer(students, many=True)
        return Response(serializer.data)
...
2
3
4
5
6
7
8
# Function Based Views
So Far we have constructed a very simple restful endpoint that returns a list of employees back, with a restfull READ operation.
Typically, any RESTful API will expose out: CREATE, READ, UPDATE, and DELETE, CRUD; through the appropriate http methods like PUT, DELETE, and GET; and also anu custom methods created. To create these custom methods we will be using function based views and class based views.
Function based views are very easy to create, we will be creating 2 fuctions to support the CRUD based operations.
@api_view(['GET', 'POST'])
    def student_list(request):

@api_view(['GET', 'PUT', 'DELETE'])
    def student_detail(request,pk):
2
3
4
5
TIP
pk stands for primary key
# Serializers
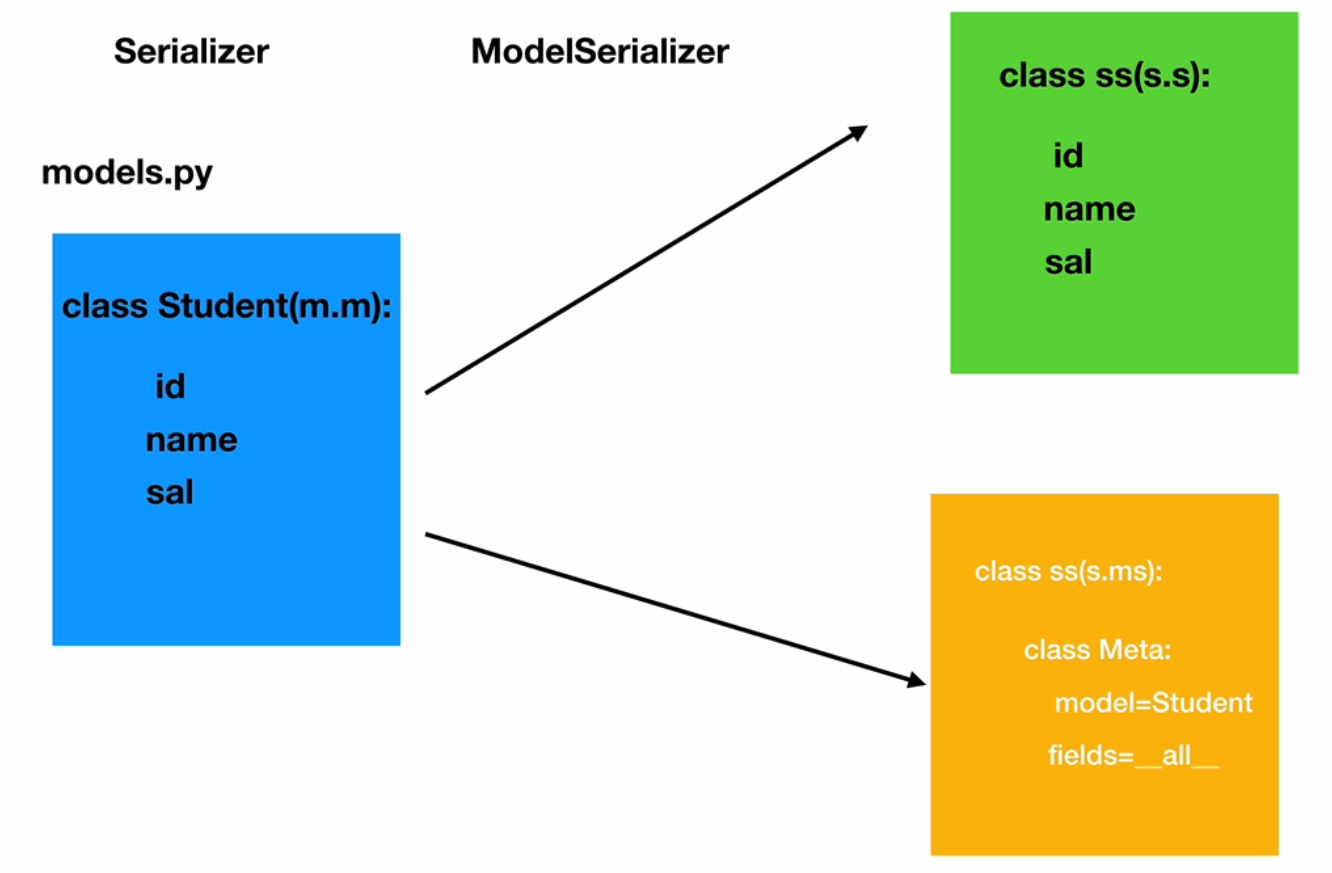
DRF provides two types of classes for serializers: Serializer and ModelSerializer which we can use to create our own serializer.
To implement a serializer, you define the model to start vetting our application, for example a student model with 3 fields, then, if you are using the Serializer class, you will have to redefine all the fields in the model in the serializer as well. Which is a repetition of the fields, you are repetting the model class pretty much.
That's why we will be using ModelSerializer in most cases. You define a class, your own serializer, which will extend from ModelSerializer and within this model serialized you use class Meta: to specify for which model the serializer is, student in this case. Then you define a set of fields that you want to be serialized and de-serialized. If you want all the fields to be serialized just use __all__.
# Create the Project
Let's create a project called fbvSerializers (Function Based Views and Serializers):
django-admin startproject fbvSerializers
then cd into the fvbSerializer directory and:
python manage.py startapp fbvApp
TIP
Remember to initialize the virtual environment:
python -m venv env
Set-ExecutionPolicy Unrestricted -Scope Process
env/Scripts/activate
Now got to the application definition, on settings.py, under APPS and register the fbvApp and the rest_framework
# Application definition

INSTALLED_APPS = [
    'django.contrib.admin',
    'django.contrib.auth',
    'django.contrib.contenttypes',
    'django.contrib.sessions',
    'django.contrib.messages',
    'django.contrib.staticfiles',
    'fbvApp',
    'rest_framework',
]
2
3
4
5
6
7
8
9
10
11
12
Then, adjust the Database settings on the same file:
# Database
# https://docs.djangoproject.com/en/3.0/ref/settings/#databases

DATABASES = {
    'default': {
        'ENGINE': 'django.db.backends.mysql',
        'NAME': 'studentdb',
        'USER': 'root',
        'PASSWORD': 'test1234'
    }
}
2
3
4
5
6
7
8
9
10
11
# Create the Model
In the app folder under models create a class called Student:
from django.db import models

# Create your models here.


class Student(models.Model):
    id = models.IntegerField(primary_key=True)
    name = models.CharField(max_length=20)
    score = models.DecimalField(max_digits=10, decimal_places=3)

    def __str__(self):
        return self.id+self.name+self.
2
3
4
5
6
7
8
9
10
11
12
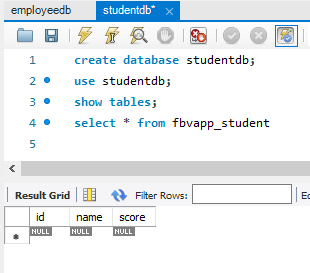
Now we create the studentdb database.
In the MySQL Workbench app:
create database studentdb;
use studentdb;
show tables
2
3
Now we can make the migrations:
python manage.py makemigrations

then

python manage.py migrate
2
3
4
5
TIP
if it doesn't find the module check the spell in the APPs register
The outcome:
(env) PS C:\Users\Thiago Souto\Documents\DJANGO\Django Rest Framework\01-Django REST\fbvSerializers> python manage.py makemigrations
Migrations for 'fbvApp':
  fbvApp\migrations\0001_initial.py
    - Create model Student
(env) PS C:\Users\Thiago Souto\Documents\DJANGO\Django Rest Framework\01-Django REST\fbvSerializers> python manage.py migrate
Operations to perform:
  Apply all migrations: admin, auth, contenttypes, fbvApp, sessions
Running migrations:
  Applying contenttypes.0001_initial... OK
  Applying auth.0001_initial... OK
  Applying admin.0001_initial... OK
  Applying admin.0002_logentry_remove_auto_add... OK
  Applying admin.0003_logentry_add_action_flag_choices... OK
  Applying contenttypes.0002_remove_content_type_name... OK
  Applying auth.0002_alter_permission_name_max_length... OK
  Applying auth.0003_alter_user_email_max_length... OK
  Applying auth.0004_alter_user_username_opts... OK
  Applying auth.0005_alter_user_last_login_null... OK
  Applying auth.0006_require_contenttypes_0002... OK
  Applying auth.0007_alter_validators_add_error_messages... OK
  Applying auth.0008_alter_user_username_max_length... OK
  Applying auth.0009_alter_user_last_name_max_length... OK
  Applying auth.0010_alter_group_name_max_length... OK
  Applying auth.0011_update_proxy_permissions... OK
  Applying auth.0012_alter_user_first_name_max_length... OK
  Applying fbvApp.0001_initial... OK
  Applying sessions.0001_initial... OK
(env) PS C:\Users\Thiago Souto\Documents\DJANGO\Django Rest Framework\01-Django REST\fbvSerializers>
2
3
4
5
6
7
8
9
10
11
12
13
14
15
16
17
18
19
20
21
22
23
24
25
26
27
28
Now show tables should a lot of tables:

And we should see our table there:
# Create the Serializer
To create the serializers we create the file serializers.py inside the fbvApp folder.
In there, there are two important imports: from rest_framework import serializers and from fbvApp.models import Student
Now we can create the class StudentSerializer:
First we make the imports, serializers from rest_framework, and the Student model from the fbvApp.models.
Then the class created will extend or inherit serializers.ModelSerializer using the Meta class and we define which models should the serializer work on and the fields on that model that should be serialized.
from rest_framework import serializers
from fbvApp.models import Student


class StudentSerializers(serializers.ModelSerializer):
    class Meta:
        model = Student
        fields = ['id', 'name', 'sal']
2
3
4
5
6
7
8
# GET single student
# Superuser
To create a superuser and password:
PS C:\Users\Thiago Souto\Documents\DJANGO\Django Rest Framework\01-Django REST\fbvSerializers> python manage.py createsuperuser
Username (leave blank to use 'thiagosouto'): admin
Email address: thiago.souto@yahoo.com.br
Password:
Password (again):
This password is too common.
Bypass password validation and create user anyway? [y/N]: y
Superuser created successfully.
2
3
4
5
6
7
8
9
To change the password of the superusers we can do:
PS C:\Users\Thiago Souto\Documents\DJANGO\Django Rest Framework\01-Django REST\fbvSerializers> python manage.py shell
Python 3.6.8 (tags/v3.6.8:3c6b436a57, Dec 24 2018, 00:16:47) [MSC v.1916 64 bit (AMD64)] on win32
Type "help", "copyright", "credits" or "license" for more information.
(InteractiveConsole)

>>> from django.contrib.auth.models import User
>>> users = User.objects.all()
>>> print(users)
<QuerySet [<User: admin>]>
>>> user = users[0]
>>> user.set_password(password123)
Traceback (most recent call last):
  File "<console>", line 1, in <module>
NameError: name 'password123' is not defined
>>> user.set_password('password123')
>>> user.save()
2
3
4
5
6
7
8
9
10
11
12
13
14
15
16
Now you can login to localuser/admin.
# Creating the Sonnet API
python -m venv env

Set-ExecutionPolicy Unrestricted -Scope Process

env/Scripts/activate

pip install djangorestframework

pip install mysqlclient
2
3
4
5
6
7
8
9
django-admin startproject sonetos

python manage.py startapp posts
2
3
then on settings.py, we include the app and the DRF:
INSTALLED_APPS = [
    'django.contrib.admin',
    'django.contrib.auth',
    'django.contrib.contenttypes',
    'django.contrib.sessions',
    'django.contrib.messages',
    'django.contrib.staticfiles',
    'posts',
    'rest_framework'
]
2
3
4
5
6
7
8
9
10
Then we make the model:
from django.db import models
from django.contrib.auth.models import User


class Post(models.Model):
    title = models.CharField(max_length=300)
    body = models.CharField(max_length=1000)
    created = models.DateTimeField()
    poster = models.ForeignKey(User, on_delete=models.CASCADE)
    # is this is ever deleted, how do we want something to
    # referencing this post to happen

    class Meta:
        ordering = ['-title']


class Vote(models.Model):
    voter = models.ForeignKey(User, on_delete=models.CASCADE)
    post = models.ForeignKey(Post, on_delete=models.CASCADE)
2
3
4
5
6
7
8
9
10
11
12
13
14
15
16
17
18
19
Then create and configure the database: go to settings.py and change the database to mysql, as well as the name of the database that is being created.
DATABASES = {
    'default': {
        'ENGINE': 'django.db.backends.mysql',
        'NAME': 'sonetosdb',
        'USER': 'root',
        'PASSWORD': 'test1234'
    }
}
2
3
4
5
6
7
8
On MySQL Workbench:
create database sonetosdb;
use sonetosdb;
show tables;
2
3
Deleting a database
DROP DATABASE sonetosdb;
Then make the migrations:
python manage.py makemigrations

python manage.py migrate
2
3
Create the serializers.py file at the posts app folder:
from rest_framework import serializers
from .models import Post


class PostSerializer(serializers.ModelSerializer):
    class Meta:
        model = Post
        fields = ['id', 'title', 'body', 'created', 'poster']
2
3
4
5
6
7
8
Create a view
from rest_framework import generics
from .models import Post
from .serializers import PostSerializer


class PostList(generics.ListAPIView):
    queryset = Post.objects.all()
    serializer_class = PostSerializer
2
3
4
5
6
7
8
Create the first URL
from django.contrib import admin
from django.urls import path
from posts import views


urlpatterns = [
    path('admin/', admin.site.urls),
    path('api/posts', views.PostList.as_view())
]
2
3
4
5
6
7
8
9
10
Create the Superuser
python manage.py createsuperuser
Register the class at admin.py
from django.contrib import admin
from .models import Post, Vote

admin.site.register(Post)
admin.site.register(Vote)
2
3
4
5
Now we can add, delete, etc posts.
Now we are going to create the models, serializer, view and url for Sonnets, Comments and Votes.
models.py:
from django.db import models
from django.contrib.auth.models import User


class Sonnet(models.Model):
    title = models.CharField(max_length=300)
    body = models.CharField(max_length=1000)
    created = models.DateTimeField()
    poster = models.ForeignKey(User, on_delete=models.CASCADE)
    # is this is ever deleted, how do we want something to
    # referencing this post to happen

    class Meta:
        ordering = ['-title']


class Vote(models.Model):
    voter = models.ForeignKey(User, on_delete=models.CASCADE)
    sonnet = models.ForeignKey(Sonnet, on_delete=models.CASCADE)


class Comment(models.Model):
    commenter = models.ForeignKey(User, on_delete=models.CASCADE)
    comment = models.CharField(max_length=1000)
    sonnet = models.ForeignKey(Sonnet,
2
3
4
5
6
7
8
9
10
11
12
13
14
15
16
17
18
19
20
21
22
23
24
25
serializer.py
from rest_framework import serializers
from .models import Sonnet, Comment, Vote


class SonnetSerializer(serializers.ModelSerializer):
    class Meta:
        model = Sonnet
        fields = ['id', 'title', 'body', 'created', 'poster']


class CommentSerializer(serializers.ModelSerializer):
    class Meta:
        model = Comment
        fields = ['commenter', 'comment', 'sonnet']


class VoteSerializer(serializers.ModelSerializer):
    class Meta:
        model = Vote
        fields = ['voter', 'sonnet']
2
3
4
5
6
7
8
9
10
11
12
13
14
15
16
17
18
19
20
view.py:
from rest_framework import generics
from .models import Sonnet, Comment, Vote
from .serializers import SonnetSerializer, CommentSerializer, VoteSerializer


class SonnetList(generics.ListAPIView):
    queryset = Sonnet.objects.all()
    serializer_class = SonnetSerializer


class CommentList(generics.ListAPIView):
    queryset = Comment.objects.all()
    serializer_class = CommentSerializer


class VoteList(generics.ListAPIView):
    queryset = Vote.objects.all()
    serializer_class = VoteSerializer
2
3
4
5
6
7
8
9
10
11
12
13
14
15
16
17
18
urls.py
from django.contrib import admin
from django.urls import path
from posts import views


urlpatterns = [
    path('admin/', admin.site.urls),
    path('api/sonnets', views.SonnetList.as_view()),
    path('api/comments', views.CommentList.as_view()),
    path('api/votes', views.VoteList.as_view())
]
2
3
4
5
6
7
8
9
10
11
Now let's Create a post, for this we will change the class from ListAPIView to ListCreateAPIView.
and just by doing that we add the functionality:
class CommentList(generics.ListCreateAPIView):
    queryset = Comment.objects.all()
    serializer_class = CommentSerializer
2
3
Now we are going to solve how only the poster can post comments on his name. Otherwise anybody will be able to comment with someone else's name.
First we go to the serializers and set some fields to read only.
serializers.py
from rest_framework import serializers
from .models import Sonnet, Comment, Vote


class SonnetSerializer(serializers.ModelSerializer):
    class Meta:
        model = Sonnet
        fields = ['id', 'title', 'body', 'created', 'poster']


class CommentSerializer(serializers.ModelSerializer):
    commenter = serializers.ReadOnlyField(source='commenter.username')
    commenter_id = serializers.ReadOnlyField(source='commenter.id')

    class Meta:
        model = Comment
        fields = ['commenter', 'commenter_id', 'comment', 'sonnet']


class VoteSerializer(serializers.ModelSerializer):
    voter = serializers.ReadOnlyField(source='voter.username')
    voter_id = serializers.ReadOnlyField(source='voter.id')

    class Meta:
        model = Vote
        fields = ['voter', 'voter_id', 'sonnet']
2
3
4
5
6
7
8
9
10
11
12
13
14
15
16
17
18
19
20
21
22
23
24
25
26
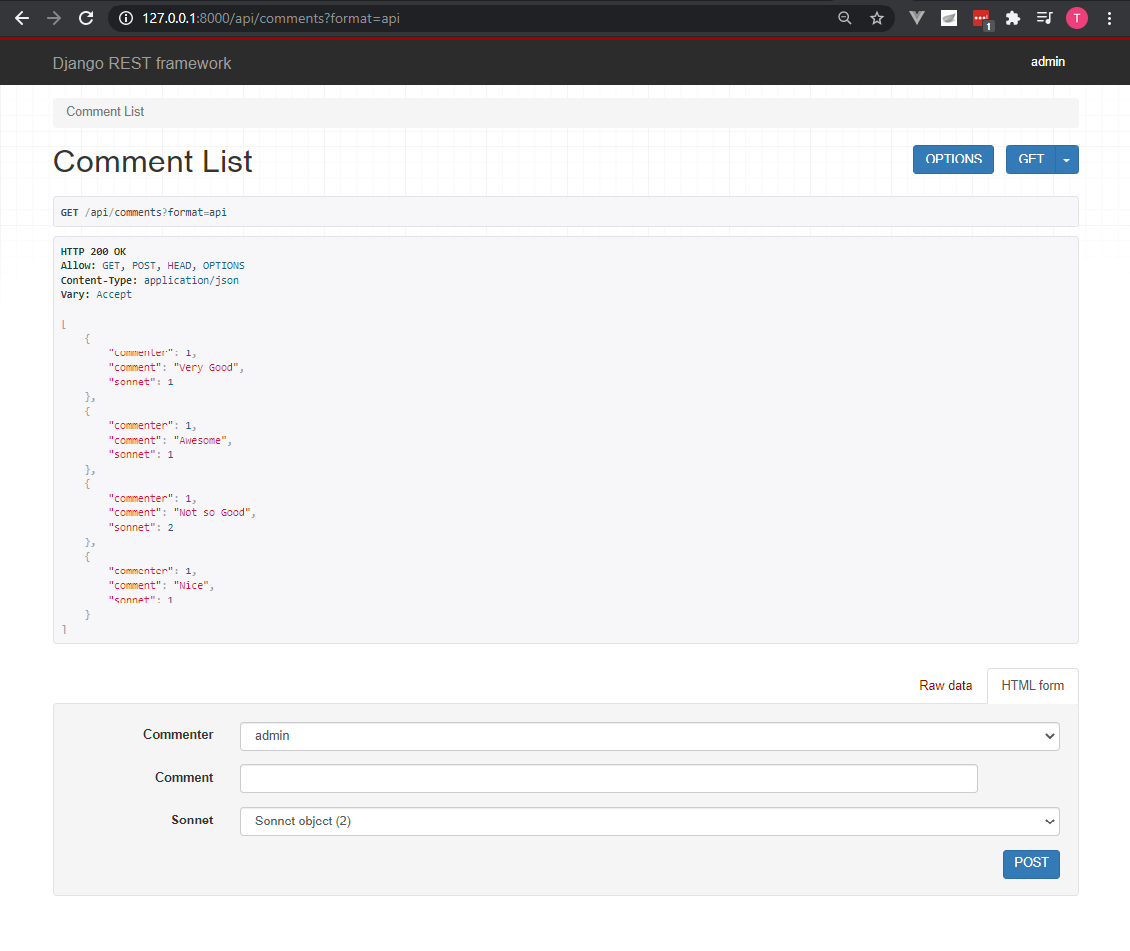
Now we no longer can choose the commenter:
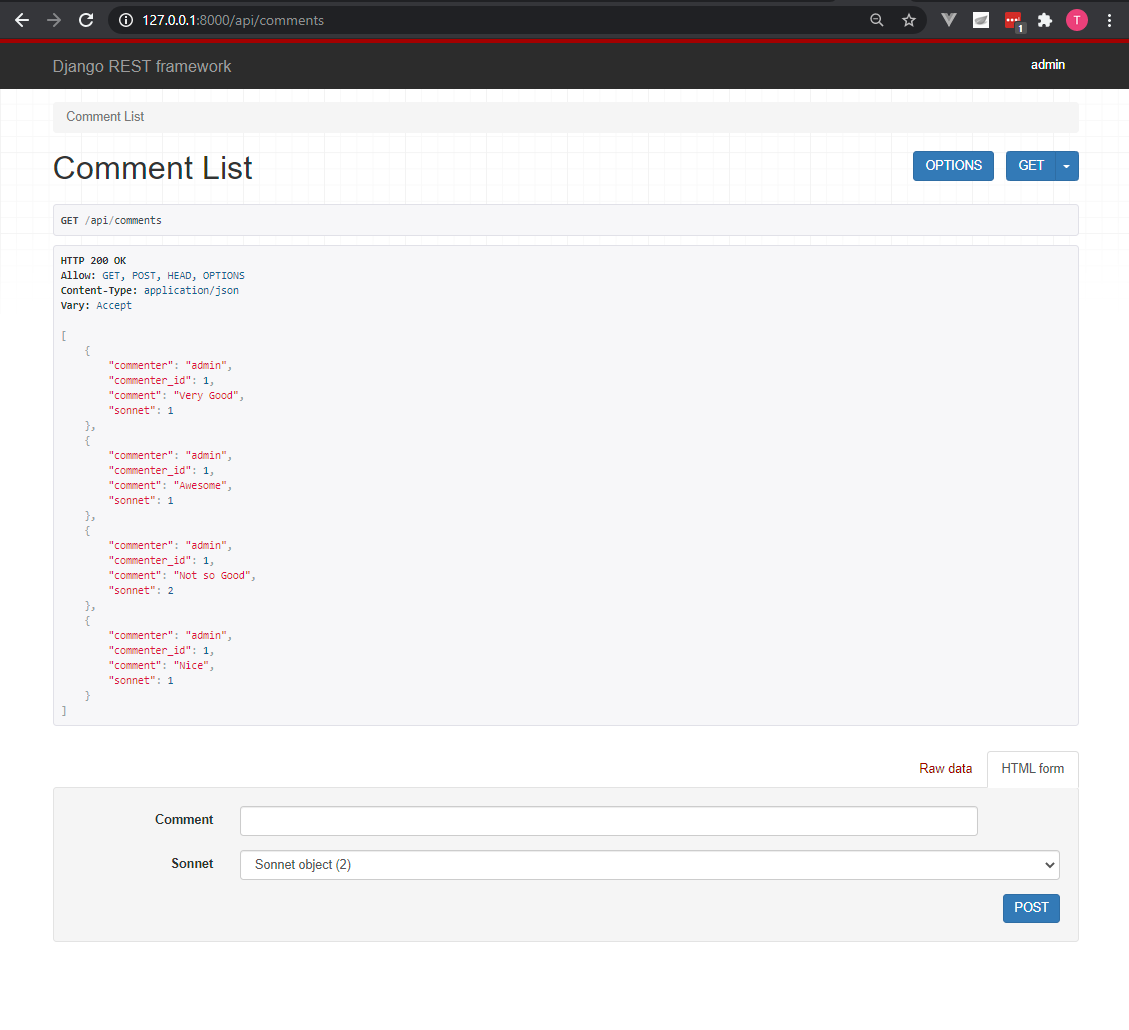
Although if we comment we will get an error, because there is no commenter.
So we have to go the view.py and define the perform_create function. And this function says anytime I'm going to save I'm going to grab who made the request and set as commenter
views.py
from rest_framework import generics
from .models import Sonnet, Comment, Vote
from .serializers import SonnetSerializer, CommentSerializer, VoteSerializer


class SonnetList(generics.ListAPIView):
    queryset = Sonnet.objects.all()
    serializer_class = SonnetSerializer


class CommentList(generics.ListCreateAPIView):
    queryset = Comment.objects.all()
    serializer_class = CommentSerializer

    def perform_create(self, serializer):
        serializer.save(commenter=self.request.user)


class VoteList(generics.ListCreateAPIView):
    queryset = Vote.objects.all()
    serializer_class = VoteSerializer

    def perform_create(self, serializer):
        serializer.save(voter=self.request.user)
2
3
4
5
6
7
8
9
10
11
12
13
14
15
16
17
18
19
20
21
22
23
24
Now we can add the permissions.
from rest_framework import generics, permissions
from .models import Sonnet, Comment, Vote
from .serializers import SonnetSerializer, CommentSerializer, VoteSerializer


class SonnetList(generics.ListAPIView):
    queryset = Sonnet.objects.all()
    serializer_class = SonnetSerializer


class CommentList(generics.ListCreateAPIView):
    queryset = Comment.objects.all()
    serializer_class = CommentSerializer
    permission_classes = [permissions.IsAuthenticated]

    def perform_create(self, serializer):
        serializer.save(commenter=self.request.user)


class VoteList(generics.ListCreateAPIView):
    queryset = Vote.objects.all()
    serializer_class = VoteSerializer
    permission_classes = [permissions.IsAuthenticated]

    def perform_create(self, serializer):
        serializer.save(voter=self.request.user)
2
3
4
5
6
7
8
9
10
11
12
13
14
15
16
17
18
19
20
21
22
23
24
25
26
But this way, when they do a get they will not see the comments.
We have to restrict only the posts for authenticated users only. For theat we just change for IsAuthenticatedOrReadOnly.
from rest_framework import generics, permissions
from .models import Sonnet, Comment, Vote
from .serializers import SonnetSerializer, CommentSerializer, VoteSerializer


class SonnetList(generics.ListAPIView):
    queryset = Sonnet.objects.all()
    serializer_class = SonnetSerializer


class CommentList(generics.ListCreateAPIView):
    queryset = Comment.objects.all()
    serializer_class = CommentSerializer
    permission_classes = [permissions.IsAuthenticatedOrReadOnly]

    def perform_create(self, serializer):
        serializer.save(commenter=self.request.user)


class VoteList(generics.ListCreateAPIView):
    queryset = Vote.objects.all()
    serializer_class = VoteSerializer
    permission_classes = [permissions.IsAuthenticatedOrReadOnly]

    def perform_create(self, serializer):
        serializer.save(voter=self.request.user)
2
3
4
5
6
7
8
9
10
11
12
13
14
15
16
17
18
19
20
21
22
23
24
25
26
Now let's vote for a Sonnet.
# Deploy mySQL to Heroku
Create the app at heroku
go to resource and look for clearDB mySQL
go to settings->Config Vars and get the
mysql:...code
mysql://bssbbb21dfagae3sa4daf3:d526632fdde7cccx8a@eu-cbdbr-west-0115.cleardb.com/heroku_343a7f9f28335c5?reconnect=true

this are the fields:

User: bssbbb21dfagae3sa4daf3
Hostname: eu-cbdbr-west-0115.cleardb.com
Password: d526632fdde7cccx8a
2
3
4
5
6
7
Configure a new connection on the mySQL workbench
Change the Database setting at Django
TIP
SHOW databases; will show you the databases and clearDB only allows one database for free
DATABASES = {
'default': {
'ENGINE': 'django.db.backends.mysql',
'NAME': 'heroku_344253add7f19f2fasdfsd8335ac5',
'USER': 'bssbbb21dfagae3sa4daf3',
'PASSWORD': 'd526632fdde7cccx8a',
'HOST': 'eu-cbdbr-west-0115.cleardb.com',
}
}
2
3
4
5
6
7
8
9
# Deploying DJANGO to Heroku
- Create a
procfileat the root with the manage.py folder. with the following inside:
web: gunicorn CCMS.wsgi --log-file -
TIP
Change the CCMS to your project name
web: gunicorn sonetos.wsgi --log-file -
- Install gunicorn:
pip install gunicorn
- Update settings.py file
DEBUG = False

ALLOWED_HOSTS = ['127.0.0.1','sampledomain.com']
2
3
Updated Middle ware Code
'whitenoise.middleware.WhiteNoiseMiddleware',
- install whitenoise
pip install whitenoise
- update urls.py
from django.views.static import serve
from django.conf.urls import url
from django.conf import settings

...

url(r'^media/(?P<path>.*)$', serve,{'document_root':       settings.MEDIA_ROOT}),
url(r'^static/(?P<path>.*)$', serve,{'document_root': settings.STATIC_ROOT}),
2
3
4
5
6
7
8
- Prepare the requirements.txt
pip freeze > requirements.txt
Go to heroku and create an app
Go to settings and add a building pack
Go to deploy and choose github and connect to the repository
get the domain name by open app and copy the address and go back to settings.py and add on
ALLOWED_HOSTS, without thehttps://. And commit the changesGo back to Heroku and deploy a GitHub branch and click Deploy Branch
TIP
Remember to change DEBUG = False
also:
heroku git:remote -a sonetos-api
heroku config:set DISABLE_COLLECTSTATIC=1