# Ubuntu
# Shortcuts
Show hidden files on explorer: ctrl + h
sudo !! : repeat the last command with sudo upfront.
Execute .sh files: bash deployu.sh
# Increase the size of partition for fixed sized disk
YouTube video:
# Command Line
Commands for the terminal bash
history - bring the history of commands
ctrl + r - history search
cat - read a file
less - read a file from the first line
grep + "word" - bring the line that have that word on the document
man "command" - manual for the command
tldr - have to install to have a cleaner command menu
# vim - text editor from the command line
vim + name of the file - edit
:q - quit
:w - write
:wq - write and quit
Under command mode (esc if you are in insert mode)
:set number - shows numbers
i - insert mode
dd - delete a line
3dd - delete 3 lines
u - undo
ctrl + r - redo
/ - search, while on search n goes up and shift n goes down
:%s/ word to replace/ word/gc - replace a word with confirmation, just g replace all words
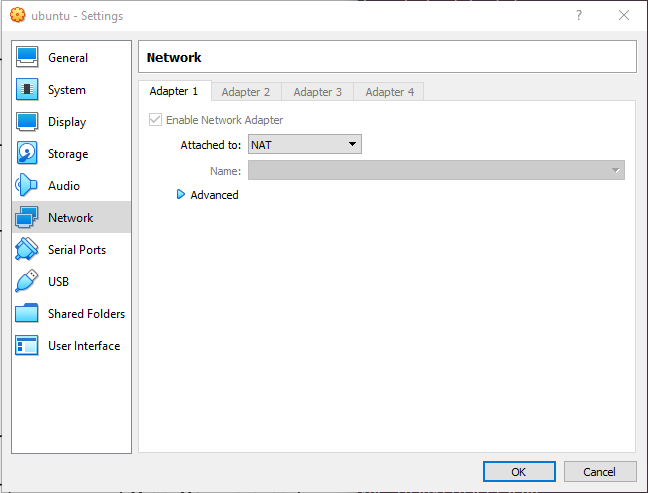
# Network Settings
# Keys
gedit /usr/share/X11/xkb/symbols/pc
# Network

ip address show
1: lo: <LOOPBACK,UP,LOWER_UP> mtu 65536 qdisc noqueue state UNKNOWN group default qlen 1000
    link/loopback 00:00:00:00:00:00 brd 00:00:00:00:00:00
    inet 127.0.0.1/8 scope host lo
       valid_lft forever preferred_lft forever
    inet6 ::1/128 scope host
       valid_lft forever preferred_lft forever
2: enp3s0: <NO-CARRIER,BROADCAST,MULTICAST,UP> mtu 1500 qdisc mq state DOWN group default qlen 1000
    link/ether 00:d8:61:07:8d:d2 brd ff:ff:ff:ff:ff:ff
3: wlo1: <BROADCAST,MULTICAST,UP,LOWER_UP> mtu 1500 qdisc mq state UP group default qlen 1000
    link/ether d4:3b:04:1e:d7:aa brd ff:ff:ff:ff:ff:ff
    inet 192.168.1.188/24 brd 192.168.1.255 scope global dynamic noprefixroute wlo1
       valid_lft 85740sec preferred_lft 85740sec
    inet6 fe80::65b6:a8c6:b7dd:bb41/64 scope link noprefixroute
       valid_lft forever preferred_lft forever
2
3
4
5
6
7
8
9
10
11
12
13
14
ip link show
1: lo: <LOOPBACK,UP,LOWER_UP> mtu 65536 qdisc noqueue state UNKNOWN mode DEFAULT group default qlen 1000
    link/loopback 00:00:00:00:00:00 brd 00:00:00:00:00:00
2: enp3s0: <NO-CARRIER,BROADCAST,MULTICAST,UP> mtu 1500 qdisc mq state DOWN mode DEFAULT group default qlen 1000
    link/ether 00:d8:61:07:8d:d2 brd ff:ff:ff:ff:ff:ff
3: wlo1: <BROADCAST,MULTICAST,UP,LOWER_UP> mtu 1500 qdisc mq state UP mode DORMANT group default qlen 1000
    link/ether d4:3b:04:1e:d7:aa brd ff:ff:ff:ff:ff:ff
2
3
4
5
6
Furthermore, you can set devices up or down (similar to ifconfig eth0 up or ifconfig eth0 down) simply by using:
ip link set DEVICE up or ip link set DEVICE down
As shown above, there are lots of other objects that can be interacted with using the ip command. I’ll cover another: ip route, in another post.
Why is this important?
As time passes, more and more features are becoming easier to use with the ip command instead of with ifconfig. We’ve already stopped installing ifconfig on desktops (it still gets installed on servers for now), and people have been discussing dropping net-tools (the package that ships ifconfig and a few other old commands that are replaced) for a while now. It may be time to revisit not installing net-tools by default anywhere.
Another Networks tools:
sudo apt install net-tools
# Instaling Yarn on Ubuntu
The first step is to enable the Yarn repository. Start by importing the repository’s GPG key using the following curl command:
curl -sS https://dl.yarnpkg.com/debian/pubkey.gpg | sudo apt-key add -
Add the Yarn APT repository to your system’s software repository list by typing:
echo "deb https://dl.yarnpkg.com/debian/ stable main" | sudo tee /etc/apt/sources.list.d/yarn.list
Once the repository is added to the system, update the package list, and install Yarn, with:
sudo apt update
sudo apt install yarn
To verify that Yarn installed successfully, run the following commands which will print the Yarn version number:
yarn --version
# Custom Resolution
xrandr
cvt 1920 1080
copy the code after Modeline
sudo xrandr --newmode "1600x900_60.00" 118.25 1600 1696 1856 2112 900 903 908 934 -hsync +vsync
sudo xrandr --addmode eDP-1 "1600x900_60.00" -->> eDP-1 is the name of the machine
gedit ~/.profile -->> to remember the settings
# Dual boot
https://www.youtube.com/watch?v=u5QyjHIYwTQ
Install etcher
Make a USB boot flah drive
Install keeping files
# Dual monitor
Dual monitor
cd /etc/X11
sudo rm xorg.conf
sudo cp xorg.conf.nvidia-xconfig-original xorg.conf
reboot
2
3
4