# OpenCV on Visual Studio
# Simple Cmake program
We can start building a simple program
main.cpp:
int main(int argc, char* argv[])
{
    std::cout << "Hello World" << std::endl;

    return 0;
}
2
3
4
5
6
With the simplest CMake file
project(main)

add_executable(main "main.cpp")
2
3
Then we press 'F1' or 'ctrl + shift + P' then 'CMake:Build' and Choose Visual Studio Community Release 2019-amd64.
This will build the project:
[main] Building folder: Cmake Simple Example
[main] Configuring folder: Cmake Simple Example
[proc] Executing command: "C:\Program Files\CMake\bin\cmake.exe" --no-warn-unused-cli -DCMAKE_EXPORT_COMPILE_COMMANDS:BOOL=TRUE -DCMAKE_BUILD_TYPE:STRING=Debug "-Hc:/Users/Thiago Souto/Desktop/MASTERS - ROBOTICS/AUTOMATION AND ROBOTICS/ASSESSMENT 03 - OpenCV/06 - OpenCV VisioStudio/Cmake Simple Example" "-Bc:/Users/Thiago Souto/Desktop/MASTERS - ROBOTICS/AUTOMATION AND ROBOTICS/ASSESSMENT 03 - OpenCV/06 - OpenCV VisioStudio/Cmake Simple Example/build" -G Ninja
[cmake] Not searching for unused variables given on the command line.
[cmake] -- The C compiler identification is MSVC 19.25.28614.0
[cmake] -- The CXX compiler identification is MSVC 19.25.28614.0
[cmake] -- Check for working C compiler: C:/Program Files (x86)/Microsoft Visual Studio/2019/Community/VC/Tools/MSVC/14.25.28610/bin/Hostx64/x64/cl.exe
[cmake] -- Check for working C compiler: C:/Program Files (x86)/Microsoft Visual Studio/2019/Community/VC/Tools/MSVC/14.25.28610/bin/Hostx64/x64/cl.exe - works
[cmake] -- Detecting C compiler ABI info
[cmake] -- Detecting C compiler ABI info - done
[cmake] -- Detecting C compile features
[cmake] -- Detecting C compile features - done
[cmake] -- Check for working CXX compiler: C:/Program Files (x86)/Microsoft Visual Studio/2019/Community/VC/Tools/MSVC/14.25.28610/bin/Hostx64/x64/cl.exe
[cmake] -- Check for working CXX compiler: C:/Program Files (x86)/Microsoft Visual Studio/2019/Community/VC/Tools/MSVC/14.25.28610/bin/Hostx64/x64/cl.exe - works
[cmake] -- Detecting CXX compiler ABI info
[cmake] -- Detecting CXX compiler ABI info - done
[cmake] -- Detecting CXX compile features
[cmake] -- Detecting CXX compile features - done
[cmake] -- Configuring done
[cmake] -- Generating done
[cmake] -- Build files have been written to: C:/Users/Thiago Souto/Desktop/MASTERS - ROBOTICS/AUTOMATION AND ROBOTICS/ASSESSMENT 03 - OpenCV/06 - OpenCV VisioStudio/Cmake Simple Example/build
[build] Starting build
[proc] Executing command: "C:\Program Files\CMake\bin\cmake.exe" --build "c:/Users/Thiago Souto/Desktop/MASTERS - ROBOTICS/AUTOMATION AND ROBOTICS/ASSESSMENT 03 - OpenCV/06 - OpenCV VisioStudio/Cmake Simple Example/build" --config Debug --target all -- -j 14
[build] [1/2  50% :: 0.376] Building CXX object CMakeFiles\main.dir\main.cpp.obj
[build] [2/2 100% :: 0.673] Linking CXX executable main.exe
[build] Build finished with exit code 0
2
3
4
5
6
7
8
9
10
11
12
13
14
15
16
17
18
19
20
21
22
23
24
25
26
To run the program we go 'F1' then CMake: Run Without Debugging
Microsoft Windows [Version 10.0.18362.418]
(c) 2019 Microsoft Corporation. All rights reserved.

C:\Users\Thiago Souto\Desktop\MASTERS - ROBOTICS\AUTOMATION AND ROBOTICS\ASSESSMENT 03 - OpenCV\06 - OpenCV VisioStudio\Cmake Simple Example>"C:\Users\Thiago Souto\Desktop\MASTERS - ROBOTICS\AUTOMATION AND ROBOTICS\ASSESSMENT 03 - OpenCV\06 - OpenCV VisioStudio\Cmake
Simple Example\build\main.exe"
Hello World

C:\Users\Thiago Souto\Desktop\MASTERS - ROBOTICS\AUTOMATION AND ROBOTICS\ASSESSMENT 03 - OpenCV\06 - OpenCV VisioStudio\Cmake Simple Example>
2
3
4
5
6
7
8
To build from the command prompt we go:
mkdir build
cd build
cmake ..
2
3
This creates all the files you need for this particular machine. On a linux It would give a different set of outputs.
cmake --build What do I want to build Debug or Release
cmake --build . --config Release
then go to Release folder and './main' to execute the file.
# Tutorial 1
main.hpp:
#ifndef __MAIN_HPP__
#define __MAIN_HPP__

#include <opencv2/opencv.hpp>

#endif //__MAIN_HPP__
2
3
4
5
6
main.cpp
#include <filesystem>
#include <iostream>

#include "main.hpp"

namespace fs = std::filesystem;

int main(int argc, char* argv[]) {

	fs::path executablePath{ fs::path(argv[0]) };

	fs::path inputFile{ (executablePath.parent_path()).append("data/image.png") };

	std::cout << inputFile << std::endl;

	cv::Mat image = cv::imread(inputFile.string(), cv::IMREAD_COLOR);

	if (image.empty()) {

		std::cout << "Error: 'image' is empty" << std::endl;

		return 1;
	}

	cv::imshow("image", image);

	cv::waitKey(0);

	cv::destroyAllWindows();

    return 0;
}
2
3
4
5
6
7
8
9
10
11
12
13
14
15
16
17
18
19
20
21
22
23
24
25
26
27
28
29
30
31
32
TIP
int main(int argc, char* argv[]) {
fs::path executablePath{ fs::path(argv[0]) };
Here we have the entry point for the program, It has two parameters, one the the integer argc which tells us how many parameters there are and char* argv[], a caractere pointing to an array, and gives us an array of c style strings. We use this array to find out where the executable is running. We know that argv first parameter will be the name of the executable, and if I have the name of the executable one can remove the executable's name, then I will have the path and we can use that to find sub directories.
CMake File:
cmake_minimum_required(VERSION 3.5.1)

project(project)

set (OpenCV_DIR "C:/opencv/build")		// Set hint variable to find OpenCV

find_package(OpenCV REQUIRED)

set(CMAKE_INCLUDE_CURRENT_DIR ON)		// Include files locally

add_executable(project main.cpp)
target_link_libraries (project ${OpenCV_LIBS})

if(CMAKE_BUILD_TYPE STREQUAL "Debug")		// Link the right Dll to the build type Debug or Release
	set(OPENCV_DLLS
		${OpenCV_DIR}/x64/vc15/bin/opencv_world430d.dll
	)
elseif(CMAKE_BUILD_TYPE STREQUAL "Release")
	set(OPENCV_DLLS
		${OpenCV_DIR}/x64/vc15/bin/opencv_world430.dll
	)
endif()

set(CMAKE_DIR "C:/Program Files/CMake")
find_program(CMAKE_EXECUTABLE NAMES cmake HINTS ${CMAKE_DIR} ENV CMAKE_DIR PATH_SUFFIXES bin)

# Build

set_property(TARGET project PROPERTY CXX_STANDARD 17)

add_custom_command(TARGET project POST_BUILD COMMAND ${CMAKE_EXECUTABLE} -E copy_directory ${CMAKE_SOURCE_DIR}/data $<TARGET_FILE_DIR:project>/data)

foreach(file ${OPENCV_DLLS})
	add_custom_command(TARGET project POST_BUILD COMMAND ${CMAKE_EXECUTABLE} ARGS -E copy ${file} $<TARGET_FILE_DIR:project>)
endforeach(file)

# Install

install(TARGETS project DESTINATION ${PROJECT_SOURCE_DIR}/bin)
install(DIRECTORY ${PROJECT_SOURCE_DIR}/data DESTINATION ${PROJECT_SOURCE_DIR}/bin)

foreach(file ${OPENCV_DLLS})
	install(FILES ${file} DESTINATION ${PROJECT_SOURCE_DIR}/bin/)
endforeach(file)
2
3
4
5
6
7
8
9
10
11
12
13
14
15
16
17
18
19
20
21
22
23
24
25
26
27
28
29
30
31
32
33
34
35
36
37
38
39
40
41
42
43
44
45
# Microsoft Visual Studio IDE
TIP
If the build is not available go to manage configurations.
# Tutorial 1: README
# OpenCV Tutorial 1: Loading and Saving an Image
Welcome to my tutorial on how to load and save an image using OpenCV.
# Introduction
You may be familiar with opening an image using an app: you double-click on the file and it appears in a window. Neat!
However, what if you want to do more than just look at an image, e.g. you want to resize it, apply Gaussian blurring, extract a region of interest, change its colour space, etc. That's where OpenCV is useful.
In this tutorial I show you how to use OpenCV's C++ library to load, display, and save an image.
The tutorial is organised as follows: I first describe the requirements for completing this tutorial; then I list the tutorial's contents and describe how to build its activities and samples; next, I go through each sample's header and source files, describing each line's and snippet's purpose; I then prescribe activities for you to complete; and lastly, I conclude the tutorial.
# Requirements
# Windows
To build the source code listed in this tutorial, you need to have the following on your computer:
If you haven't got these installed, click on each of the links to go to their respective download websites. Download and run the relevant system installer for your computer, e.g. CMake's "cmake-3.13.3-win64-x64.msi", OpenCV's 4.0.1 "Win pack", and Microsoft's latest "Windows" installers for a 64-bit version of Windows 10.
If you'd like to use an alternative Integrated Development Environment (IDE) to edit code, consider Microsoft's Visual Studio Code. You'll find it a light-weight, and flexible, alternative to Visual Studio.
Once you've got CMake, OpenCV, and an IDE installed, you're ready to get started.
# How to Build the Tutorial's Samples and Activities
Sample 1 contains source code that shows how to load an image from a sub-directory. Sample 2 shows how to save an image to a sub-directory. Activity 1 and Activity 2 are projects set up for you to complete the tutorial's activities with. Sample 1's 'data' sub-directory contains an input file.
# Windows
The following describe how to build the tutorial's sample and activity using either: console commands or Visual Studio IDE.
# Console Commands
To build a Debug version of a sample or actvity, browse to its directory and use the following commands:
mkdir build
cd build
cmake -G "Visual Studio 15 2017 Win64" ..
cmake --build . --config Debug --target install
2
3
4
To run the executable, browse to the sample's or actvity's 'bin' directory.
To build a Release version of a sample or activity, browse to its directory and use the following commands:
mkdir build
cd build
cmake -G "Visual Studio 15 2017 Win64" ..
cmake --build . --config Release --target install
2
3
4
To run the executable, browse to the sample's or activity's 'bin' directory.
# Visual Studio IDE
To build a Debug Version of a sample or activity:
- Open Visual Studio IDE.
- Click on 'File > Open > CMake'.
- Browse to the sample's or activity's directory.
- Select 'CMakeLists.txt' and click on Open.
- Click 'CMake > Build All'.
To run the executable:
- Click 'CMake > Debug from Build Folder > project'.
To change the build configuration:
- Click 'CMake > Change CMake Settings > project'
- Select the build configuration.
To build a 64-bit, debug application, select 'x64-Debug'. To build a 64-bit, release application, select 'x64-Release'. CMake's default is a x64-bit, debug configuration.
# Sample 1: Loading an Image from a Directory
Browse to the 'sample_1' directory.
Let's have a look at Sample 1's source code:
'main.hpp'
#ifndef __MAIN_HPP__
#define __MAIN_HPP__

#include <opencv2/opencv.hpp>

#endif //__MAIN_HPP__
2
3
4
5
6
'main.cpp'
#include <filesystem>
#include <iostream>

#include "main.hpp"

namespace fs = std::experimental::filesystem;

int main(int argc, char* argv[]) {

    fs::path executablePath{ fs::path(argv[0]) };

    fs::path dataPath{ fs::path("/data/image.png") };

    fs::path inputFile{ executablePath.parent_path().append(dataPath) };

    std::cout << inputFile.string() << std::endl;

    cv::Mat image = cv::imread(inputFile.string(), cv::IMREAD_COLOR);

    if (image.empty()) {

        std::cout << "Error: 'image' is empty" << std::endl;

        return 1;
    }

    cv::imshow("image", image);

    cv::waitKey(0);

    cv::destroyAllWindows();

    return 0;
}
2
3
4
5
6
7
8
9
10
11
12
13
14
15
16
17
18
19
20
21
22
23
24
25
26
27
28
29
30
31
32
33
34
Let's first consider 'main.hpp'. I have used a header guard to prevent including a header file more than once. Header guards are conditional directives that take the form:
#ifndef __NAME__
#define __NAME__
    // declarations and definitions go here.
#endif __NAME__ //__NAME__
2
3
4
When 'main.hpp' is included, the first thing it does is check if __MAIN_H__ has been defined. If it hasn't been, it defines __MAIN_H__ and includes a header file. If it has, the entire header is ignored. For more information about header guards, see [here].
I have included the opencv2/opencv.hpp header file, which provides access to a range of OpenCV's modules, e.g. core, imgproc, and highgui. For more information about the modules, see [here].
Next, let's consider 'main.cpp'. I have included the filesystem and iostream header files, which provides facilities for performing operations on file systems and their components, e.g. paths, files, and directories, and access to input and output streams, e.g. std::cin and std::cout. For simplicity, I define an alias, fs, for the std::experimental::filesystem namespace.
Let's now go through the 'main.cpp' block by block:
The line
int main(int argc, char* argv[])
defines the program's entry point and has two parameters: int argc and char* argv[]. argc contains an integer number of command-line arguments, and argv contains a string of command-line arguments.
The line
fs::path executablePath{ fs::path(argv[0]) };
defines the variable executablePath, which is initialised with the executable's path. For more information about std::experimental::filesystem::path, see [here].
The line
fs::path dataPath{ fs::path("/data/image.png") };
defines the variable dataPath, which is initialised with the path to the input file's location.
The line
fs::path inputFile{ executablePath.parent_path().append(dataPath) };
defines the variable inputFile, which is initialised with the absolute path to the input file's location. Here, executablePath contains the executable's name, e.g. 'C:/main.exe'. By using the parent_path() member function, the parent path, e.g. 'C:/', is returned. Subsequently, using the append() member function, dataPath is appended to the parent path, e.g. 'C:/data/image.png'.
The line
std::cout << inputFile.string() << std::endl;
uses the output stream, cout, to display inputFile's path on the console.
The line
cv::Mat image = cv::imread(inputFile.string(), cv::IMREAD_COLOR);
defines the variable image, which is initialised using OpenCV's imread() function. imread() has two parameters: std::string &filename and int flags. filename is the name of the file to be loaded and flags is the image read mode. Here, I have used the absolute path to the input file's location and will load the image as a three channel, Blue Green Red (BGR) color image. For more information about imread(), see [here].
The snippet
if (image.empty()) {

    std::cout << "Error: 'image' is empty" << std::endl;

    return 1;
}
2
3
4
5
6
checks to see if image's empty() member function returns true. If it does, imread() could not find the input file; an error message is displayed; and a return statement terminates the program. If it does not, then the program continues.
The line
cv::imshow("image", image);
uses OpenCV's imshow() function to display image in a window. imshow() has two parameters: const String &winname and InputArray mat. winname is the name of the window and mat is the image to be shown. For more information about imshow(), see [here].
The line
cv::waitKey(0)
uses OpenCV's waitKey() function to wait for a user to press a key. waitKey() has one parameter: int delay. delay is the delay in milliseconds the function waits; 0 means "forever". For more information about waitKey(), see [here]
The snippet
cv::destroyAllWindows();
uses OpenCV's destroyAllWindows() function to close all open highgui windows. destroyAllWindows() has no parameters. For more information about `destroyAllWindows()', see [here].
The line
return 0;
terminates the program.
Now that we've looked at the sample's source code, let's build and run its executable.
You should see the following image be displayed:

# Actvity 1: Load your own Image from a Directory
Browse to the 'activity_1' directory.
Now that you know how to load an image from a directory, complete the following activities:
- Download and save an image in Activity 1's 'data' sub-directory. Bonus points for a funny meme.
- Use a header guard to include the OpenCV header file.
- Use an OpenCV function to read the image.
- Use an OpenCV function to show the image in a window.
- Use an OpenCV function to wait for a user to press a key.
Once you've completed these, build the activity's source code and run it's executable.
Take a screen shot of the displayed window.
# Sample 2: Saving an Image to a Directory
Browse to the 'sample_2' directory.
Let's have a look at Sample 2's source code:
'main.hpp'
#ifndef __MAIN_HPP__
#define __MAIN_HPP__

#include <opencv2/opencv.hpp>

#endif //__MAIN_HPP__
2
3
4
5
6
'main.cpp'
#include <filesystem>
#include <iostream>
#include "main.hpp"
namespace fs = std::experimental::filesystem;
int main(int argc, char* argv[]) {
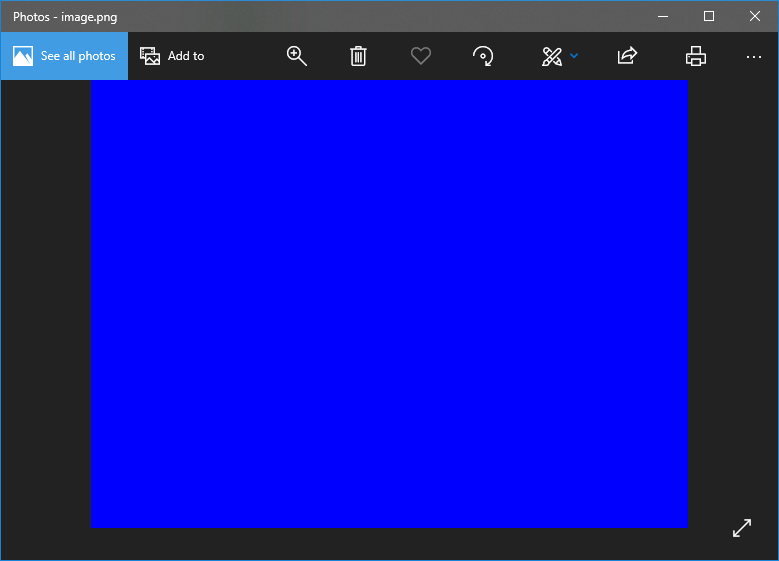
cv::Mat image = cv::Mat(cv::Size(640, 480), CV_8UC3, cv::Scalar(255, 0, 0));
cv::imshow("image", image);
cv::waitKey(0);
fs::path executablePath{ fs::path(argv[0]) };
fs::path dataPath{ fs::path("/data") };
fs::path outputPath{ executablePath.parent_path().append(dataPath) };
if(!fs::is_directory(outputPath)) {
fs::create_directory(outputPath);
}
fs::path outputFile {outputPath.append(fs::path("/image.png"))};
std::cout << outputFile.string() << std::endl;
cv::imwrite(outputFile.string(), image);
return 0;
}
2
3
4
5
6
7
8
9
10
11
12
13
14
15
16
17
18
19
20
21
22
23
24
25
26
27
28
29
30
31
32
33
34
35
Let's first consider 'main.hpp'. I have used a header guard to prevent including a header file more than once. Header guards are conditional directives that take the form:
#ifndef __NAME__
#define __NAME__
    // declarations and definitions go here.
#endif __NAME__ //__NAME__
2
3
4
When 'main.hpp' is included, the first thing it does is check if __MAIN_H__ has been defined. If it hasn't been, it defines __MAIN_H__ and includes a header file. If it has been, the entire header is ignored. For information about header guards, see [here].
I have included the opencv2/opencv.hpp header file, which provides access to a range of OpenCV's modules, e.g. core, imgproc, and highgui. For more information about the modules, see [here].
Next, let's consider 'main.cpp'. I have included the filesystem and iostream header files, which provides facilities for performing operations on file systems and their components, e.g. paths, files, and directories, and access to input and output streams, e.g. std::cin and std::cout. For simplicity, I define an alias, fs, for the std::experimental::filesystem namespace.
Let's now go through the 'main.cpp' block by block:
The line
int main(int argc, char* argv[])
defines the program's entry point and has two parameters: int argc and char* argv[]. argc contains an integer number of command-line arguments, and argv contains a string of command-line arguments.
The line
cv::Mat image = cv::Mat(cv::Size(640, 480), CV_8UC3, cv::Scalar(255, 0, 0));
defines the variable image, which is initialised using an overloaded member function of OpenCV's Mat class . There are, to date, 29 different overloaded member functions available. Here, I've defined image as a 640 x 480 pixel (px), 8-bit, three channel image, whose pixels' colour is set by the Blue Green Red (BGR) scalar (255, 0, 0). For more information about the Mat class, see [here].
The line
cv::imshow("image", image);
OpenCV's imshow() function displays image in a window. imshow() has two parameters: const String &winname and InputArray mat. winname is the name of the window and mat is the image to be shown. For more information about imshow(), see [here].
The line
cv::waitKey(0)
OpenCV's waitKey() function waits for a user to press a key. waitKey() has one parameter: int delay. delay is the delay in milliseconds the function waits; 0 means "forever". For more information about waitKey(), see [here]
The line
fs::path executablePath{ fs::path(argv[0]) };
defines the variable executablePath, which is initialised with the executable's path. For more information about the std::experimental::filesystem::path, see [here].
The line
fs::path dataPath{ fs::path("/data") };
define the variable dataPath, which is initialised with the path to the output file's directory.
The line
fs::path outputPath{ executablePath.parent_path().append(dataPath) };
defines the variable outputPath, which is initialised with the absolute path to the output file's directory. Here, 'executablePath' contains the executable's name, e.g. 'C:/main.exe'. By using the parent_path() member function, the parent path, e.g. 'C:/' is returned. Subequently, using the append() member function, dataPath is appended to the parent path, e.g. 'C:/data'.
The snippet
if(!fs::is_directory(outputPath)) {

	fs::create_directory(outputPath);

}
2
3
4
5
checks to see if outputPath's directory exists. If it does, the program continuese. If it doesn't, then the directory is created.
The line
fs::path outputFile {outputPath.append(fs::path("/image.png"))};
defines the variable outputFile, which is initialised with the absolute path to the output file's location. Here, outputPath contains the output file's directory. Using the append() member function, 'image.png' is appended to outputPath to create a file location.
The line
std::cout << outputFile.string() << std::endl;
uses the output stream, cout, to display outputFile's path on the console.
The line
cv::imwrite(outputFile.string(), image);
uses OpenCV's imwrite() function to write an image to a directory. imwrite() has three parameters: const string &filename, InputArray img, and const std::vector<int> ¶ms. filename is the name of the file to be written, img is the image to be written, and params is the image write flags. Here, I have used the absolute path to the output file's location and the image I originally created. For more information about imwrite(), see [here].
The line
return 0;
terminates the program.
Now that we've looked at the sample's source code, let's build and run its executable.
You should see the following image saved:
# Activity 2: Save your own Image to a Directory
Browse to the 'activity_2' directory.
Now that you know how to save an image to a directory, complete the following activities:
- Use a header guard to include the OpenCV header file.
- Create a 320 x 240 px image of your own colour choice.
- Use an OpenCV function to show the image in a window.
- Use an OpenCV function to wait for a user to press a key.
- Use an OpenCV function to save the image to a 'data' sub-directory.
Once you've completed these, build the activity's source code and run its executable.
Open the saved image using Windows' Photo App' and take a screen shot of the displayed image.
# Conclusion
In this tutorial I've shown you how to use OpenCV's C++ library to load, display, and save an image.
You've used OpenCV's imread() function to load an image from a directory; imwrite() function to save an image to a directory; and imshow() to display an image in a window. You've also looked at using the std::experimental::filesystem to work with the system's components, e.g. paths, files, and directories.
# Configuring the project in VSCode
We can go Cmake: configure on the 'F1' menu, or use the extension tool
# Tutorial 02
Most important lines of code on this file are these 2 highlighted showing how to read and write data to a file.
#include <filesystem>
#include <iostream>

#include "main.hpp"

namespace fs = std::filesystem;

int main(int argc, char* argv[]) {

    fs::path executablePath{ fs::path(argv[0]) };

    fs::path inputFile { (executablePath.parent_path()).append("data/image.jpg") };

    std::cout << inputFile.string() << std::endl;

    cv::Mat image = cv::imread(inputFile.string(), cv::IMREAD_COLOR);

    if(image.empty()) {

        std::cout << "Error: `image` is empty" << std::endl;

        return 1;

    }

	cv::Vec3b intensity = image.at<cv::Vec3b>(cv::Point(100, 100));

	uchar blue = intensity.val[0];
	uchar green = intensity.val[1];
	uchar red = intensity.val[2];

	std::cout << intensity << ", " << static_cast<int>(blue) << ", " << static_cast<int>(green) << ", " << static_cast<int>(red) << std::endl;

	cv::imshow("image", image);

	cv::waitKey(0);

	image.at<cv::Vec3b>(cv::Point(100, 100)) = cv::Vec3b(100, 0, 0);

	intensity = image.at<cv::Vec3b>(cv::Point(100, 100));

	blue = intensity.val[0];
	green = intensity.val[1];
	red = intensity.val[2];

	std::cout << intensity << ", " << static_cast<int>(blue) << ", " << static_cast<int>(green) << ", " << static_cast<int>(red) << std::endl;

	cv::imshow("image", image);

	cv::waitKey(0);

    cv::destroyAllWindows();

    return 0;
}
2
3
4
5
6
7
8
9
10
11
12
13
14
15
16
17
18
19
20
21
22
23
24
25
26
27
28
29
30
31
32
33
34
35
36
37
38
39
40
41
42
43
44
45
46
47
48
49
50
51
52
53
54
55
# Tutorial 3
# Drawing Shapes
In this tutorial some shapes are draw. -1 on line 23 causes the circle to be filled.
#include <filesystem>
#include <iostream>

#include "main.hpp"

namespace fs = std::filesystem;

int main(int argc, char* argv[]) {

	cv::Mat image = cv::Mat(cv::Size(400, 400), CV_8UC3, cv::Scalar(255, 255, 255));

	cv::line(image, cv::Point(100, 50), cv::Point(300, 50), cv::Scalar(0, 0, 0), 10);
	cv::line(image, cv::Point(350, 100), cv::Point(350, 300), cv::Scalar(0, 0, 0), 10);
	cv::line(image, cv::Point(300, 350), cv::Point(100, 350), cv::Scalar(0, 0, 0), 10);
	cv::line(image, cv::Point(50, 300), cv::Point(50, 100), cv::Scalar(0, 0, 0), 10);

	cv::ellipse(image, cv::Point(100, 100), cv::Size(50, 50), 0, 180, 270, cv::Scalar(0, 0, 0), 10);
	cv::ellipse(image, cv::Point(300, 100), cv::Size(50, 50), 0, 270, 360, cv::Scalar(0, 0, 0), 10);
	cv::ellipse(image, cv::Point(100, 300), cv::Size(50, 50), 0, 90, 180, cv::Scalar(0, 0, 0), 10);
	cv::ellipse(image, cv::Point(300, 300), cv::Size(50, 50), 0, 0, 90, cv::Scalar(0, 0, 0), 10);

	cv::circle(image, cv::Point(200, 200), 75, cv::Scalar(0, 0, 0), 10);
	cv::circle(image, cv::Point(300, 100), 25, cv::Scalar(0, 0, 0), -1);

	cv::imshow("image", image);

	cv::waitKey(0);

	cv::destroyAllWindows();

    return 0;
}
2
3
4
5
6
7
8
9
10
11
12
13
14
15
16
17
18
19
20
21
22
23
24
25
26
27
28
29
30
31
32

# Drawing text
#include <filesystem>
#include <iostream>

#include "main.hpp"

int main(int argc, char* argv[]) {

	cv::Mat image = cv::Mat(cv::Size(600, 200), CV_8UC3, cv::Scalar(255, 255, 255));

	cv::putText(image, "OpenCV is Great!", cv::Point(50,100), cv::FONT_HERSHEY_PLAIN, 3, cv::Scalar(0, 0, 0), 3);

	cv::imshow("image", image);

	cv::waitKey(0);

	cv::destroyAllWindows();

    return 0;
}
2
3
4
5
6
7
8
9
10
11
12
13
14
15
16
17
18
19

# Treshold
CV_8UC1 is a gray scale image.
On line 15 we can use THRESH_OTSU for automatic setting of threshold
#include "main.hpp"

int main(int argc, char* argv[]) {

	cv::Mat image{ cv::Mat(cv::Size(640, 480), CV_8UC1, cv::Scalar(0)) };

	cv::circle(image, cv::Point(320, 240), 50, cv::Scalar(125), -1);

	cv::imshow("image", image);

	cv::waitKey(1);

	cv::Mat imageThreshold;

	cv::threshold(image, imageThreshold, 124, 255, cv::THRESH_BINARY);

	cv::imshow("imageThreshold", imageThreshold);

	cv::waitKey(0);

	cv::destroyAllWindows();

    return 0;

}
2
3
4
5
6
7
8
9
10
11
12
13
14
15
16
17
18
19
20
21
22
23
24
25


# Dilation and Erosion
#include "main.hpp"

int main(int argc, char* argv[]) {

	cv::Mat image{ cv::Mat(cv::Size(640, 480), CV_8UC1, cv::Scalar(0)) };

	cv::circle(image, cv::Point(320, 240), 50, cv::Scalar(125), -1);

	cv::Mat thresholdedImage;

	cv::threshold(image, thresholdedImage, 124, 255, cv::THRESH_BINARY);

	cv::imshow("thresholdedImage", thresholdedImage);

	cv::waitKey(1);

	int elementSize = 10;
	cv::Mat element = cv::getStructuringElement(cv::MORPH_ELLIPSE, cv::Size(2 * elementSize + 1, 2 * elementSize + 1), cv::Point(elementSize, elementSize));

	std::cout << element << std::endl;

	cv::Mat erodedImage;

	cv::erode(thresholdedImage, erodedImage, element);

	cv::imshow("erodedImage", erodedImage);
	cv::waitKey(1);

	cv::Mat dilatedImage;

	cv::dilate(thresholdedImage, dilatedImage, element);

	cv::imshow("dilatedImage", dilatedImage);
	cv::waitKey(1);

	cv::waitKey(0);

	cv::destroyAllWindows();

    return 0;

}
2
3
4
5
6
7
8
9
10
11
12
13
14
15
16
17
18
19
20
21
22
23
24
25
26
27
28
29
30
31
32
33
34
35
36
37
38
39
40
41
42
# Canny Image
#include "main.hpp"

int main(int argc, char* argv[]) {

	cv::Mat image{ cv::Mat(cv::Size(640, 480), CV_8UC1, cv::Scalar(0)) };

	cv::circle(image, cv::Point(320, 240), 50, cv::Scalar(125), -1);

	cv::Mat cannyImage;

	cv::Canny(image, cannyImage, 124, 255);

	cv::imshow("cannyImage", cannyImage);

	cv::waitKey(0);

	cv::destroyAllWindows();

    return 0;

}
2
3
4
5
6
7
8
9
10
11
12
13
14
15
16
17
18
19
20
21

# Color image
#include "main.hpp"
int main(int argc, char* argv[]) {

	cv::Mat image{ cv::Mat(cv::Size(640, 480), CV_8UC3, cv::Scalar(0, 0, 0)) };

	cv::circle(image, cv::Point(320, 240), 50, cv::Scalar(255, 0, 0), -1);

	cv::imshow("originalImage", image);
	cv::waitKey(1);

	cv::Mat imageHSV;

	cv::cvtColor(image, imageHSV, cv::COLOR_BGR2HSV);

	cv::Mat thresholdedImage;

	cv::inRange(imageHSV, cv::Scalar(115, 0, 0), cv::Scalar(125, 255, 255), thresholdedImage);

	cv::imshow("thresholdedImage", thresholdedImage);

	cv::waitKey(0);

	cv::destroyAllWindows();

    return 0;

}
2
3
4
5
6
7
8
9
10
11
12
13
14
15
16
17
18
19
20
21
22
23
24
25
26
# Filtering
To produce same noise we will use a util file :
import cv2 as cv
import numpy as np

from enum import Enum


class Noise(Enum):
    GAUSSIAN = 0
    SALT_PEPPER = 1


def noise(img, noise_type):

    def gaussian():

        rows = np.shape(img)[0]
        cols = np.shape(img)[1]

        mean = 0
        var = 1
        sigma = np.power(var, 0.5)

        gaussian = np.random.normal(mean, sigma, (rows, cols))
        gaussian = np.reshape(gaussian, (rows, cols))
        gaussian = np.uint8(gaussian)

        noisy_img = cv.addWeighted(img, 1.0, gaussian, 0.2, 0.0)

        return (noisy_img)

    def salt_pepper():

        rows = np.shape(img)[0]
        cols = np.shape(img)[1]

        ratio = 0.5
        volume = 0.01

        salt = np.ceil(volume * img.size * (ratio))
        salt_coordinates = [np.random.randint(0, i - 1, int(salt)) for i in img.shape]

        pepper = np.ceil(volume * img.size * (1.0 - ratio))
        pepper_coordinates = [np.random.randint(0, i - 1, int(pepper)) for i in img.shape]

        noisy_img = img
        noisy_img[tuple(salt_coordinates)] = 255
        noisy_img[tuple(pepper_coordinates)] = 0

        return (noisy_img)

    switch = {
        Noise.GAUSSIAN: gaussian(),
        Noise.SALT_PEPPER: salt_pepper()
    }

    return switch.get(noise_type)
2
3
4
5
6
7
8
9
10
11
12
13
14
15
16
17
18
19
20
21
22
23
24
25
26
27
28
29
30
31
32
33
34
35
36
37
38
39
40
41
42
43
44
45
46
47
48
49
50
51
52
53
54
55
56
# Filters
We can see the effects of the filters at the filte.py file:
import cv2 as cv
import numpy as np
def main():
# Load image
img = cv.imread("data/apples.png")
if img is None:
print("ERROR::CV::Could not read image.")
return
# Resize image
rows, cols, channels = img.shape
rows = rows // 2
cols = cols // 2
img = cv.resize(img, (cols, rows))
cv.imshow("img", img)
cv.waitKey(0)
# Kernel, K = [0, 0, 0; 0, 1, 0; 0, 0, 0]
kernel = np.float32([0, 0, 0, 0, 1, 0, 0, 0, 0])
kernel = kernel.reshape((3, 3))
I_img = cv.filter2D(img, cv.CV_8UC3, kernel)
cv.imshow("Identity Image", I_img)
cv.waitKey(0)
cv.imwrite("data/I_img.png", I_img)
# Kernel, K = [0, -1, 0; -1, 5, -1; 0, -1, 0]
kernel = np.float32([0, -1, 0, -1, 5, -1, 0, -1, 0])
kernel = kernel.reshape((3, 3))
I_img = cv.filter2D(img, cv.CV_8UC3, kernel)
cv.imshow("Sharpened Image", I_img)
cv.waitKey(0)
cv.imwrite("data/sharp_img.png", I_img)
# Kernel, K = 1/9 * [1, 1, 1; 1, 1, 1; 1, 1, 1]
kernel = 1.0/9.0 * np.float32([1, 1, 1, 1, 1, 1, 1, 1, 1])
kernel = kernel.reshape((3, 3))
box_img = cv.filter2D(img, cv.CV_8UC3, kernel)
cv.imshow("Box Blurred Image", box_img)
cv.waitKey(0)
cv.imwrite("data/box_img.png", box_img)
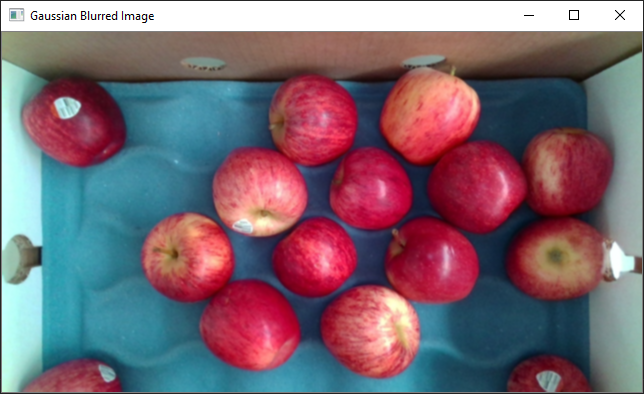
# Kernel, K = 1/16 * [1, 2, 1; 2, 4, 2; 1, 2, 1]
kernel = 1.0/16.0 * np.float32([1, 2, 1, 2, 4, 2, 1, 2, 1])
kernel = kernel.reshape((3, 3))
box_img = cv.filter2D(img, cv.CV_8UC3, kernel)
cv.imshow("Gaussian Blurred Image", box_img)
cv.waitKey(0)
cv.imwrite("data/gaussian_img.png", box_img)
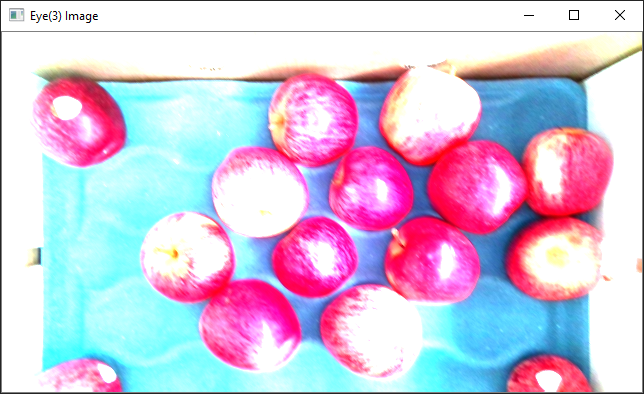
# Kernel, K = [1, 0, 0; 0, 1, 0; 0, 0, 1]
kernel = np.float32([1, 0, 0, 0, 1, 0, 0, 0, 1])
kernel = kernel.reshape((3, 3))
I3_img = cv.filter2D(img, cv.CV_8UC3, kernel)
cv.imshow("Eye(3) Image", I3_img)
cv.waitKey(0)
cv.imwrite("data/I3_img.png", I3_img)
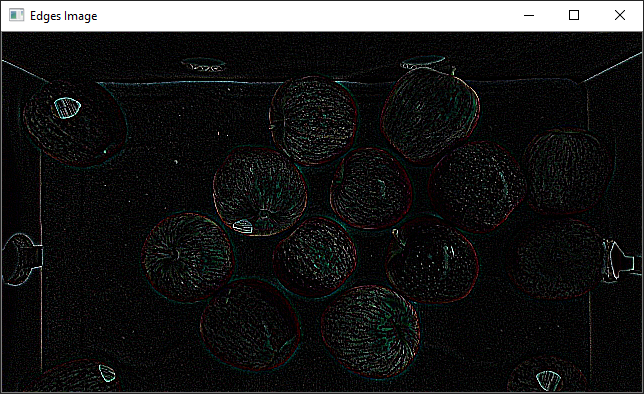
# Kernel, K = [0, 1, 0; 1, -4, 1; 0, 1, 0]
kernel = np.float32([-1, -1, -1, -1, 8, -1, -1, -1, -1])
kernel = kernel.reshape((3, 3))
edge_img = cv.filter2D(img, cv.CV_8UC3, kernel)
cv.imshow("Edges Image", edge_img)
cv.waitKey(0)
cv.imwrite("data/edge_img.png", edge_img)
cv.destroyAllWindows()
return
if __name__ == "__main__":
main()
2
3
4
5
6
7
8
9
10
11
12
13
14
15
16
17
18
19
20
21
22
23
24
25
26
27
28
29
30
31
32
33
34
35
36
37
38
39
40
41
42
43
44
45
46
47
48
49
50
51
52
53
54
55
56
57
58
59
60
61
62
63
64
65
66
67
68
69
70
71
72
73
74
75
76
77
78
79
80
81
82
83
84
85
86
87
88
89
90
91
92
93
94
95
96
97
98
99


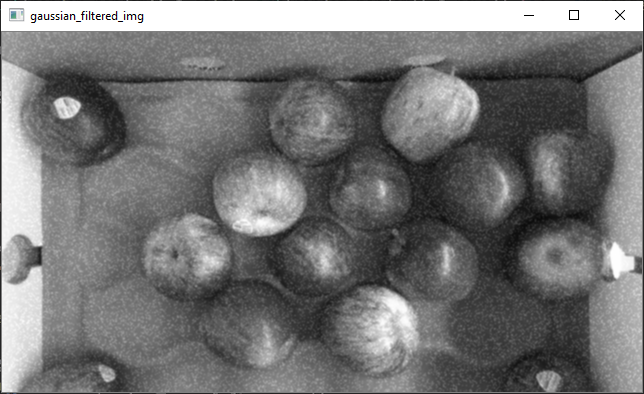
# Gaussian
import cv2 as cv
import numpy as np

from utils import noise, Noise


def main():

    # Load image

    img = cv.imread("data/apples.png")

    if img is None:
        print("ERROR::CV::Could not read image.")
        return

    # Resize image

    rows, cols, channels = img.shape

    rows = rows // 2
    cols = cols // 2

    img = cv.resize(img, (cols, rows))

    cv.imshow("img", img)
    cv.waitKey(0)

    # Convert image from BGR to grayscale

    img = cv.cvtColor(img, cv.COLOR_BGR2GRAY)

    # Apply gaussian noise to img

    img = noise(img, Noise.GAUSSIAN)

    cv.imshow("img", img)
    cv.waitKey(0)
    cv.imwrite("data/gaussian_noise_apples.png", img)

    # Use a gaussian filter to remove noise

    filtered_img = cv.GaussianBlur(img, (3, 3), 0)

    cv.imshow("gaussian_filtered_img", filtered_img)
    cv.waitKey(0)
    cv.imwrite("data/gaussian_filtered_apples.png", filtered_img)

    cv.destroyAllWindows()

    return


if __name__ == "__main__":

    main()
2
3
4
5
6
7
8
9
10
11
12
13
14
15
16
17
18
19
20
21
22
23
24
25
26
27
28
29
30
31
32
33
34
35
36
37
38
39
40
41
42
43
44
45
46
47
48
49
50
51
52
53
54
55
56

# Median
import cv2 as cv
import numpy as np

from utils import noise, Noise


def main():

    # Load image

    img = cv.imread("data/apples.png")

    if img is None:
        print("ERROR::CV::Could not read image.")
        return

    # Resize image

    rows, cols, channels = img.shape

    rows = rows // 2
    cols = cols // 2

    img = cv.resize(img, (cols, rows))

    cv.imshow("img", img)
    cv.waitKey(0)

    # Convert image from BGR to grayscale

    img = cv.cvtColor(img, cv.COLOR_BGR2GRAY)

    # Apply salt and pepper noise to img

    salt_img = noise(img, Noise.SALT_PEPPER)

    cv.imshow("salt_img", salt_img)
    cv.waitKey(0)
    cv.imwrite("data/salt_noise_apples.png", salt_img)

    # Use a median filter to remove noise

    filtered_img = cv.medianBlur(salt_img, 3)

    cv.imshow("median_salt_filtered_img", filtered_img)
    cv.waitKey(0)
    cv.imwrite("data/median_filtered_apples.png", filtered_img)

    cv.destroyAllWindows()

    return


if __name__ == "__main__":

    main()
2
3
4
5
6
7
8
9
10
11
12
13
14
15
16
17
18
19
20
21
22
23
24
25
26
27
28
29
30
31
32
33
34
35
36
37
38
39
40
41
42
43
44
45
46
47
48
49
50
51
52
53
54
55
56


# Edge Detection
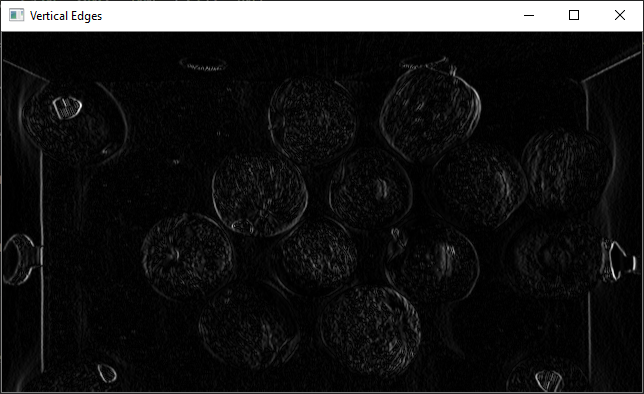
# Sobel
import cv2 as cv
import numpy as np
def main():
# Load image
img = cv.imread("data/apples.png")
if img is None:
print("ERROR::CV::Could not read image.")
return
# Resize image
rows, cols, channels = img.shape
rows = rows // 2
cols = cols // 2
img = cv.resize(img, (cols, rows))
cv.imshow("img", img)
cv.waitKey(0)
# Convert image from BGR to grayscale
img = cv.cvtColor(img, cv.COLOR_BGR2GRAY)
vertical = np.float32([-1, 0, 1, -2, 0, 2, -1, 0, 1])
vertical = vertical.reshape((3, 3))
vertical_edges = cv.filter2D(img, cv.CV_32FC1, vertical)
vertical_edges = np.abs(vertical_edges)
G_x = vertical_edges/vertical_edges.max() * 255
G_x = np.uint8(G_x)
cv.imshow("Vertical Edges", G_x)
cv.waitKey(0)
cv.imwrite("data/sobel_vertical_edges.png", G_x)
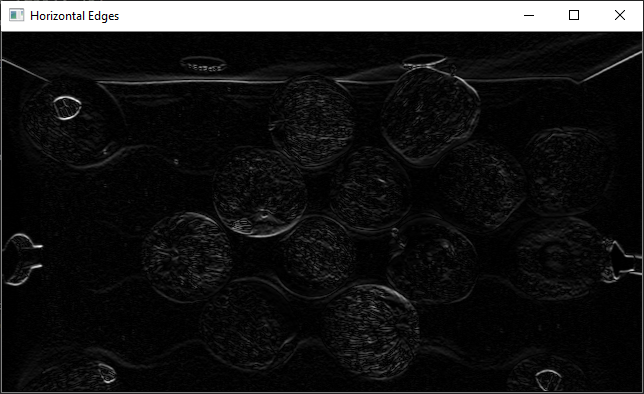
horizontal = np.float32([-1, -2, -1, 0, 0, 0, 1, 2, 1])
horizontal = horizontal.reshape((3, 3))
horizontal_edges = cv.filter2D(img, cv.CV_32FC1, horizontal)
horizontal_edges = np.abs(horizontal_edges)
G_y = horizontal_edges/horizontal_edges.max() * 255
G_y = np.uint8(G_y)
cv.imshow("Horizontal Edges", G_y)
cv.waitKey(0)
cv.imwrite("data/sobel_horizontal_edges.png", G_y)
G = np.hypot(G_x, G_y)
G = G/G.max() * 255
G = np.uint8(G)
cv.imshow("Magnitude", G)
cv.waitKey(0)
cv.imwrite("data/sobel_edges.png", G)
return
if __name__ == "__main__":
main()
2
3
4
5
6
7
8
9
10
11
12
13
14
15
16
17
18
19
20
21
22
23
24
25
26
27
28
29
30
31
32
33
34
35
36
37
38
39
40
41
42
43
44
45
46
47
48
49
50
51
52
53
54
55
56
57
58
59
60
61
62
63
64
65
66
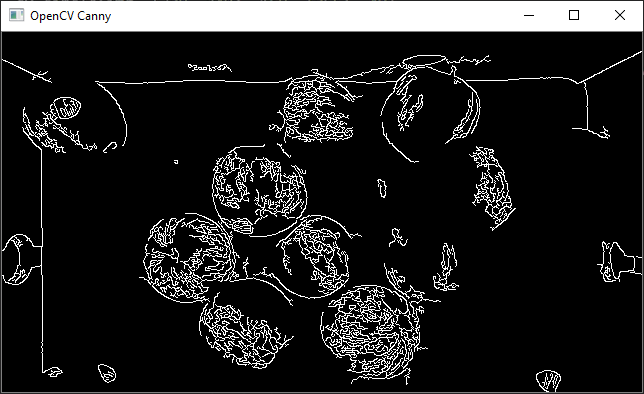
# Canny
import cv2 as cv
import numpy as np


def main():

    # Load image

    img = cv.imread("data/apples.png")

    if img is None:
        print("ERROR::CV::Could not read image.")
        return

    # Resize image

    rows, cols, channels = img.shape

    img = cv.resize(img, (cols // 2, rows // 2))

    cv.imshow("img", img)
    cv.waitKey(0)

    # Convert image from BGR to grayscale

    img = cv.cvtColor(img, cv.COLOR_BGR2GRAY)

    # OpenCV canny()

    canny = cv.Canny(img, 25, 255)

    cv.imshow("OpenCV Canny", canny)
    cv.waitKey(0)
    cv.imwrite("data/cv_canny.png", canny)

    cv.destroyAllWindows()

    return


if __name__ == "__main__":

    main()
2
3
4
5
6
7
8
9
10
11
12
13
14
15
16
17
18
19
20
21
22
23
24
25
26
27
28
29
30
31
32
33
34
35
36
37
38
39
40
41
42
43
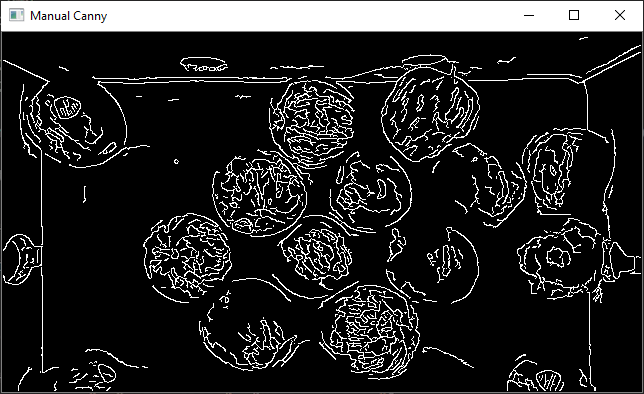
# Canny Manual
import cv2 as cv
import numpy as np


def main():

    # Load image

    img = cv.imread("data/apples.png")

    if img is None:
        print("ERROR::CV::Could not read image.")
        return

    # Resize image

    rows, cols, channels = img.shape

    rows = rows // 2
    cols = cols // 2

    img = cv.resize(img, (cols, rows))

    cv.imshow("img", img)
    cv.waitKey(0)

    # The manual implementation of the Canny algorithm is a bit slow, so
    print("Please wait...")

    # Convert image from BGR to grayscale

    gray = cv.cvtColor(img, cv.COLOR_BGR2GRAY)

    # Gaussian Blurring

    blur = cv.GaussianBlur(gray, (5, 5), 0)

    cv.imwrite("data/manual_canny_blurred.png", blur)

    # Apply Sobel operator

    sobelx_64 = cv.Sobel(blur, cv.CV_32F, 1, 0, ksize=3)
    absx_64 = np.absolute(sobelx_64)
    sobelx_8u1 = absx_64/absx_64.max()*255
    G_x = np.uint8(sobelx_8u1)

    sobely_64 = cv.Sobel(blur, cv.CV_32F, 0, 1, ksize=3)
    absy_64 = np.absolute(sobely_64)
    sobely_8u1 = absy_64/absy_64.max()*255
    G_y = np.uint8(sobely_8u1)

    # Compute gradient magnitude

    G = np.hypot(G_x, G_y)
    G = G/G.max()*255
    G = np.uint8(G)

    # Compute gradient angle

    theta = np.arctan2(sobely_64, sobelx_64)
    angle = np.rad2deg(theta)

    cv.imwrite("data/manual_canny_G.png", G)

    # Non-maximum suppression

    non_max = np.zeros((rows, cols), dtype=np.uint8)

    for i in range(1, rows-1):

        for j in range(1, cols-1):

            # Horizontal 0
            if (0 <= angle[i, j] < 22.5) or (157.5 <= angle[i, j] <= 180) or (-22.5 <= angle[i, j] < 0) or (-180 <= angle[i, j] < -157.5):

                b = G[i, j+1]
                c = G[i, j-1]

            # Diagonal 45
            elif (22.5 <= angle[i, j] < 67.5) or (-157.5 <= angle[i, j] < -112.5):

                b = G[i+1, j+1]
                c = G[i-1, j-1]

            # Vertical 90
            elif (67.5 <= angle[i, j] < 112.5) or (-112.5 <= angle[i, j] < -67.5):

                b = G[i+1, j]
                c = G[i-1, j]

            # Diagonal 135
            elif (112.5 <= angle[i, j] < 157.5) or (-67.5 <= angle[i, j] < -22.5):

                b = G[i+1, j-1]
                c = G[i-1, j+1]

            # Non-max Suppression
            if (G[i, j] >= b) and (G[i, j] >= c):

                non_max[i, j] = G[i, j]

            else:

                non_max[i, j] = 0

    cv.imwrite("data/manual_canny_non_max.png", non_max)

    # Double threshold

    highThreshold = 30
    lowThreshold = 10

    out = np.zeros((rows, cols), dtype=np.uint8)

    strong_i, strong_j = np.where(non_max >= highThreshold)
    zeros_i, zeros_j = np.where(non_max < lowThreshold)

    weak_i, weak_j = np.where((non_max <= highThreshold) & (non_max >= lowThreshold))

    # Hysteresis

    out[strong_i, strong_j] = 255
    out[zeros_i, zeros_j] = 0
    out[weak_i, weak_j] = 128

    for i in range(1, rows-1):

        for j in range(1, cols-1):

            if (out[i, j] == 128):

                if 255 in [out[i+1, j-1], out[i+1, j], out[i+1, j+1], out[i, j-1], out[i, j+1], out[i-1, j-1], out[i-1, j], out[i-1, j+1]]:

                    out[i, j] = 255

                else:

                    out[i, j] = 0

    print("Done")

    cv.imshow("Manual Canny", out)
    cv.waitKey(0)
    cv.imwrite("data/manual_canny.png", G)

    cv.destroyAllWindows()

    return


if __name__ == "__main__":

    main()
2
3
4
5
6
7
8
9
10
11
12
13
14
15
16
17
18
19
20
21
22
23
24
25
26
27
28
29
30
31
32
33
34
35
36
37
38
39
40
41
42
43
44
45
46
47
48
49
50
51
52
53
54
55
56
57
58
59
60
61
62
63
64
65
66
67
68
69
70
71
72
73
74
75
76
77
78
79
80
81
82
83
84
85
86
87
88
89
90
91
92
93
94
95
96
97
98
99
100
101
102
103
104
105
106
107
108
109
110
111
112
113
114
115
116
117
118
119
120
121
122
123
124
125
126
127
128
129
130
131
132
133
134
135
136
137
138
139
140
141
142
143
144
145
146
147
148
149
150
151
152
153
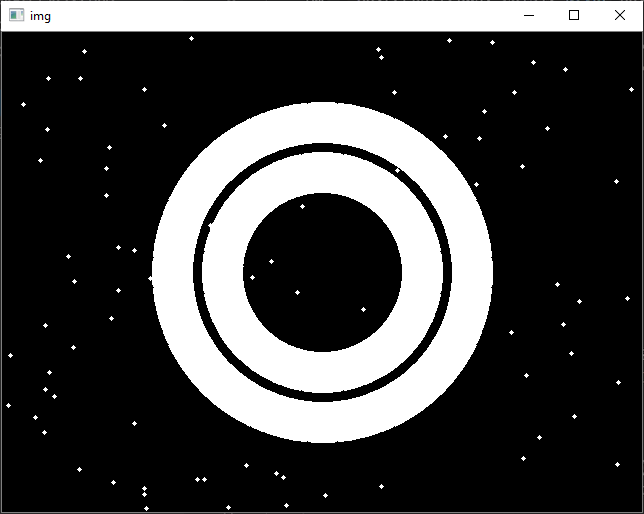
# Morphological Transforms
# Erode
import cv2 as cv
import numpy as np
import random

def main():

    # Create image

    rows, cols = 480, 640
    img = np.zeros((rows, cols), dtype=np.uint8)

    # Draw circles at the centre

    cv.circle(img, (320, 240), 150, (255), 40)
    cv.circle(img, (320, 240), 100, (255), 40)

    # Generate random noise

    coordinates = [(int(random.random() * cols), int(random.random() * rows)) for _ in range(100)]

    for c in coordinates:

        cv.circle(img, c, 2, (255), -1)

    cv.imshow("img", img)
    cv.waitKey(0)
    cv.imwrite("data/morph_img.png", img)

    # Erode image using different shapes

    shapes = [cv.MORPH_RECT, cv.MORPH_CROSS, cv.MORPH_ELLIPSE]
    shapes_label = ["MORPH_RECT", "MORPH_CROSS", "MORPH_ELLIPSE"]

    for i, s in enumerate(shapes):

        kernel = cv.getStructuringElement(s, (20, 20))
        print("{}: \n{}\n".format(shapes_label[i], kernel))

        eroded = cv.erode(img, kernel)

        cv.imshow("Eroded + {}".format(shapes_label[i]), eroded)
        cv.waitKey(0)
        cv.imwrite("data/eroded_{}.png".format(shapes_label[i]), eroded)

    cv.destroyAllWindows()

    return


if __name__ == "__main__":

    main()
2
3
4
5
6
7
8
9
10
11
12
13
14
15
16
17
18
19
20
21
22
23
24
25
26
27
28
29
30
31
32
33
34
35
36
37
38
39
40
41
42
43
44
45
46
47
48
49
50
51
52
TIP
The size of the kernel will affect the outcome, in this example 20 is being used, normally use 5
MORPH_RECT:
[[1 1 1 1 1 1 1 1 1 1 1 1 1 1 1 1 1 1 1 1]
 [1 1 1 1 1 1 1 1 1 1 1 1 1 1 1 1 1 1 1 1]
 [1 1 1 1 1 1 1 1 1 1 1 1 1 1 1 1 1 1 1 1]
 [1 1 1 1 1 1 1 1 1 1 1 1 1 1 1 1 1 1 1 1]
 [1 1 1 1 1 1 1 1 1 1 1 1 1 1 1 1 1 1 1 1]
 [1 1 1 1 1 1 1 1 1 1 1 1 1 1 1 1 1 1 1 1]
 [1 1 1 1 1 1 1 1 1 1 1 1 1 1 1 1 1 1 1 1]
 [1 1 1 1 1 1 1 1 1 1 1 1 1 1 1 1 1 1 1 1]
 [1 1 1 1 1 1 1 1 1 1 1 1 1 1 1 1 1 1 1 1]
 [1 1 1 1 1 1 1 1 1 1 1 1 1 1 1 1 1 1 1 1]
 [1 1 1 1 1 1 1 1 1 1 1 1 1 1 1 1 1 1 1 1]
 [1 1 1 1 1 1 1 1 1 1 1 1 1 1 1 1 1 1 1 1]
 [1 1 1 1 1 1 1 1 1 1 1 1 1 1 1 1 1 1 1 1]
 [1 1 1 1 1 1 1 1 1 1 1 1 1 1 1 1 1 1 1 1]
 [1 1 1 1 1 1 1 1 1 1 1 1 1 1 1 1 1 1 1 1]
 [1 1 1 1 1 1 1 1 1 1 1 1 1 1 1 1 1 1 1 1]
 [1 1 1 1 1 1 1 1 1 1 1 1 1 1 1 1 1 1 1 1]
 [1 1 1 1 1 1 1 1 1 1 1 1 1 1 1 1 1 1 1 1]
 [1 1 1 1 1 1 1 1 1 1 1 1 1 1 1 1 1 1 1 1]
 [1 1 1 1 1 1 1 1 1 1 1 1 1 1 1 1 1 1 1 1]]

MORPH_CROSS:
[[0 0 0 0 0 0 0 0 0 0 1 0 0 0 0 0 0 0 0 0]
 [0 0 0 0 0 0 0 0 0 0 1 0 0 0 0 0 0 0 0 0]
 [0 0 0 0 0 0 0 0 0 0 1 0 0 0 0 0 0 0 0 0]
 [0 0 0 0 0 0 0 0 0 0 1 0 0 0 0 0 0 0 0 0]
 [0 0 0 0 0 0 0 0 0 0 1 0 0 0 0 0 0 0 0 0]
 [0 0 0 0 0 0 0 0 0 0 1 0 0 0 0 0 0 0 0 0]
 [0 0 0 0 0 0 0 0 0 0 1 0 0 0 0 0 0 0 0 0]
 [0 0 0 0 0 0 0 0 0 0 1 0 0 0 0 0 0 0 0 0]
 [0 0 0 0 0 0 0 0 0 0 1 0 0 0 0 0 0 0 0 0]
 [0 0 0 0 0 0 0 0 0 0 1 0 0 0 0 0 0 0 0 0]
 [1 1 1 1 1 1 1 1 1 1 1 1 1 1 1 1 1 1 1 1]
 [0 0 0 0 0 0 0 0 0 0 1 0 0 0 0 0 0 0 0 0]
 [0 0 0 0 0 0 0 0 0 0 1 0 0 0 0 0 0 0 0 0]
 [0 0 0 0 0 0 0 0 0 0 1 0 0 0 0 0 0 0 0 0]
 [0 0 0 0 0 0 0 0 0 0 1 0 0 0 0 0 0 0 0 0]
 [0 0 0 0 0 0 0 0 0 0 1 0 0 0 0 0 0 0 0 0]
 [0 0 0 0 0 0 0 0 0 0 1 0 0 0 0 0 0 0 0 0]
 [0 0 0 0 0 0 0 0 0 0 1 0 0 0 0 0 0 0 0 0]
 [0 0 0 0 0 0 0 0 0 0 1 0 0 0 0 0 0 0 0 0]
 [0 0 0 0 0 0 0 0 0 0 1 0 0 0 0 0 0 0 0 0]]

MORPH_ELLIPSE:
[[0 0 0 0 0 0 0 0 0 0 1 0 0 0 0 0 0 0 0 0]
 [0 0 0 0 0 0 1 1 1 1 1 1 1 1 1 0 0 0 0 0]
 [0 0 0 0 1 1 1 1 1 1 1 1 1 1 1 1 1 0 0 0]
 [0 0 0 1 1 1 1 1 1 1 1 1 1 1 1 1 1 1 0 0]
 [0 0 1 1 1 1 1 1 1 1 1 1 1 1 1 1 1 1 1 0]
 [0 1 1 1 1 1 1 1 1 1 1 1 1 1 1 1 1 1 1 1]
 [0 1 1 1 1 1 1 1 1 1 1 1 1 1 1 1 1 1 1 1]
 [1 1 1 1 1 1 1 1 1 1 1 1 1 1 1 1 1 1 1 1]
 [1 1 1 1 1 1 1 1 1 1 1 1 1 1 1 1 1 1 1 1]
 [1 1 1 1 1 1 1 1 1 1 1 1 1 1 1 1 1 1 1 1]
 [1 1 1 1 1 1 1 1 1 1 1 1 1 1 1 1 1 1 1 1]
 [1 1 1 1 1 1 1 1 1 1 1 1 1 1 1 1 1 1 1 1]
 [1 1 1 1 1 1 1 1 1 1 1 1 1 1 1 1 1 1 1 1]
 [1 1 1 1 1 1 1 1 1 1 1 1 1 1 1 1 1 1 1 1]
 [0 1 1 1 1 1 1 1 1 1 1 1 1 1 1 1 1 1 1 1]
 [0 1 1 1 1 1 1 1 1 1 1 1 1 1 1 1 1 1 1 1]
 [0 0 1 1 1 1 1 1 1 1 1 1 1 1 1 1 1 1 1 0]
 [0 0 0 1 1 1 1 1 1 1 1 1 1 1 1 1 1 1 0 0]
 [0 0 0 0 1 1 1 1 1 1 1 1 1 1 1 1 1 0 0 0]
 [0 0 0 0 0 0 1 1 1 1 1 1 1 1 1 0 0 0 0 0]]


Process finished with exit code 0
2
3
4
5
6
7
8
9
10
11
12
13
14
15
16
17
18
19
20
21
22
23
24
25
26
27
28
29
30
31
32
33
34
35
36
37
38
39
40
41
42
43
44
45
46
47
48
49
50
51
52
53
54
55
56
57
58
59
60
61
62
63
64
65
66
67
68


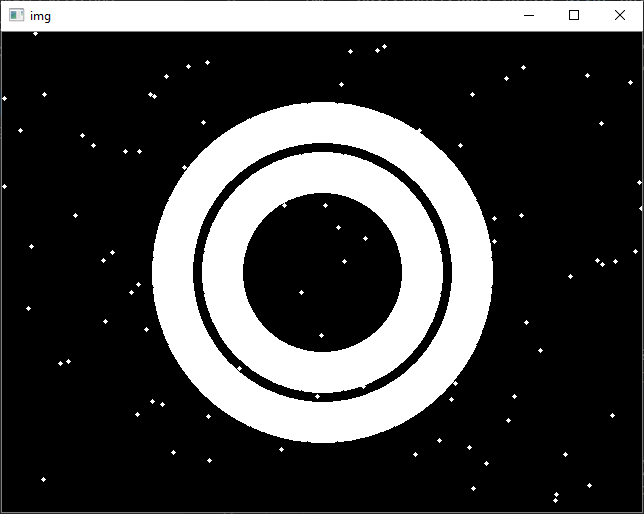
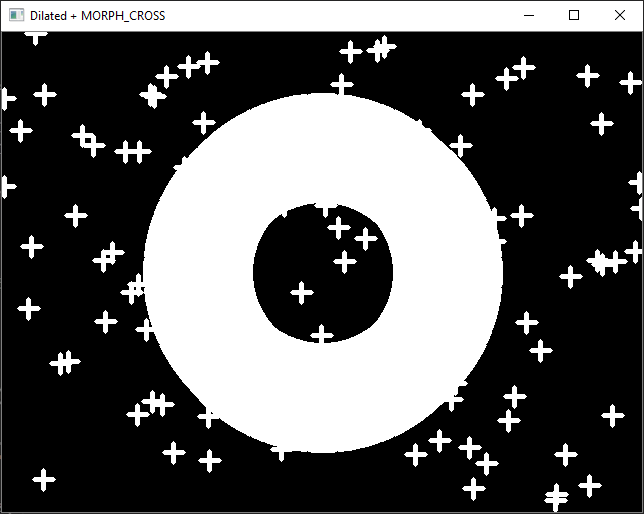
# Dilate
import cv2 as cv
import numpy as np
import random


def main():

    # Create image

    rows, cols = 480, 640
    img = np.zeros((rows, cols), dtype=np.uint8)

    # Draw circles at the centre

    cv.circle(img, (320, 240), 150, (255), 40)
    cv.circle(img, (320, 240), 100, (255), 40)

    # Generate random noise

    coordinates = [(int(random.random() * cols), int(random.random() * rows)) for _ in range(100)]

    for c in coordinates:

        cv.circle(img, c, 2, (255), -1)

    cv.imshow("img", img)
    cv.waitKey(0)
    cv.imwrite("data/morph_img.png", img)

    # Dilate image using different shapes

    shapes = [cv.MORPH_RECT, cv.MORPH_CROSS, cv.MORPH_ELLIPSE]
    shapes_label = ["MORPH_RECT", "MORPH_CROSS", "MORPH_ELLIPSE"]

    for i, s in enumerate(shapes):

        kernel = cv.getStructuringElement(s, (20, 20))
        print("{}: \n{}\n".format(shapes_label[i], kernel))

        eroded = cv.dilate(img, kernel)

        cv.imshow("Dilated + {}".format(shapes_label[i]), eroded)
        cv.waitKey(0)
        cv.imwrite("data/dilated_{}.png".format(shapes_label[i]), eroded)

    cv.destroyAllWindows()

    return


if __name__ == "__main__":
    main()
2
3
4
5
6
7
8
9
10
11
12
13
14
15
16
17
18
19
20
21
22
23
24
25
26
27
28
29
30
31
32
33
34
35
36
37
38
39
40
41
42
43
44
45
46
47
48
49
50
51
52
MORPH_RECT:
[[1 1 1 1 1 1 1 1 1 1 1 1 1 1 1 1 1 1 1 1]
 [1 1 1 1 1 1 1 1 1 1 1 1 1 1 1 1 1 1 1 1]
 [1 1 1 1 1 1 1 1 1 1 1 1 1 1 1 1 1 1 1 1]
 [1 1 1 1 1 1 1 1 1 1 1 1 1 1 1 1 1 1 1 1]
 [1 1 1 1 1 1 1 1 1 1 1 1 1 1 1 1 1 1 1 1]
 [1 1 1 1 1 1 1 1 1 1 1 1 1 1 1 1 1 1 1 1]
 [1 1 1 1 1 1 1 1 1 1 1 1 1 1 1 1 1 1 1 1]
 [1 1 1 1 1 1 1 1 1 1 1 1 1 1 1 1 1 1 1 1]
 [1 1 1 1 1 1 1 1 1 1 1 1 1 1 1 1 1 1 1 1]
 [1 1 1 1 1 1 1 1 1 1 1 1 1 1 1 1 1 1 1 1]
 [1 1 1 1 1 1 1 1 1 1 1 1 1 1 1 1 1 1 1 1]
 [1 1 1 1 1 1 1 1 1 1 1 1 1 1 1 1 1 1 1 1]
 [1 1 1 1 1 1 1 1 1 1 1 1 1 1 1 1 1 1 1 1]
 [1 1 1 1 1 1 1 1 1 1 1 1 1 1 1 1 1 1 1 1]
 [1 1 1 1 1 1 1 1 1 1 1 1 1 1 1 1 1 1 1 1]
 [1 1 1 1 1 1 1 1 1 1 1 1 1 1 1 1 1 1 1 1]
 [1 1 1 1 1 1 1 1 1 1 1 1 1 1 1 1 1 1 1 1]
 [1 1 1 1 1 1 1 1 1 1 1 1 1 1 1 1 1 1 1 1]
 [1 1 1 1 1 1 1 1 1 1 1 1 1 1 1 1 1 1 1 1]
 [1 1 1 1 1 1 1 1 1 1 1 1 1 1 1 1 1 1 1 1]]

MORPH_CROSS:
[[0 0 0 0 0 0 0 0 0 0 1 0 0 0 0 0 0 0 0 0]
 [0 0 0 0 0 0 0 0 0 0 1 0 0 0 0 0 0 0 0 0]
 [0 0 0 0 0 0 0 0 0 0 1 0 0 0 0 0 0 0 0 0]
 [0 0 0 0 0 0 0 0 0 0 1 0 0 0 0 0 0 0 0 0]
 [0 0 0 0 0 0 0 0 0 0 1 0 0 0 0 0 0 0 0 0]
 [0 0 0 0 0 0 0 0 0 0 1 0 0 0 0 0 0 0 0 0]
 [0 0 0 0 0 0 0 0 0 0 1 0 0 0 0 0 0 0 0 0]
 [0 0 0 0 0 0 0 0 0 0 1 0 0 0 0 0 0 0 0 0]
 [0 0 0 0 0 0 0 0 0 0 1 0 0 0 0 0 0 0 0 0]
 [0 0 0 0 0 0 0 0 0 0 1 0 0 0 0 0 0 0 0 0]
 [1 1 1 1 1 1 1 1 1 1 1 1 1 1 1 1 1 1 1 1]
 [0 0 0 0 0 0 0 0 0 0 1 0 0 0 0 0 0 0 0 0]
 [0 0 0 0 0 0 0 0 0 0 1 0 0 0 0 0 0 0 0 0]
 [0 0 0 0 0 0 0 0 0 0 1 0 0 0 0 0 0 0 0 0]
 [0 0 0 0 0 0 0 0 0 0 1 0 0 0 0 0 0 0 0 0]
 [0 0 0 0 0 0 0 0 0 0 1 0 0 0 0 0 0 0 0 0]
 [0 0 0 0 0 0 0 0 0 0 1 0 0 0 0 0 0 0 0 0]
 [0 0 0 0 0 0 0 0 0 0 1 0 0 0 0 0 0 0 0 0]
 [0 0 0 0 0 0 0 0 0 0 1 0 0 0 0 0 0 0 0 0]
 [0 0 0 0 0 0 0 0 0 0 1 0 0 0 0 0 0 0 0 0]]

MORPH_ELLIPSE:
[[0 0 0 0 0 0 0 0 0 0 1 0 0 0 0 0 0 0 0 0]
 [0 0 0 0 0 0 1 1 1 1 1 1 1 1 1 0 0 0 0 0]
 [0 0 0 0 1 1 1 1 1 1 1 1 1 1 1 1 1 0 0 0]
 [0 0 0 1 1 1 1 1 1 1 1 1 1 1 1 1 1 1 0 0]
 [0 0 1 1 1 1 1 1 1 1 1 1 1 1 1 1 1 1 1 0]
 [0 1 1 1 1 1 1 1 1 1 1 1 1 1 1 1 1 1 1 1]
 [0 1 1 1 1 1 1 1 1 1 1 1 1 1 1 1 1 1 1 1]
 [1 1 1 1 1 1 1 1 1 1 1 1 1 1 1 1 1 1 1 1]
 [1 1 1 1 1 1 1 1 1 1 1 1 1 1 1 1 1 1 1 1]
 [1 1 1 1 1 1 1 1 1 1 1 1 1 1 1 1 1 1 1 1]
 [1 1 1 1 1 1 1 1 1 1 1 1 1 1 1 1 1 1 1 1]
 [1 1 1 1 1 1 1 1 1 1 1 1 1 1 1 1 1 1 1 1]
 [1 1 1 1 1 1 1 1 1 1 1 1 1 1 1 1 1 1 1 1]
 [1 1 1 1 1 1 1 1 1 1 1 1 1 1 1 1 1 1 1 1]
 [0 1 1 1 1 1 1 1 1 1 1 1 1 1 1 1 1 1 1 1]
 [0 1 1 1 1 1 1 1 1 1 1 1 1 1 1 1 1 1 1 1]
 [0 0 1 1 1 1 1 1 1 1 1 1 1 1 1 1 1 1 1 0]
 [0 0 0 1 1 1 1 1 1 1 1 1 1 1 1 1 1 1 0 0]
 [0 0 0 0 1 1 1 1 1 1 1 1 1 1 1 1 1 0 0 0]
 [0 0 0 0 0 0 1 1 1 1 1 1 1 1 1 0 0 0 0 0]]


Process finished with exit code 0
2
3
4
5
6
7
8
9
10
11
12
13
14
15
16
17
18
19
20
21
22
23
24
25
26
27
28
29
30
31
32
33
34
35
36
37
38
39
40
41
42
43
44
45
46
47
48
49
50
51
52
53
54
55
56
57
58
59
60
61
62
63
64
65
66
67
68


# Opening
# Closing
# Gray Scale Erode
# Gray Scale Dilation
# Gray Scale Opening
# Gray Scale Closing
# Shape Detection
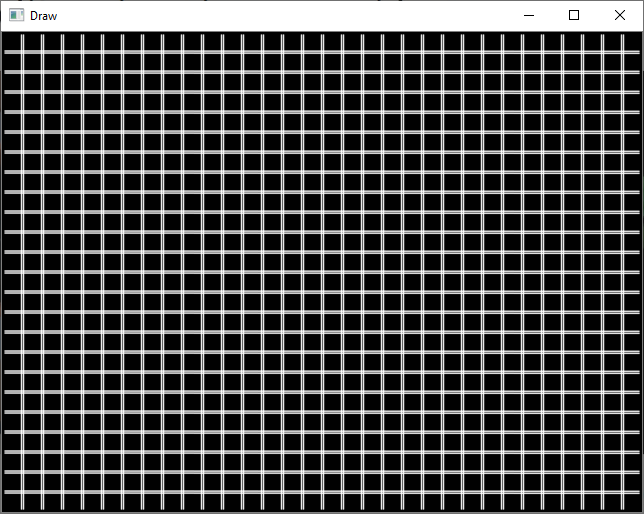
# Line.py
import cv2 as cv
import numpy as np
def main():
img = cv.imread("./data/line.png", cv.IMREAD_GRAYSCALE)
if img is None:
print("ERROR::CV::Could not read image.")
return -1
img = cv.resize(img, (640, 480))
cv.imshow("Image", img)
cv.waitKey(0)
edges = cv.Canny(img, 127, 255)
lines = cv.HoughLines(edges, 1, np.pi / 180, 225, None, 0, 0)
draw = np.ones((480, 640), dtype=np.uint8)
if lines is not None:
for i in range(0, len(lines)):
rho = lines[i][0][0]
theta = lines[i][0][1]
a = np.cos(theta)
b = np.sin(theta)
x0 = a * rho
y0 = b * rho
p1 = (int(x0 + 1000*(-b)), int(y0 + 1000*(a)))
p2 = (int(x0 - 1000*(-b)), int(y0 - 1000*(a)))
cv.line(draw, p1, p2, [255], 1, cv.LINE_AA)
cv.imshow("Draw", draw)
cv.waitKey(0)
cv.imwrite("./houghlines.png", draw)
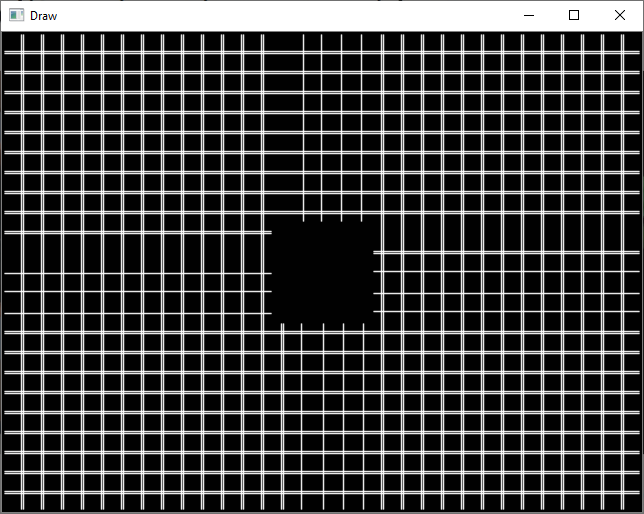
lines = cv.HoughLinesP(edges, 1, np.pi/180, 225, None, 50, 3)
draw = np.ones((480, 640), dtype=np.uint8)
if lines is not None:
for i in range(0, len(lines)):
l = lines[i][0]
p1 = (l[0], l[1])
p2 = (l[2], l[3])
cv.line(draw, p1, p2, [255], 1, cv.LINE_AA)
cv.imshow("Draw", draw)
cv.waitKey(0)
cv.imwrite("./houghlines_p.png", draw)
cv.destroyAllWindows()
return
if __name__ == "__main__":
main()
2
3
4
5
6
7
8
9
10
11
12
13
14
15
16
17
18
19
20
21
22
23
24
25
26
27
28
29
30
31
32
33
34
35
36
37
38
39
40
41
42
43
44
45
46
47
48
49
50
51
52
53
54
55
56
57
58
59
60
61
62
63
64
65
66
67
68
69
70

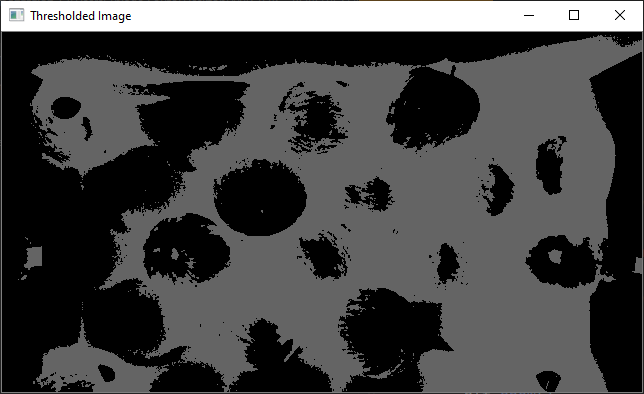
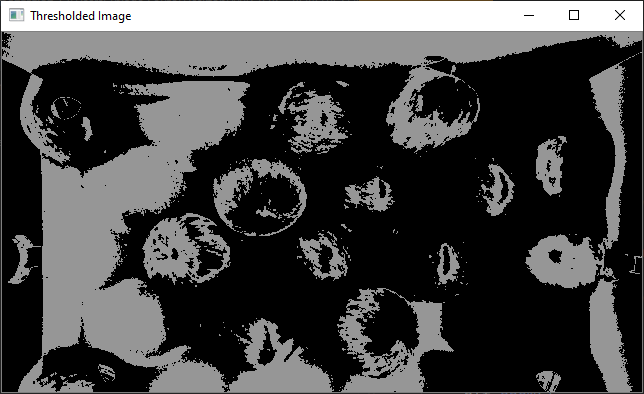
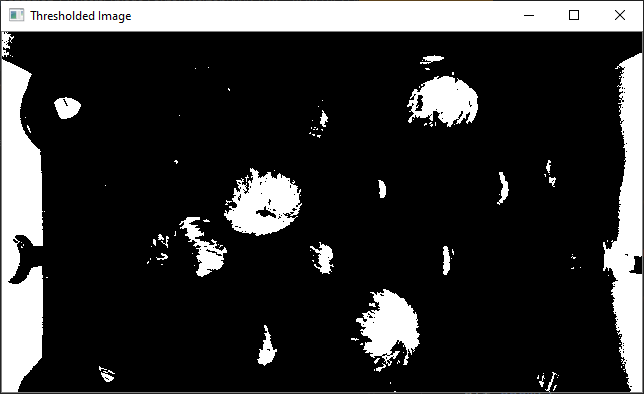
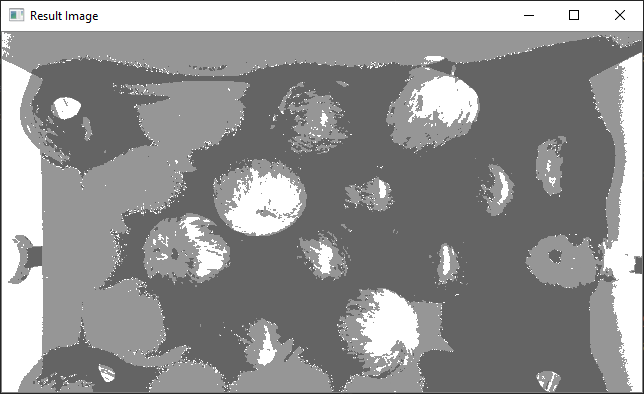
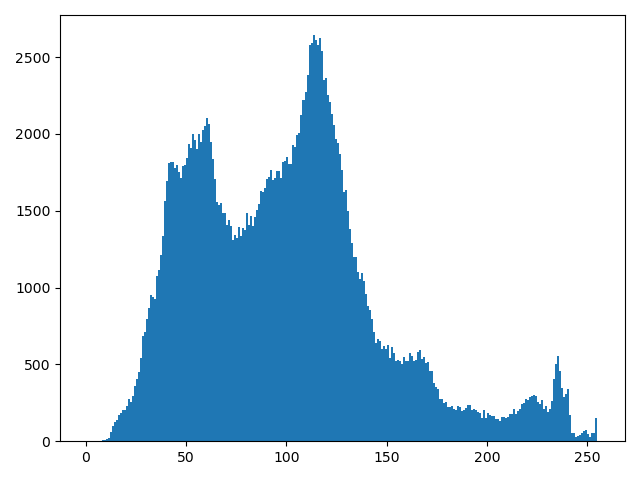
# Segmentation
Threshold.py:
import cv2 as cv
import numpy as np
import matplotlib.pyplot as plt

def main():

    # Load image

    img = cv.imread("data/apples.png")

    if img is None:
        print("ERROR::CV::Could not read image.")
        return

    # Resize image

    rows, cols, channels = img.shape

    rows = rows // 2
    cols = cols // 2

    img = cv.resize(img, (cols, rows))

    cv.imshow("img", img)
    cv.waitKey(0)

    # Convert image from BGR to grayscale

    img = cv.cvtColor(img, cv.COLOR_BGR2GRAY)

    # Generate histogram

    plt.hist(img.ravel(), 256, [0, 256])
    plt.savefig("data/threshold_histogram.png")
    plt.show()

    thresholds = [0, 100, 150, 255]

    thresholded_img = np.zeros((rows, cols), dtype=np.uint8)
    result_img = np.zeros((rows, cols), dtype=np.uint8)

    for i in range(len(thresholds) - 1):

        thresholded_img = cv.inRange(img, thresholds[i], thresholds[i+1])
        thresholded_img = np.uint8(thresholded_img / 255) * thresholds[i + 1]

        cv.imshow("Thresholded Image", thresholded_img)
        cv.waitKey(0)

        result_img = result_img + thresholded_img

    cv.imshow("Result Image", result_img)
    cv.waitKey(0)
    cv.imwrite("data/threshold_segemented_image.png", result_img)

    cv.destroyAllWindows()

    return


if __name__ == "__main__":

    main()
2
3
4
5
6
7
8
9
10
11
12
13
14
15
16
17
18
19
20
21
22
23
24
25
26
27
28
29
30
31
32
33
34
35
36
37
38
39
40
41
42
43
44
45
46
47
48
49
50
51
52
53
54
55
56
57
58
59
60
61
62
63

# K-Means (50.47 video 5)
import cv2 as cv
import numpy as np


def main():

    # Load image

    img = cv.imread("data/apples.png")

    if img is None:
        print("ERROR::CV::Could not read image.")
        return

    # Resize image

    rows, cols, channels = img.shape

    rows = rows // 2
    cols = cols // 2

    img = cv.resize(img, (cols, rows))

    cv.imshow("img", img)
    cv.waitKey(0)

    # k-means

    data = np.reshape(img, (-1, channels))
    data = np.float32(data)

    criteria = (cv.TERM_CRITERIA_EPS + cv.TERM_CRITERIA_MAX_ITER, 10, 1.0)

    for K in range(2, 14, 2):

        ret, label, center = cv.kmeans(data, K, None, criteria, 10, cv.KMEANS_RANDOM_CENTERS)

        center = np.uint8(center)

        quantized = center[label.flatten()]
        quantized = quantized.reshape((rows, cols, channels))

        cv.imshow("Quantized Image, K = {}".format(K), quantized)
        cv.waitKey(0)

        cv.imwrite("data/quantized_image_{}.png".format(K), quantized)

    cv.destroyAllWindows()

    return


if __name__ == "__main__":

    main()
2
3
4
5
6
7
8
9
10
11
12
13
14
15
16
17
18
19
20
21
22
23
24
25
26
27
28
29
30
31
32
33
34
35
36
37
38
39
40
41
42
43
44
45
46
47
48
49
50
51
52
53
54
55
| Raw | K=2 | K=4 |
|---|---|---|
 | 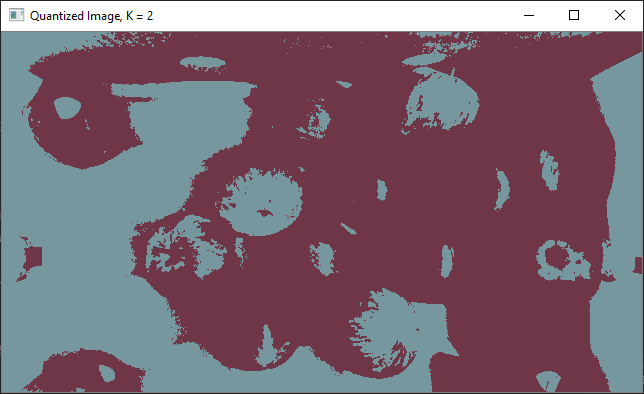 | 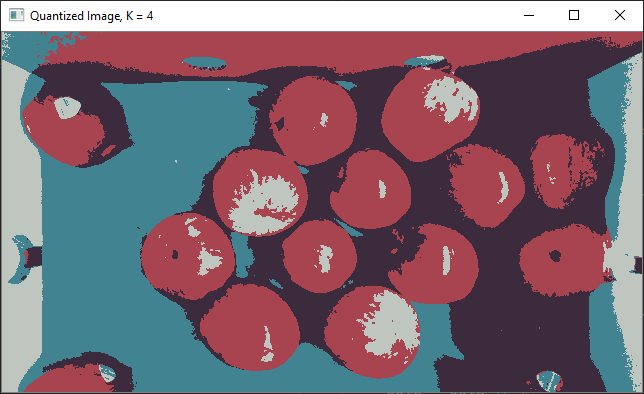 |
| K=6 | K=8 | K=10 |
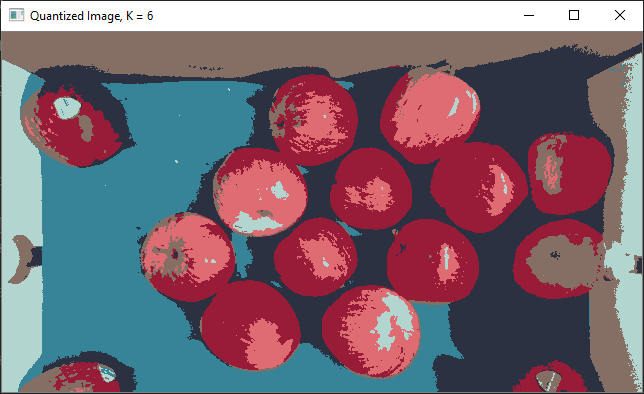 | 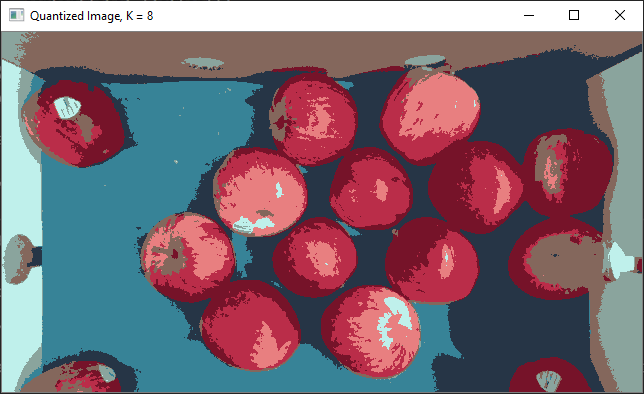 |  |
| K=12 | ||
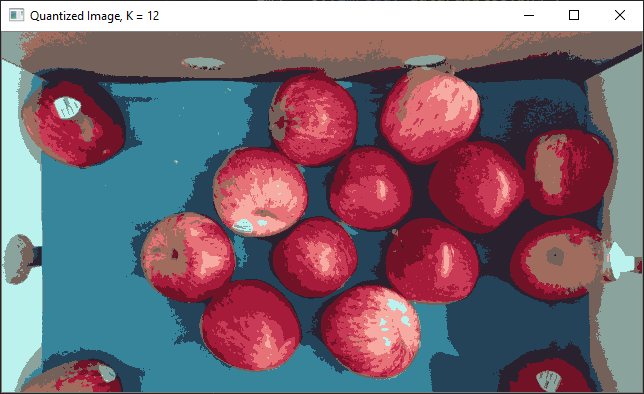 |
# Edge Based Segmentation
Look for in the video 5 before k=-means
TIP
For the assignment: histogram equalization + thresholding, regions thresholded region + in range function + erosion and dilation. histogram equalization + K-Means + Color detection + Morfological operations + Contour Detection + Find your contour centers
# RGB Colour Space
# HSV Colour Space
# YUV Conversion
TIP
black and white apply morph transforms, detect thte countours and contour center and contour areas
# Region labeling
import cv2 as cv
import numpy as np
import random

def main():

    # Create shapes

    image1 = np.zeros((480, 640, 1), np.uint8)

    coordinates = [(int(random.random() * 640), int(random.random() * 480)) for _ in range(40)]

    for c in coordinates:

        cv.circle(image1, c, 10, (255), -1)

    #  Find contorus

    contours, hierarchy = cv.findContours(image1, cv.RETR_EXTERNAL, cv.CHAIN_APPROX_SIMPLE)

    image2 = np.zeros((480, 640, 3), np.uint8)

    # Colourize each contour

    for i, c in enumerate(contours):

        colour = (random.random() * 255, random.random() * 255, random.random() * 255)

        cv.drawContours(image2, contours, i, colour, -1)

    cv.imshow("image1", image1)
    cv.waitKey(0)
    cv.imwrite("data/image_1.png", image1)

    cv.imshow("image2", image2)
    cv.waitKey(0)
    cv.imwrite("data/image_2.png", image2)

    cv.destroyAllWindows()

    return


if __name__ == "__main__":

    main()
2
3
4
5
6
7
8
9
10
11
12
13
14
15
16
17
18
19
20
21
22
23
24
25
26
27
28
29
30
31
32
33
34
35
36
37
38
39
40
41
42
43
44
45
46

