# QT
This study is based on: Qt 5 C++ GUI Development For Beginners The Fundamentals
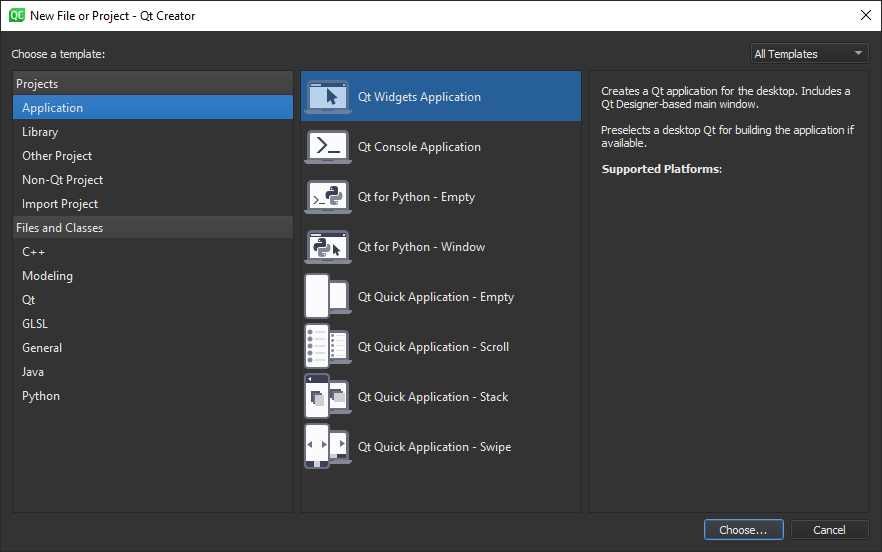
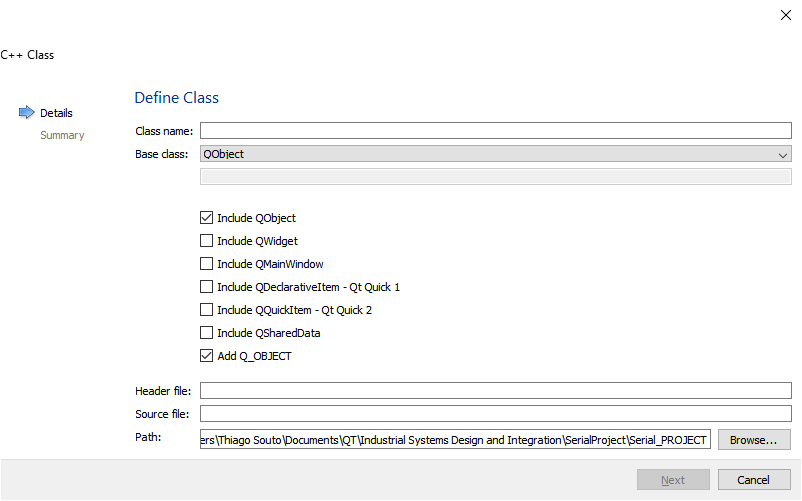
# Creating a new Project
Go New Project --> Application --> Qt Widgets Application
Choose Location and Build System(Cmake), then configure class information as below

After following the steps and choosing the kit, press the play button and compile.

We can easily build a user interface using labels, buttons etc...
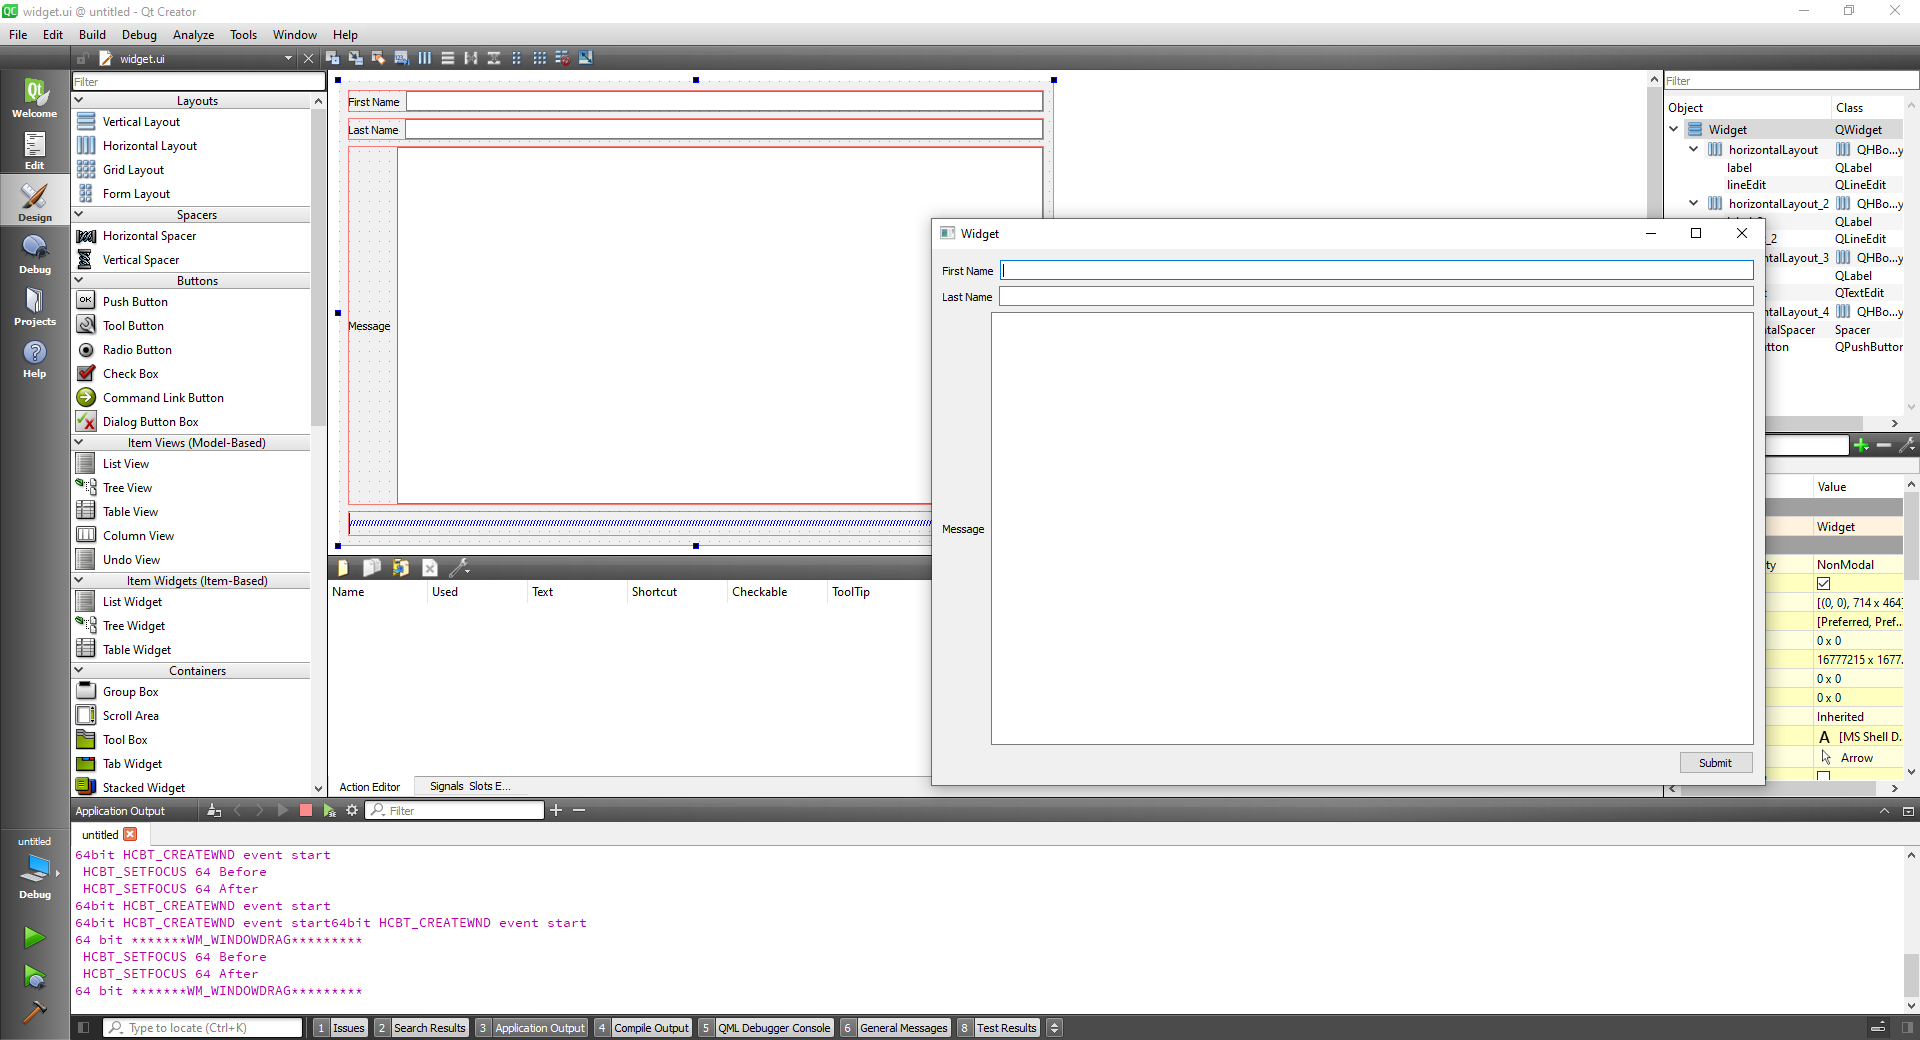
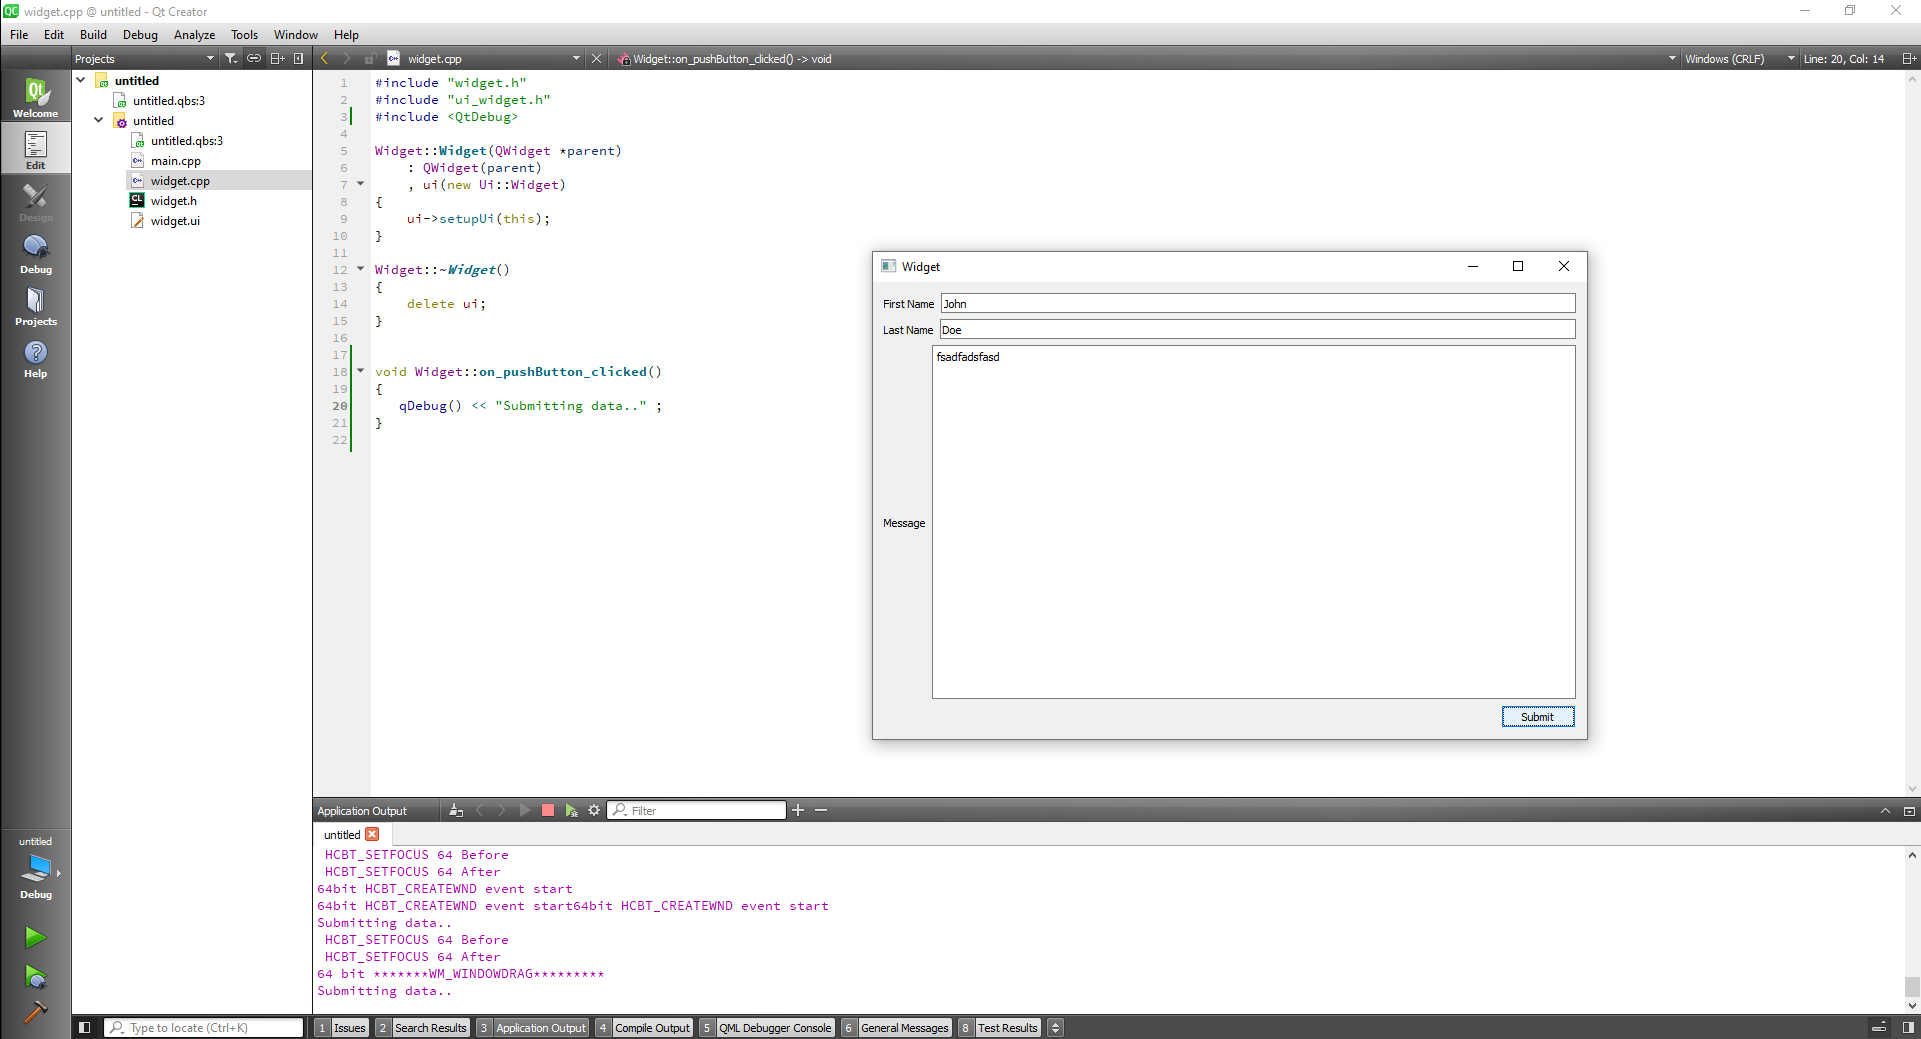
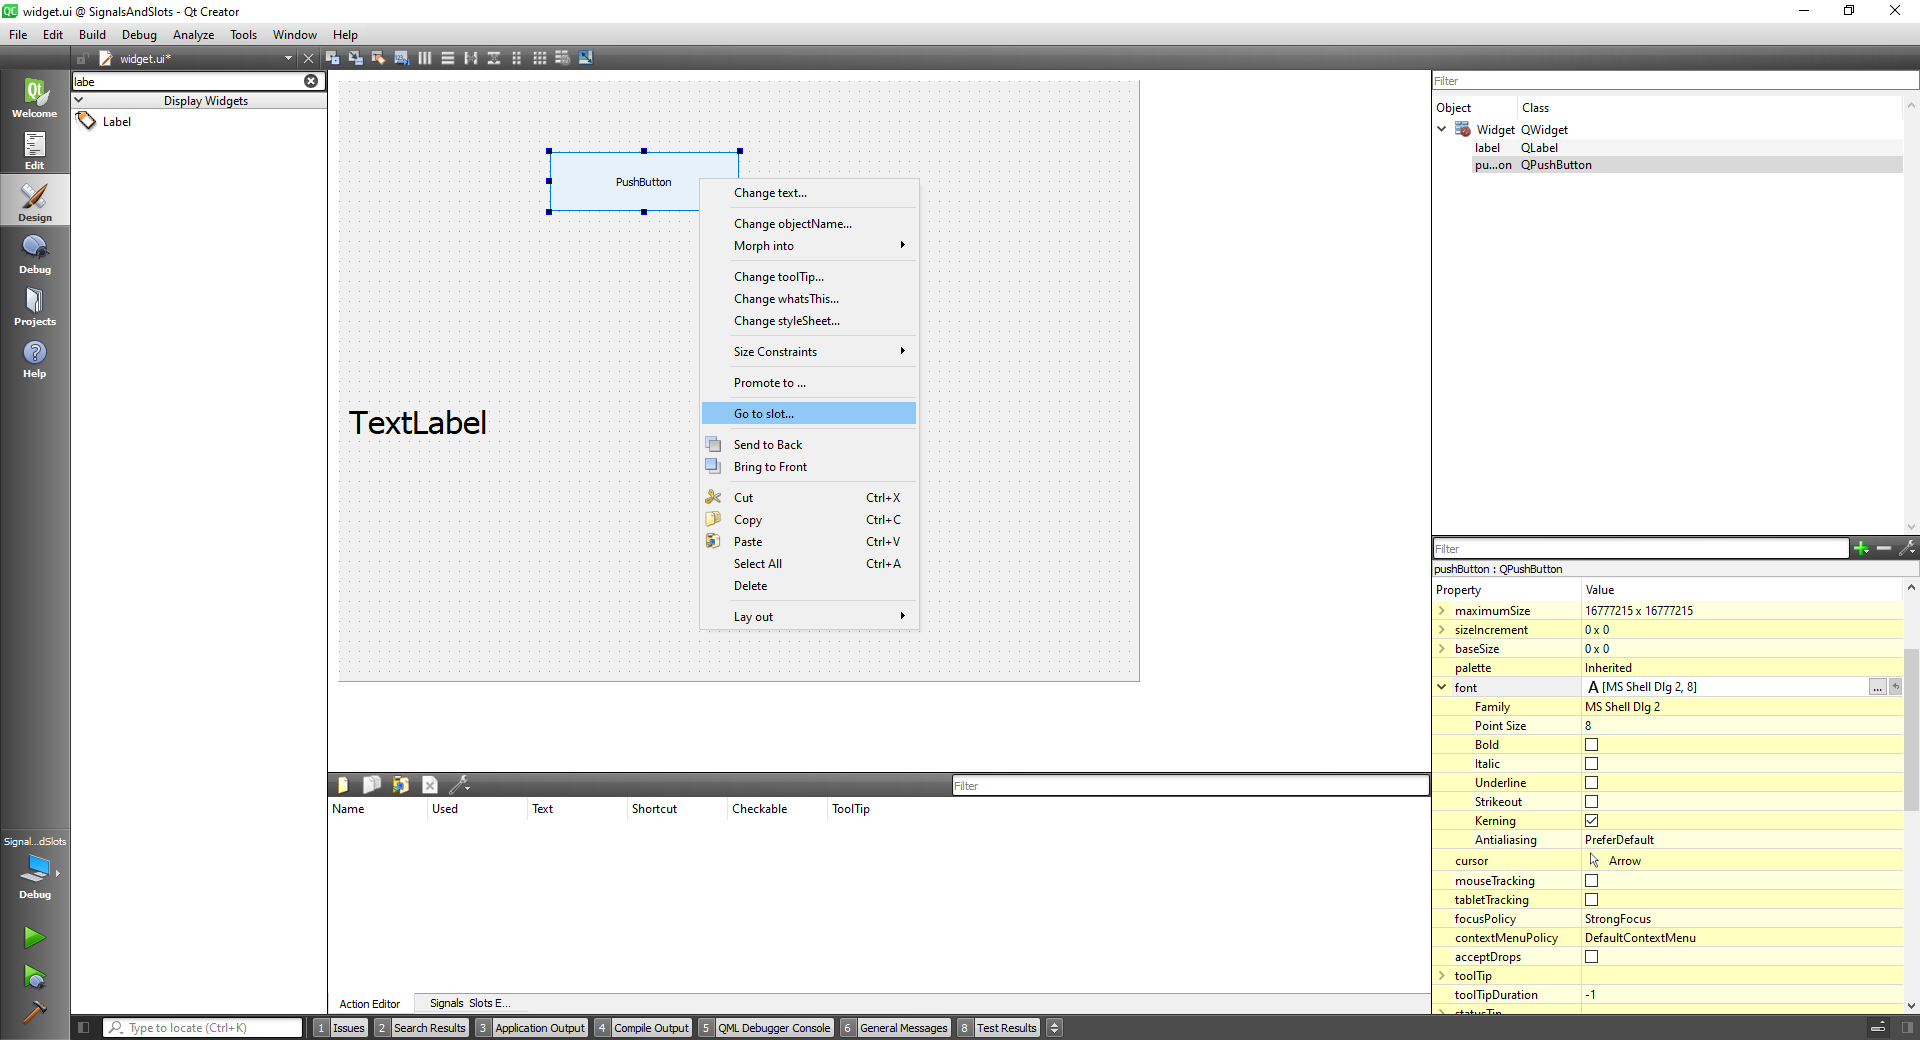
On double click on the submit button and go to slot and on click(), we can alter the widget.cpp like so:
#include "widget.h"
#include "ui_widget.h"
#include <QtDebug>

Widget::Widget(QWidget *parent)
    : QWidget(parent)
    , ui(new Ui::Widget)
{
    ui->setupUi(this);
}

Widget::~Widget()
{
    delete ui;
}


void Widget::on_pushButton_clicked()
{
   qDebug() << "Submitting data.." ;
}
2
3
4
5
6
7
8
9
10
11
12
13
14
15
16
17
18
19
20
21
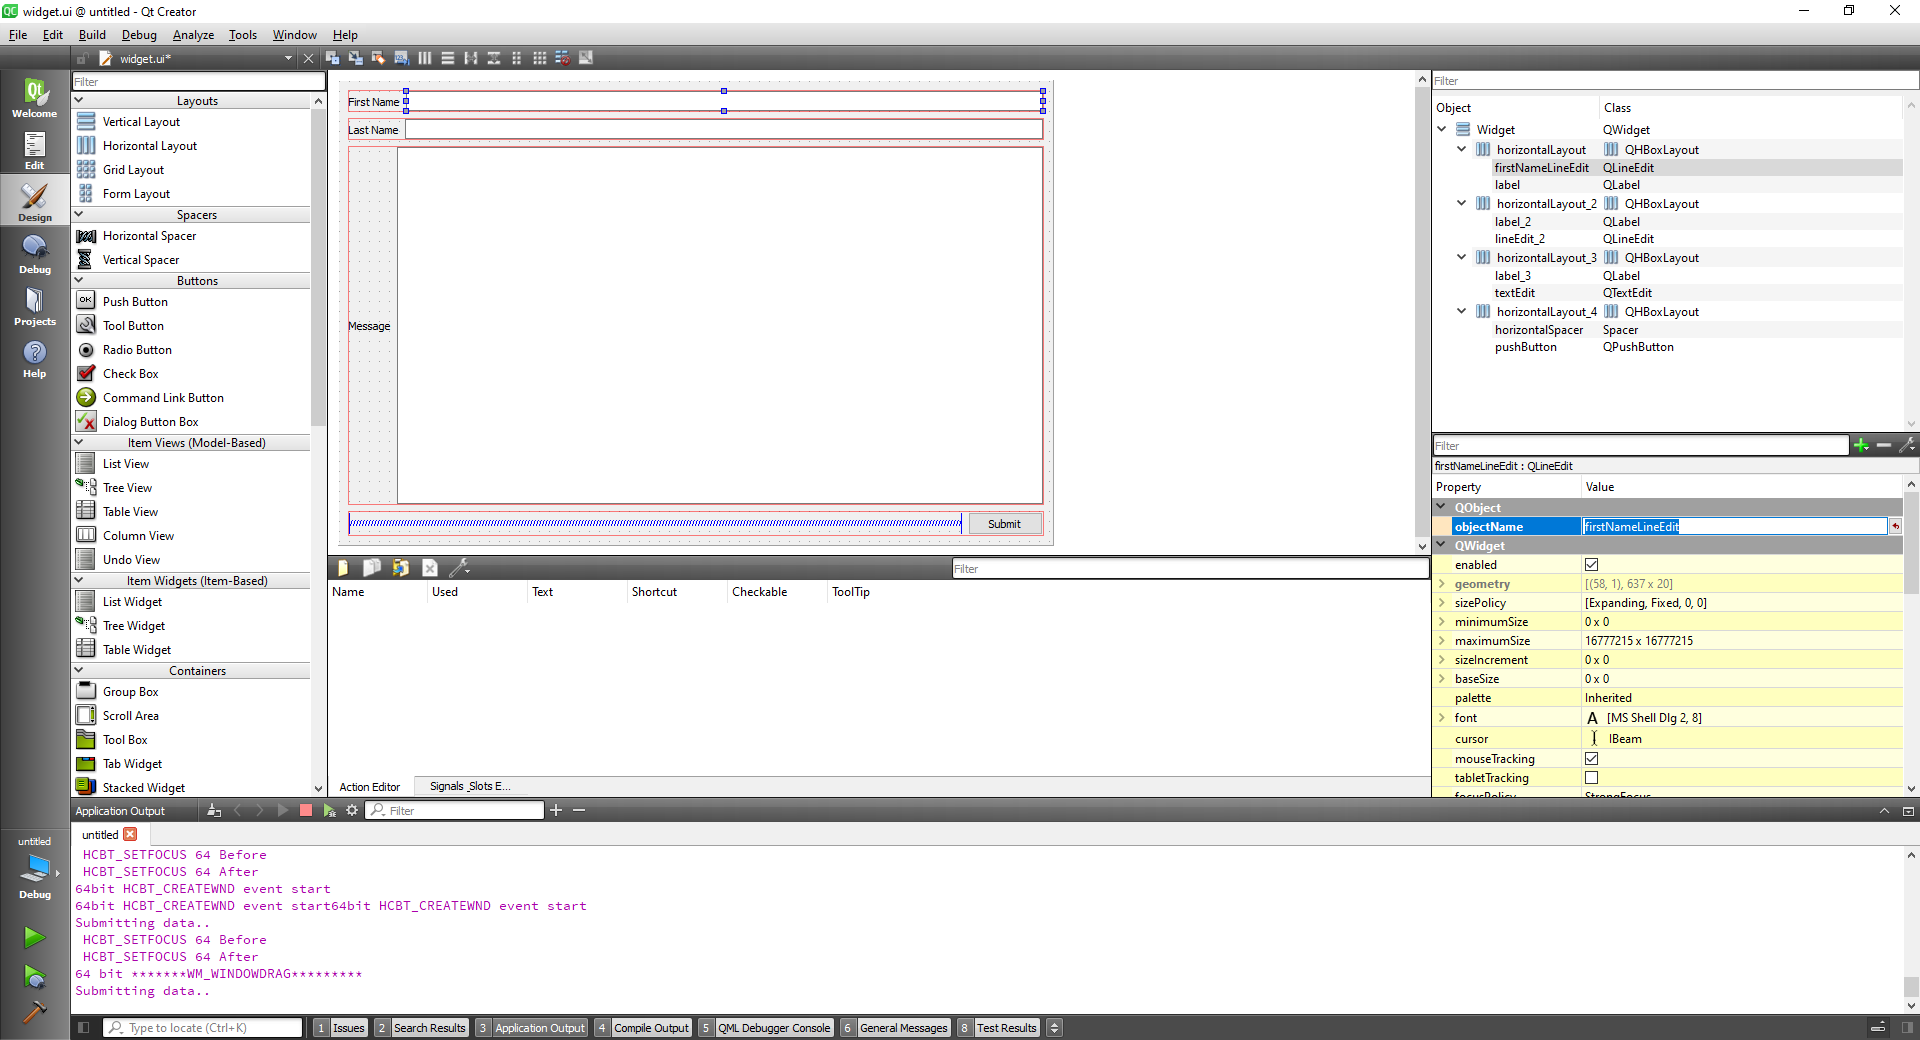
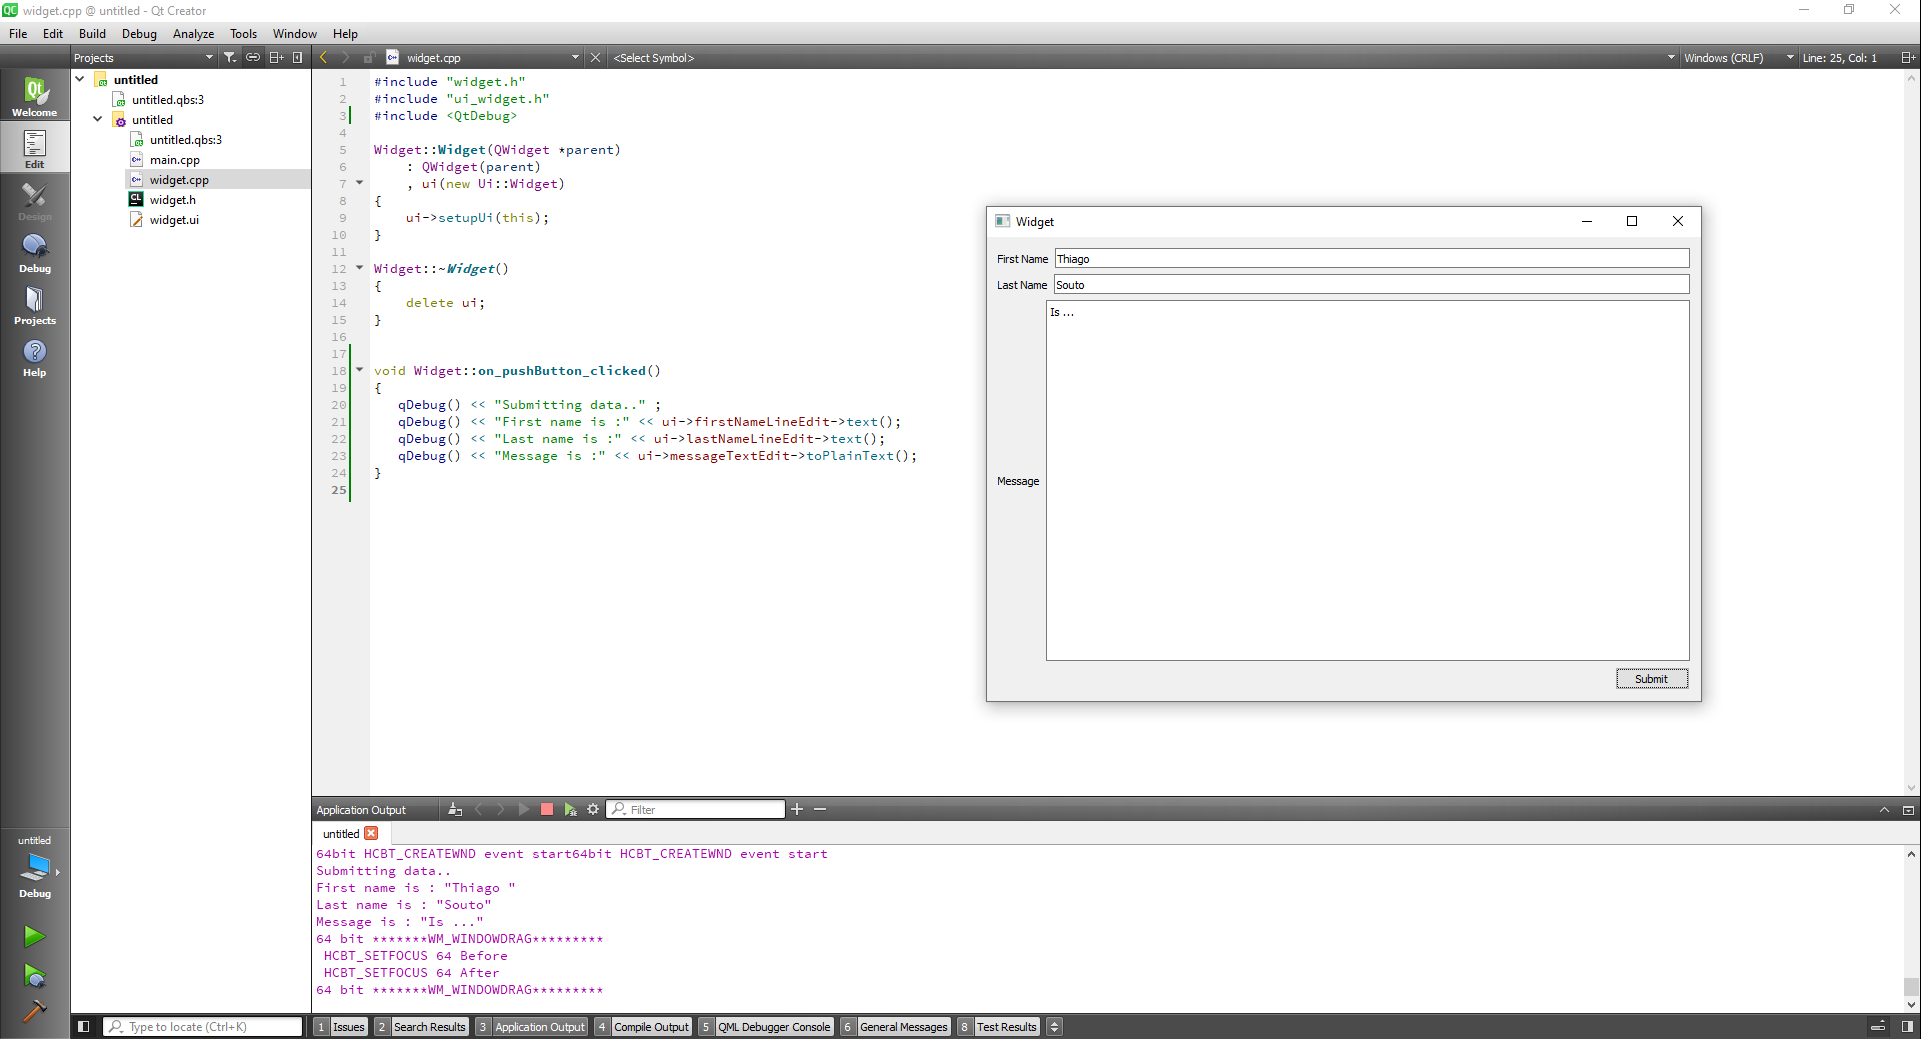
We can change the objects names to use on our code:
Adjust widget.cpp to:
#include "widget.h"
#include "ui_widget.h"
#include <QtDebug>

Widget::Widget(QWidget *parent)
    : QWidget(parent)
    , ui(new Ui::Widget)
{
    ui->setupUi(this);
}

Widget::~Widget()
{
    delete ui;
}


void Widget::on_pushButton_clicked()
{
   qDebug() << "Submitting data.." ;
   qDebug() << "First name is :" << ui->firstNameLineEdit->text();
   qDebug() << "Last name is :" << ui->lastNameLineEdit->text();
   qDebug() << "Message is :" << ui->messageTextEdit->toPlainText();
}
2
3
4
5
6
7
8
9
10
11
12
13
14
15
16
17
18
19
20
21
22
23
24
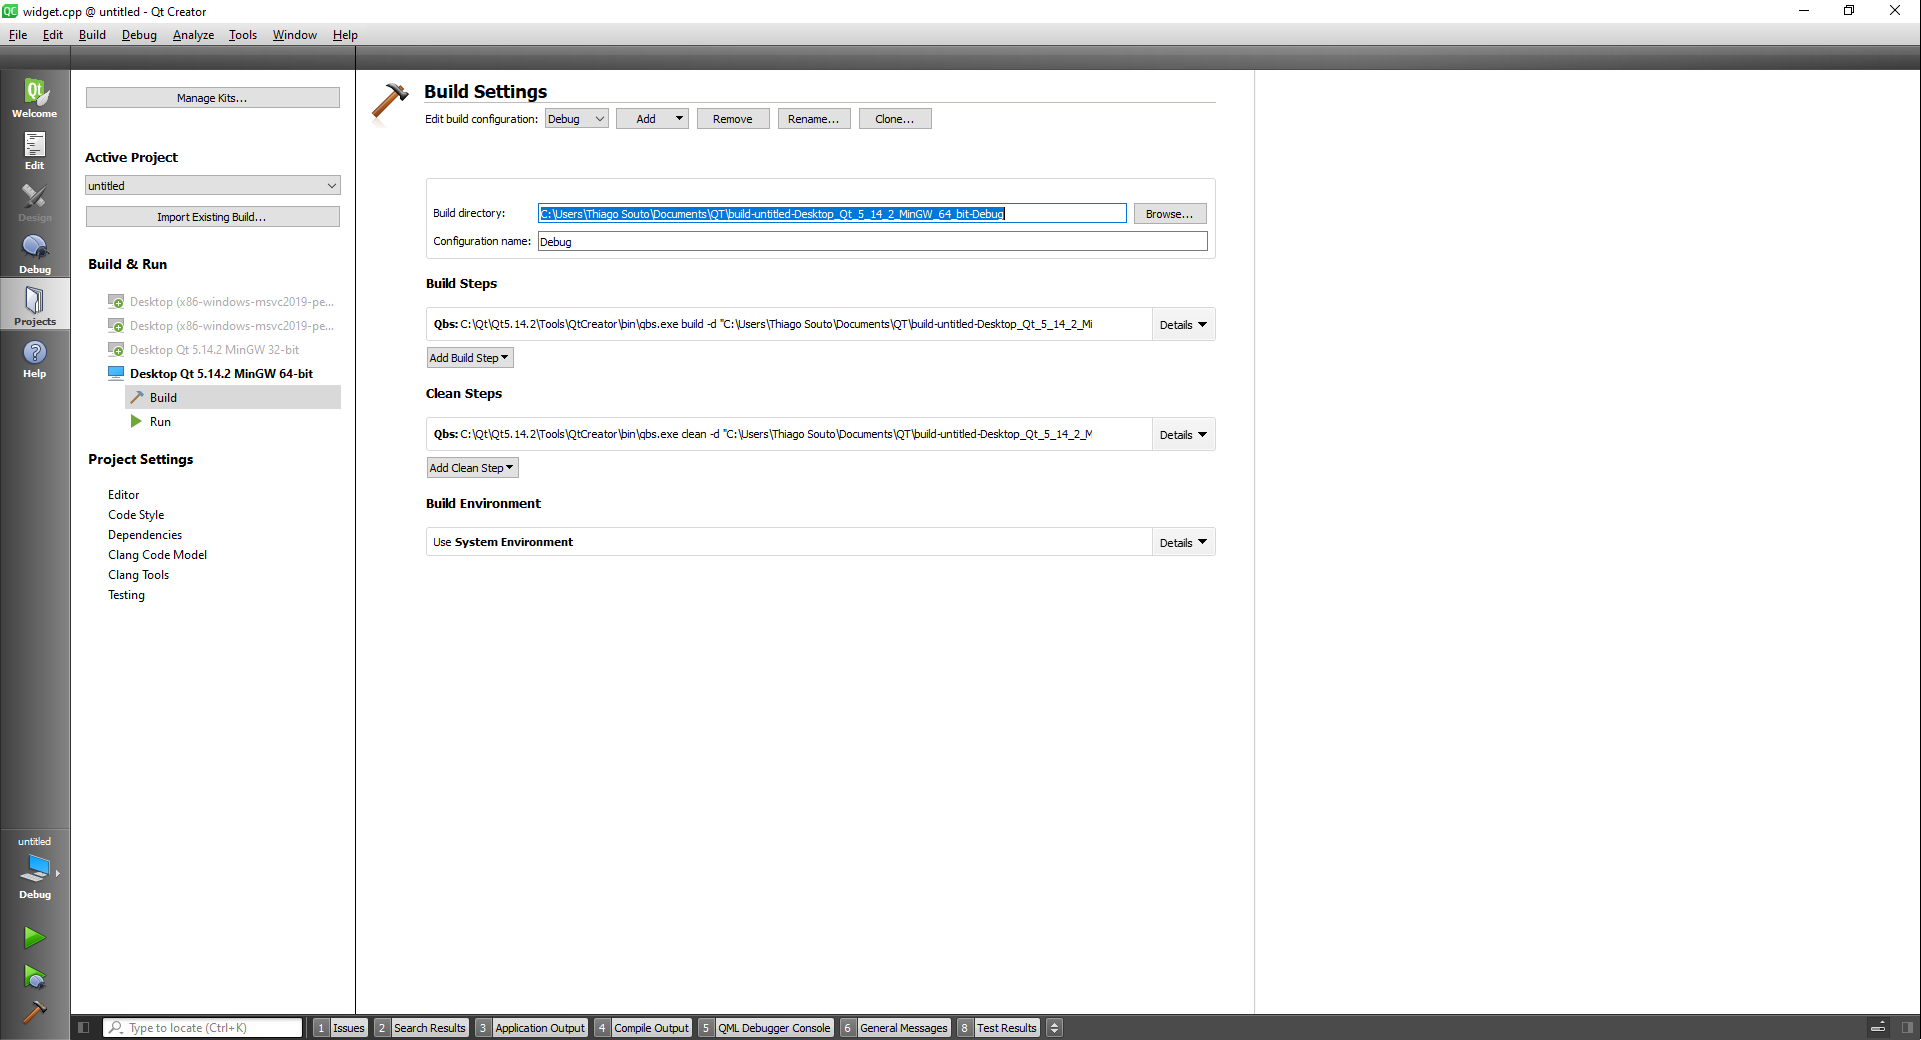
We can find the details of the build here:
Also in tools options we can find the debugger, the kits...
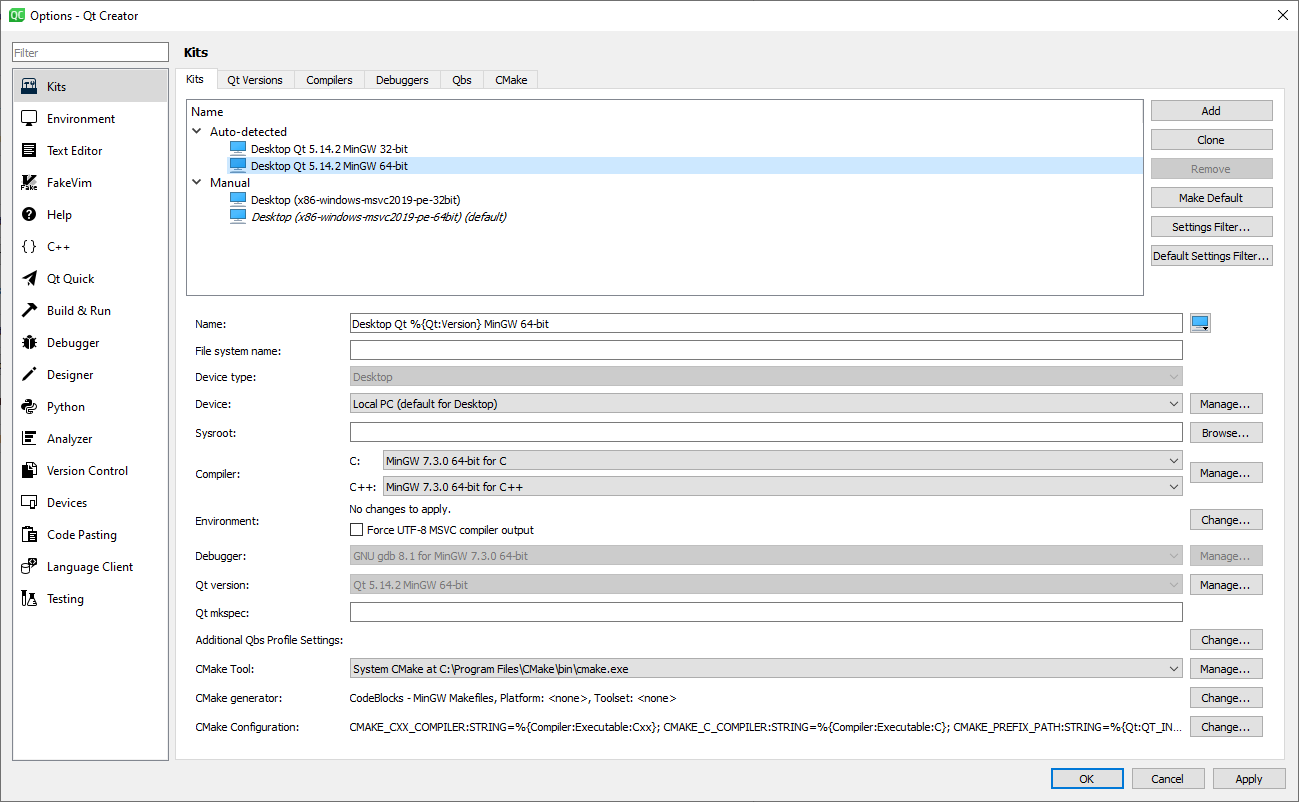
A kit is a bundle of tools that you are going to use to target a certain platform.
# C++ Review
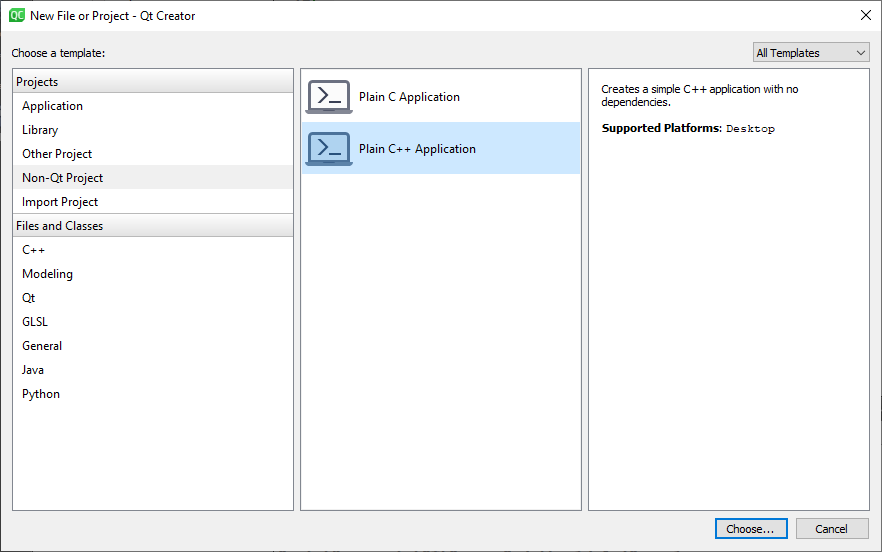
To create simple C++ project we can create a plain C++ application:
# iostream
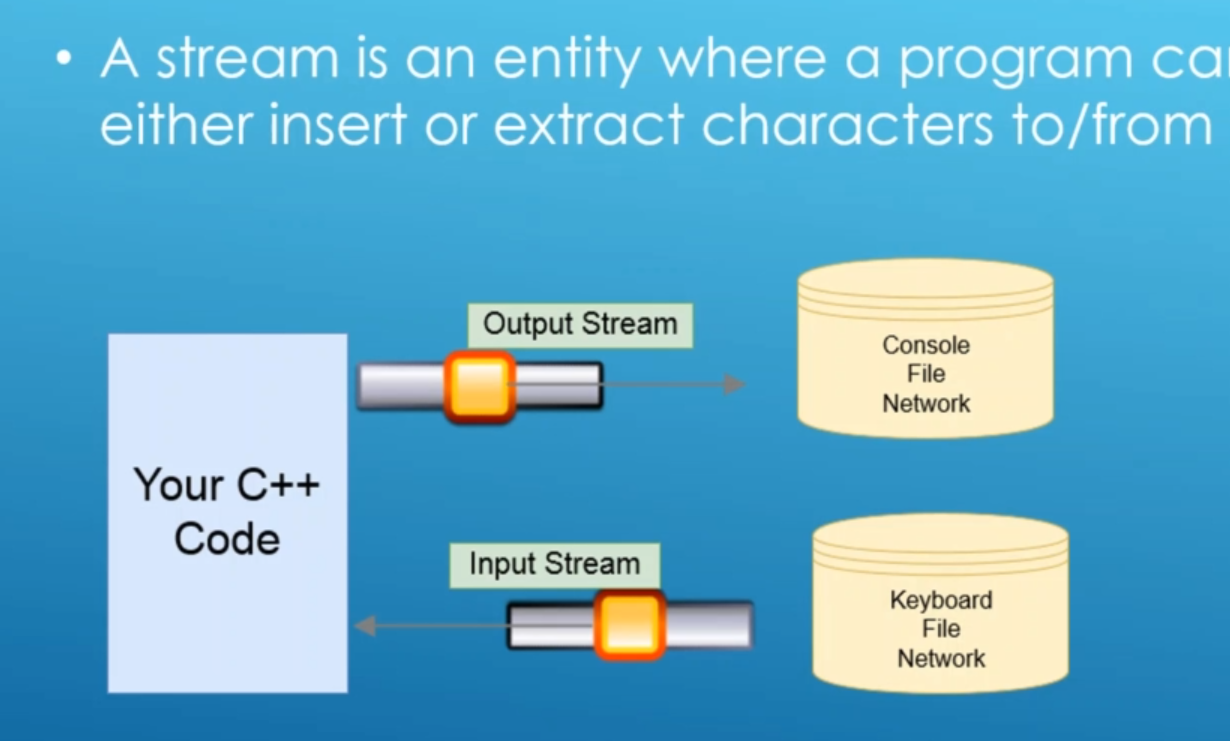
Some useful commands:
cerr - output an error
clog - output a log
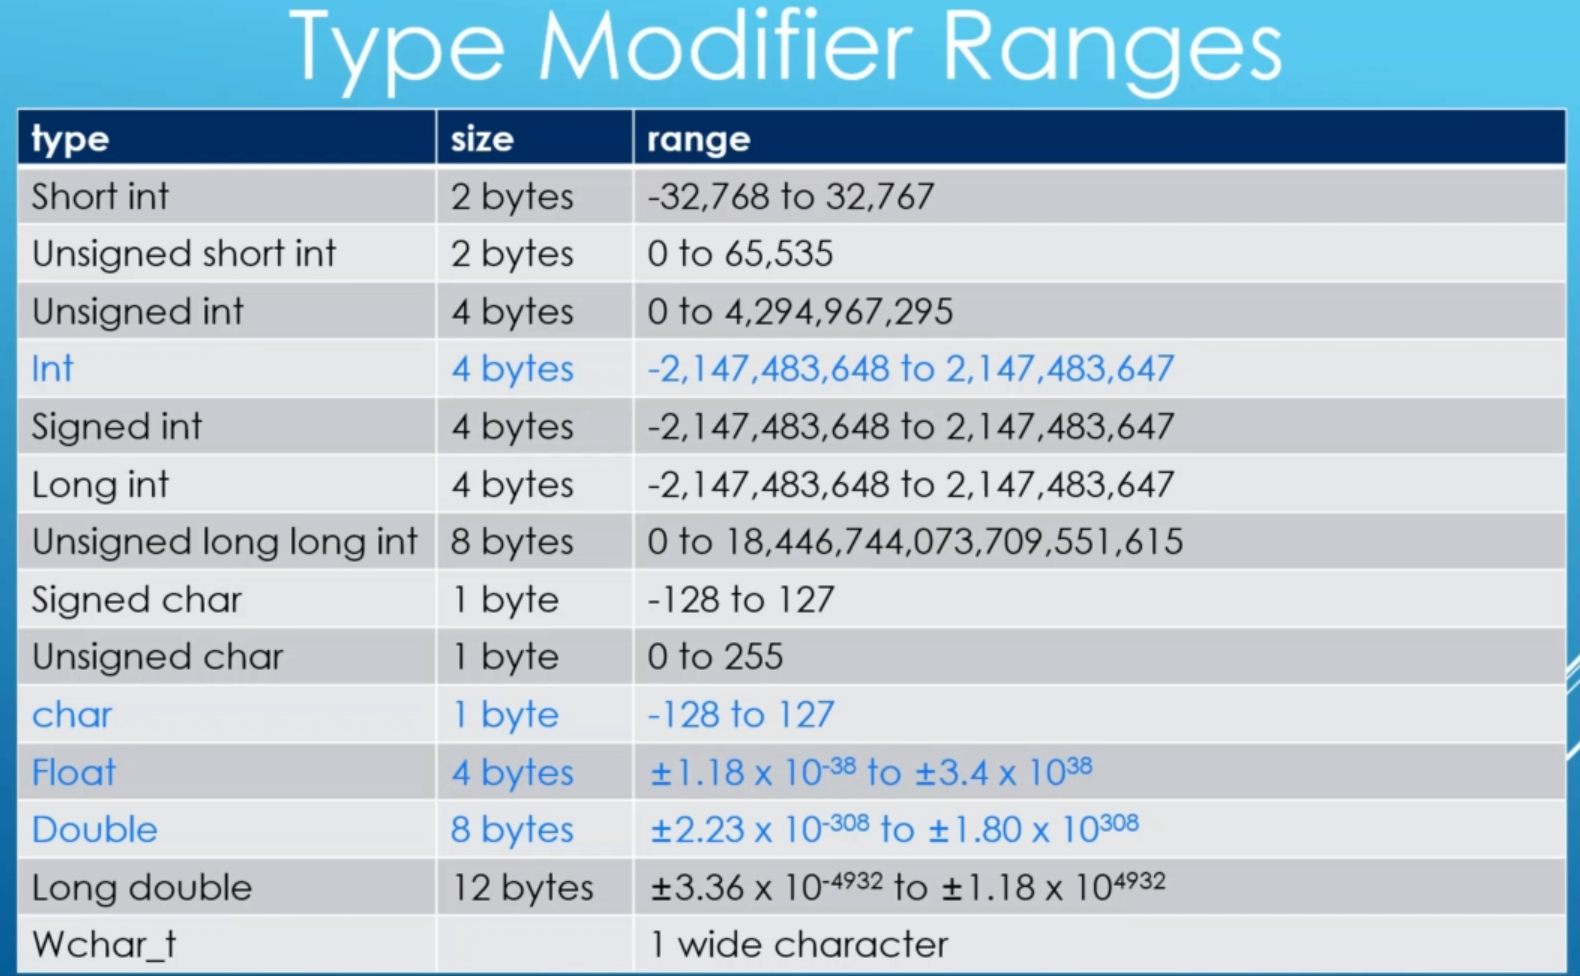
Type modifiers ranges:
# C++ Lambdas
Lambdas are defined in place functions
#include <iostream>

using namespace std;

int main()
{
    cout << "Hello World!" << endl;
    return 0;
}
2
3
4
5
6
7
8
9
Hello World!
As a signature of a lambda function we have:
[capture list] (parameter list) {function body}
#include <iostream>

using namespace std;

int main()
{
    auto func = [](){
        cout << "Hello World!" << endl;
    };

    func();

    return 0;
}
2
3
4
5
6
7
8
9
10
11
12
13
14
Hello World!
We can also call a lambda function right after definition:
#include <iostream>

using namespace std;

int main()
{
    [](){
        cout << "Hello World!" << endl;
    }();

    return 0;
}
2
3
4
5
6
7
8
9
10
11
12
Hello World!
Or we can use some parameters, two in this next case:
#include <iostream>

using namespace std;

int main()
{
    [](int a, int b){
        cout << "a + b = " << a + b << endl;
    }(7,3);

    return 0;
}
2
3
4
5
6
7
8
9
10
11
12
a + b = 10
Now we are going to define a lambda that returns something:
To do that we use the -> and what It's going to return, in this case int.
#include <iostream>

using namespace std;

int main()
{
    int sum = [](int a, int b)->int{
        return a + b;
    }(7,3);

    cout << "The sum is: " << sum << endl;

    return 0;
}
2
3
4
5
6
7
8
9
10
11
12
13
14
The sum is: 10
Or we can use the lambda function directly:
#include <iostream>

using namespace std;

int main()
{
    cout << "The sum is: " << [](int a, int b)->int{
        return a + b;
    }(7,3) << endl;

    return 0;
}
2
3
4
5
6
7
8
9
10
11
12
The sum is: 10
For a more complete signature of a lambda function we have:
[capture list] (parameter list)->return_value_type {function body}
# Capture Lists
Capture lists give you a way to capture the variables that are in the current context.
#include <iostream>

using namespace std;

int main()
{
    int a = 7;
    int b = 3;

    [a, b](){
        cout << "a is : " << a << endl;
        cout << "b is : " << b << endl;
    }();

    return 0;
}
2
3
4
5
6
7
8
9
10
11
12
13
14
15
16
a is : 7
b is : 3
2
or:
#include <iostream>

using namespace std;

int main()
{
    int a = 7;
    int b = 3;

    [a, b](){
        cout << "a + b is: " << a + b << endl;
    }();

    return 0;
}
2
3
4
5
6
7
8
9
10
11
12
13
14
15
a + b is: 10
# Capturing by value
With the following function we want to see that the value that is in the outside is the same value of inside of the lambda function.
#include <iostream>

using namespace std;

int main()
{
    int c = 42;

    auto func = [c](){
        cout << "The inside value of c is: " << c << endl;
    };

    for(int i=1; i<5; i++) {
        cout << "The outer value of c is: " << c << endl;
        func();
        c++;
    }

    return 0;
}
2
3
4
5
6
7
8
9
10
11
12
13
14
15
16
17
18
19
20
The outer value of c is: 42
The inside value of c is: 42
The outer value of c is: 43
The inside value of c is: 42
The outer value of c is: 44
The inside value of c is: 42
The outer value of c is: 45
The inside value of c is: 42
2
3
4
5
6
7
8
TIP
The inner value is always 42, even if we increment in the outside.
if you want to pass the original value in the lambda function you can pass it by reference
# Capturing by reference
#include <iostream>

using namespace std;

int main()
{
    int c = 42;

    auto func = [&c](){
        cout << "The inside value of c is: " << c << endl;
    };

    for(int i=1; i<5; i++) {
        cout << "The outer value of c is: " <<c << endl;
        func();
        c++;
    }

    return 0;
}
2
3
4
5
6
7
8
9
10
11
12
13
14
15
16
17
18
19
20
The outer value of c is: 42
The inside value of c is: 42
The outer value of c is: 43
The inside value of c is: 43
The outer value of c is: 44
The inside value of c is: 44
The outer value of c is: 45
The inside value of c is: 45
2
3
4
5
6
7
8
# Capturing everything by value
We just put an equal sign in the brakets[]:
#include <iostream>

using namespace std;

int main()
{
    int c = 42;

    auto func = [=](){
        cout << "The inside value of c is: " << c << endl;
    };

    for(int i=1; i<5; i++) {
        cout << "The outer value of c is: " <<c << endl;
        func();
        c++;
    }

    return 0;
}
2
3
4
5
6
7
8
9
10
11
12
13
14
15
16
17
18
19
20
The outer value of c is: 42
The inside value of c is: 42
The outer value of c is: 43
The inside value of c is: 42
The outer value of c is: 44
The inside value of c is: 42
The outer value of c is: 45
The inside value of c is: 42
2
3
4
5
6
7
8
If we introduce another variable we should be able to access it, because we capture everything in the context of this function.
#include <iostream>

using namespace std;

int main()
{
    int c = 42;
    int d = 6;

    auto func = [=](){
        cout << "The inside value of c is: " << c << endl;
        cout << "The inside value of d is: " << d << endl;
    };

    for(int i=1; i<5; i++) {
        cout << "The outer value of c is: " <<c << endl;
        func();
        c++;
    }

    return 0;
}
2
3
4
5
6
7
8
9
10
11
12
13
14
15
16
17
18
19
20
21
22
The outer value of c is: 42
The inside value of c is: 42
The inside value of d is: 6
The outer value of c is: 43
The inside value of c is: 42
The inside value of d is: 6
The outer value of c is: 44
The inside value of c is: 42
The inside value of d is: 6
The outer value of c is: 45
The inside value of c is: 42
The inside value of d is: 6
2
3
4
5
6
7
8
9
10
11
12
# Capturing everything by reference
We can also capture everything by reference, using the &
#include <iostream>

using namespace std;

int main()
{
    int c = 42;
    int d = 6;

    auto func = [&](){
        cout << "The inside value of c is: " << c << endl;
        cout << "The inside value of d is: " << d << endl;
    };

    for(int i=1; i<5; i++) {
        cout << "The outer value of c is: " <<c << endl;
        func();
        c++;
    }

    return 0;
}
2
3
4
5
6
7
8
9
10
11
12
13
14
15
16
17
18
19
20
21
22
The outer value of c is: 42
The inside value of c is: 42
The inside value of d is: 6
The outer value of c is: 43
The inside value of c is: 42
The inside value of d is: 6
The outer value of c is: 44
The inside value of c is: 42
The inside value of d is: 6
The outer value of c is: 45
The inside value of c is: 42
The inside value of d is: 6
2
3
4
5
6
7
8
9
10
11
12
# Signals and Slots
Signals are a way for Qt to know that something happened.
First we create a Qt Widget application and add a button and a label:
# String Notation
The first notation we are going to use is the string notation:
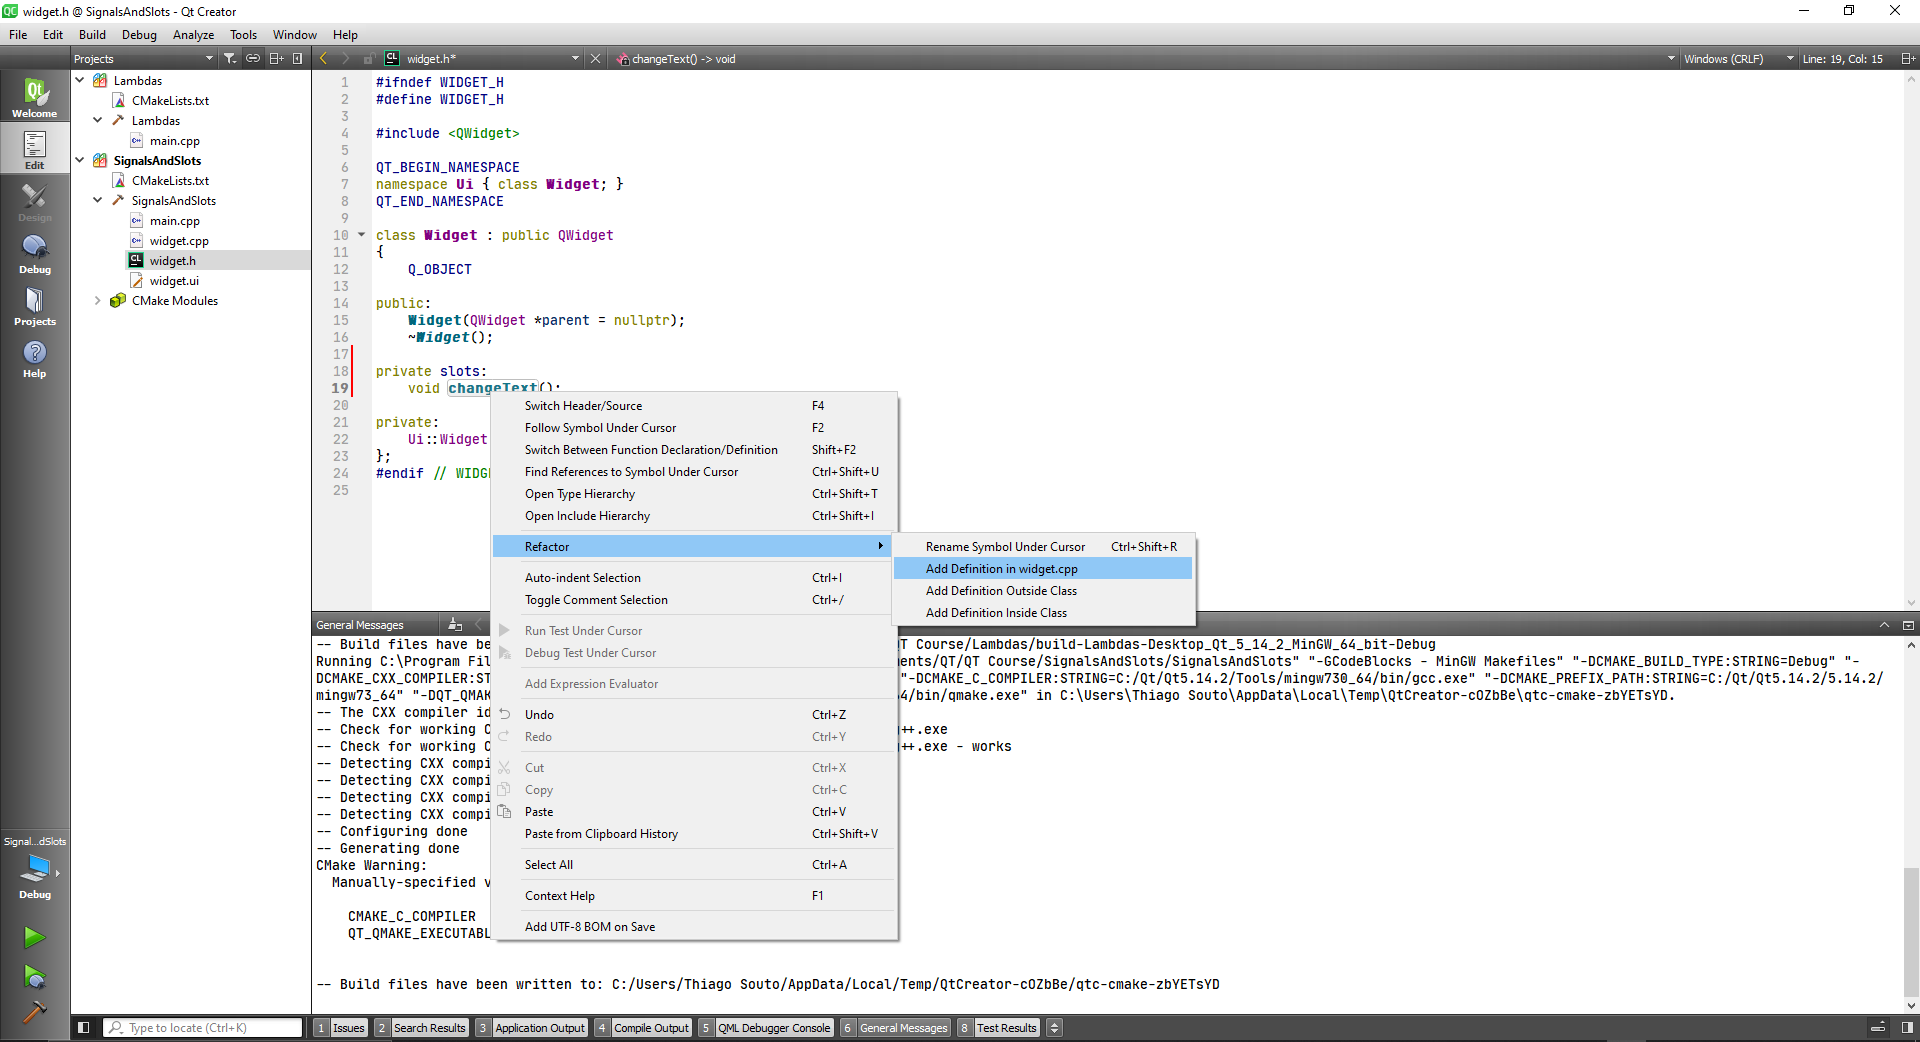
For this we have to go to the widget.h and define a slot.
We define a slot this way adding a private slot at the widget.h file
#ifndef WIDGET_H
#define WIDGET_H

#include <QWidget>

QT_BEGIN_NAMESPACE
namespace Ui { class Widget; }
QT_END_NAMESPACE

class Widget : public QWidget
{
    Q_OBJECT

public:
    Widget(QWidget *parent = nullptr);
    ~Widget();

private slots:
    void changeText();

private:
    Ui::Widget *ui;
};
#endif // WIDGET_H
2
3
4
5
6
7
8
9
10
11
12
13
14
15
16
17
18
19
20
21
22
23
24
To add the definition to the cpp file Qt can help us by refactoring the code like so:
Now we can connect the button to the text label.
We are going to connect the ui->pushButton, the SIGNAL will be the clicked, the object will be this and the SLOT will be the changeText SLOT.
#include "widget.h"
#include "./ui_widget.h"

Widget::Widget(QWidget *parent)
    : QWidget(parent)
    , ui(new Ui::Widget)
{
    ui->setupUi(this);
    //String Notation
    connect(ui->pushButton, SIGNAL(clicked()), this, SLOT(changeText()));
}

Widget::~Widget()
{
    delete ui;
}

void Widget::changeText()
{

}
2
3
4
5
6
7
8
9
10
11
12
13
14
15
16
17
18
19
20
21
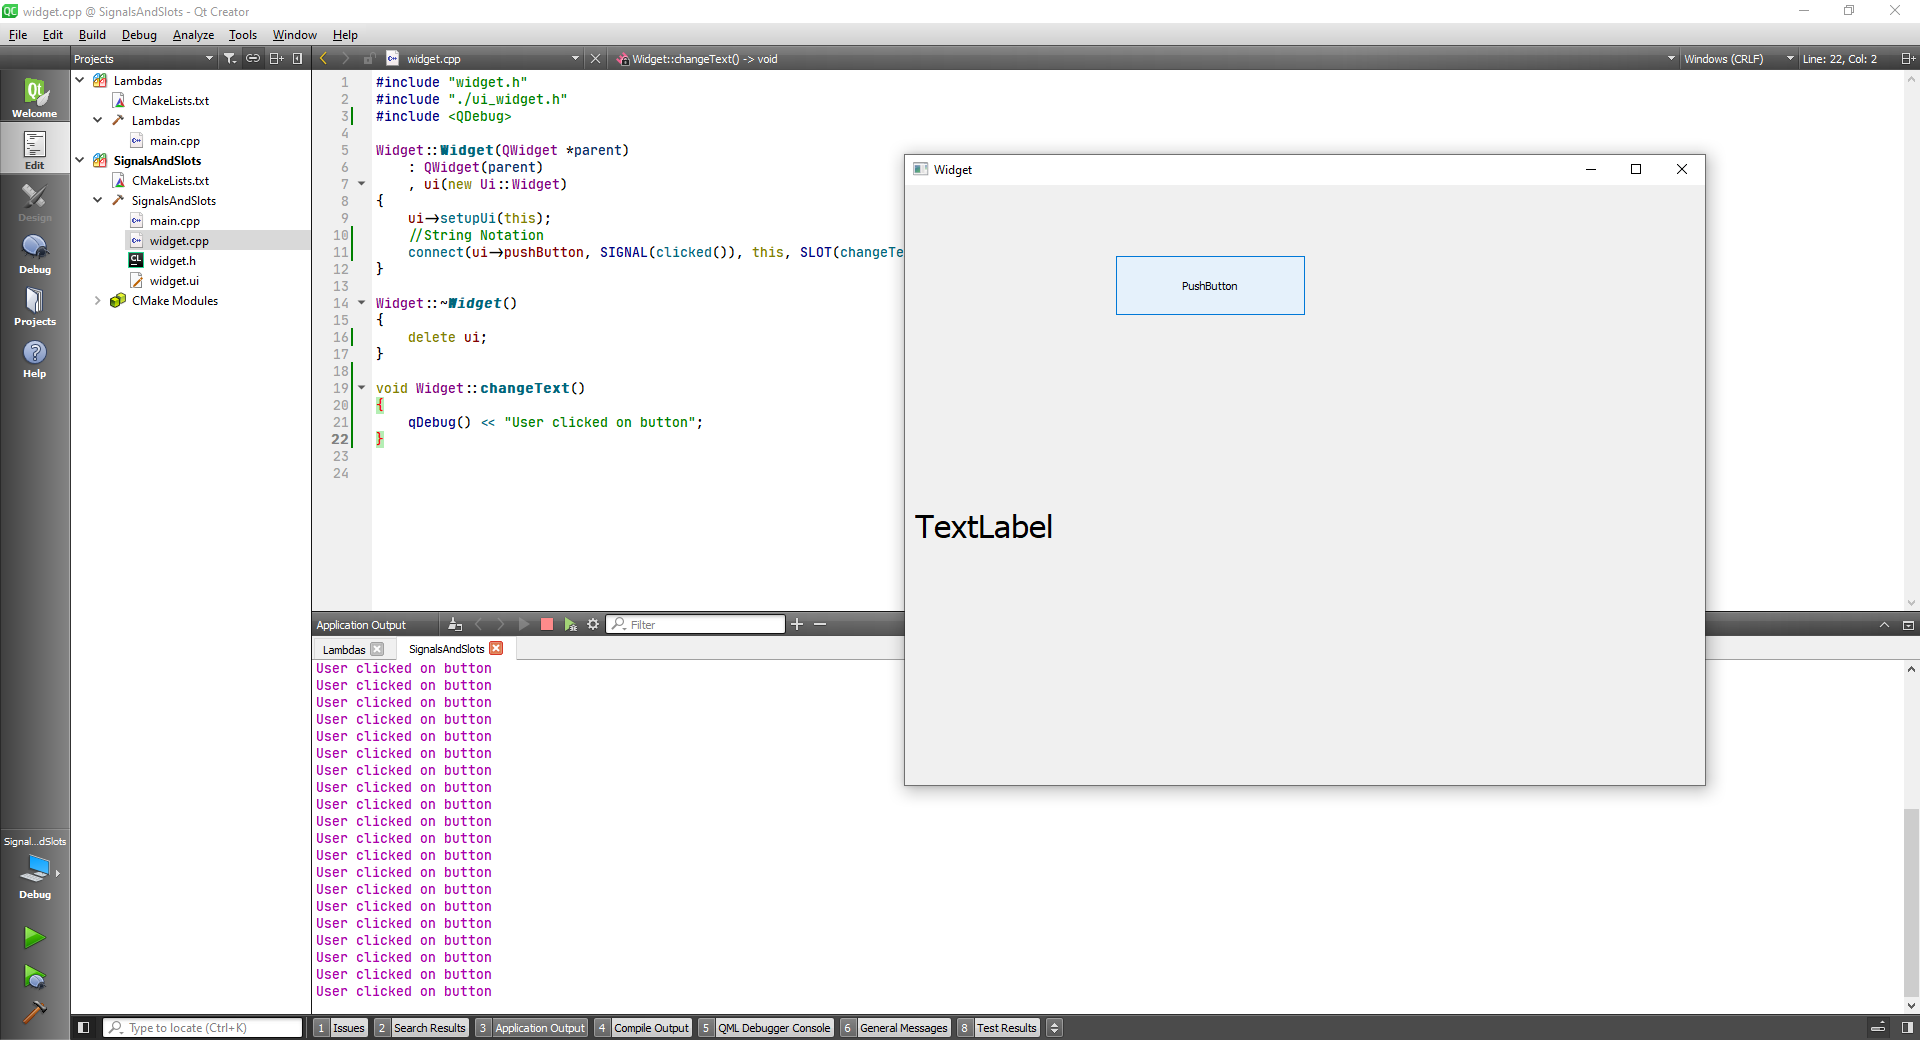
We can prove that they are connected by inserting a QDebug on the changeText SLOT.
For this we will need to include the library.
#include "widget.h"
#include "./ui_widget.h"
#include <QDebug>

Widget::Widget(QWidget *parent)
    : QWidget(parent)
    , ui(new Ui::Widget)
{
    ui->setupUi(this);
    //String Notation
    connect(ui->pushButton, SIGNAL(clicked()), this, SLOT(changeText()));
}

Widget::~Widget()
{
    delete ui;
}

void Widget::changeText()
{
    qDebug() << "User clicked on button";
}
2
3
4
5
6
7
8
9
10
11
12
13
14
15
16
17
18
19
20
21
22
TIP
~Widget is a destructor
Running the application we can see the debug message in the console:
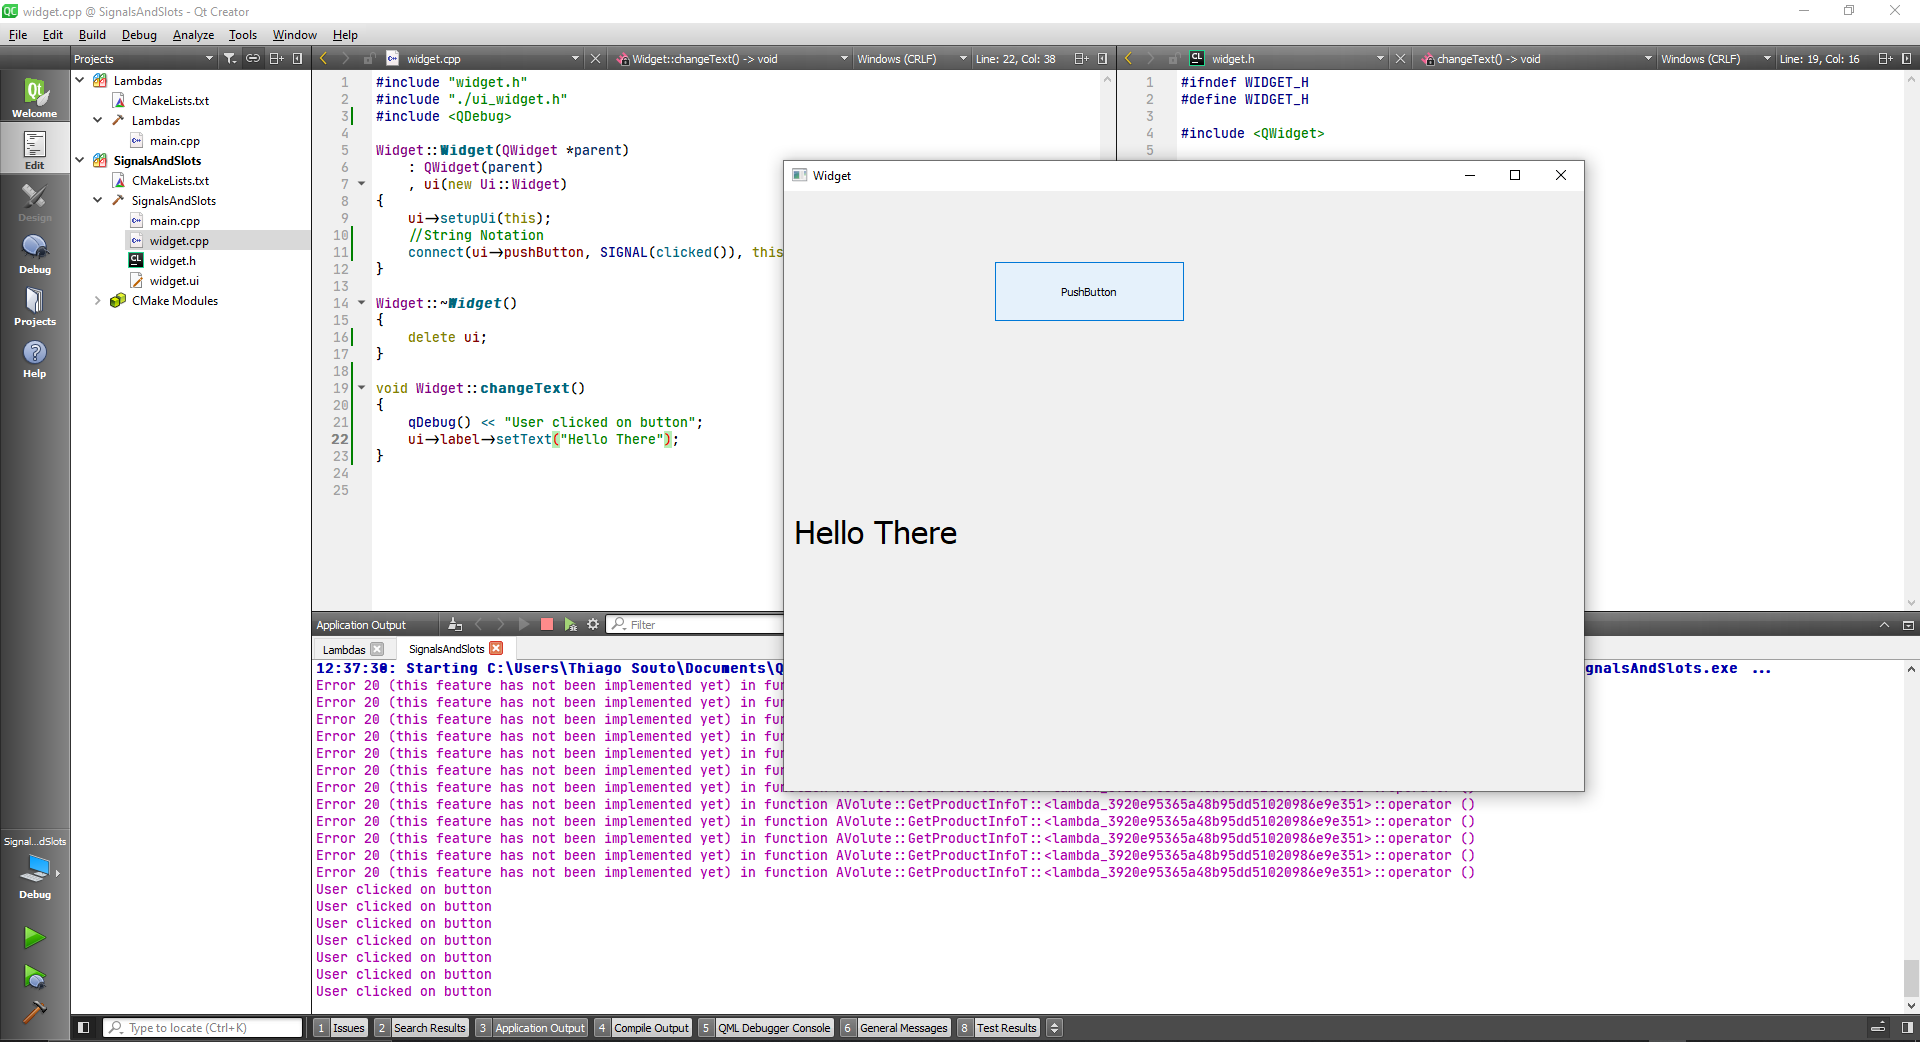
# Affecting UI components
Now we are going to use the signal to affect a ui component.
For this we have to change the widget.cpp file:
#include "widget.h"
#include "./ui_widget.h"
#include <QDebug>

Widget::Widget(QWidget *parent)
    : QWidget(parent)
    , ui(new Ui::Widget)
{
    ui->setupUi(this);
    //String Notation
    connect(ui->pushButton, SIGNAL(clicked()), this, SLOT(changeText()));
}

Widget::~Widget()
{
    delete ui;
}

void Widget::changeText()
{
    qDebug() << "User clicked on button";
    ui->label->setText("Hello There");
}
2
3
4
5
6
7
8
9
10
11
12
13
14
15
16
17
18
19
20
21
22
23
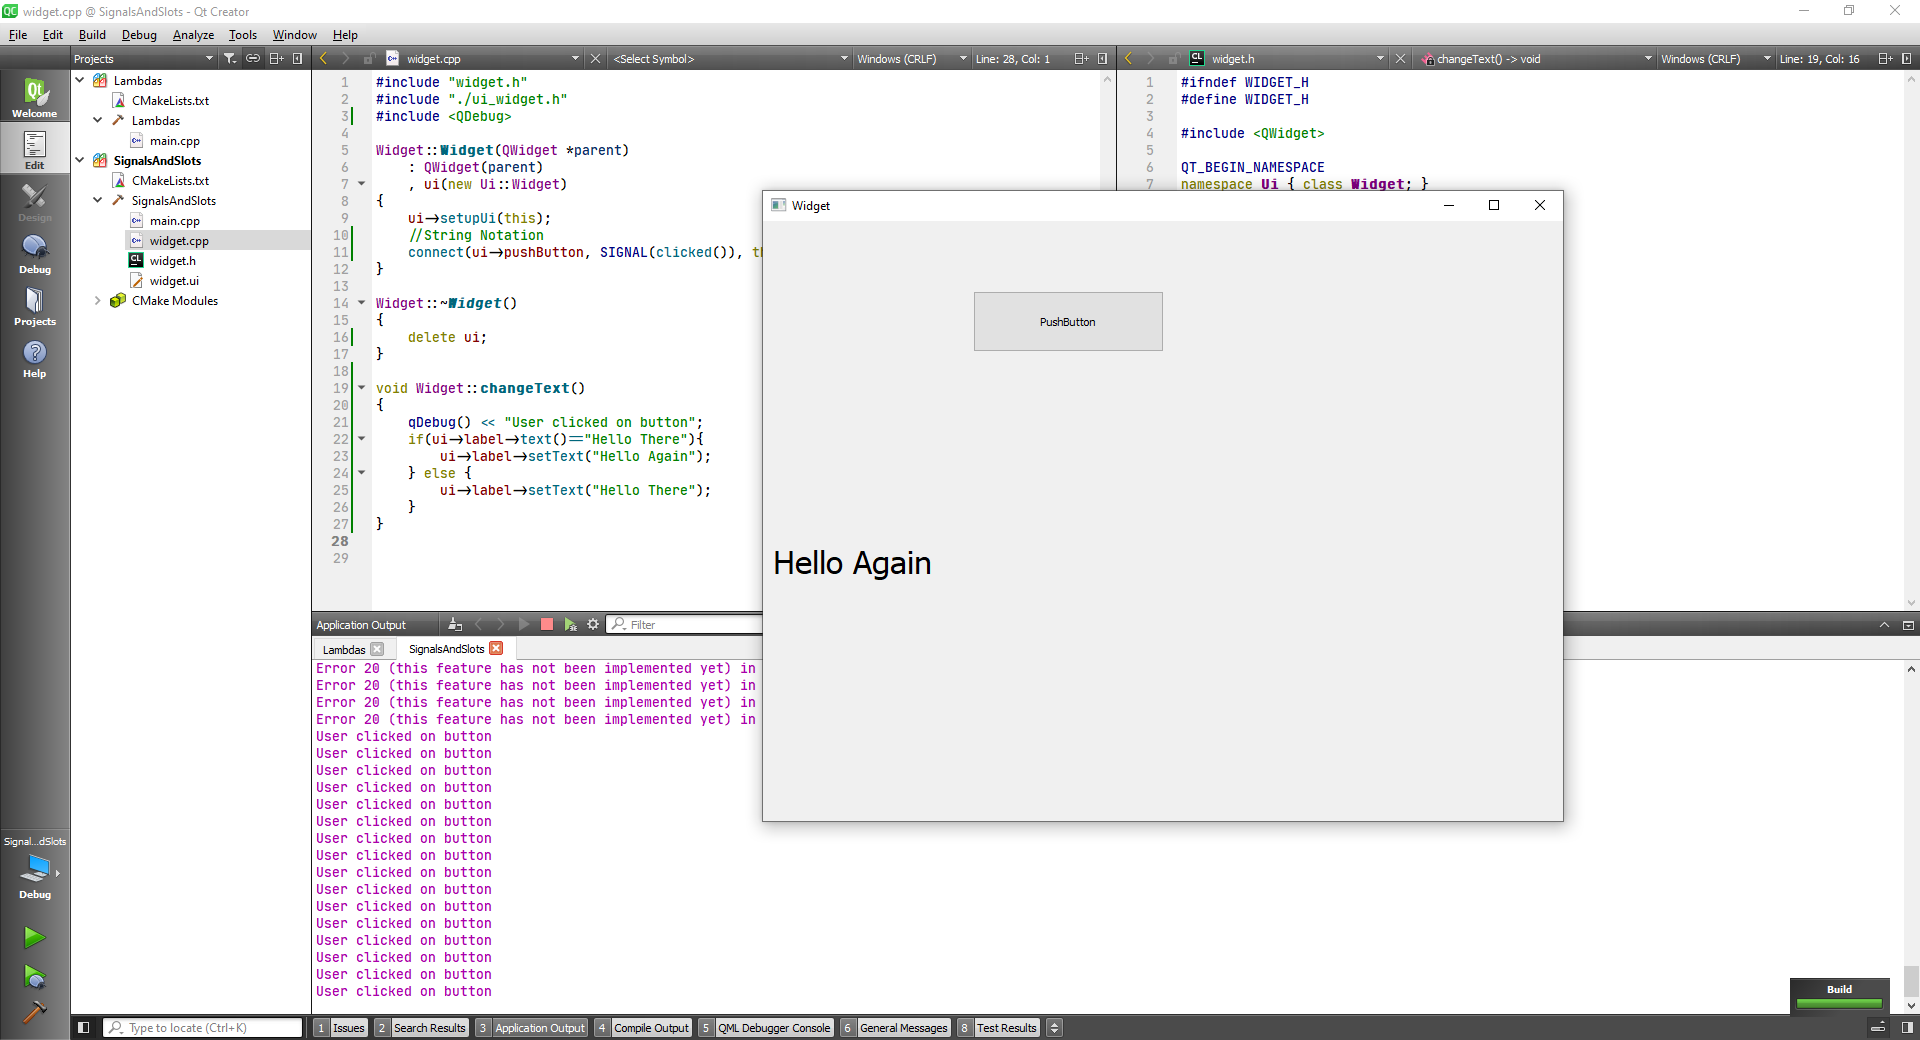
Or we can change to Hello gain like so:
#include "widget.h"
#include "./ui_widget.h"
#include <QDebug>

Widget::Widget(QWidget *parent)
    : QWidget(parent)
    , ui(new Ui::Widget)
{
    ui->setupUi(this);
    //String Notation
    connect(ui->pushButton, SIGNAL(clicked()), this, SLOT(changeText()));
}

Widget::~Widget()
{
    delete ui;
}

void Widget::changeText()
{
    qDebug() << "User clicked on button";
    if(ui->label->text()=="Hello There"){
        ui->label->setText("Hello Again");
    } else {
        ui->label->setText("Hello There");
    }
}
2
3
4
5
6
7
8
9
10
11
12
13
14
15
16
17
18
19
20
21
22
23
24
25
26
27
# Functor Notation : Regular Slot
#include "widget.h"
#include "./ui_widget.h"
#include <QDebug>

Widget::Widget(QWidget *parent)
    : QWidget(parent)
    , ui(new Ui::Widget)
{
    ui->setupUi(this);
    //String Notation
    connect(ui->pushButton, &QPushButton::clicked, this, &Widget::changeText);
}

Widget::~Widget()
{
    delete ui;
}

void Widget::changeText()
{
    qDebug() << "User clicked on button";
    if(ui->label->text()=="Hello There"){
        ui->label->setText("Hello Again");
    } else {
        ui->label->setText("Hello There");
    }
}
2
3
4
5
6
7
8
9
10
11
12
13
14
15
16
17
18
19
20
21
22
23
24
25
26
27
# Functor Notation : Lambdas
#include "widget.h"
#include "./ui_widget.h"
#include <QDebug>

Widget::Widget(QWidget *parent)
    : QWidget(parent)
    , ui(new Ui::Widget)
{
    ui->setupUi(this);
    //String Notation
    connect(ui->pushButton, &QPushButton::clicked, [=](){
        ui->label->setText("Lambda");
    });
}

Widget::~Widget()
{
    delete ui;
}

void Widget::changeText()
{
    qDebug() << "User clicked on button";
    if(ui->label->text()=="Hello There"){
        ui->label->setText("Hello Again");
    } else {
        ui->label->setText("Hello There");
    }
}
2
3
4
5
6
7
8
9
10
11
12
13
14
15
16
17
18
19
20
21
22
23
24
25
26
27
28
29

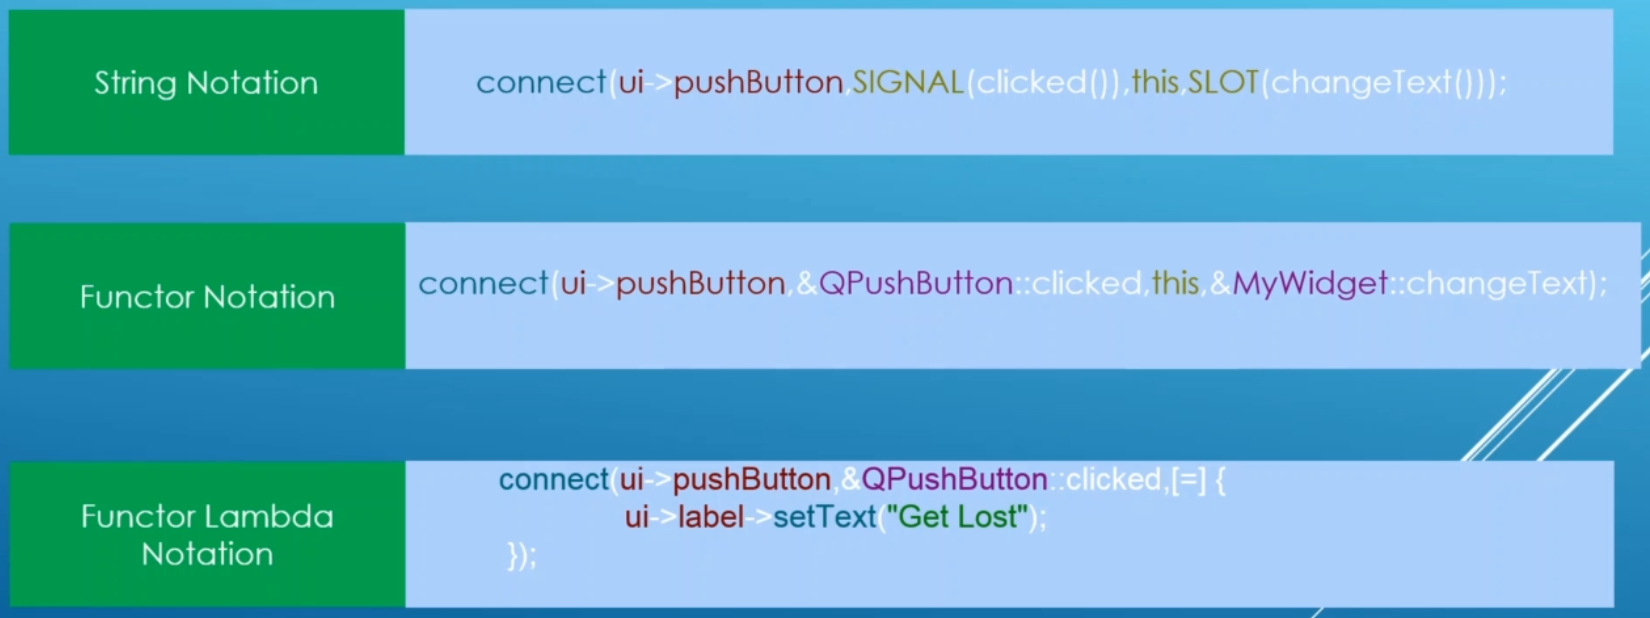
# Slot notation comparison
//String Notation
connect(ui->pushButton, SIGNAL(clicked()), this, SLOT(changeText()));

//Functor Notation
connect(ui->pushButton, &QPushButton::clicked, this, &Widget::changeText);

//Functor Lambda
connect(ui->pushButton, &QPushButton::clicked, [=](){
    ui->label->setText("Lambda");
});
2
3
4
5
6
7
8
9
10
# Qt Widget demo
Create a new Widget project with an horizontal slider and a progress bar.
Set the ranges to 0-100.
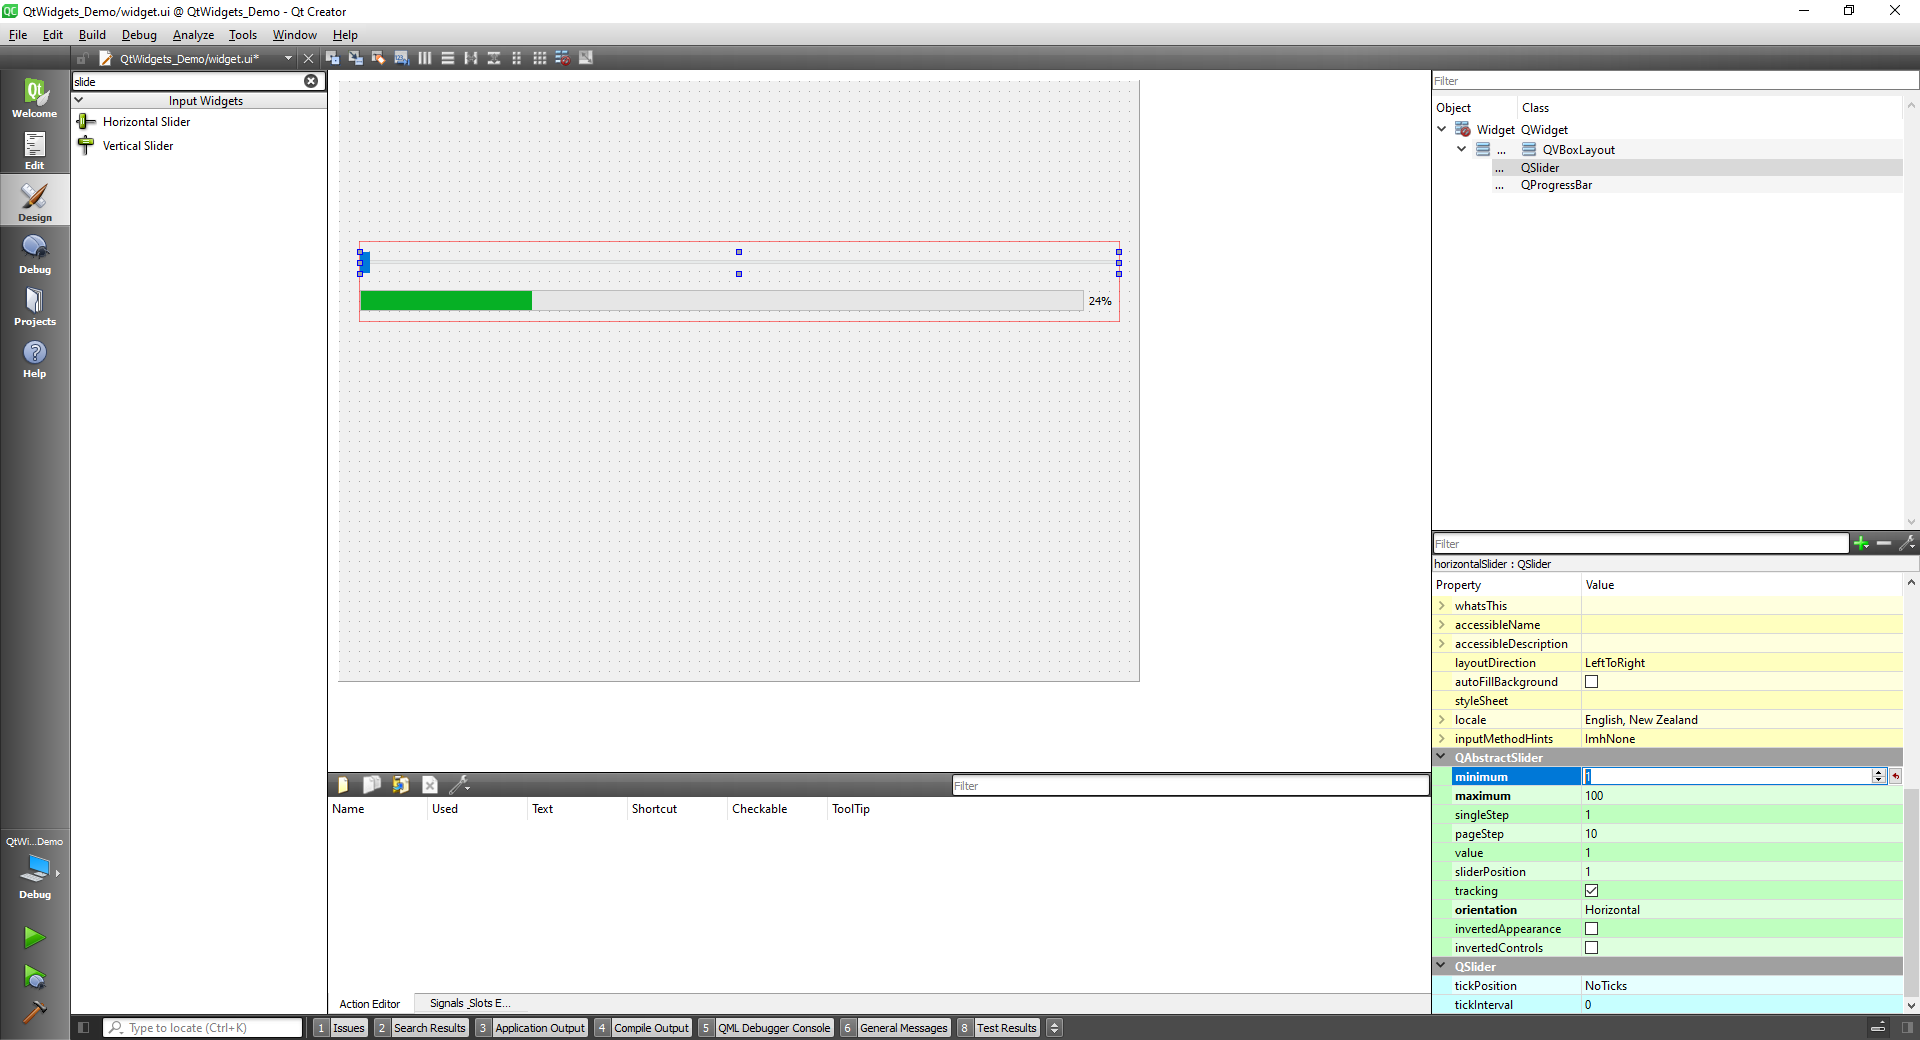
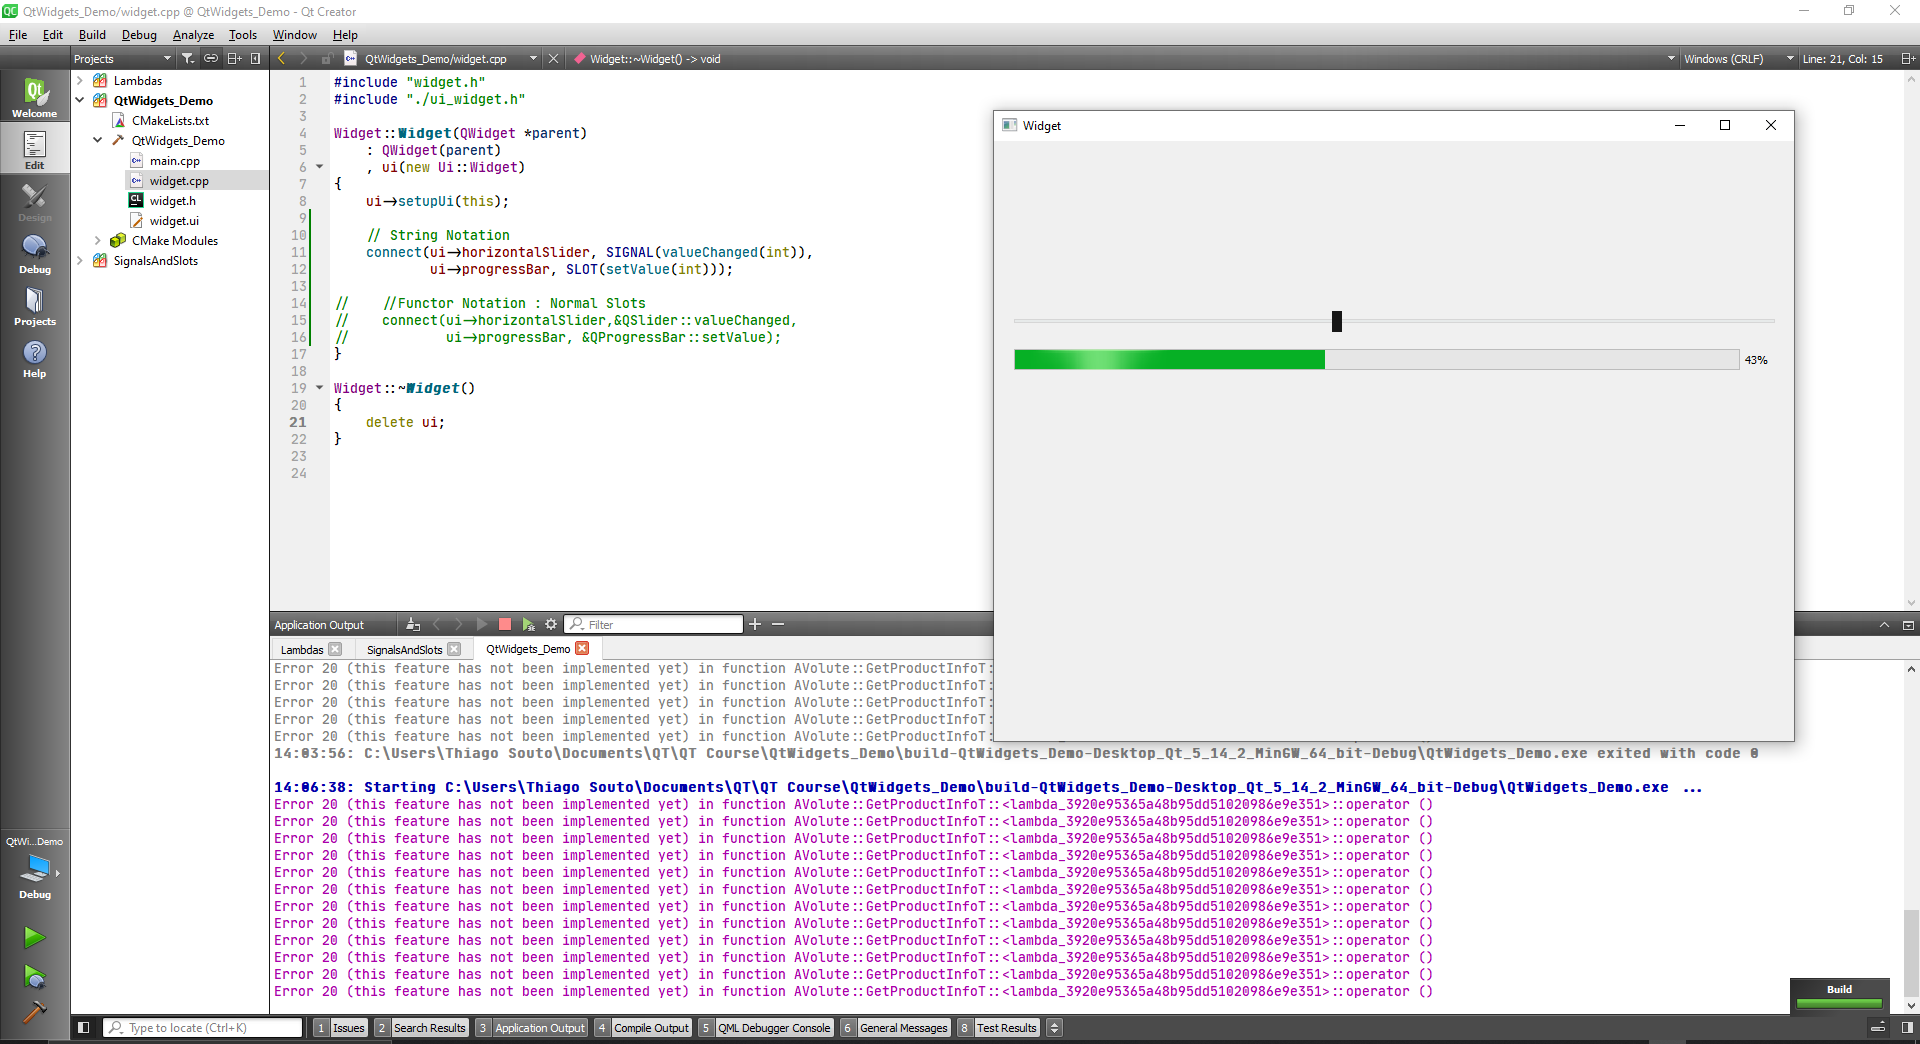
We can connect them on the widget.cpp file
#include "widget.h"
#include "./ui_widget.h"

Widget::Widget(QWidget *parent)
    : QWidget(parent)
    , ui(new Ui::Widget)
{
    ui->setupUi(this);

    // String Notation
    connect(ui->horizontalSlider, SIGNAL(valueChanged(int)),
            ui->progressBar, SLOT(setValue(int)));
}

Widget::~Widget()
{
    delete ui;
}
2
3
4
5
6
7
8
9
10
11
12
13
14
15
16
17
18
or using the Functor Notation
#include "widget.h"
#include "./ui_widget.h"

Widget::Widget(QWidget *parent)
    : QWidget(parent)
    , ui(new Ui::Widget)
{
    ui->setupUi(this);

    //Functor Notation : Normal Slots
    connect(ui->horizontalSlider,&QSlider::valueChanged,
            ui->progressBar, &QProgressBar::setValue);
}

Widget::~Widget()
{
    delete ui;
}
2
3
4
5
6
7
8
9
10
11
12
13
14
15
16
17
18
or using Functor notation with lambda:
#include "widget.h"
#include "./ui_widget.h"

Widget::Widget(QWidget *parent)
    : QWidget(parent)
    , ui(new Ui::Widget)
{
    ui->setupUi(this);

    //Functor Notation : Lambda
    connect(ui->horizontalSlider,&QSlider::valueChanged,
            [=](){
        ui->progressBar->setValue(ui->horizontalSlider->value());
    });
}

Widget::~Widget()
{
    delete ui;
}
2
3
4
5
6
7
8
9
10
11
12
13
14
15
16
17
18
19
20
Comparing the notations:
// String Notation
connect(ui->horizontalSlider, SIGNAL(valueChanged(int)),
        ui->progressBar, SLOT(setValue(int)));

//Functor Notation : Normal Slots
connect(ui->horizontalSlider,&QSlider::valueChanged,
        ui->progressBar, &QProgressBar::setValue);

//Functor Notation : Lambda
connect(ui->horizontalSlider,&QSlider::valueChanged,
        [=](){
    ui->progressBar->setValue(ui->horizontalSlider->value());
});
2
3
4
5
6
7
8
9
10
11
12
13
The results are the same
# QWidget class
The QWidget class is the base class of all user interface objects
The widget is the atom of the user interface: it receives mouse, keyboard and other events from the window system, and paints a representation of itself on the screen. Every widget is rectangular, and they are sorted in a Z-order. A widget is clipped by its parent and by the widgets in front of it. A widget that is not embedded in a parent widget is called a window. Usually, windows have a frame and a title bar, although it is also possible to create windows without such decoration using suitable window flags). In Qt, QMainWindow and the various subclasses of QDialog are the most common window types.
Every widget's constructor accepts one or two standard arguments:
QWidget *parent = nullptris the parent of the new widget. If it is nullptr (the default), the new widget will be a window. If not, it will be a child of parent, and be constrained by parent's geometry (unless you specify Qt::Window as window flag).Qt::WindowFlags f = 0(where available) sets the window flags; the default is suitable for almost all widgets, but to get, for example, a window without a window system frame, you must use special flags.
QWidget has many member functions, but some of them have little direct functionality; for example, QWidget has a font property, but never uses this itself. There are many subclasses which provide real functionality, such as QLabel, QPushButton, QListWidget, and QTabWidget.
First let's create a simple QWidget application.
Note at the widget.h file that we have a class Widget that extends a class that is called QWidget. This class is the mother of all Wigets, it has a good number of features that they are going to need.
class Widget : public QWidget
Then we have a constructor and the destructor for the widget
public:
    Widget(QWidget *parent = nullptr);
    ~Widget();
2
3
Now let's look at the source file.
TIP
Right click and Switch Header/Source, or f4
#include "widget.h"
#include "./ui_widget.h"

Widget::Widget(QWidget *parent)
    : QWidget(parent)
    , ui(new Ui::Widget)
{
    ui->setupUi(this);
}

Widget::~Widget()
{
    delete ui;
}
2
3
4
5
6
7
8
9
10
11
12
13
14
In this file we have a constructor here:
Widget::Widget(QWidget *parent)
and we are using a initializer list to initialize it:
    : QWidget(parent)
    , ui(new Ui::Widget)
2
Inside we are doing some setup to have our user interface:
{
    ui->setupUi(this);
}
2
3
And we have a destructor function here:
Widget::~Widget()
{
    delete ui;
}
2
3
4
Now that we know the widget class we can take a look on how it is being instantiated on main.cpp.
#include "widget.h"

#include <QApplication>

int main(int argc, char *argv[])
{
    QApplication a(argc, argv);
    Widget w;
    w.show();
    return a.exec();
}
2
3
4
5
6
7
8
9
10
11
Here we initialize a QApplication object: the QApplication class is a class that is wrapping around your application in Qt.
QApplication a(argc, argv);
Then we initialize our widget class and give it a variable name, and we call our widget:
    Widget w;
    w.show();
2
Then we call a.exec() in return and what this does is its starts an event loop, and keep waiting for you to do things.
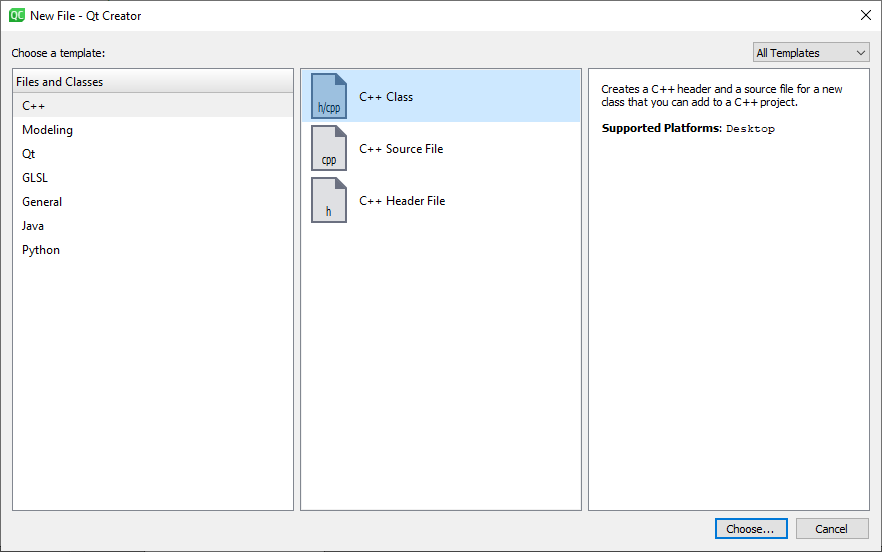
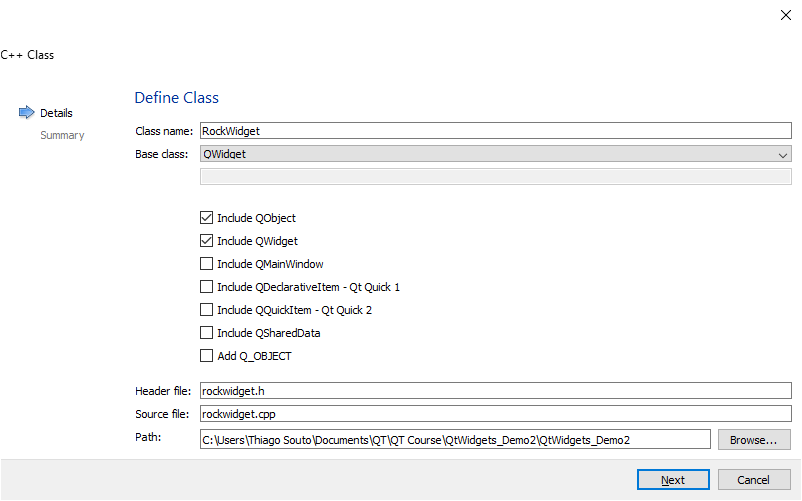
# Creating a custom widget
Now we are going to delete the widget.h, widget.cpp and widget.ui and create a class called rockwidget. But first we have to delete the unnecessary files from tha main.cpp: It will have the QApplication include and the minimum initialization.
#include <QApplication>

int main(int argc, char *argv[])
{
    QApplication a(argc, argv);

    return a.exec();
}
2
3
4
5
6
7
8
and we are going to include a QObject and a QWidget:
now we have to add them on the CMakeLists.txt file
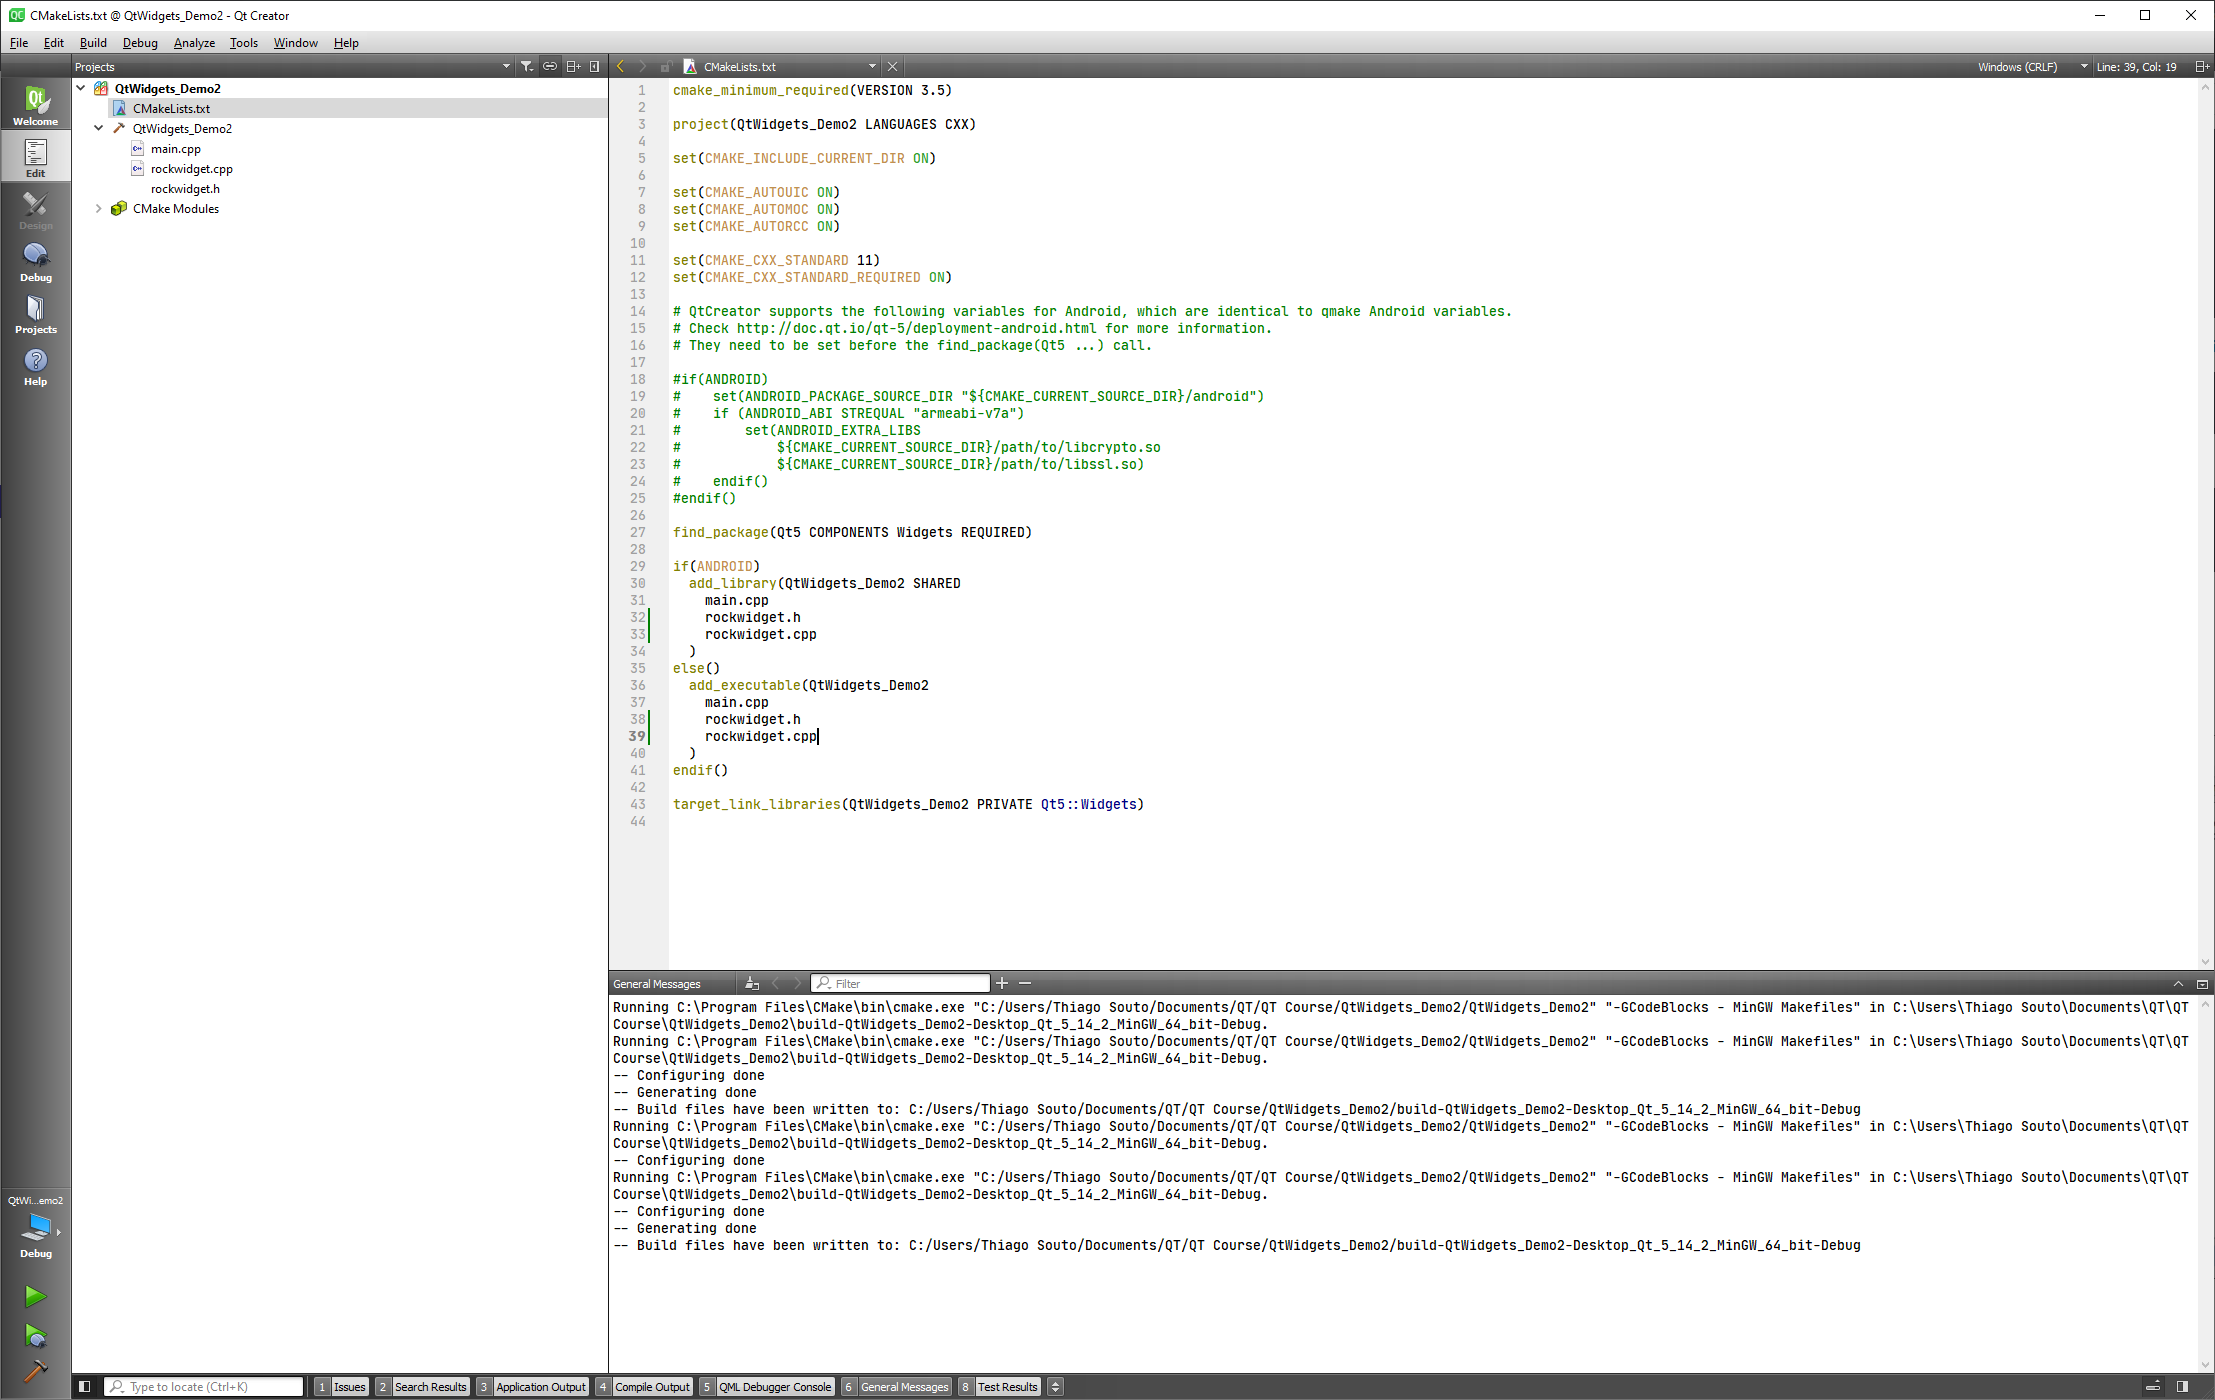
We have the rockwidget.h file here:
#ifndef ROCKWIDGET_H
#define ROCKWIDGET_H

#include <QObject>
#include <QWidget>

class RockWidget : public QWidget
{
public:
    explicit RockWidget(QWidget *parent = nullptr);

signals:

};

#endif // ROCKWIDGET_H
2
3
4
5
6
7
8
9
10
11
12
13
14
15
16
the rockwidget.cpp
#include "rockwidget.h"

RockWidget::RockWidget(QWidget *parent) : QWidget(parent)
{

}
2
3
4
5
6
Now in order to see anything in the application view we have to initialize the class. We have to include the rockwidget.h, initialize a new RockWidget w and do a w.show().
#include "rockwidget.h"
#include <QApplication>

int main(int argc, char *argv[])
{
    QApplication a(argc, argv);
    RockWidget w;
    w.show();

    return a.exec();
}
2
3
4
5
6
7
8
9
10
11
now we have a clean custom widget

Now we are going back to the rockwidget.cpp file and initialize the constructor with many different things, including labels, titles, colors and buttons.
Beginning with title:
#include "rockwidget.h"

RockWidget::RockWidget(QWidget *parent) : QWidget(parent)
{
    setWindowTitle("Rock Widget Here");
}
2
3
4
5
6

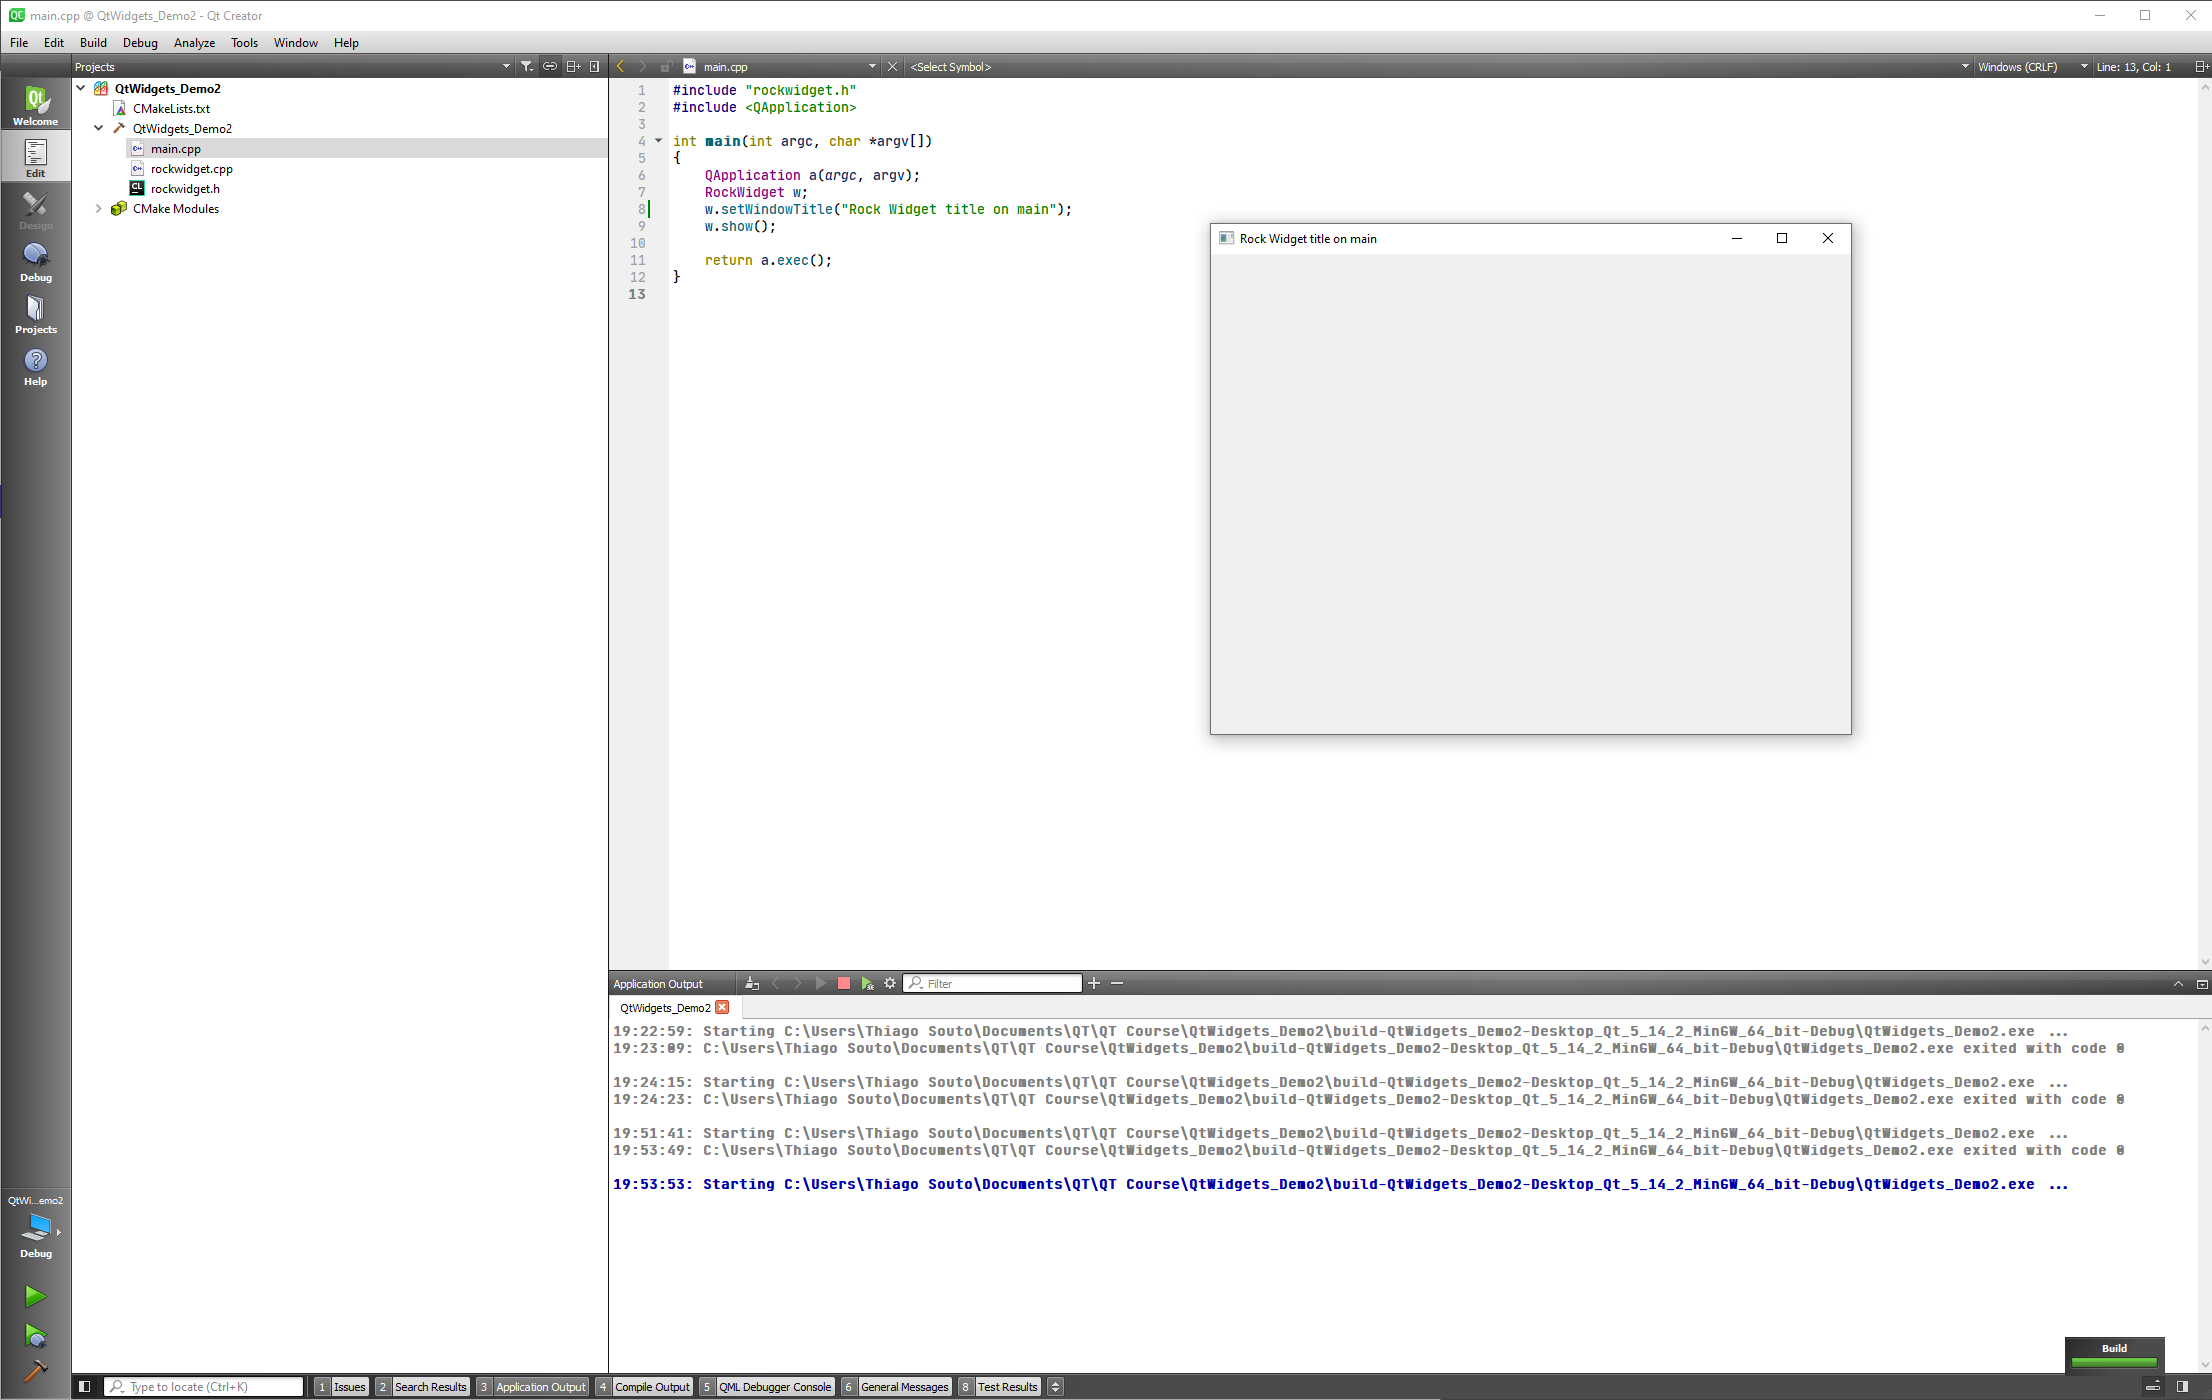
or we can do that on the main.cpp, and comment the command on rockwidget.cpp constructor.
#include "rockwidget.h"
#include <QApplication>

int main(int argc, char *argv[])
{
    QApplication a(argc, argv);
    RockWidget w;
    w.setWindowTitle("Rock Widget title on main");
    w.show();

    return a.exec();
}
2
3
4
5
6
7
8
9
10
11
12
TIP
We can only call public methods from the outside of your class, if a method is private the only way to use it is to call it inside the class.
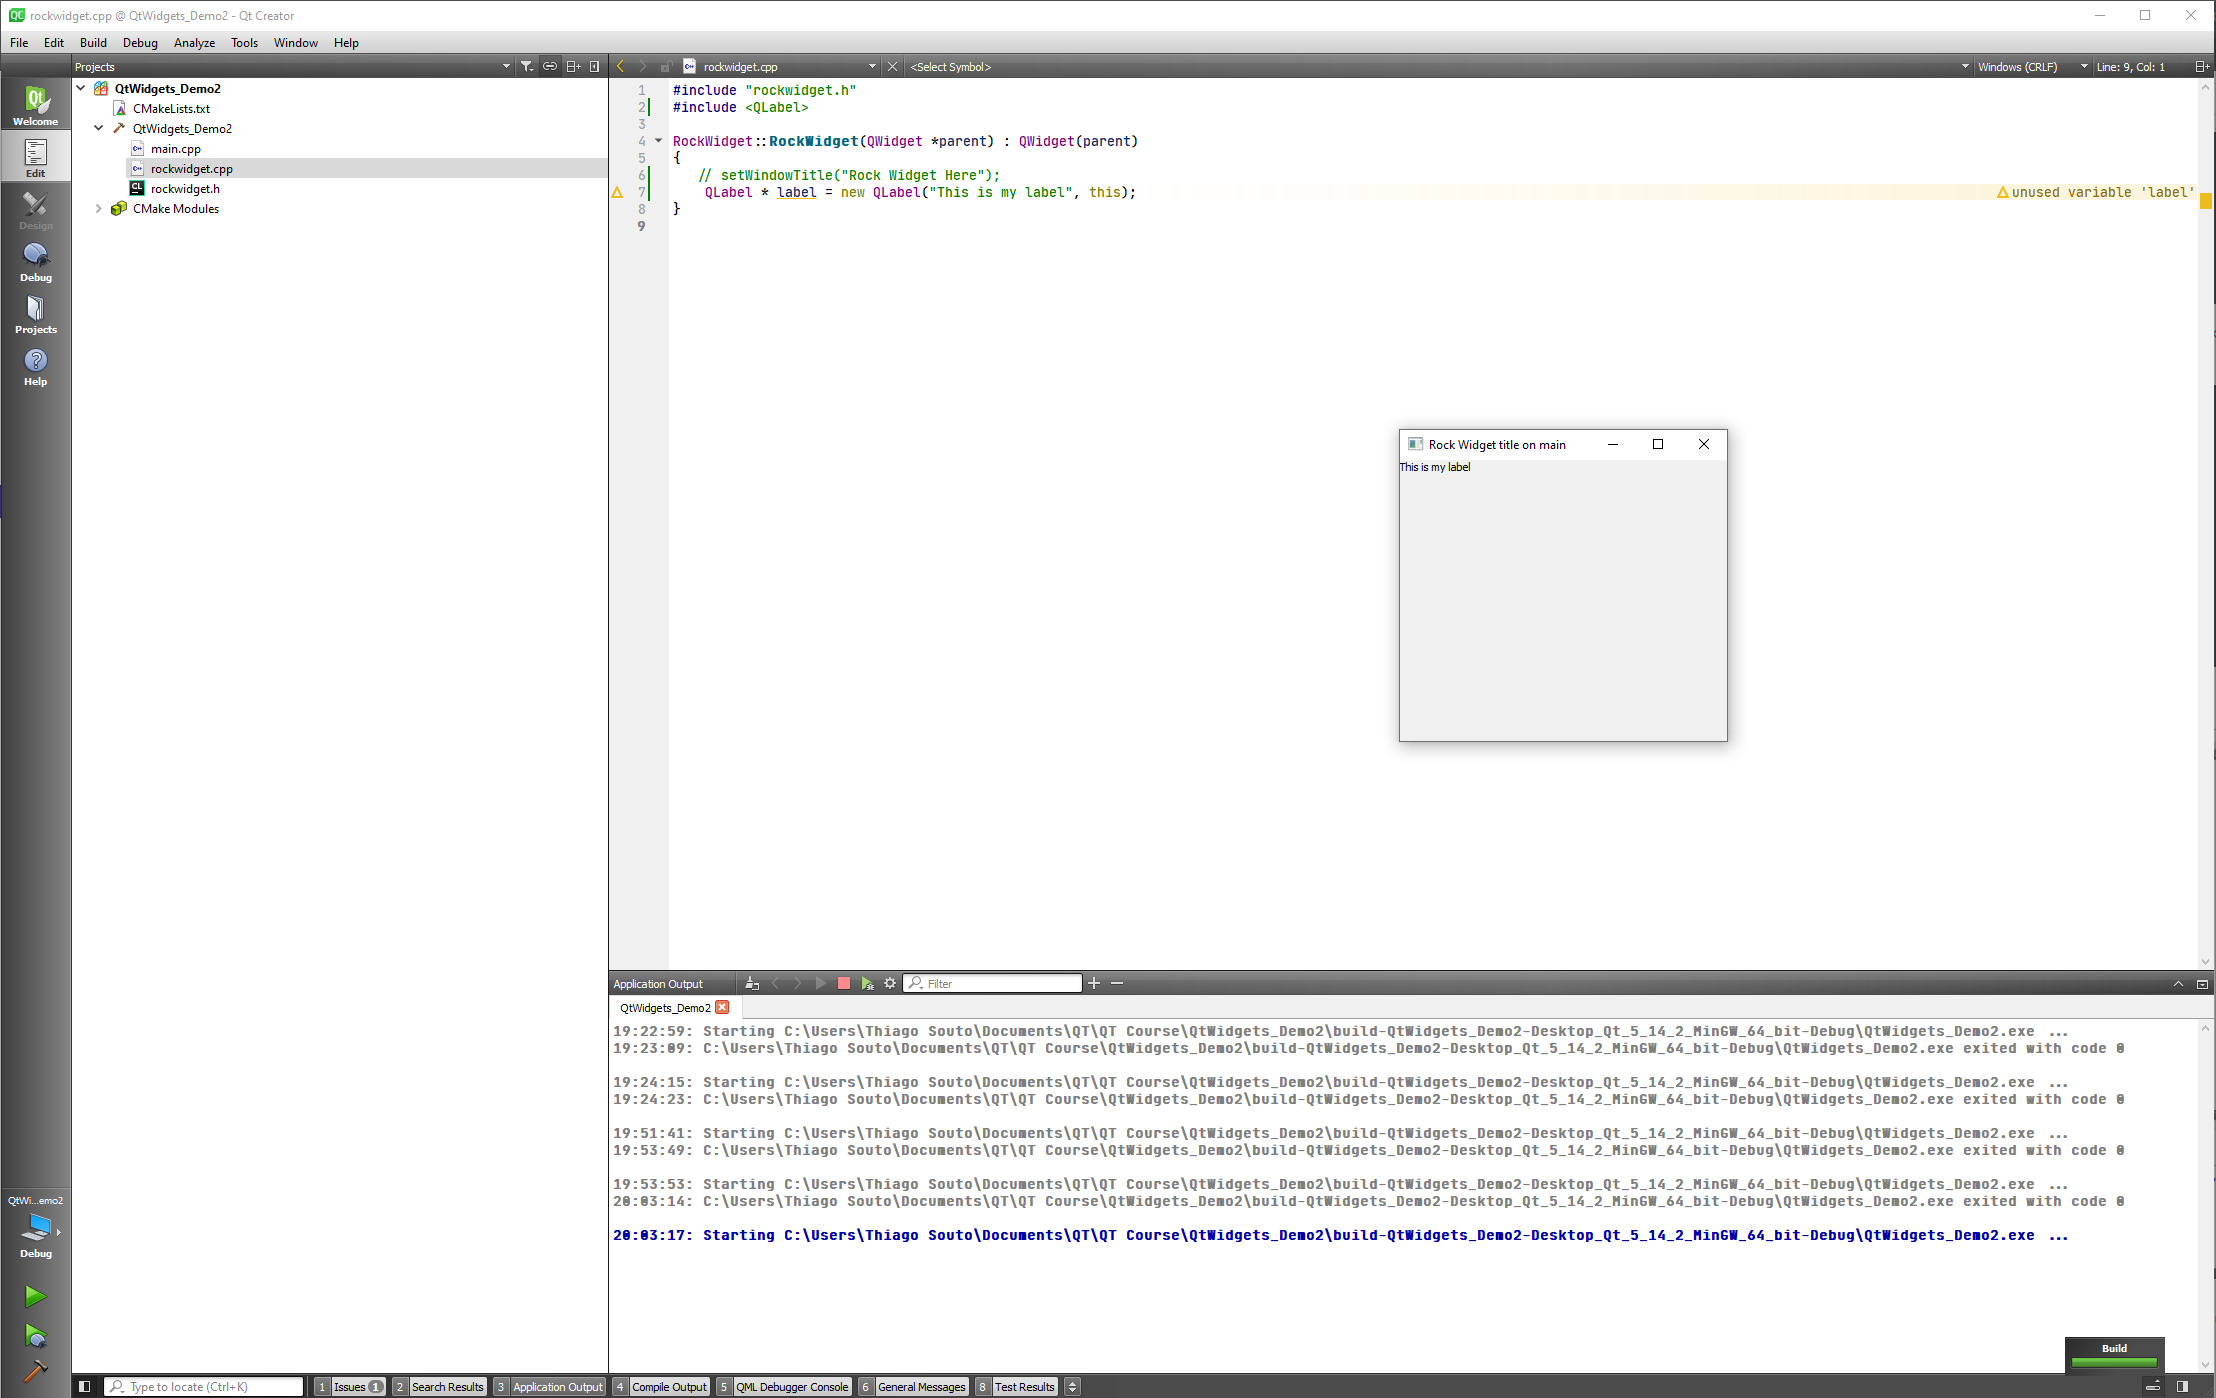
To add something inside the widget we do it in the constructor as well. Now we are going to include the QLable class and add some labels and labels properties.
#include "rockwidget.h"
#include <QLabel>

RockWidget::RockWidget(QWidget *parent) : QWidget(parent)
{
   // setWindowTitle("Rock Widget Here");
    QLabel * label = new QLabel("This is my label", this);
}
2
3
4
5
6
7
8
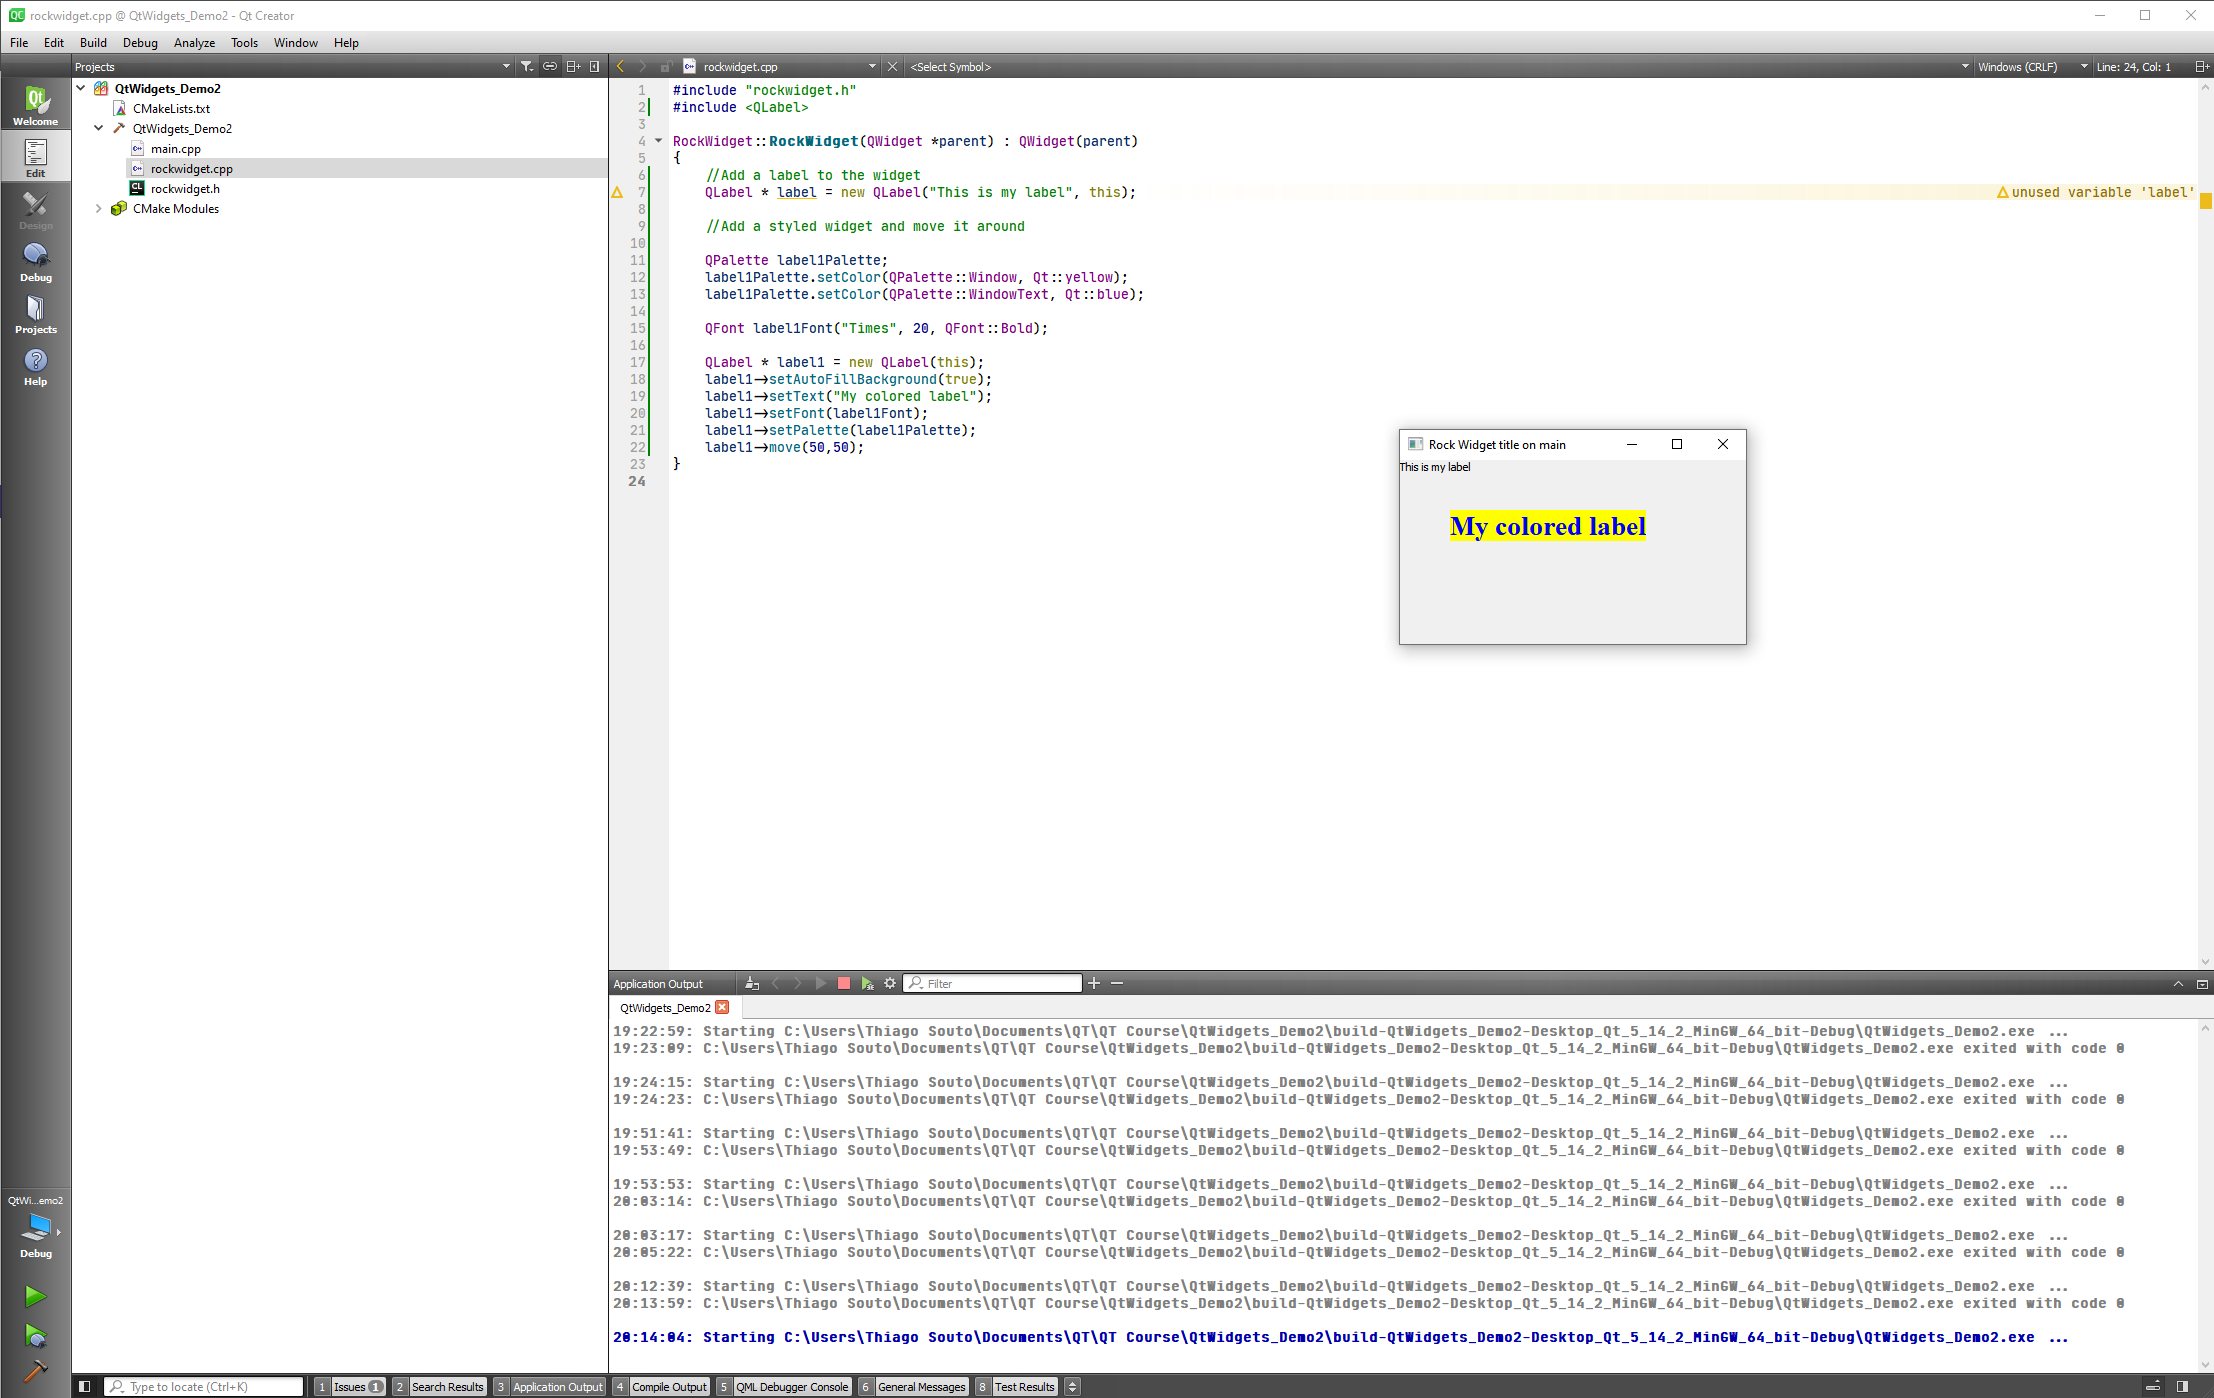
Now we add a new colored blue label with a yellow background:
#include "rockwidget.h"
#include <QLabel>

RockWidget::RockWidget(QWidget *parent) : QWidget(parent)
{
    //Add a label to the widget
    QLabel * label = new QLabel("This is my label", this);

    //Add a styled widget and move it around
    QPalette label1Palette;
    label1Palette.setColor(QPalette::Window, Qt::yellow);
    label1Palette.setColor(QPalette::WindowText, Qt::blue);

    QFont label1Font("Times", 20, QFont::Bold);

    QLabel * label1 = new QLabel(this);
    label1->setAutoFillBackground(true);
    label1->setText("My colored label");
    label1->setFont(label1Font);
    label1->setPalette(label1Palette);
    label1->move(50,50);
}
2
3
4
5
6
7
8
9
10
11
12
13
14
15
16
17
18
19
20
21
22
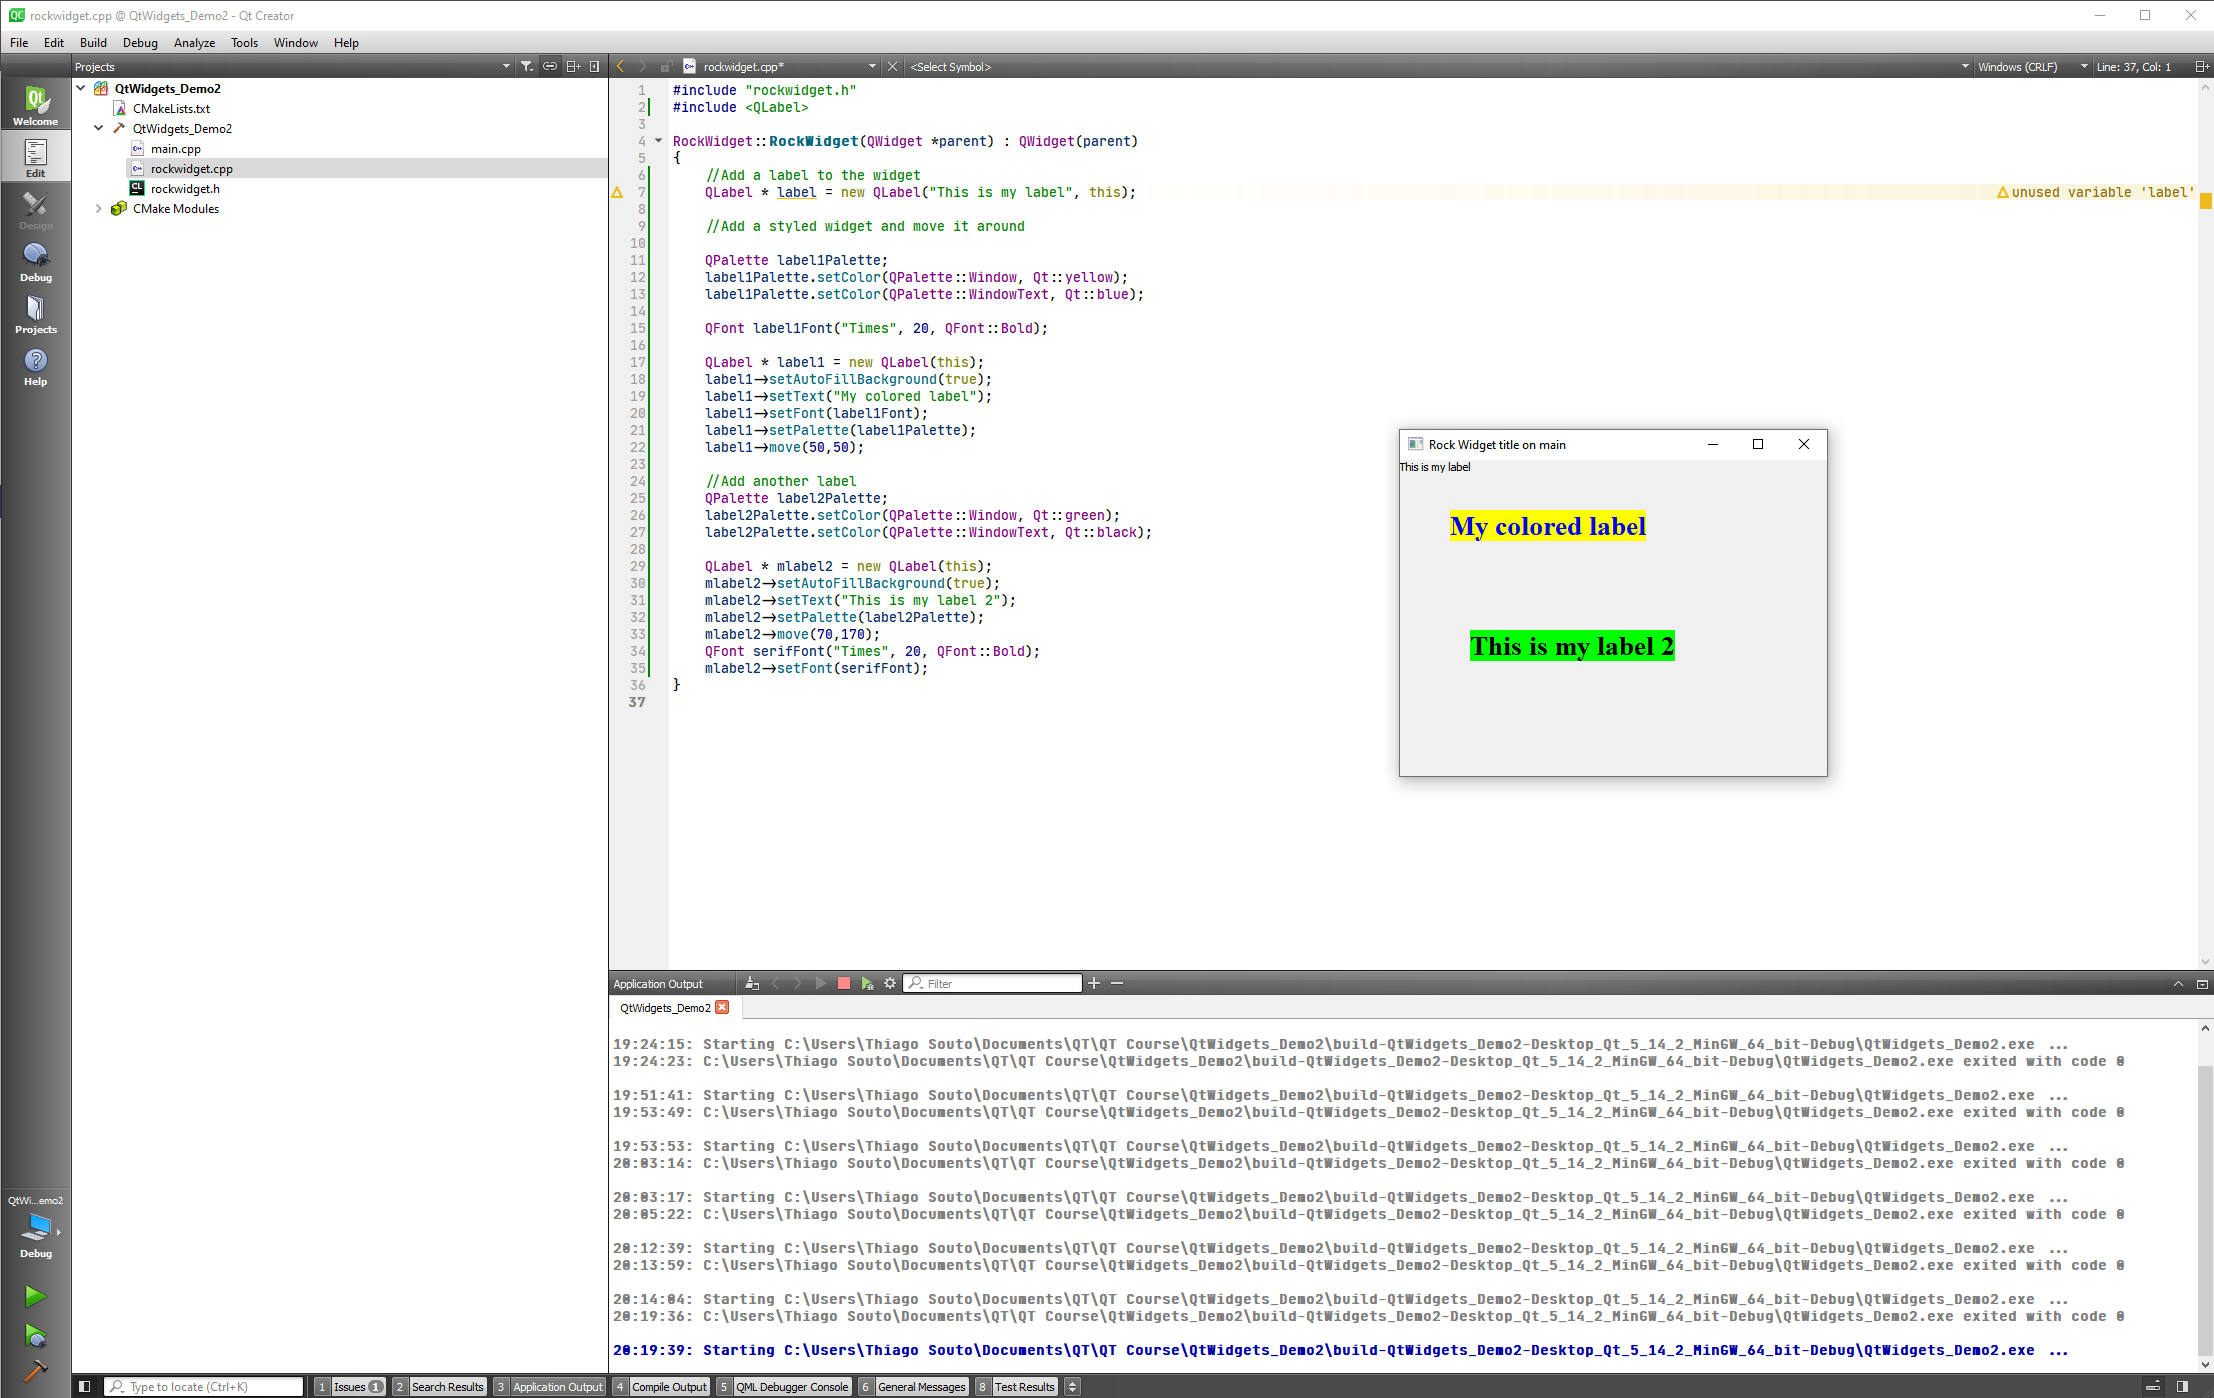
Let's put another label:
#include "rockwidget.h"
#include <QLabel>

RockWidget::RockWidget(QWidget *parent) : QWidget(parent)
{
    //Add a label to the widget
    QLabel * label = new QLabel("This is my label", this);

    //Add a styled widget and move it around

    QPalette label1Palette;
    label1Palette.setColor(QPalette::Window, Qt::yellow);
    label1Palette.setColor(QPalette::WindowText, Qt::blue);

    QFont label1Font("Times", 20, QFont::Bold);

    QLabel * label1 = new QLabel(this);
    label1->setAutoFillBackground(true);
    label1->setText("My colored label");
    label1->setFont(label1Font);
    label1->setPalette(label1Palette);
    label1->move(50,50);

    //Add another label
    QPalette label2Palette;
    label2Palette.setColor(QPalette::Window, Qt::green);
    label2Palette.setColor(QPalette::WindowText, Qt::black);

    QLabel * mlabel2 = new QLabel(this);
    mlabel2->setAutoFillBackground(true);
    mlabel2->setText("This is my label 2");
    mlabel2->setPalette(label2Palette);
    mlabel2->move(70,170);
    QFont serifFont("Times", 20, QFont::Bold);
    mlabel2->setFont(serifFont);
}
2
3
4
5
6
7
8
9
10
11
12
13
14
15
16
17
18
19
20
21
22
23
24
25
26
27
28
29
30
31
32
33
34
35
36
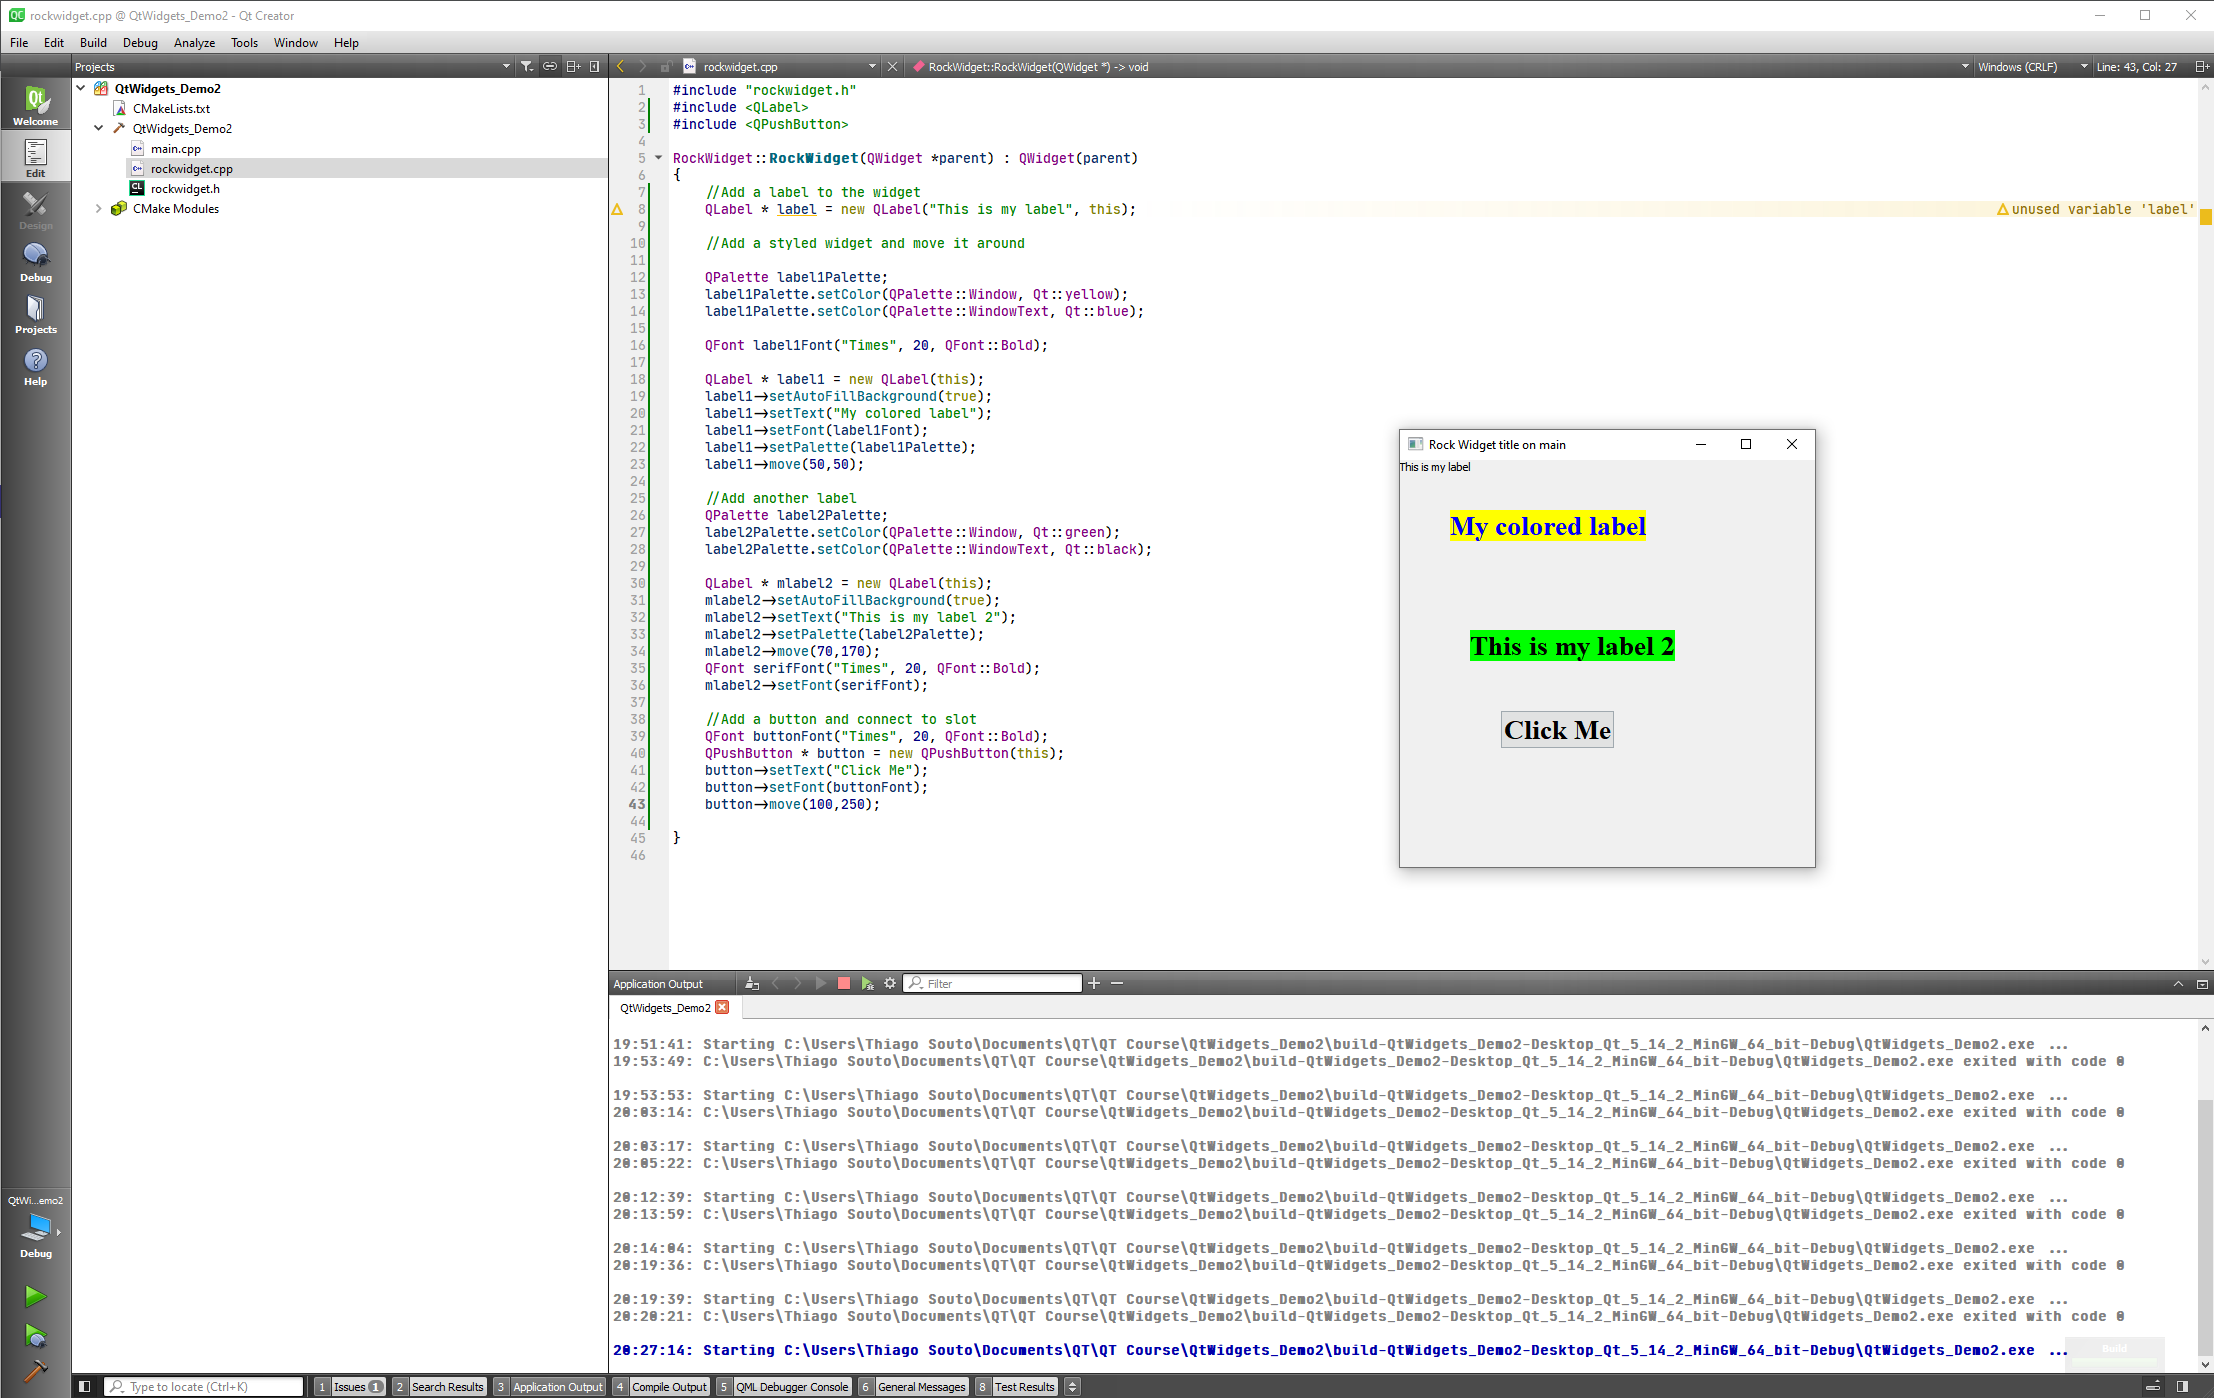
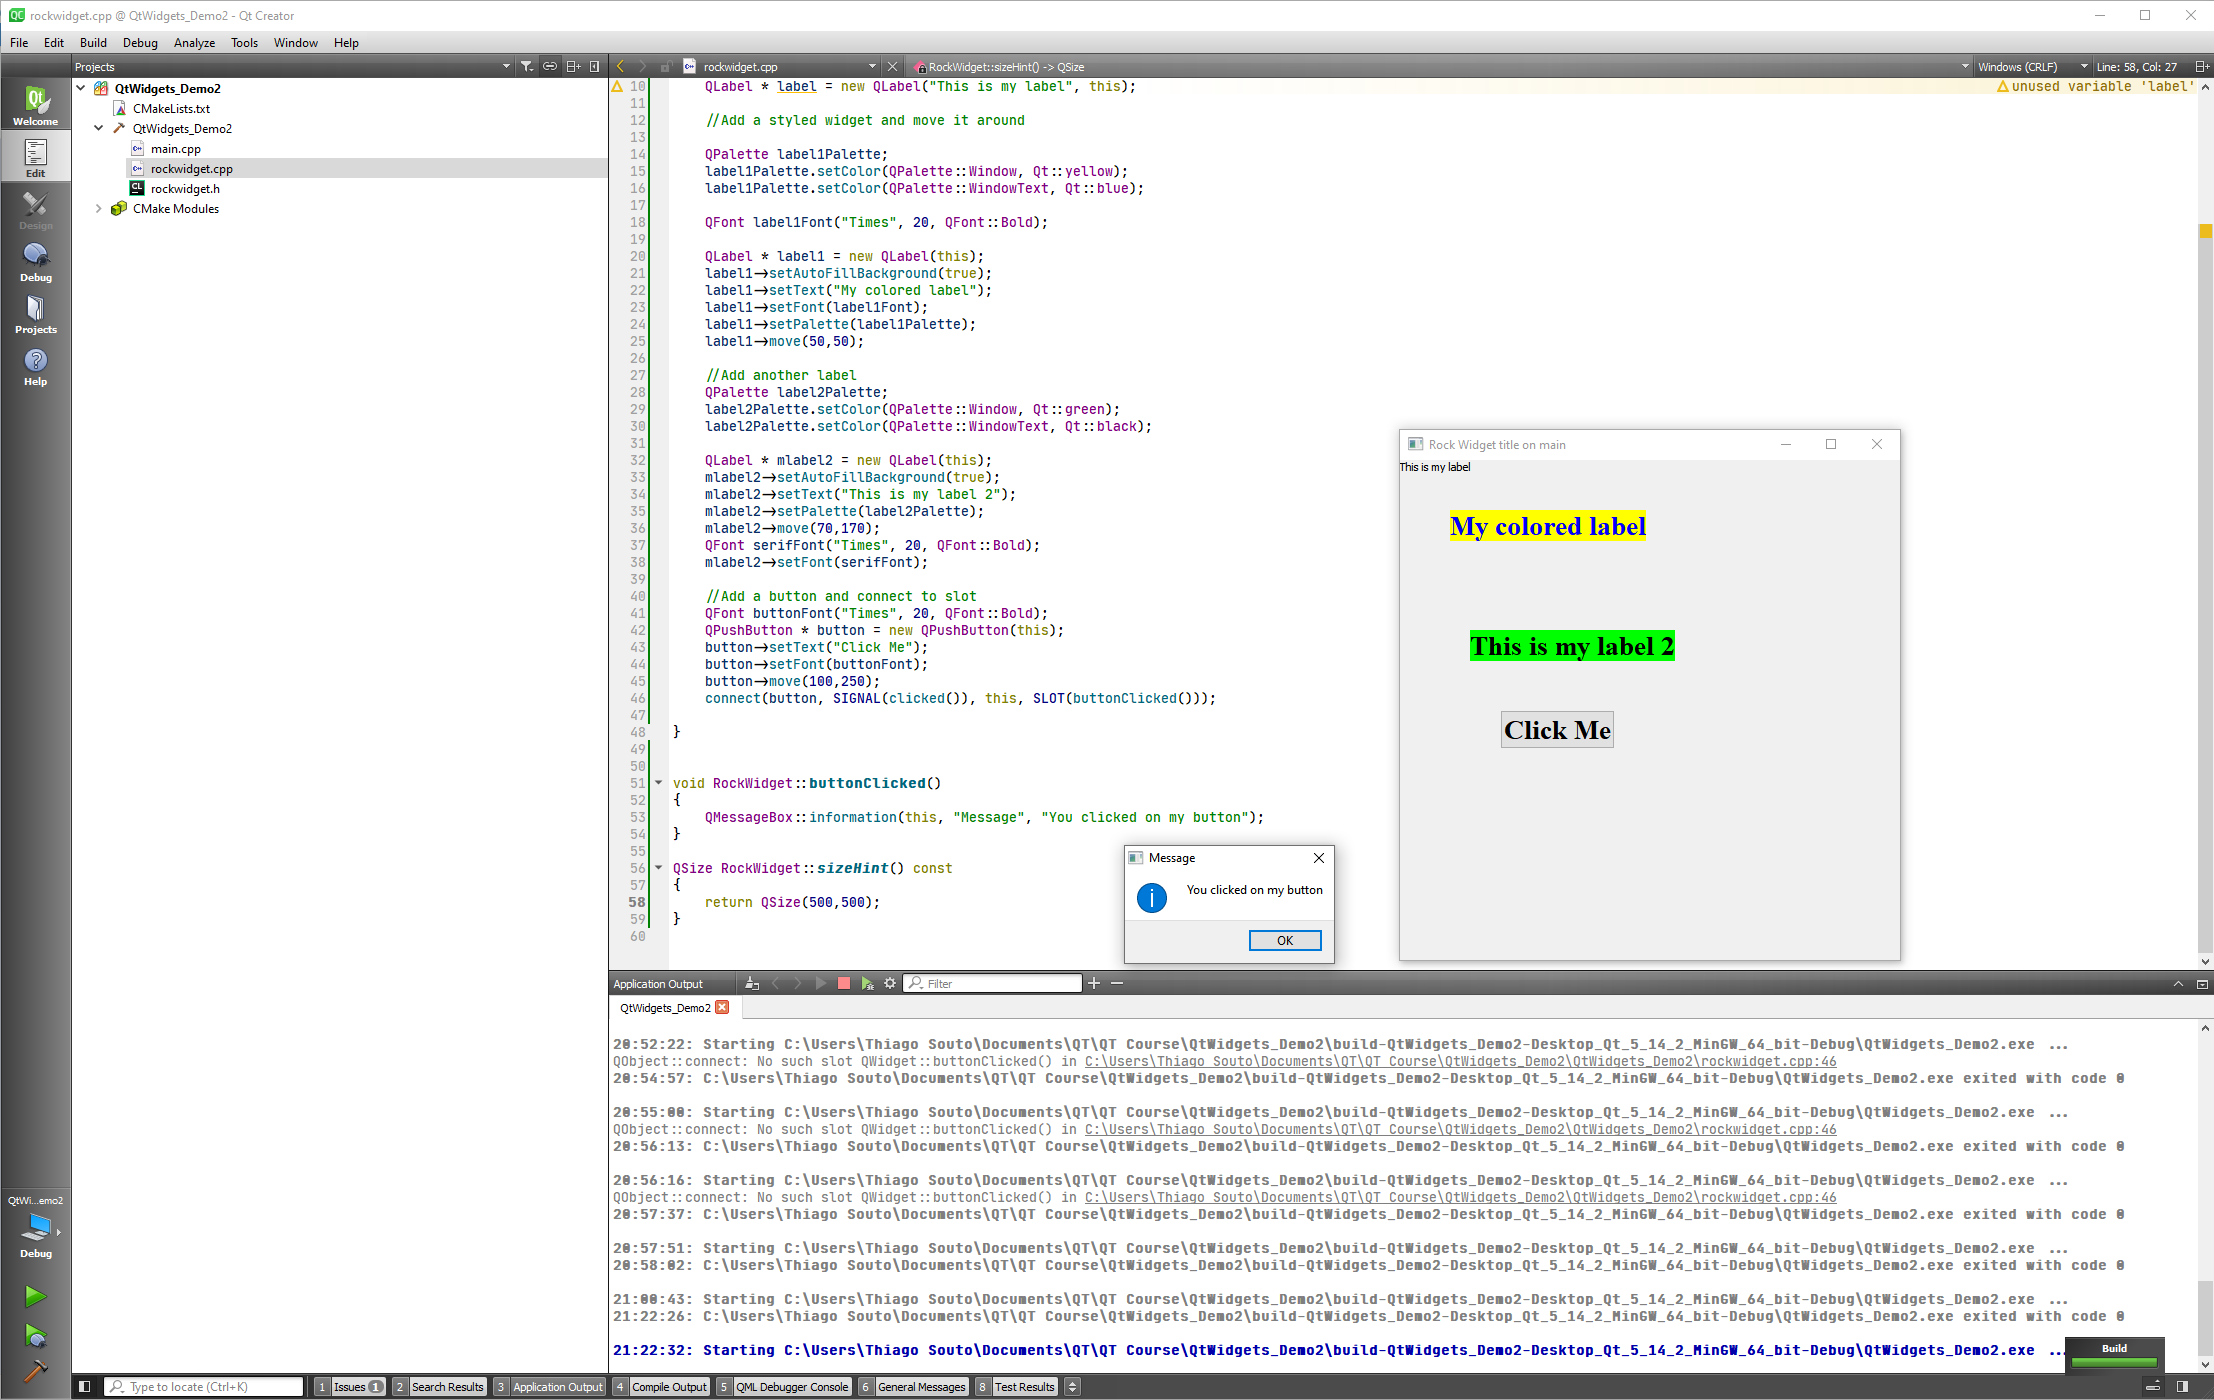
Now let's add a button:
#include "rockwidget.h"
#include <QLabel>
#include <QPushButton>

RockWidget::RockWidget(QWidget *parent) : QWidget(parent)
{
    //Add a label to the widget
    QLabel * label = new QLabel("This is my label", this);

    //Add a styled widget and move it around

    QPalette label1Palette;
    label1Palette.setColor(QPalette::Window, Qt::yellow);
    label1Palette.setColor(QPalette::WindowText, Qt::blue);

    QFont label1Font("Times", 20, QFont::Bold);

    QLabel * label1 = new QLabel(this);
    label1->setAutoFillBackground(true);
    label1->setText("My colored label");
    label1->setFont(label1Font);
    label1->setPalette(label1Palette);
    label1->move(50,50);

    //Add another label
    QPalette label2Palette;
    label2Palette.setColor(QPalette::Window, Qt::green);
    label2Palette.setColor(QPalette::WindowText, Qt::black);

    QLabel * mlabel2 = new QLabel(this);
    mlabel2->setAutoFillBackground(true);
    mlabel2->setText("This is my label 2");
    mlabel2->setPalette(label2Palette);
    mlabel2->move(70,170);
    QFont serifFont("Times", 20, QFont::Bold);
    mlabel2->setFont(serifFont);

    //Add a button and connect to slot
    QFont buttonFont("Times", 20, QFont::Bold);
    QPushButton * button = new QPushButton(this);
    button->setText("Click Me");
    button->setFont(buttonFont);
    button->move(100,250);
}
2
3
4
5
6
7
8
9
10
11
12
13
14
15
16
17
18
19
20
21
22
23
24
25
26
27
28
29
30
31
32
33
34
35
36
37
38
39
40
41
42
43
44
Now we can connect the button, for this we have to go the rockwidget.h file and add a private slot.
#ifndef ROCKWIDGET_H
#define ROCKWIDGET_H

#include <QObject>
#include <QWidget>

class RockWidget : public QWidget
{
public:
    explicit RockWidget(QWidget *parent = nullptr);

signals:

private slots:
    void buttonClicked();

};

#endif // ROCKWIDGET_H
2
3
4
5
6
7
8
9
10
11
12
13
14
15
16
17
18
19
Now we have to implement this into the cpp file of the class, for this we will let Qt creator help us:
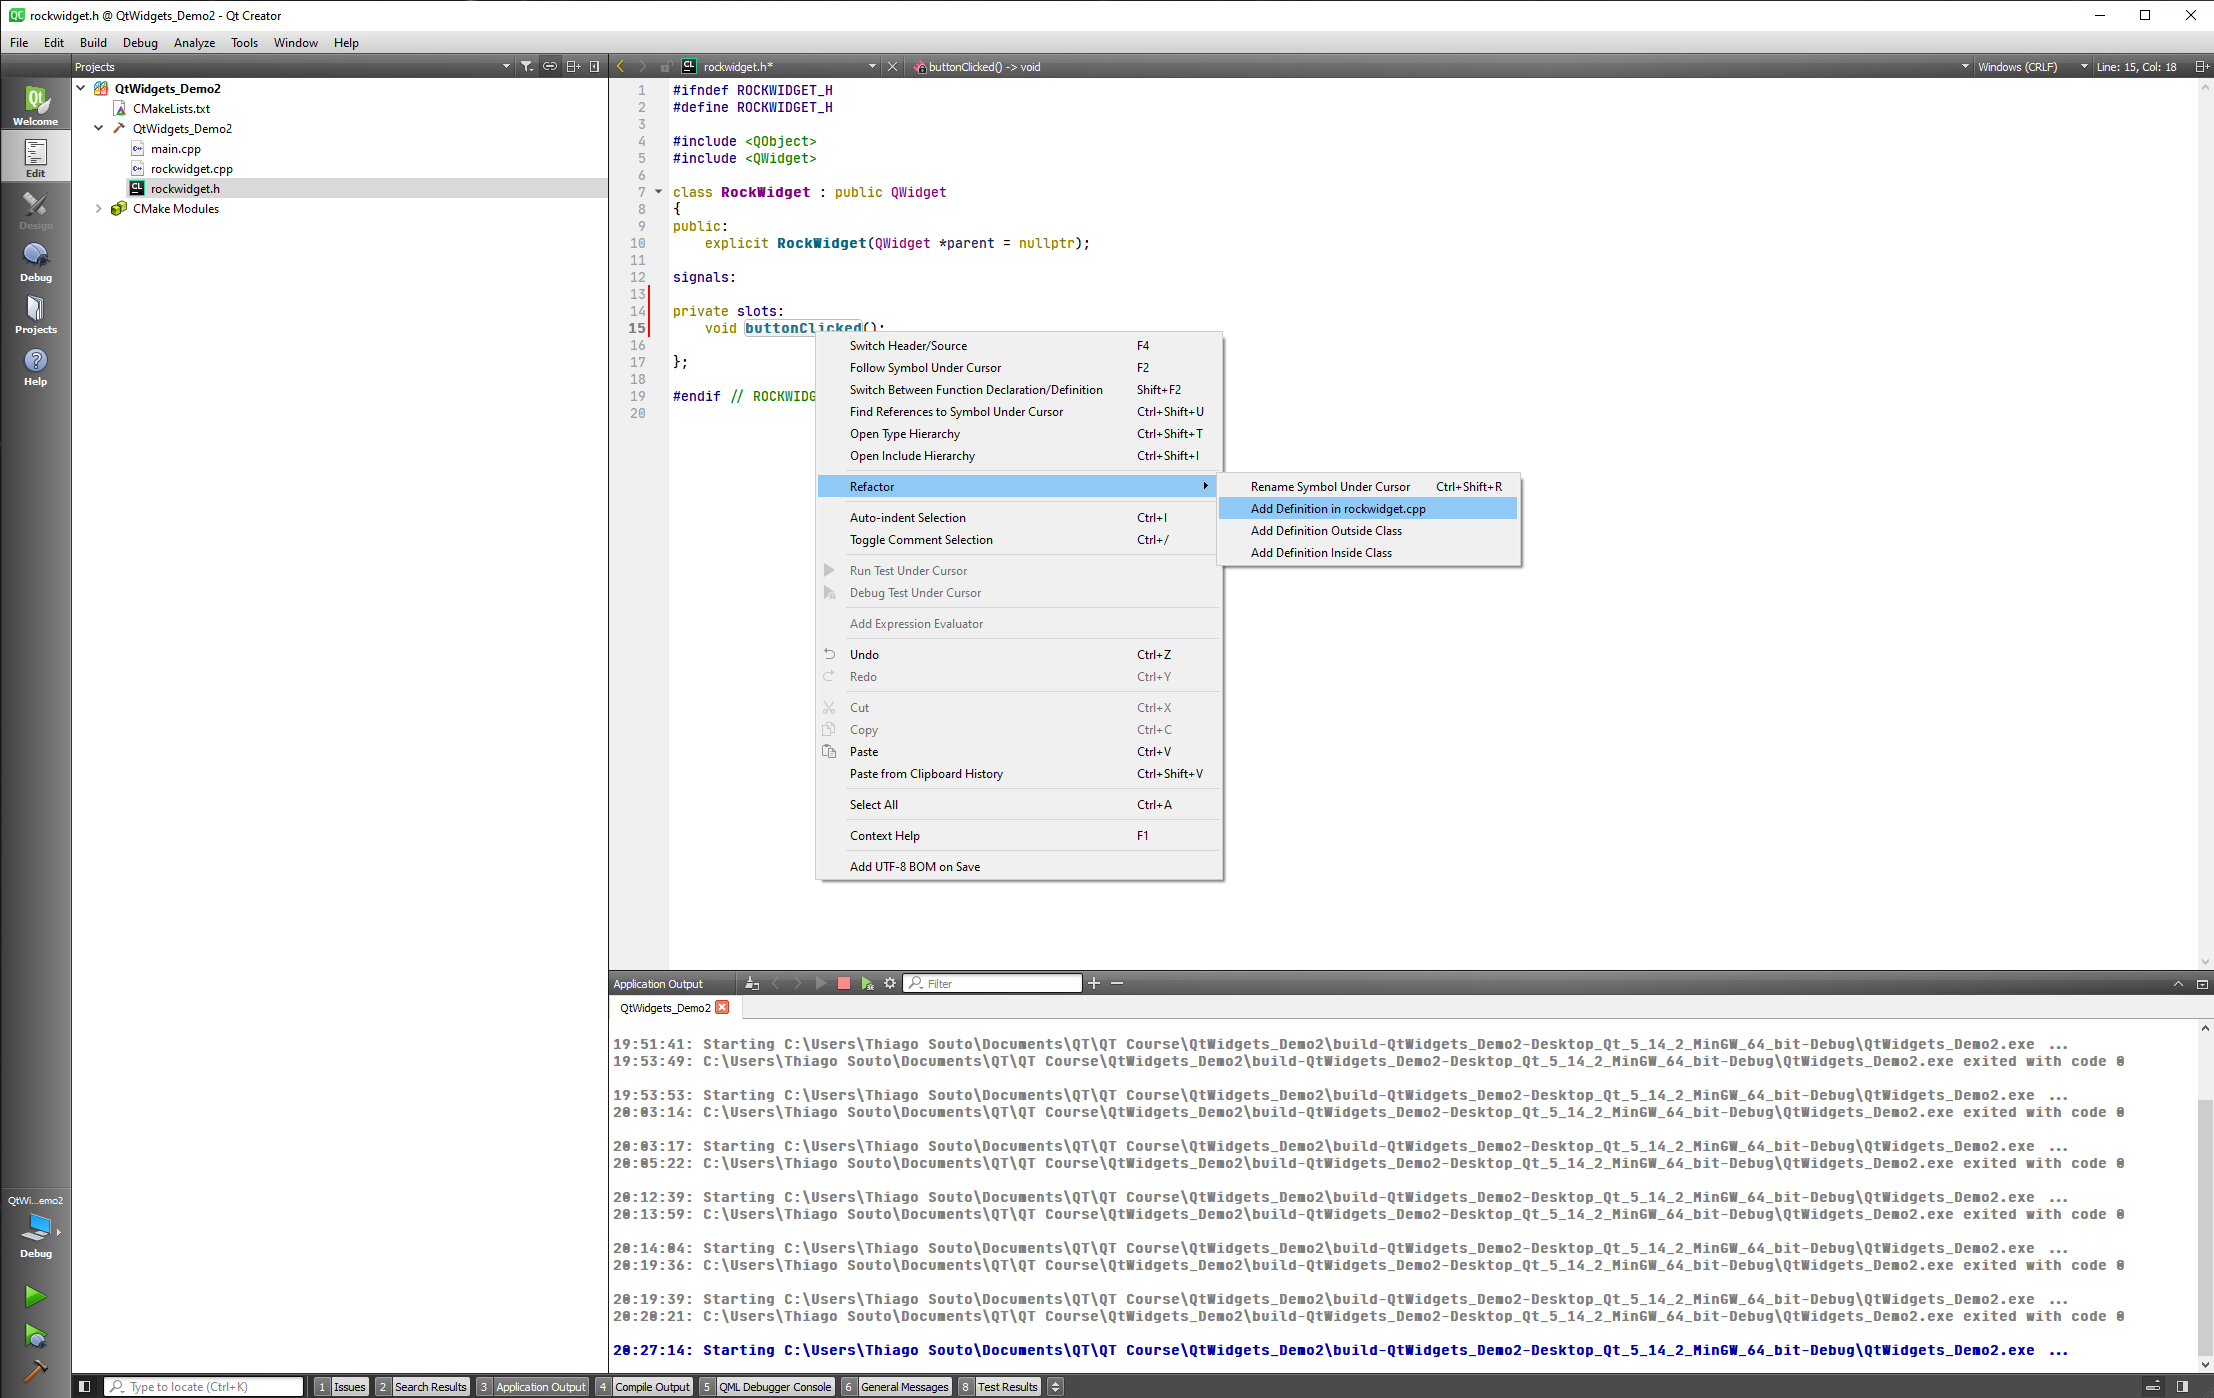
This will create the function on the cpp file for us:
#include "rockwidget.h"
#include <QLabel>
#include <QPushButton>

RockWidget::RockWidget(QWidget *parent) : QWidget(parent)
{
    //Add a label to the widget
    QLabel * label = new QLabel("This is my label", this);

    //Add a styled widget and move it around

    QPalette label1Palette;
    label1Palette.setColor(QPalette::Window, Qt::yellow);
    label1Palette.setColor(QPalette::WindowText, Qt::blue);

    QFont label1Font("Times", 20, QFont::Bold);

    QLabel * label1 = new QLabel(this);
    label1->setAutoFillBackground(true);
    label1->setText("My colored label");
    label1->setFont(label1Font);
    label1->setPalette(label1Palette);
    label1->move(50,50);

    //Add another label
    QPalette label2Palette;
    label2Palette.setColor(QPalette::Window, Qt::green);
    label2Palette.setColor(QPalette::WindowText, Qt::black);

    QLabel * mlabel2 = new QLabel(this);
    mlabel2->setAutoFillBackground(true);
    mlabel2->setText("This is my label 2");
    mlabel2->setPalette(label2Palette);
    mlabel2->move(70,170);
    QFont serifFont("Times", 20, QFont::Bold);
    mlabel2->setFont(serifFont);

    //Add a button and connect to slot
    QFont buttonFont("Times", 20, QFont::Bold);
    QPushButton * button = new QPushButton(this);
    button->setText("Click Me");
    button->setFont(buttonFont);
    button->move(100,250);

}

void RockWidget::buttonClicked()
{

}
2
3
4
5
6
7
8
9
10
11
12
13
14
15
16
17
18
19
20
21
22
23
24
25
26
27
28
29
30
31
32
33
34
35
36
37
38
39
40
41
42
43
44
45
46
47
48
49
50
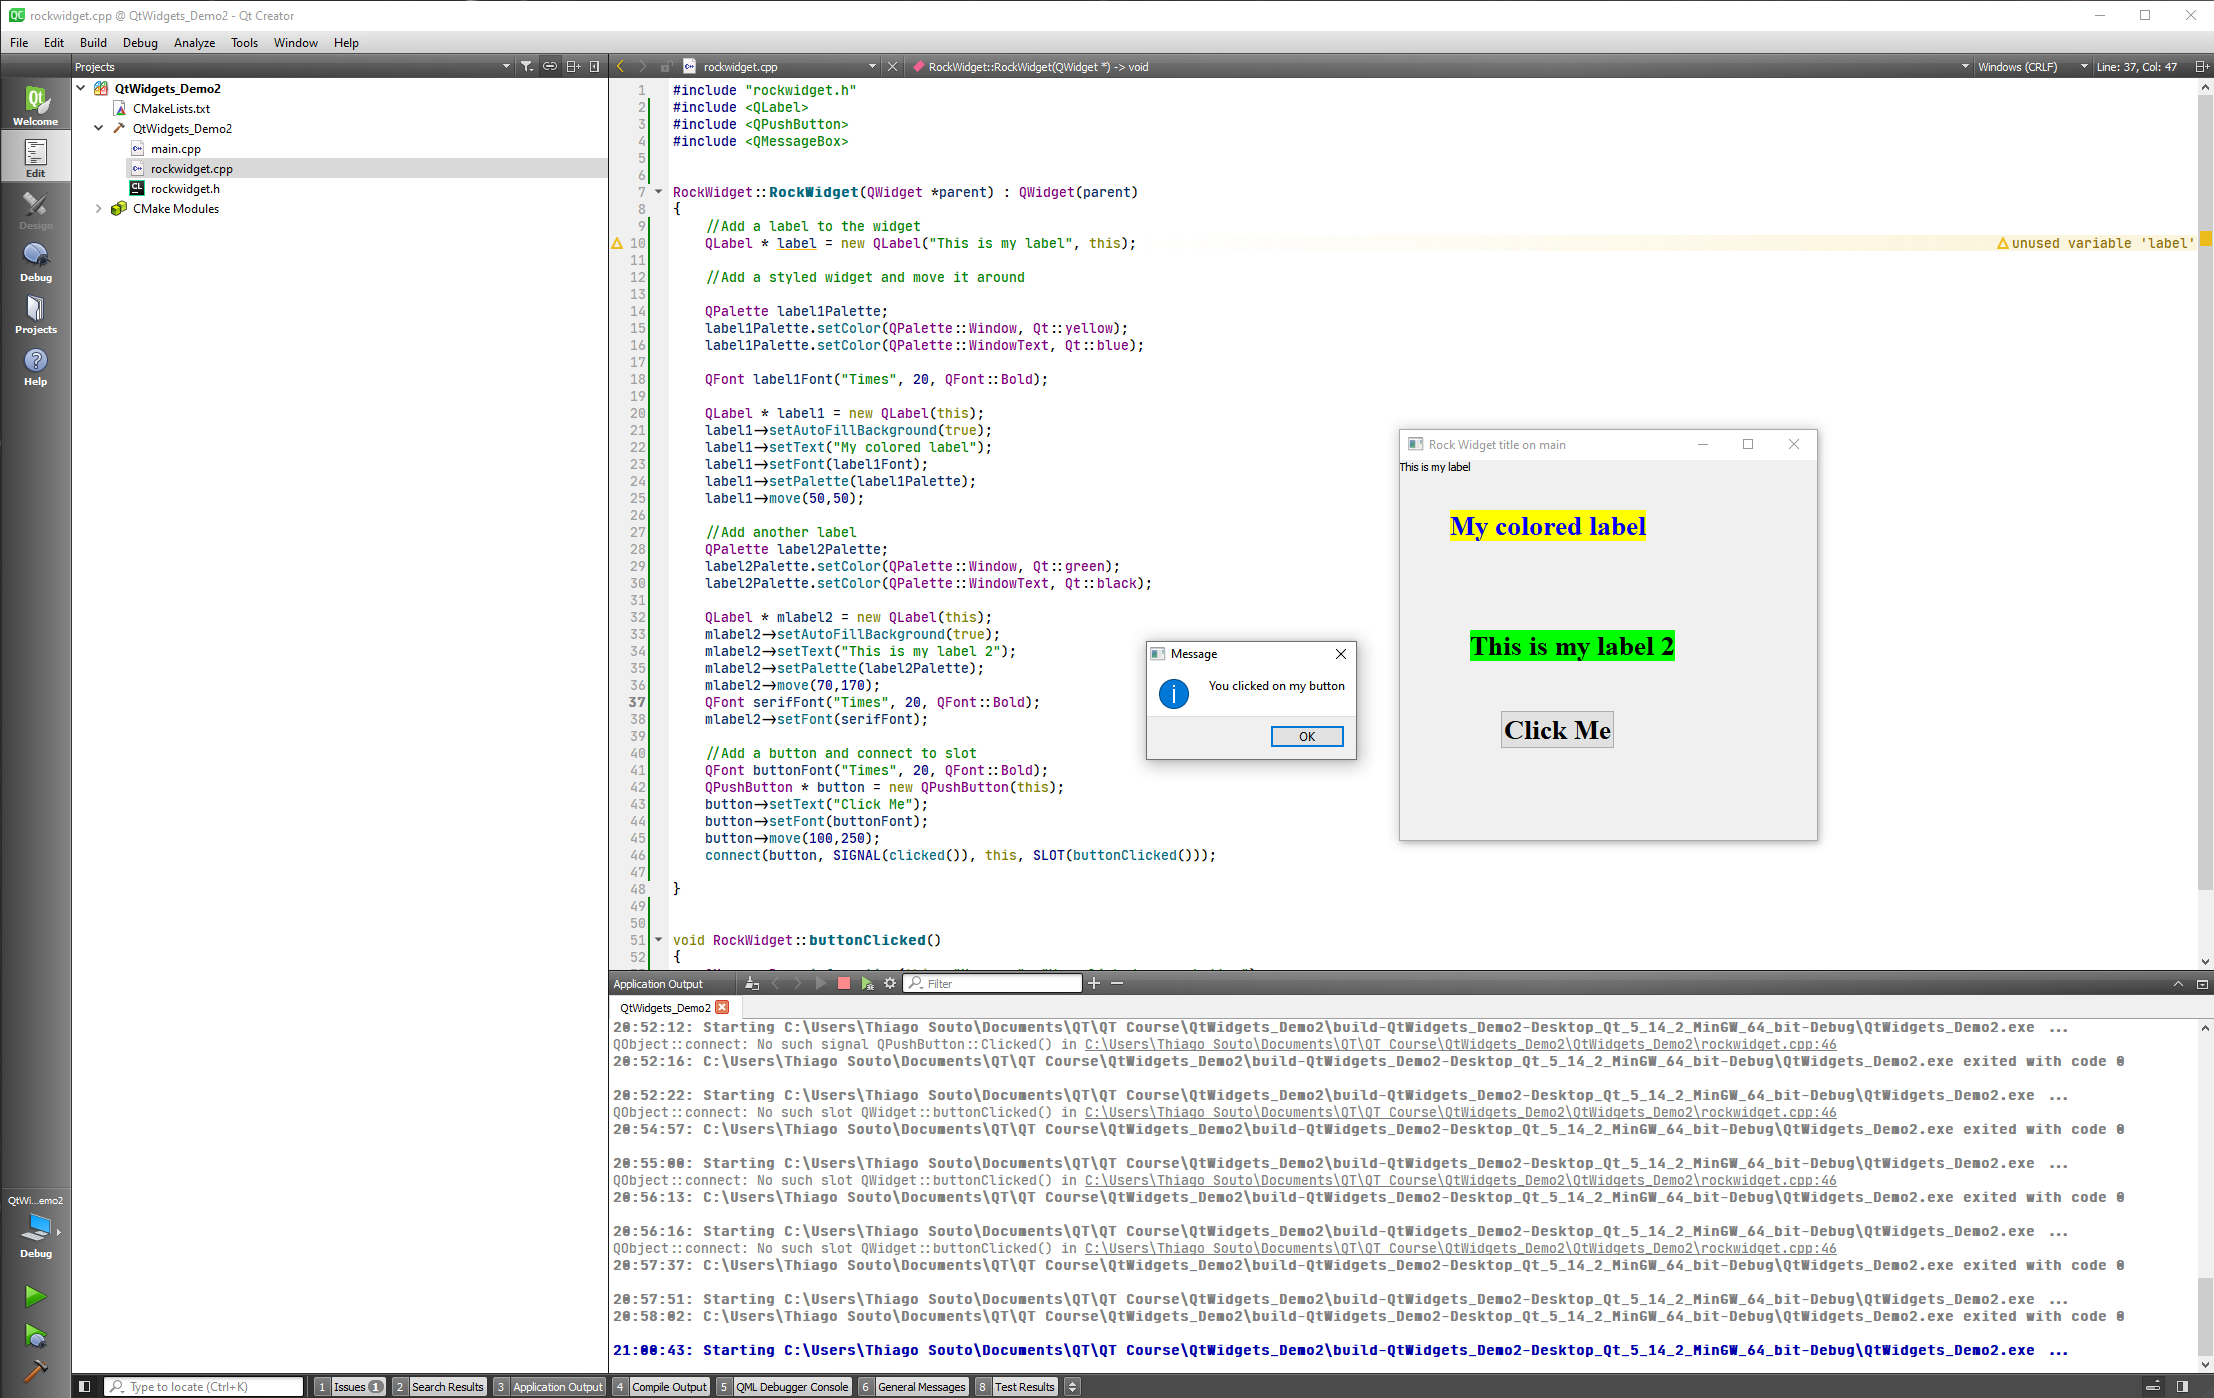
Now we can implement a message box when the button is clicked.
For this we will have to include the class.
#include "rockwidget.h"
#include <QLabel>
#include <QPushButton>
#include <QMessageBox>


RockWidget::RockWidget(QWidget *parent) : QWidget(parent)
{
    //Add a label to the widget
    QLabel * label = new QLabel("This is my label", this);

    //Add a styled widget and move it around

    QPalette label1Palette;
    label1Palette.setColor(QPalette::Window, Qt::yellow);
    label1Palette.setColor(QPalette::WindowText, Qt::blue);

    QFont label1Font("Times", 20, QFont::Bold);

    QLabel * label1 = new QLabel(this);
    label1->setAutoFillBackground(true);
    label1->setText("My colored label");
    label1->setFont(label1Font);
    label1->setPalette(label1Palette);
    label1->move(50,50);

    //Add another label
    QPalette label2Palette;
    label2Palette.setColor(QPalette::Window, Qt::green);
    label2Palette.setColor(QPalette::WindowText, Qt::black);

    QLabel * mlabel2 = new QLabel(this);
    mlabel2->setAutoFillBackground(true);
    mlabel2->setText("This is my label 2");
    mlabel2->setPalette(label2Palette);
    mlabel2->move(70,170);
    QFont serifFont("Times", 20, QFont::Bold);
    mlabel2->setFont(serifFont);

    //Add a button and connect to slot
    QFont buttonFont("Times", 20, QFont::Bold);
    QPushButton * button = new QPushButton(this);
    button->setText("Click Me");
    button->setFont(buttonFont);
    button->move(100,250);

}


void RockWidget::buttonClicked()
{
    QMessageBox::information(this, "Message", "You clicked on my button");
}
2
3
4
5
6
7
8
9
10
11
12
13
14
15
16
17
18
19
20
21
22
23
24
25
26
27
28
29
30
31
32
33
34
35
36
37
38
39
40
41
42
43
44
45
46
47
48
49
50
51
52
53
And we have to connect the SLOT as well:
#include "rockwidget.h"
#include <QLabel>
#include <QPushButton>
#include <QMessageBox>


RockWidget::RockWidget(QWidget *parent) : QWidget(parent)
{
    //Add a label to the widget
    QLabel * label = new QLabel("This is my label", this);

    //Add a styled widget and move it around

    QPalette label1Palette;
    label1Palette.setColor(QPalette::Window, Qt::yellow);
    label1Palette.setColor(QPalette::WindowText, Qt::blue);

    QFont label1Font("Times", 20, QFont::Bold);

    QLabel * label1 = new QLabel(this);
    label1->setAutoFillBackground(true);
    label1->setText("My colored label");
    label1->setFont(label1Font);
    label1->setPalette(label1Palette);
    label1->move(50,50);

    //Add another label
    QPalette label2Palette;
    label2Palette.setColor(QPalette::Window, Qt::green);
    label2Palette.setColor(QPalette::WindowText, Qt::black);

    QLabel * mlabel2 = new QLabel(this);
    mlabel2->setAutoFillBackground(true);
    mlabel2->setText("This is my label 2");
    mlabel2->setPalette(label2Palette);
    mlabel2->move(70,170);
    QFont serifFont("Times", 20, QFont::Bold);
    mlabel2->setFont(serifFont);

    //Add a button and connect to slot
    QFont buttonFont("Times", 20, QFont::Bold);
    QPushButton * button = new QPushButton(this);
    button->setText("Click Me");
    button->setFont(buttonFont);
    button->move(100,250);
    connect(button, SIGNAL(clicked()), this, SLOT(buttonClicked()));

}


void RockWidget::buttonClicked()
{
    QMessageBox::information(this, "Message", "You clicked on my button");
}
2
3
4
5
6
7
8
9
10
11
12
13
14
15
16
17
18
19
20
21
22
23
24
25
26
27
28
29
30
31
32
33
34
35
36
37
38
39
40
41
42
43
44
45
46
47
48
49
50
51
52
53
54
WARNING
For the message to work we had to add the Q_OBJECT like shown below.
#ifndef ROCKWIDGET_H
#define ROCKWIDGET_H

#include <QObject>
#include <QWidget>

class RockWidget : public QWidget
{
    Q_OBJECT
public:
    explicit RockWidget(QWidget *parent = nullptr);

signals:

public slots:

private slots:
    void buttonClicked();

};

#endif // ROCKWIDGET_H
2
3
4
5
6
7
8
9
10
11
12
13
14
15
16
17
18
19
20
21
22
Now as a last thing we are going to specify the size of the window so we don't have to resize the window all the time.
For that we are going to specify a private session in our class.
#ifndef ROCKWIDGET_H
#define ROCKWIDGET_H

#include <QObject>
#include <QWidget>

class RockWidget : public QWidget
{
    Q_OBJECT
public:
    explicit RockWidget(QWidget *parent = nullptr);

signals:

public slots:

private slots:
    void buttonClicked();
private:
    QSize sizeHint() const;

};

#endif // ROCKWIDGET_H
2
3
4
5
6
7
8
9
10
11
12
13
14
15
16
17
18
19
20
21
22
23
24
and implement it into the class:
#include "rockwidget.h"
#include <QLabel>
#include <QPushButton>
#include <QMessageBox>


RockWidget::RockWidget(QWidget *parent) : QWidget(parent)
{
    //Add a label to the widget
    QLabel * label = new QLabel("This is my label", this);

    //Add a styled widget and move it around

    QPalette label1Palette;
    label1Palette.setColor(QPalette::Window, Qt::yellow);
    label1Palette.setColor(QPalette::WindowText, Qt::blue);

    QFont label1Font("Times", 20, QFont::Bold);

    QLabel * label1 = new QLabel(this);
    label1->setAutoFillBackground(true);
    label1->setText("My colored label");
    label1->setFont(label1Font);
    label1->setPalette(label1Palette);
    label1->move(50,50);

    //Add another label
    QPalette label2Palette;
    label2Palette.setColor(QPalette::Window, Qt::green);
    label2Palette.setColor(QPalette::WindowText, Qt::black);

    QLabel * mlabel2 = new QLabel(this);
    mlabel2->setAutoFillBackground(true);
    mlabel2->setText("This is my label 2");
    mlabel2->setPalette(label2Palette);
    mlabel2->move(70,170);
    QFont serifFont("Times", 20, QFont::Bold);
    mlabel2->setFont(serifFont);

    //Add a button and connect to slot
    QFont buttonFont("Times", 20, QFont::Bold);
    QPushButton * button = new QPushButton(this);
    button->setText("Click Me");
    button->setFont(buttonFont);
    button->move(100,250);
    connect(button, SIGNAL(clicked()), this, SLOT(buttonClicked()));

}


void RockWidget::buttonClicked()
{
    QMessageBox::information(this, "Message", "You clicked on my button");
}

QSize RockWidget::sizeHint() const
{
    return QSize(500,500);
}
2
3
4
5
6
7
8
9
10
11
12
13
14
15
16
17
18
19
20
21
22
23
24
25
26
27
28
29
30
31
32
33
34
35
36
37
38
39
40
41
42
43
44
45
46
47
48
49
50
51
52
53
54
55
56
57
58
59
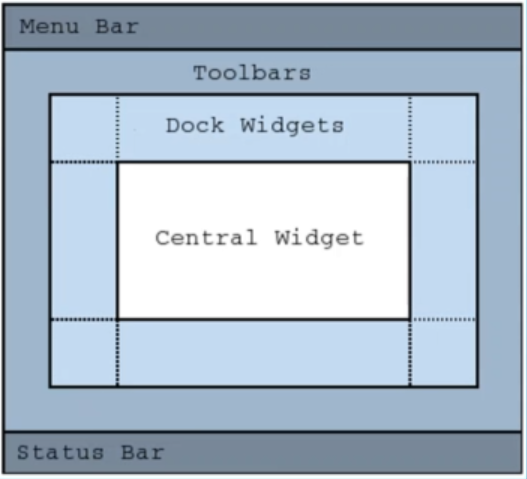
# QMainWindow class
The QMainWindow class provides a main application window.
A main window provides a framework for building an application's user interface. Qt has QMainWindow and its related classes for main window management. QMainWindow has its own layout to which you can add QToolBars, QDockWidgets, a QMenuBar, and a QStatusBar. The layout has a center area that can be occupied by any kind of widget. You can see an image of the layout below.
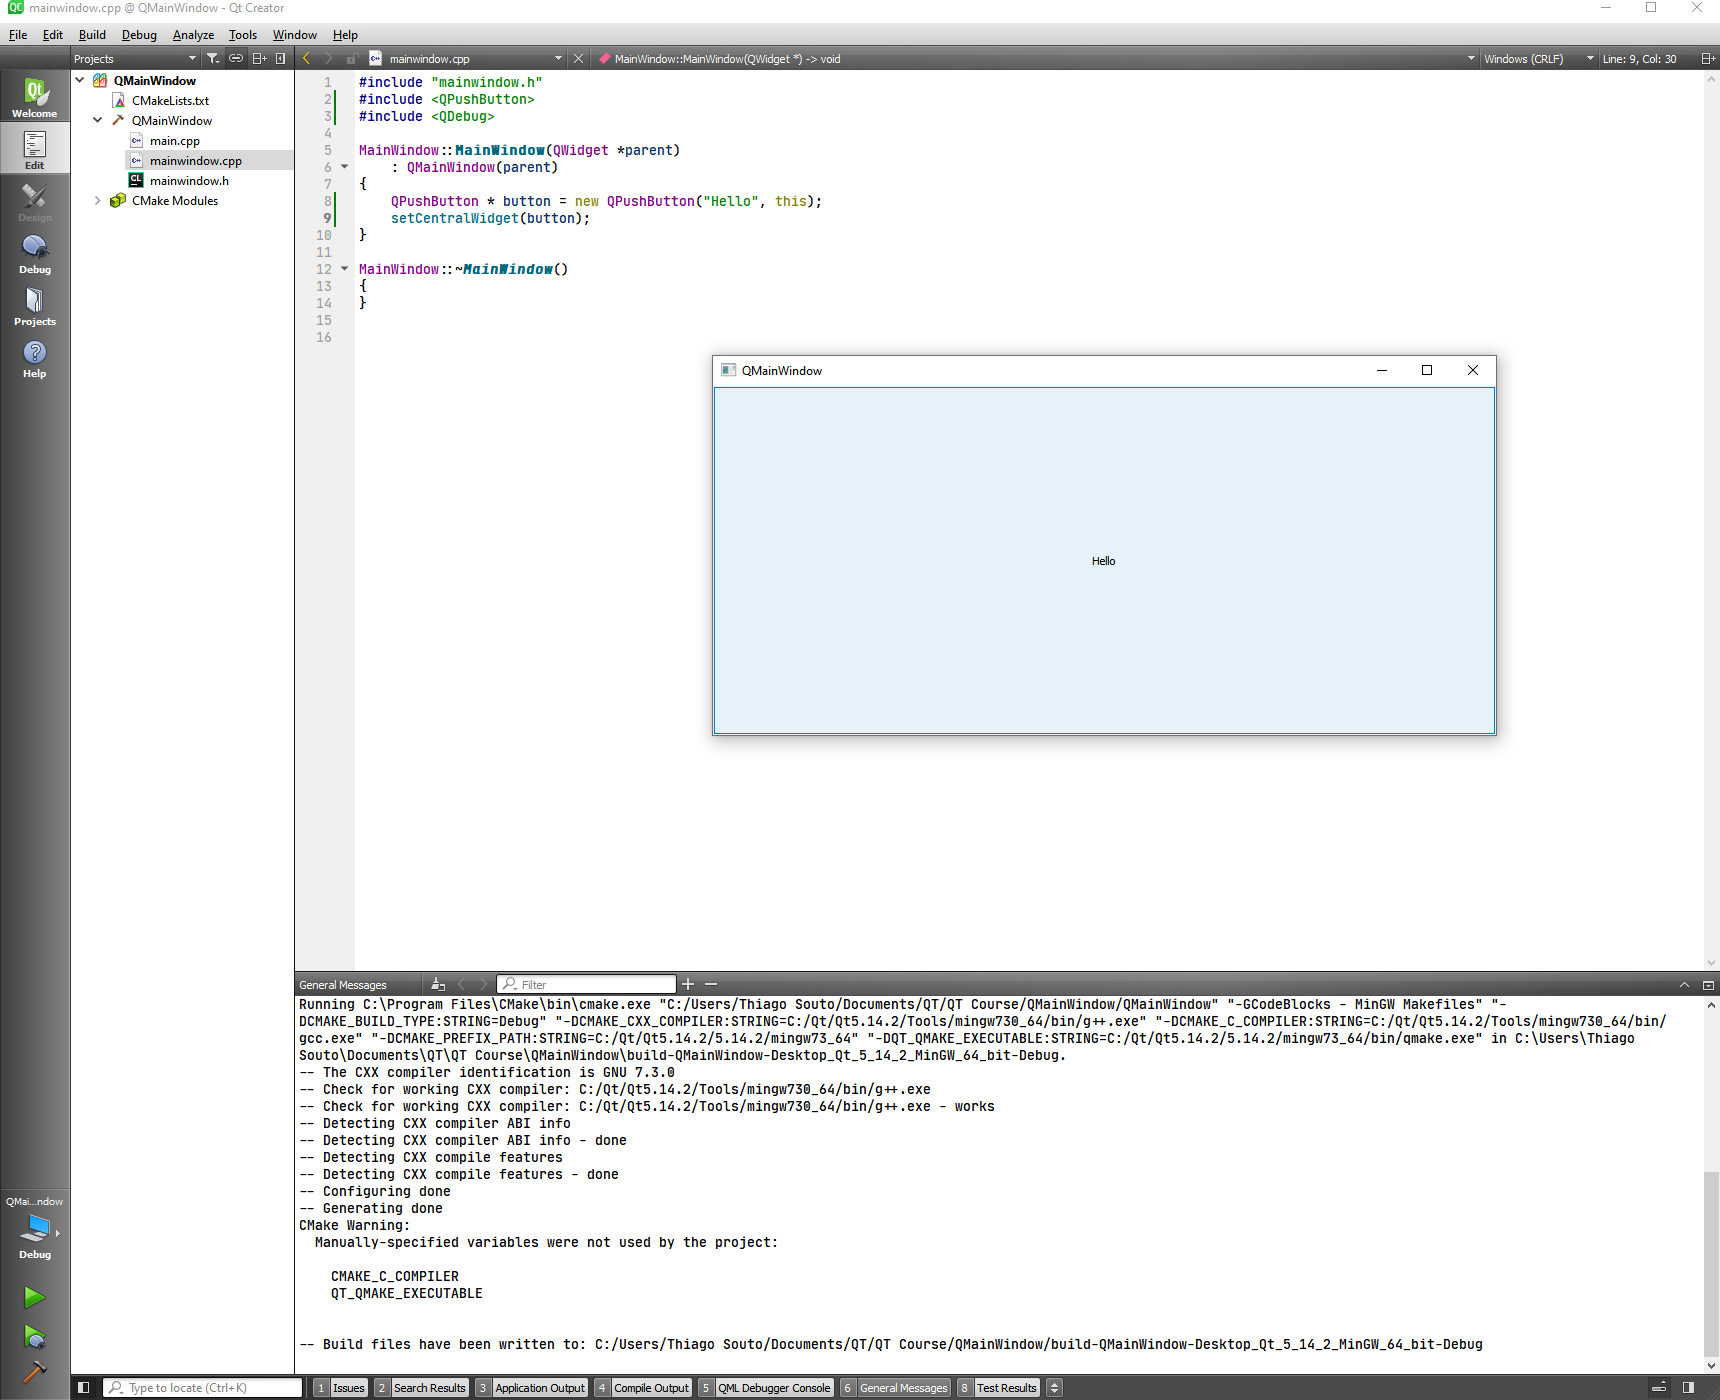
Now we are going to create a QMainWindow Application, without the form.
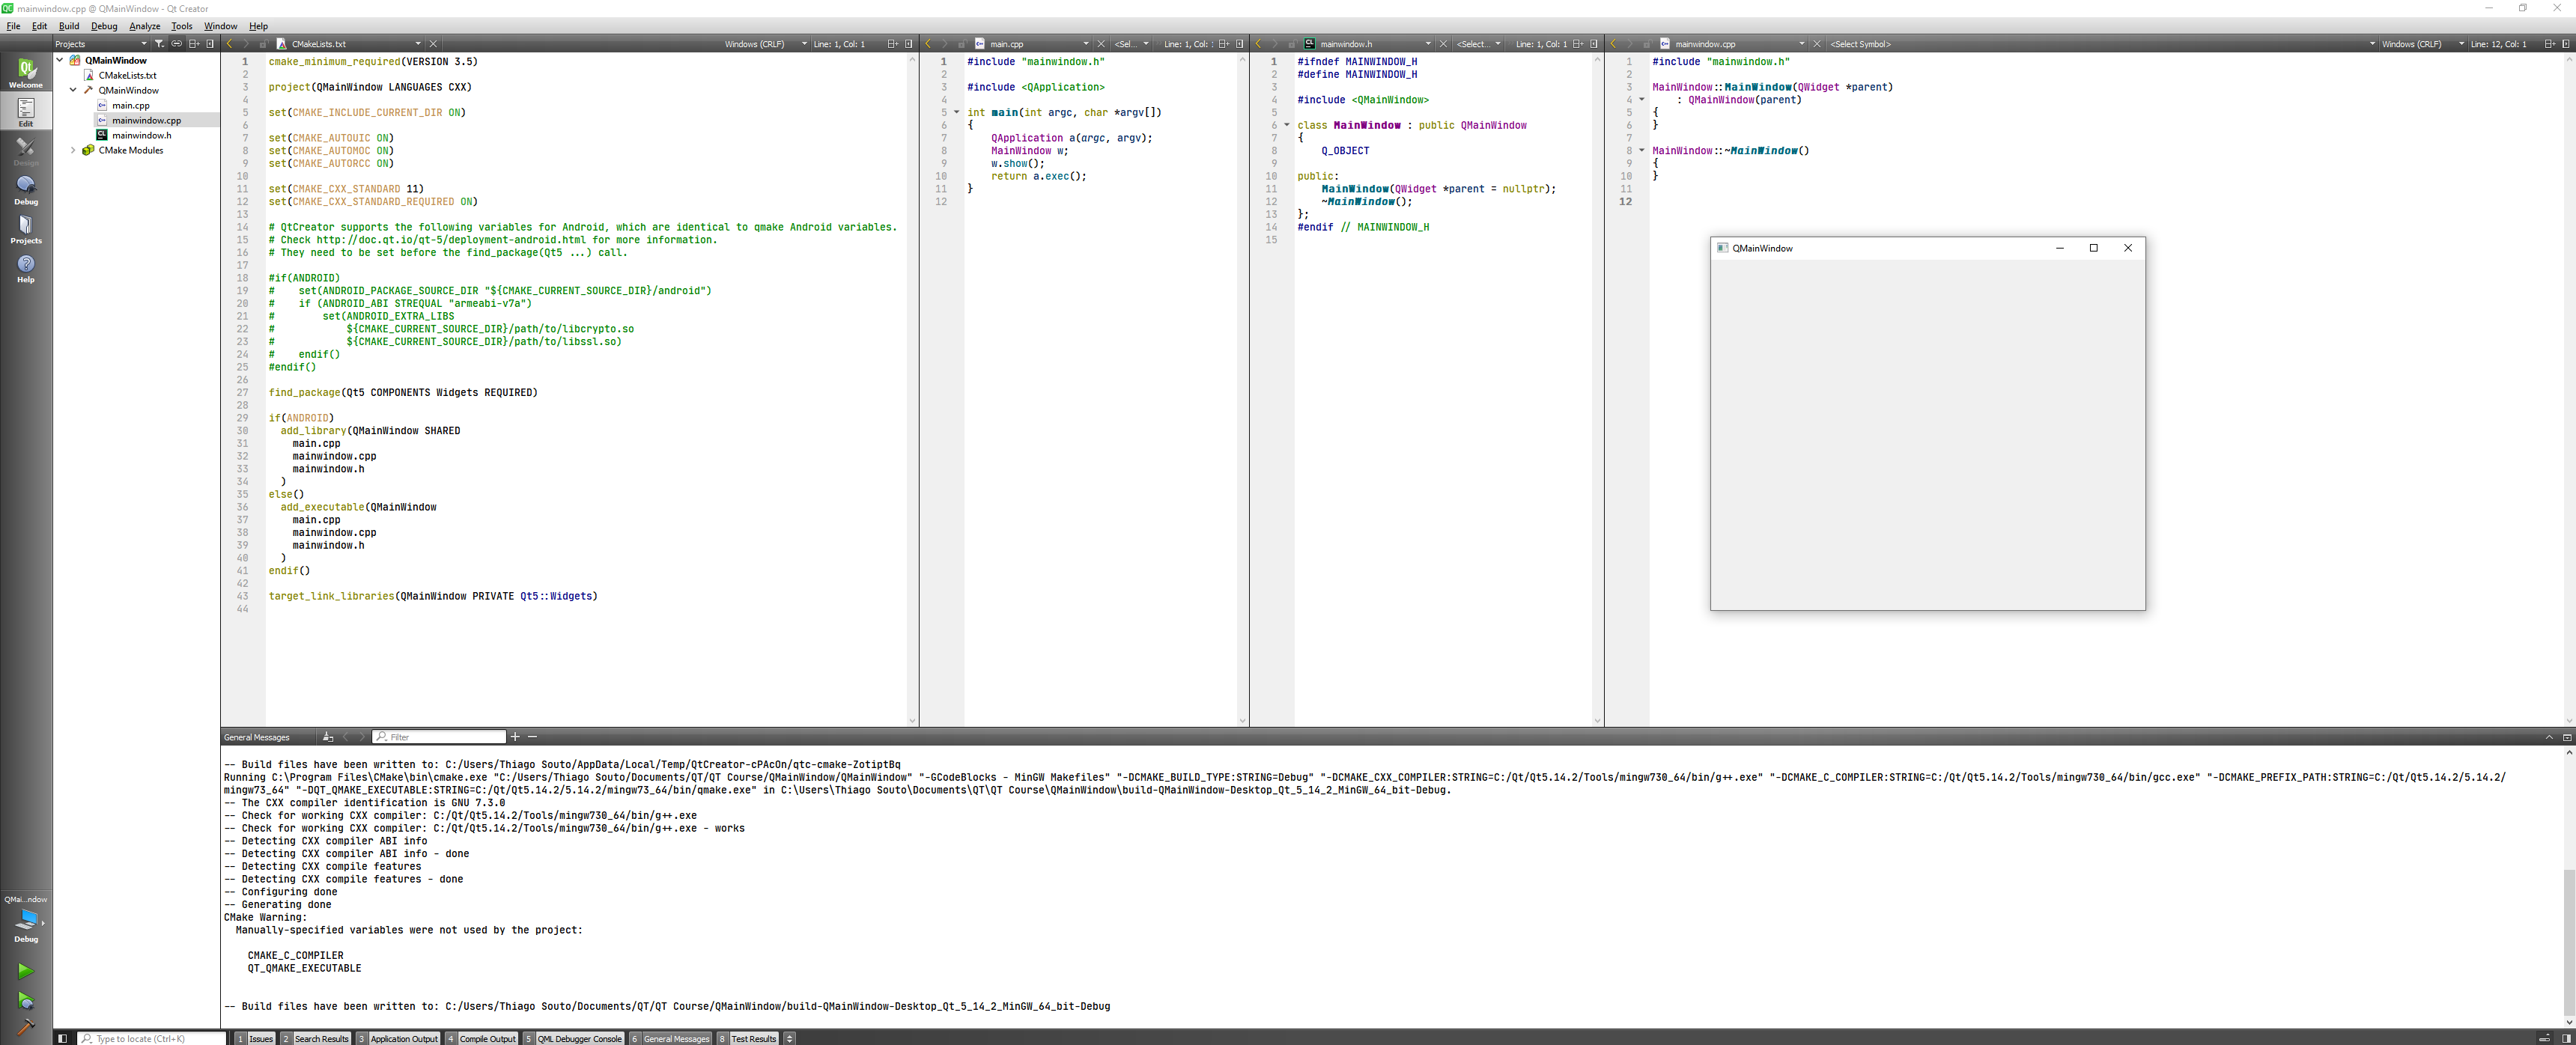
Then we can include the QPushButton class, and the QDebug as well.
We are going to call a method setCentralWidget() for the button, to make the push button the central widget of the main window.
#include "mainwindow.h"
#include <QPushButton>
#include <QDebug>

MainWindow::MainWindow(QWidget *parent)
    : QMainWindow(parent)
{
    //Add Central Widget
    QPushButton * button = new QPushButton("Hello", this);
    setCentralWidget(button);
}

MainWindow::~MainWindow()
{
}
2
3
4
5
6
7
8
9
10
11
12
13
14
15
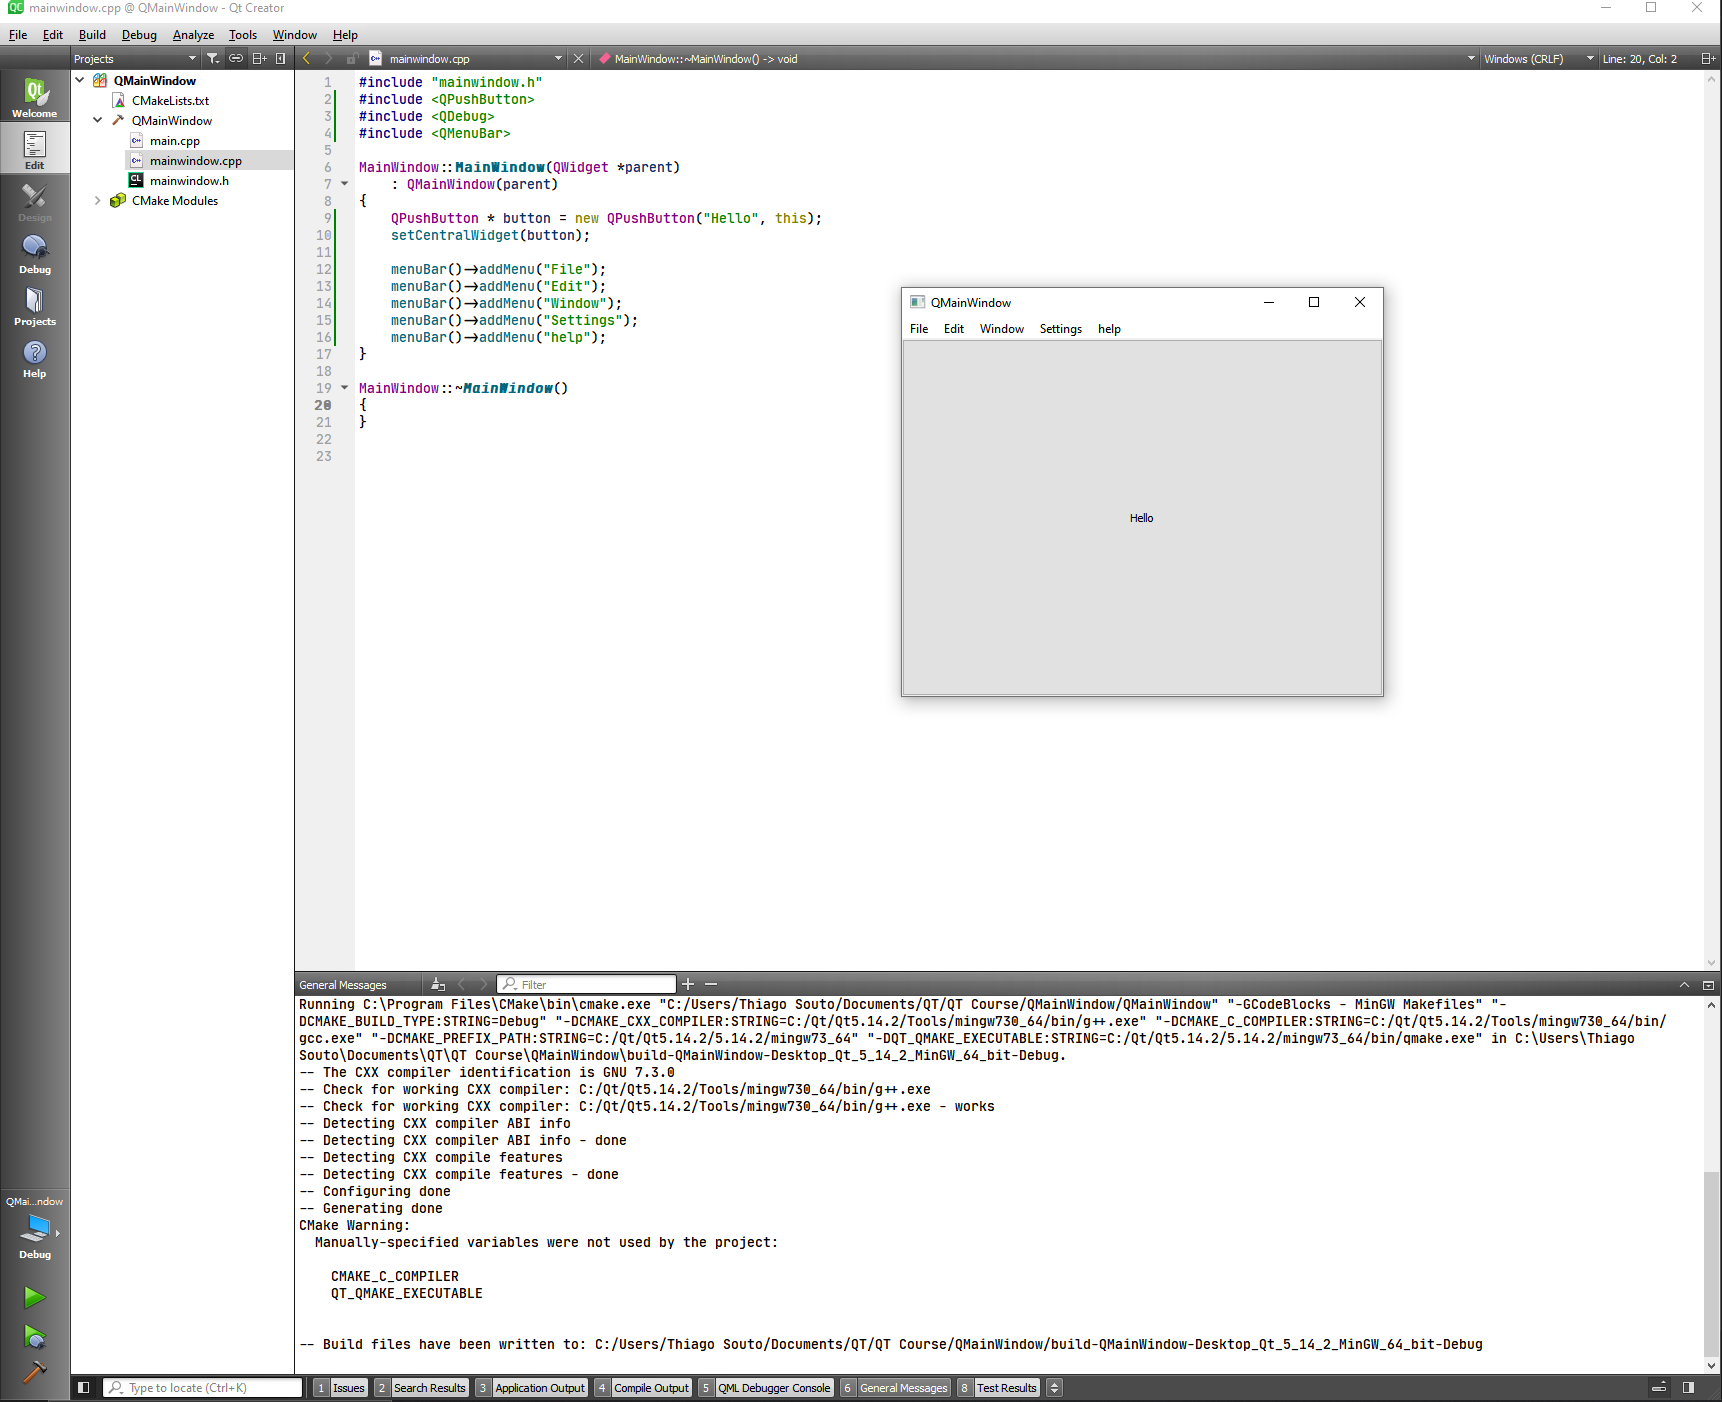
Now let's include the QMenuBar class and create a menu bar.
#include "mainwindow.h"
#include <QPushButton>
#include <QDebug>
#include <QMenuBar>

MainWindow::MainWindow(QWidget *parent)
    : QMainWindow(parent)
{
    //Add Central Widget
    QPushButton * button = new QPushButton("Hello", this);
    setCentralWidget(button);

    //Add Menu Bar
    menuBar()->addMenu("File");
    menuBar()->addMenu("Edit");
    menuBar()->addMenu("Window");
    menuBar()->addMenu("Settings");
    menuBar()->addMenu("help");
}

MainWindow::~MainWindow()
{
}
2
3
4
5
6
7
8
9
10
11
12
13
14
15
16
17
18
19
20
21
22
23
Now let's include the QStatusBar class, and create a status bar
#include "mainwindow.h"
#include <QPushButton>
#include <QDebug>
#include <QMenuBar>
#include <QStatusBar>

MainWindow::MainWindow(QWidget *parent)
    : QMainWindow(parent)
{
    //Add Central Widget
    QPushButton * button = new QPushButton("Hello", this);
    setCentralWidget(button);

    //Add Menu Bar
    menuBar()->addMenu("File");
    menuBar()->addMenu("Edit");
    menuBar()->addMenu("Window");
    menuBar()->addMenu("Settings");
    menuBar()->addMenu("help");

    //Add status bar message
    statusBar()->showMessage("Uploading File...", 10000);


}

MainWindow::~MainWindow()
{
}
2
3
4
5
6
7
8
9
10
11
12
13
14
15
16
17
18
19
20
21
22
23
24
25
26
27
28
29

Now let's give it some action with the QAction class.
TIP
In applications many common commands can be invoked via menus, toolbar buttons, and keyboard shortcuts. Since the user expects each command to be performed in the same way, regardless of the user interface used, it is useful to represent each command as an action.
Actions can be added to menus and toolbars, and will automatically keep them in sync. For example, in a word processor, if the user presses a Bold toolbar button, the Bold menu item will automatically be checked.
Actions can be created as independent objects, but they may also be created during the construction of menus; the QMenu class contains convenience functions for creating actions suitable for use as menu items.
A QAction may contain an icon, menu text, a shortcut, status text, "What's This?" text, and a tooltip. Most of these can be set in the constructor. They can also be set independently with setIcon(), setText(), setIconText(), setShortcut(), setStatusTip(), setWhatsThis(), and setToolTip(). For menu items, it is possible to set an individual font with setFont().
Actions are added to widgets using QWidget::addAction() or QGraphicsWidget::addAction(). Note that an action must be added to a widget before it can be used; this is also true when the shortcut should be global (i.e., Qt::ApplicationShortcut as Qt::ShortcutContext).
Once a QAction has been created it should be added to the relevant menu and toolbar, then connected to the slot which will perform the action. For example:
  const QIcon openIcon = QIcon::fromTheme("document-open", QIcon(":/images/open.png"));
  QAction *openAct = new QAction(openIcon, tr("&Open..."), this);
  openAct->setShortcuts(QKeySequence::Open);
  openAct->setStatusTip(tr("Open an existing file"));
  connect(openAct, &QAction::triggered, this, &MainWindow::open);
  fileMenu->addAction(openAct);
  fileToolBar->addAction(openAct);
We recommend that actions are created as children of the window they are used in. In most cases actions will be children of the application's main window.
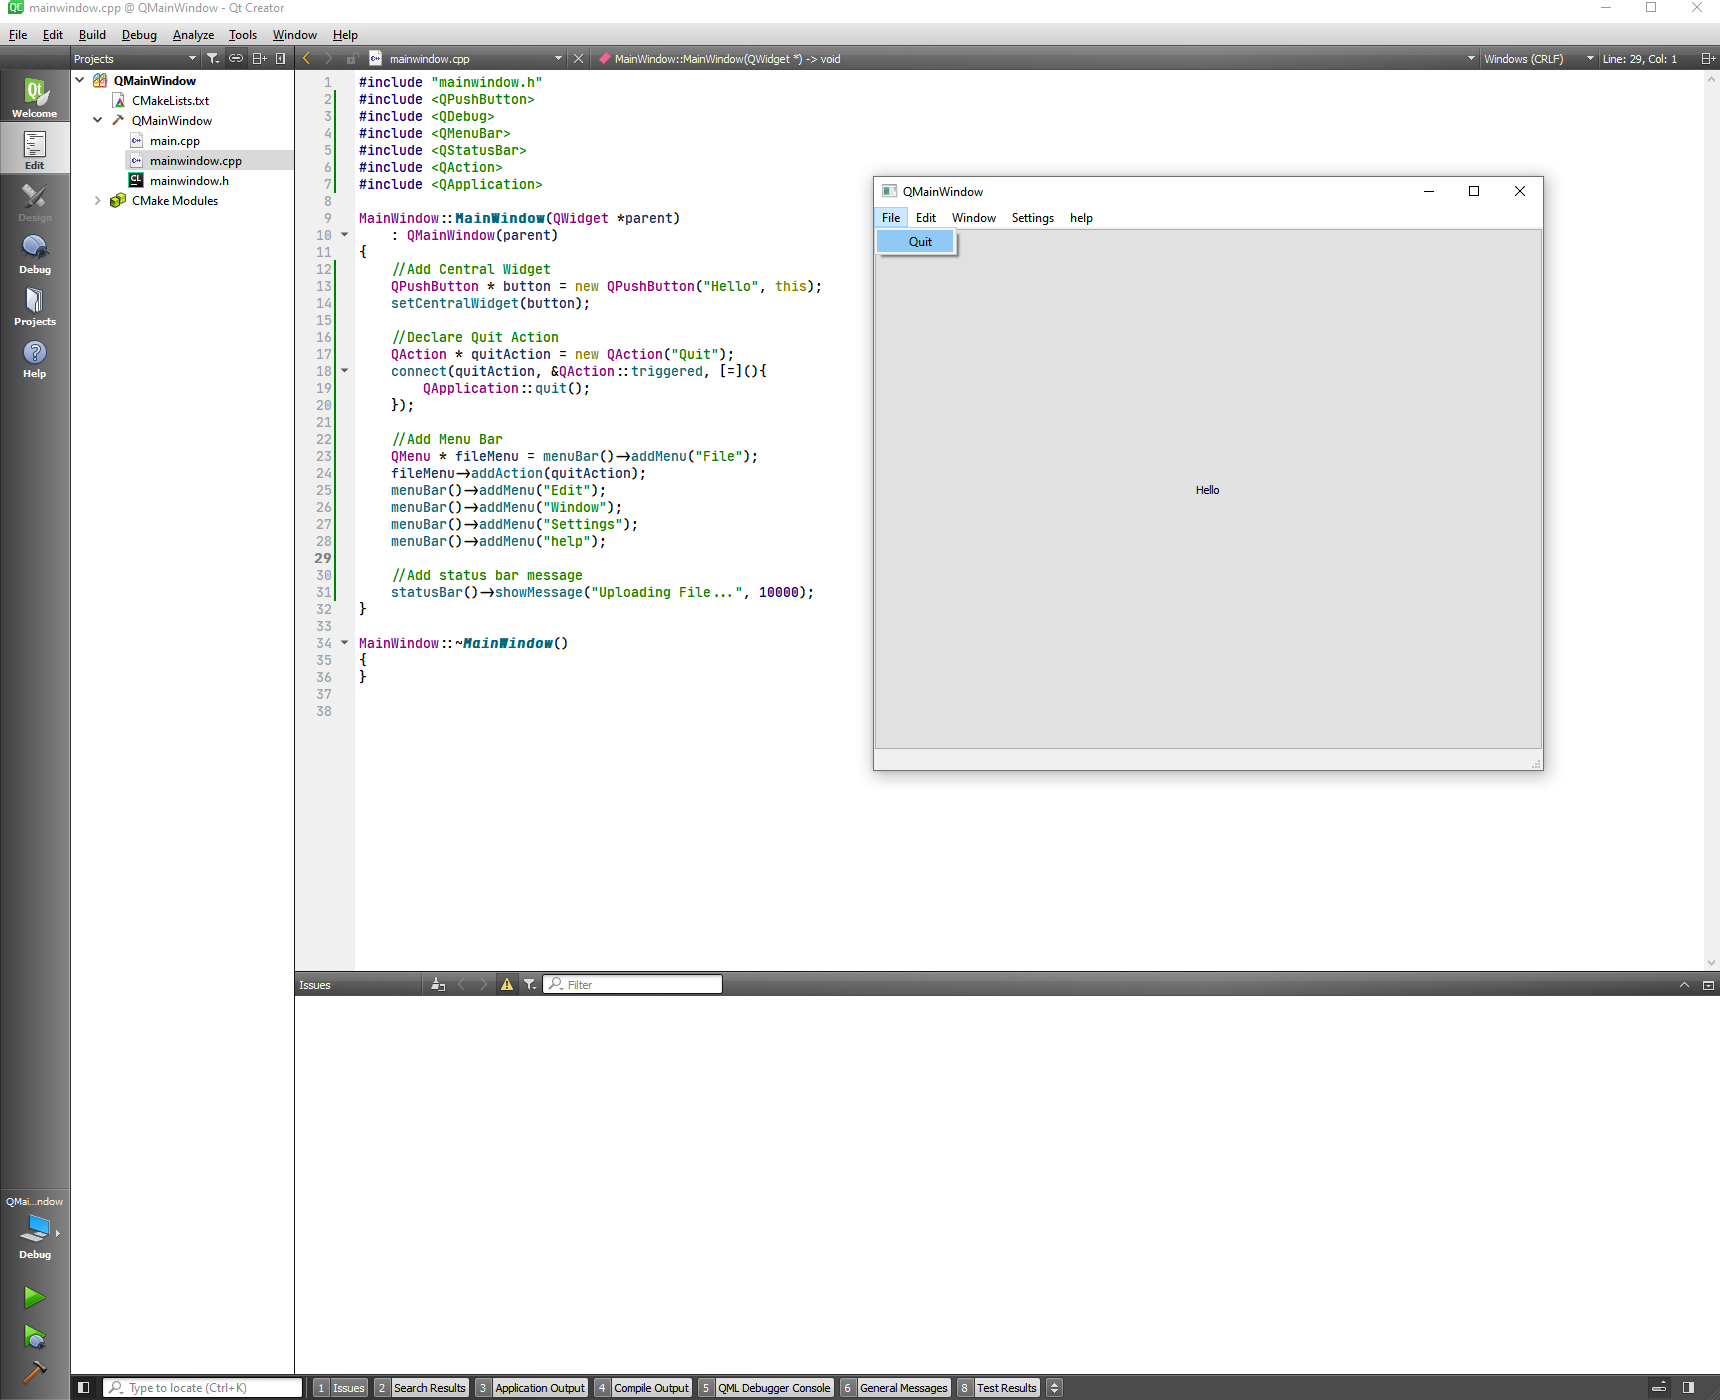
In this action we are going to trigger the QApplication method quit(), so we have to include QApplication as well.
//Declare Quit Action
QAction * quitAction = new QAction("Quit");
connect(quitAction, &QAction::triggered, [=](){
    QApplication::quit();
});
2
3
4
5
Now we are going to add the action to the file menu:
For this we associate the Qmenu item to a pointer fileMenu so we can manipulate the pointer, then we addAction.
QMenu * fileMenu = menuBar()->addMenu("File");
fileMenu->addAction(quitAction);
2
The whole application will be:
#include "mainwindow.h"
#include <QPushButton>
#include <QDebug>
#include <QMenuBar>
#include <QStatusBar>
#include <QAction>
#include <QApplication>

MainWindow::MainWindow(QWidget *parent)
    : QMainWindow(parent)
{
    //Add Central Widget
    QPushButton * button = new QPushButton("Hello", this);
    setCentralWidget(button);

    //Declare Quit Action
    QAction * quitAction = new QAction("Quit");
    connect(quitAction, &QAction::triggered, [=](){
        QApplication::quit();
    });

    //Add Menu Bar
    QMenu * fileMenu = menuBar()->addMenu("File");
    fileMenu->addAction(quitAction);
    menuBar()->addMenu("Edit");
    menuBar()->addMenu("Window");
    menuBar()->addMenu("Settings");
    menuBar()->addMenu("help");

    //Add status bar message
    statusBar()->showMessage("Uploading File...", 10000);
}

MainWindow::~MainWindow()
{
}
2
3
4
5
6
7
8
9
10
11
12
13
14
15
16
17
18
19
20
21
22
23
24
25
26
27
28
29
30
31
32
33
34
35
36
The last thing is to give it a size so we don't have to resize all the time.
mainwindow.h
#ifndef MAINWINDOW_H
#define MAINWINDOW_H

#include <QMainWindow>

class MainWindow : public QMainWindow
{
    Q_OBJECT

public:
    MainWindow(QWidget *parent = nullptr);
    ~MainWindow();

    QSize sizeHint() const;
};
#endif // MAINWINDOW_H
2
3
4
5
6
7
8
9
10
11
12
13
14
15
16
mainwindow.cpp
#include "mainwindow.h"
#include <QPushButton>
#include <QDebug>
#include <QMenuBar>
#include <QStatusBar>
#include <QAction>
#include <QApplication>

MainWindow::MainWindow(QWidget *parent)
    : QMainWindow(parent)
{
    //Add Central Widget
    QPushButton * button = new QPushButton("Hello", this);
    setCentralWidget(button);

    //Declare Quit Action
    QAction * quitAction = new QAction("Quit");
    connect(quitAction, &QAction::triggered, [=](){
        QApplication::quit();
    });

    //Add Menu Bar
    QMenu * fileMenu = menuBar()->addMenu("File");
    fileMenu->addAction(quitAction);
    menuBar()->addMenu("Edit");
    menuBar()->addMenu("Window");
    menuBar()->addMenu("Settings");
    menuBar()->addMenu("help");

    //Add status bar message
    statusBar()->showMessage("Uploading File...", 10000);
}

MainWindow::~MainWindow()
{
}

QSize MainWindow::sizeHint() const
{
    return QSize(800,500);
}
2
3
4
5
6
7
8
9
10
11
12
13
14
15
16
17
18
19
20
21
22
23
24
25
26
27
28
29
30
31
32
33
34
35
36
37
38
39
40
41
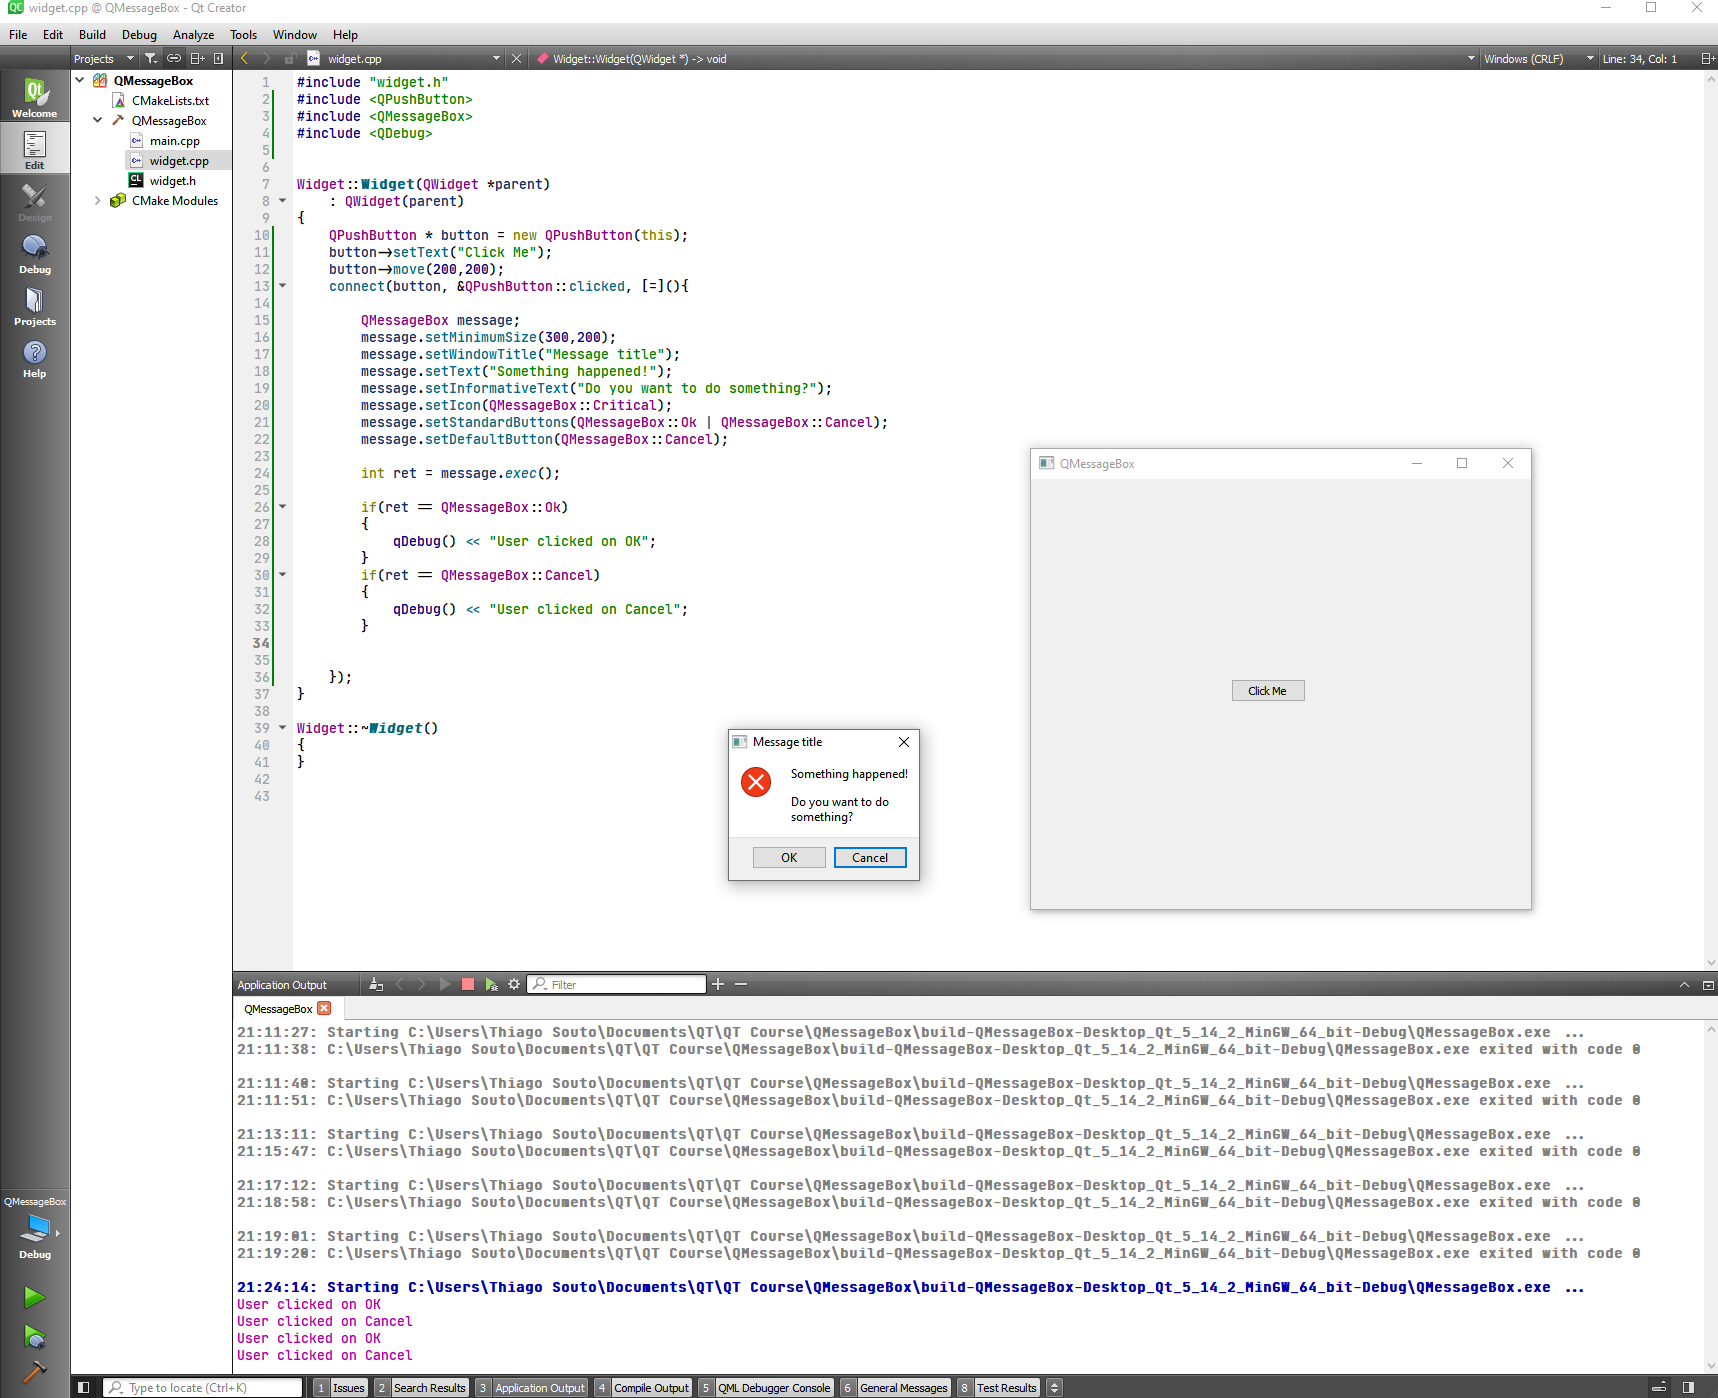
# QMessageBox Class
The QMessageBox class provides a modal dialog for informing the user or for asking the user a question and receiving an answer.
A message box displays a primary text to alert the user to a situation, an informative text to further explain the alert or to ask the user a question, and an optional detailed text to provide even more data if the user requests it. A message box can also display an icon and standard buttons for accepting a user response.
Two APIs for using QMessageBox are provided, the property-based API, and the static functions. Calling one of the static functions is the simpler approach, but it is less flexible than using the property-based API, and the result is less informative. Using the property-based API is recommended.
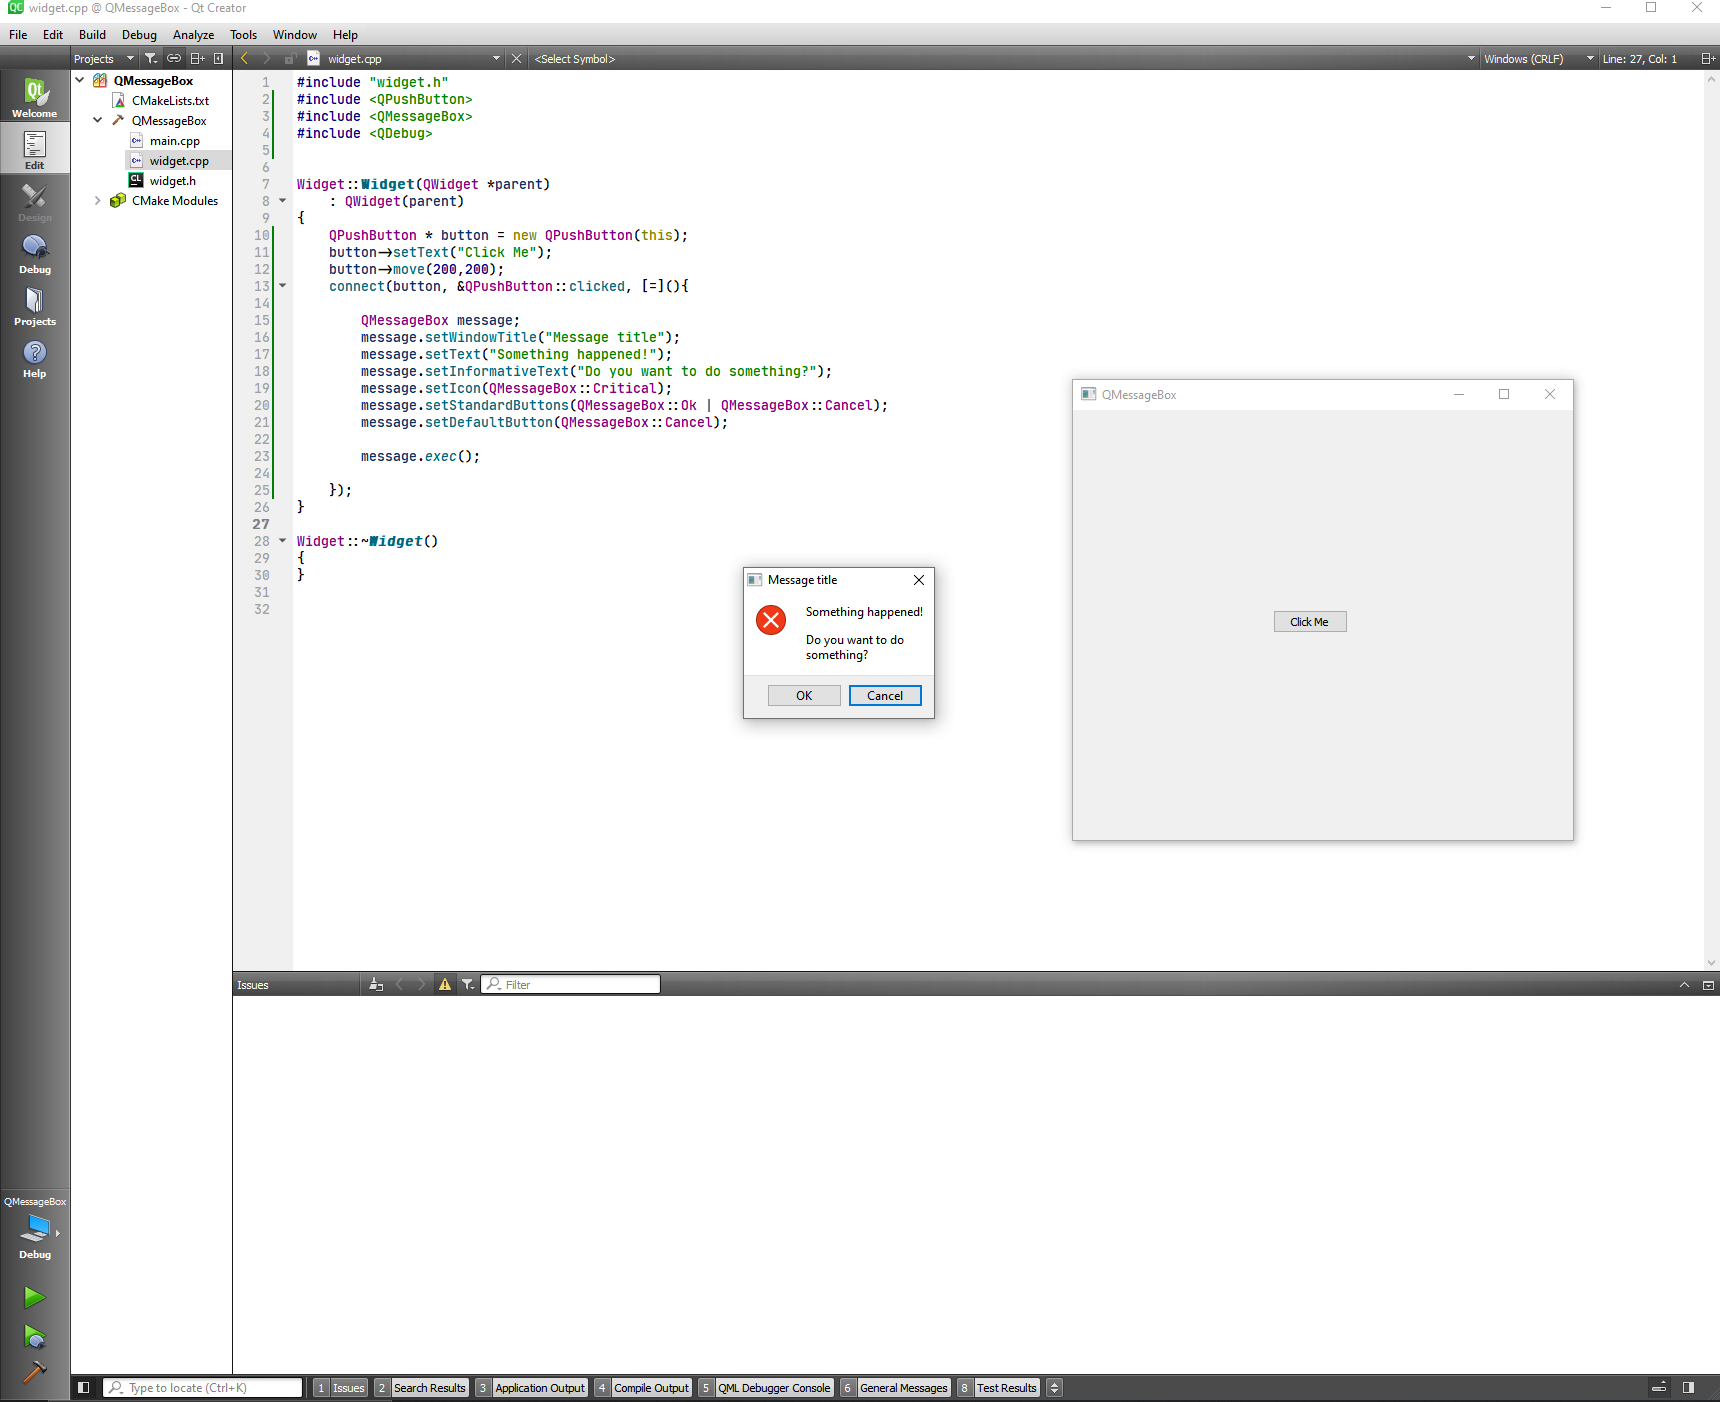
First we creat a QWidget application and include some classes, declare a button, set a text to the button, move the button and connect the button to a lambda function that will show a message box.
widget.cpp
#include "widget.h"
#include <QPushButton>
#include <QMessageBox>
#include <QDebug>


Widget::Widget(QWidget *parent)
    : QWidget(parent)
{
    QPushButton * button = new QPushButton(this);
    button->setText("Click Me");
    button->move(200,200);
    connect(button, &QPushButton::clicked, [=](){

        QMessageBox message;
        message.setMinimumSize(300,200);
        message.setWindowTitle("Message title");
        message.setText("Something happened!");
        message.setInformativeText("Do you want to do something?");
        message.setIcon(QMessageBox::Critical);
        message.setStandardButtons(QMessageBox::Ok | QMessageBox::Cancel);
        message.setDefaultButton(QMessageBox::Cancel);

        message.exec();

    });
}

Widget::~Widget()
{
}
2
3
4
5
6
7
8
9
10
11
12
13
14
15
16
17
18
19
20
21
22
23
24
25
26
27
28
29
30
31
Now we can react when the user do something. For such we have to recover what comes from the message.exec()
#include "widget.h"
#include <QPushButton>
#include <QMessageBox>
#include <QDebug>


Widget::Widget(QWidget *parent)
    : QWidget(parent)
{
    QPushButton * button = new QPushButton(this);
    button->setText("Click Me");
    button->move(200,200);
    connect(button, &QPushButton::clicked, [=](){

        QMessageBox message;
        message.setMinimumSize(300,200);
        message.setWindowTitle("Message title");
        message.setText("Something happened!");
        message.setInformativeText("Do you want to do something?");
        message.setIcon(QMessageBox::Critical);
        message.setStandardButtons(QMessageBox::Ok | QMessageBox::Cancel);
        message.setDefaultButton(QMessageBox::Cancel);

        int ret = message.exec();

        if(ret == QMessageBox::Ok)
        {
            qDebug() << "User clicked on OK";
        }
        if(ret == QMessageBox::Cancel)
        {
            qDebug() << "User clicked on Cancel";
        }

    });
}

Widget::~Widget()
{
}
2
3
4
5
6
7
8
9
10
11
12
13
14
15
16
17
18
19
20
21
22
23
24
25
26
27
28
29
30
31
32
33
34
35
36
37
38
39
40
Now that we have done it on the hard way, let's let Qt help.
#include "widget.h"
#include <QPushButton>
#include <QMessageBox>
#include <QDebug>


Widget::Widget(QWidget *parent)
    : QWidget(parent)
{
    QPushButton * button = new QPushButton(this);
    button->setText("Click Me");
    button->move(200,200);
    connect(button, &QPushButton::clicked, [=](){

        int ret = QMessageBox::critical(this, "Message Title", "Something happened!", QMessageBox::Ok | QMessageBox::Cancel);

        if(ret == QMessageBox::Ok)
        {
            qDebug() << "User clicked on OK";
        }
        if(ret == QMessageBox::Cancel)
        {
            qDebug() << "User clicked on Cancel";
        }


    });
}

Widget::~Widget()
{
}
2
3
4
5
6
7
8
9
10
11
12
13
14
15
16
17
18
19
20
21
22
23
24
25
26
27
28
29
30
31
32
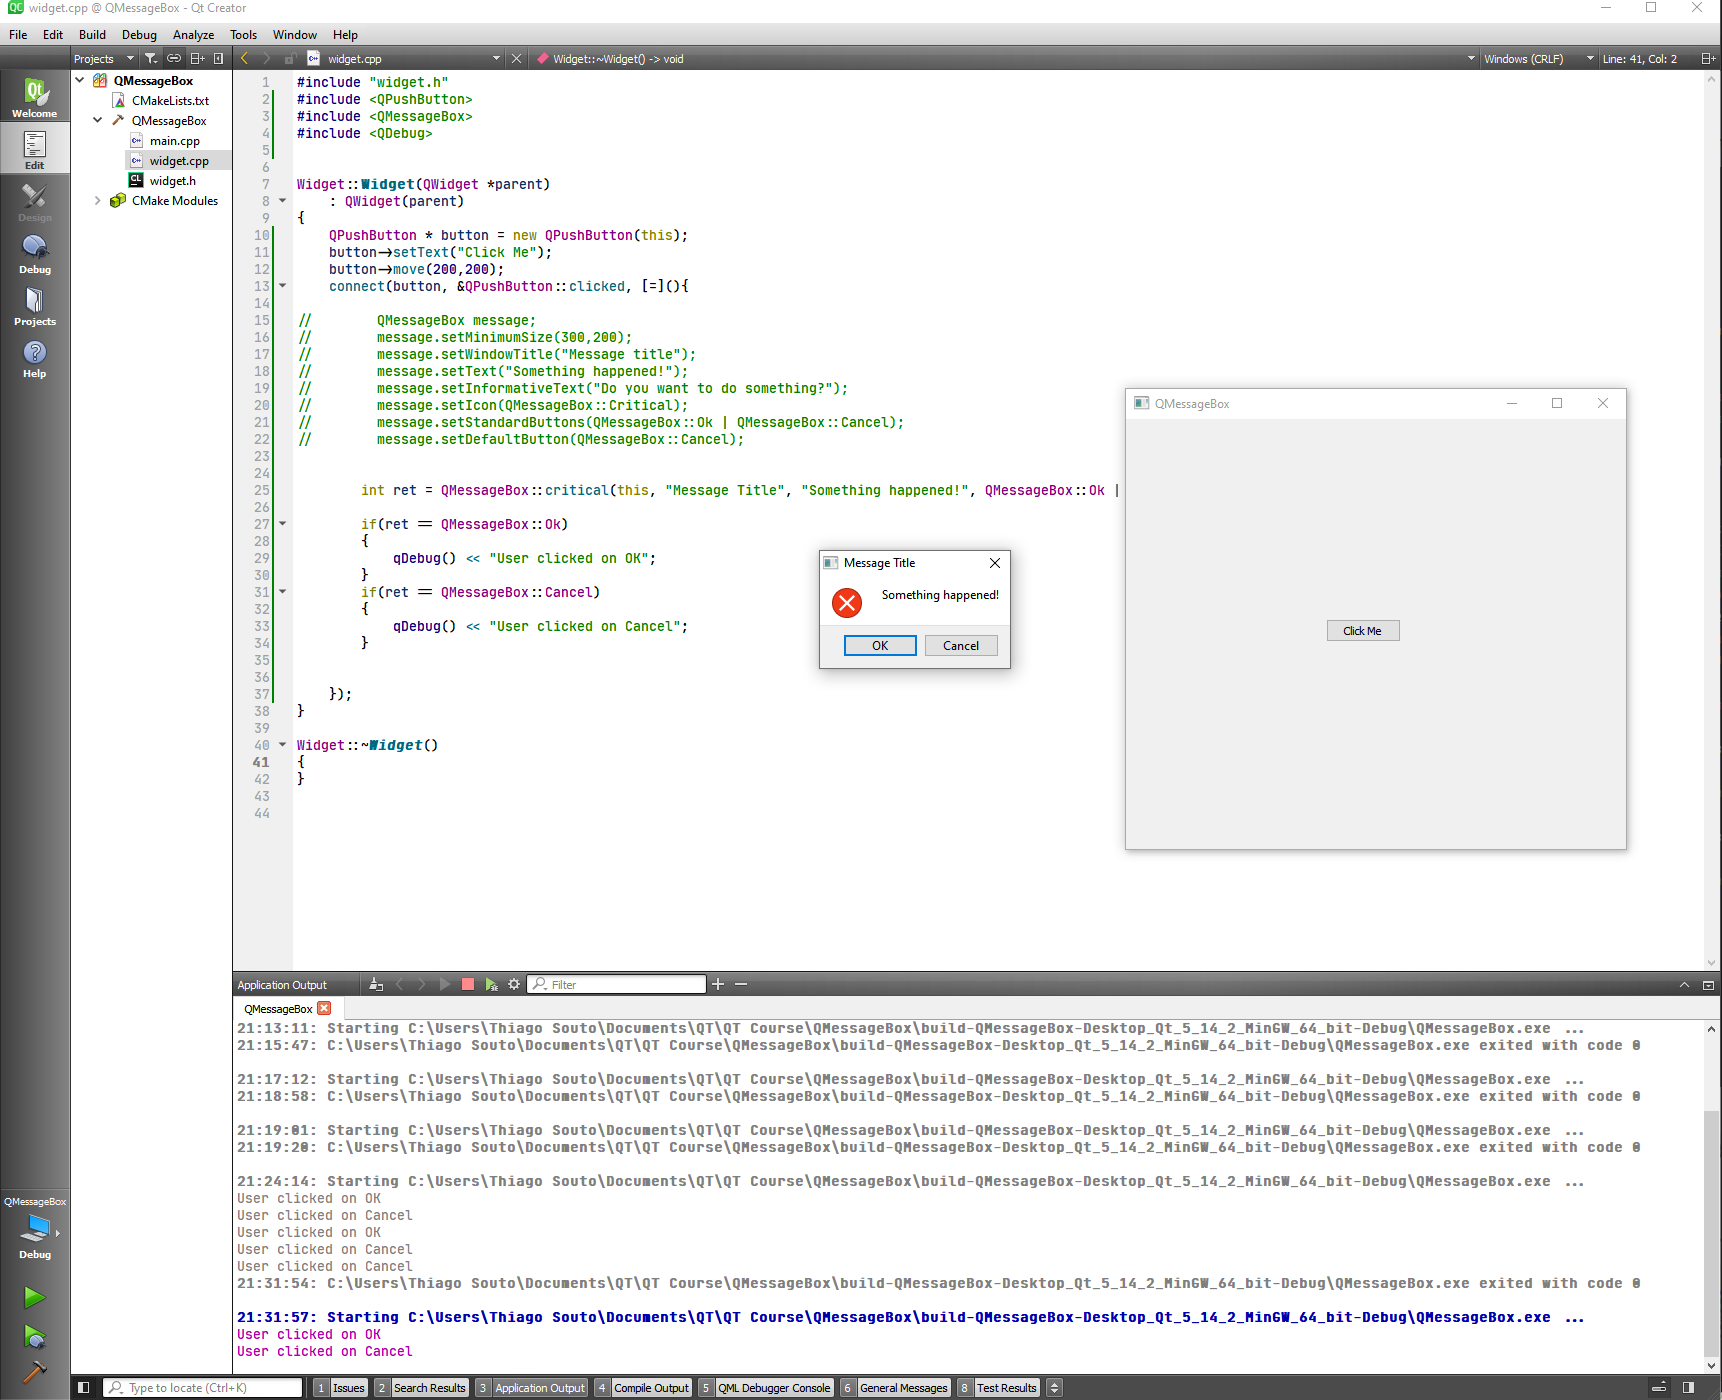
Messages can be information, question and many more just look at the reference.


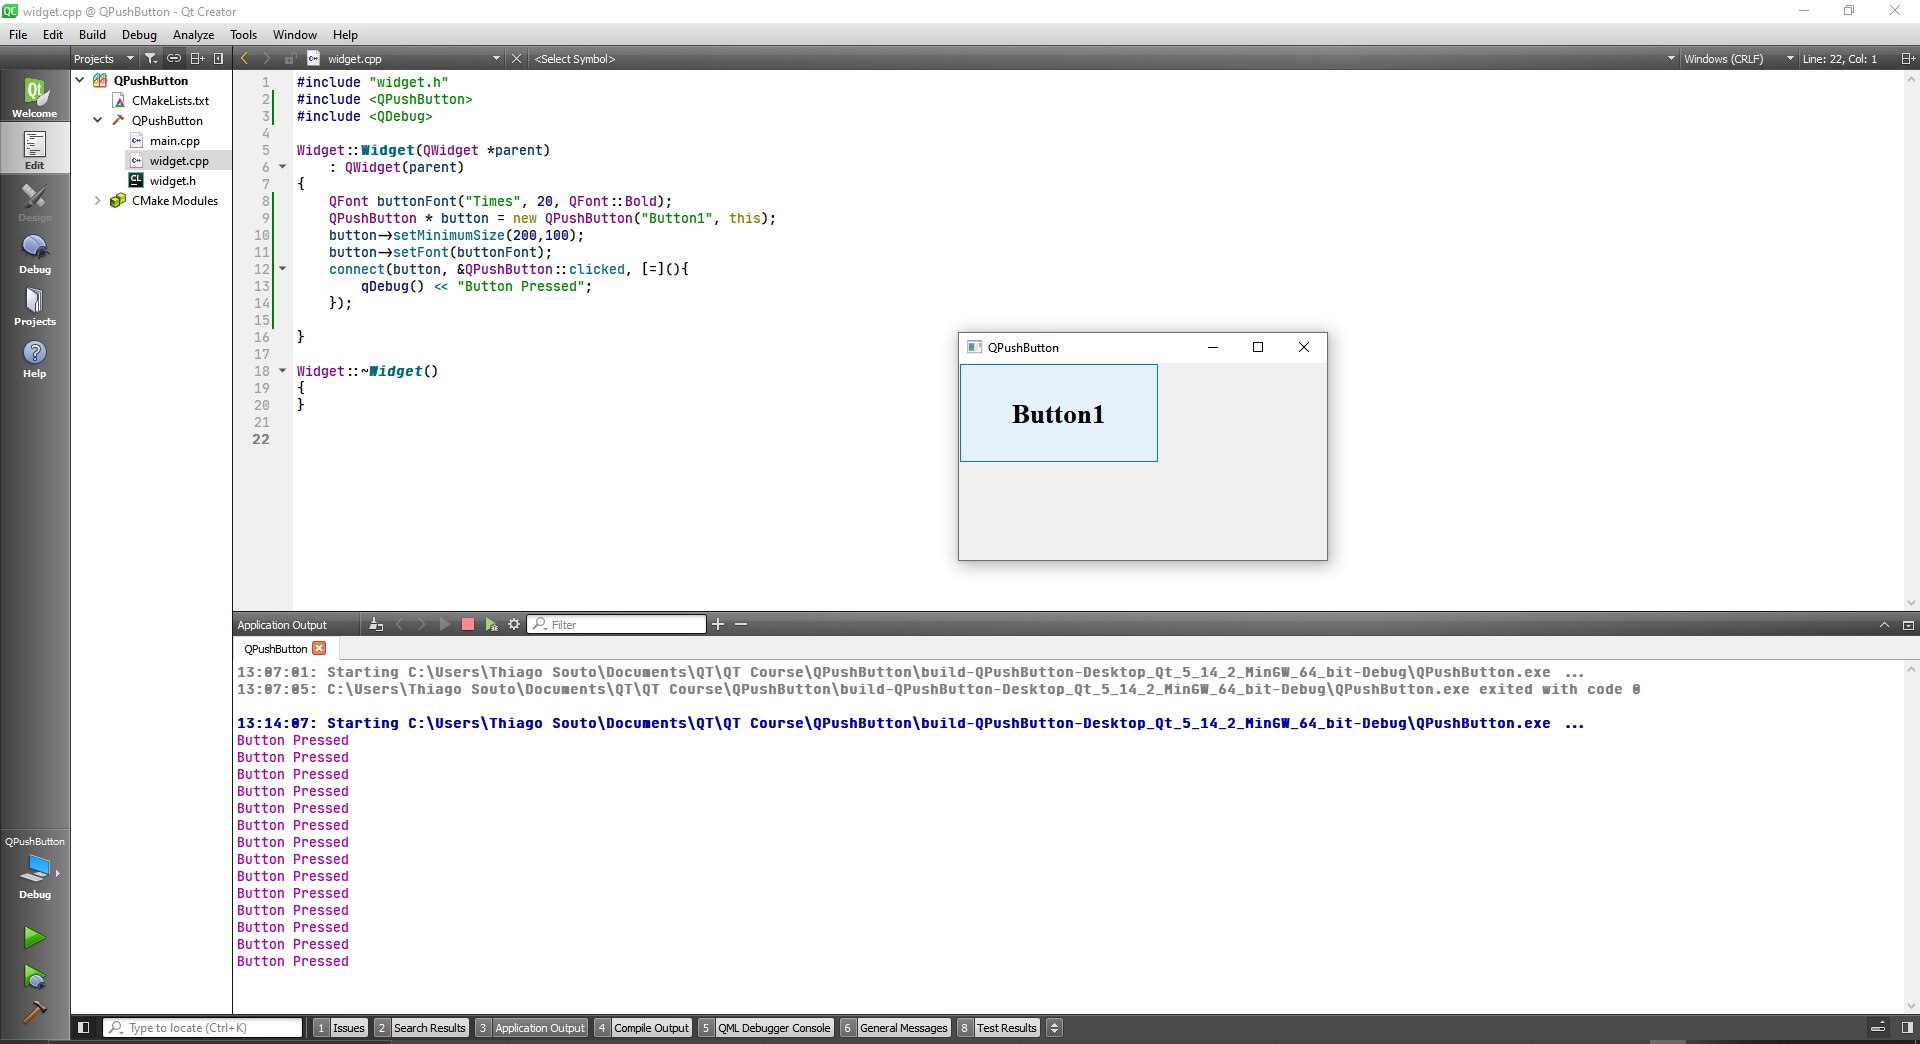
# QPushButton Class
The QPushButton widget provides a command button.
DETAILS
The push button, or command button, is perhaps the most commonly used widget in any graphical user interface. Push (click) a button to command the computer to perform some action, or to answer a question. Typical buttons are OK, Apply, Cancel, Close, Yes, No and Help.
A command button is rectangular and typically displays a text label describing its action. A shortcut key can be specified by preceding the preferred character with an ampersand in the text. For example:
QPushButton *button = new QPushButton("&Download", this);
2
In this example the shortcut is Alt+D. See the QShortcut documentation for details (to display an actual ampersand, use '&&').
Push buttons display a textual label, and optionally a small icon. These can be set using the constructors and changed later using setText() and setIcon(). If the button is disabled, the appearance of the text and icon will be manipulated with respect to the GUI style to make the button look "disabled".
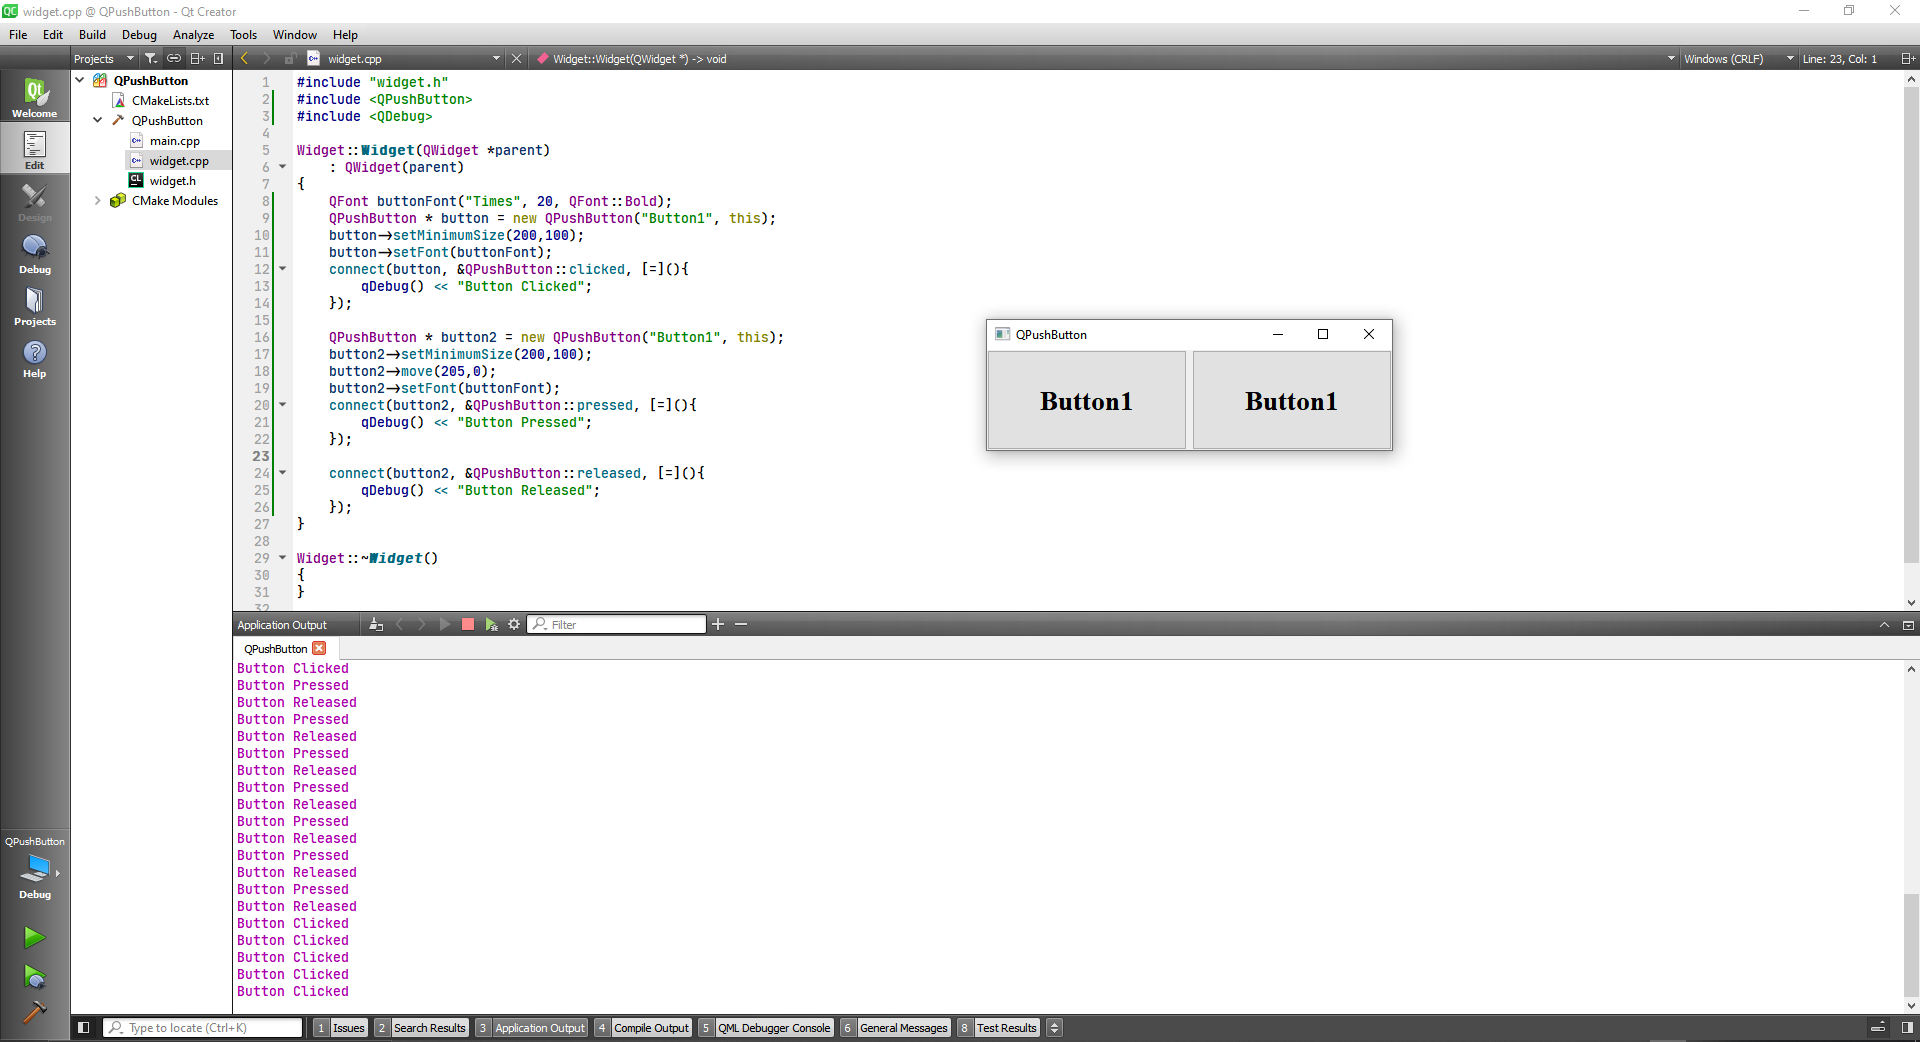
A push button emits the signal clicked() when it is activated by the mouse, the Spacebar or by a keyboard shortcut. Connect to this signal to perform the button's action. Push buttons also provide less commonly used signals, for example pressed() and released().
Command buttons in dialogs are by default auto-default buttons, i.e., they become the default push button automatically when they receive the keyboard input focus. A default button is a push button that is activated when the user presses the Enter or Return key in a dialog. You can change this with setAutoDefault(). Note that auto-default buttons reserve a little extra space which is necessary to draw a default-button indicator. If you do not want this space around your buttons, call setAutoDefault(false).
Being so central, the button widget has grown to accommodate a great many variations in the past decade. The Microsoft style guide now shows about ten different states of Windows push buttons and the text implies that there are dozens more when all the combinations of features are taken into consideration.
The most important modes or states are:
- Available or not (grayed out, disabled).
- Standard push button, toggling push button or menu button.
- On or off (only for toggling push buttons).
- Default or normal. The default button in a dialog can generally be "clicked" using the Enter or Return key.
- Auto-repeat or not.
- Pressed down or not.
As a general rule, use a push button when the application or dialog window performs an action when the user clicks on it (such as Apply, Cancel, Close and Help) and when the widget is supposed to have a wide, rectangular shape with a text label. Small, typically square buttons that change the state of the window rather than performing an action (such as the buttons in the top-right corner of the QFileDialog) are not command buttons, but tool buttons. Qt provides a special class (QToolButton) for these buttons.
If you need toggle behavior (see setCheckable()) or a button that auto-repeats the activation signal when being pushed down like the arrows in a scroll bar (see setAutoRepeat()), a command button is probably not what you want. When in doubt, use a tool button.
Note: On macOS when a push button's width becomes smaller than 50 or its height becomes smaller than 30, the button's corners are changed from round to square. Use the setMinimumSize() function to prevent this behavior.
A variation of a command button is a menu button. These provide not just one command, but several, since when they are clicked they pop up a menu of options. Use the method setMenu() to associate a popup menu with a push button.
Other classes of buttons are option buttons (see QRadioButton) and check boxes (see QCheckBox).
In Qt, the QAbstractButton base class provides most of the modes and other API, and QPushButton provides GUI logic. See QAbstractButton for more information about the API.
#include "widget.h"
#include <QPushButton>
#include <QDebug>

Widget::Widget(QWidget *parent)
    : QWidget(parent)
{
    QFont buttonFont("Times", 20, QFont::Bold);
    QPushButton * button = new QPushButton("Button1", this);
    button->setMinimumSize(200,100);
    button->setFont(buttonFont);
    connect(button, &QPushButton::clicked, [=](){
        qDebug() << "Button Pressed";
    });
}

Widget::~Widget()
{
}
2
3
4
5
6
7
8
9
10
11
12
13
14
15
16
17
18
19
#include "widget.h"
#include <QPushButton>
#include <QDebug>

Widget::Widget(QWidget *parent)
    : QWidget(parent)
{
    QFont buttonFont("Times", 20, QFont::Bold);
    QPushButton * button = new QPushButton("Button1", this);
    button->setMinimumSize(200,100);
    button->setFont(buttonFont);
    connect(button, &QPushButton::clicked, [=](){
        qDebug() << "Button Clicked";
    });

    QPushButton * button2 = new QPushButton("Button1", this);
    button2->setMinimumSize(200,100);
    button2->move(205,0);
    button2->setFont(buttonFont);
    connect(button2, &QPushButton::pressed, [=](){
        qDebug() << "Button Pressed";
    });

    connect(button2, &QPushButton::released, [=](){
        qDebug() << "Button Released";
    });
}

Widget::~Widget()
{
}
2
3
4
5
6
7
8
9
10
11
12
13
14
15
16
17
18
19
20
21
22
23
24
25
26
27
28
29
30
31
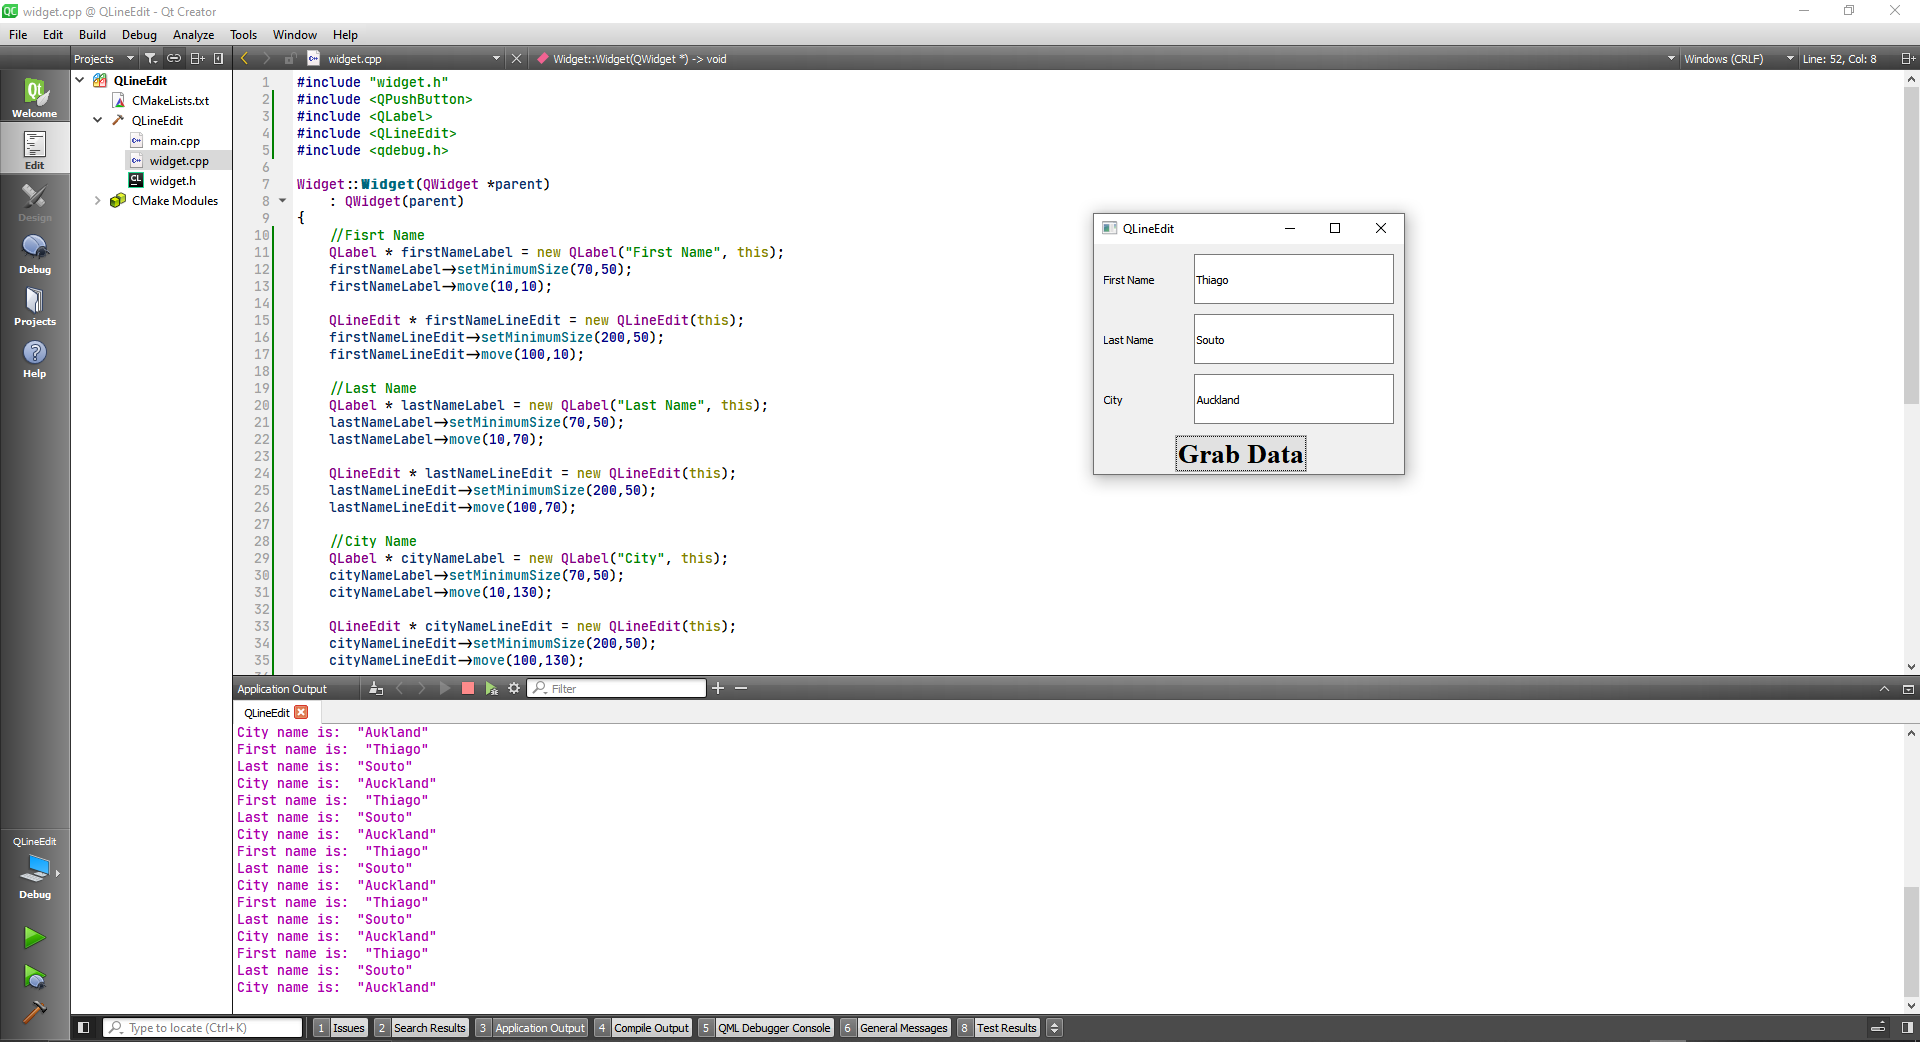
# QLineEdit Class
The QLineEdit widget is a one-line text editor.
DETAILS
A line edit allows the user to enter and edit a single line of plain text with a useful collection of editing functions, including undo and redo, cut and paste, and drag and drop (see setDragEnabled()).
By changing the echoMode() of a line edit, it can also be used as a "write-only" field, for inputs such as passwords.
The length of the text can be constrained to maxLength(). The text can be arbitrarily constrained using a validator() or an inputMask(), or both. When switching between a validator and an input mask on the same line edit, it is best to clear the validator or input mask to prevent undefined behavior.
A related class is QTextEdit which allows multi-line, rich text editing.
You can change the text with setText() or insert(). The text is retrieved with text(); the displayed text (which may be different, see EchoMode) is retrieved with displayText(). Text can be selected with setSelection() or selectAll(), and the selection can be cut(), copy()ied and paste()d. The text can be aligned with setAlignment().
When the text changes the textChanged() signal is emitted; when the text changes other than by calling setText() the textEdited() signal is emitted; when the cursor is moved the cursorPositionChanged() signal is emitted; and when the Return or Enter key is pressed the returnPressed() signal is emitted.
When editing is finished, either because the line edit lost focus or Return/Enter is pressed the editingFinished() signal is emitted.
Note that if there is a validator set on the line edit, the returnPressed()/editingFinished() signals will only be emitted if the validator returns QValidator::Acceptable.
By default, QLineEdits have a frame as specified by platform style guides; you can turn it off by calling setFrame(false).
The default key bindings are described below. The line edit also provides a context menu (usually invoked by a right mouse click) that presents some of these editing options.
| Keypress | Action |
|---|---|
| Left Arrow | Moves the cursor one character to the left. |
| Shift+Left Arrow | Moves and selects text one character to the left. |
| Right Arrow | Moves the cursor one character to the right. |
| Shift+Right Arrow | Moves and selects text one character to the right. |
| Home | Moves the cursor to the beginning of the line. |
| End | Moves the cursor to the end of the line. |
| Backspace | Deletes the character to the left of the cursor. |
| Ctrl+Backspace | Deletes the word to the left of the cursor. |
| Delete | Deletes the character to the right of the cursor. |
| Ctrl+Delete | Deletes the word to the right of the cursor. |
| Ctrl+A | Select all. |
| Ctrl+C | Copies the selected text to the clipboard. |
| Ctrl+Insert | Copies the selected text to the clipboard. |
| Ctrl+K | Deletes to the end of the line. |
| Ctrl+V | Pastes the clipboard text into line edit. |
| Shift+Insert | Pastes the clipboard text into line edit. |
| Ctrl+X | Deletes the selected text and copies it to the clipboard. |
| Shift+Delete | Deletes the selected text and copies it to the clipboard. |
| Ctrl+Z | Undoes the last operation. |
| Ctrl+Y | Redoes the last undone operation. |
Any other key sequence that represents a valid character, will cause the character to be inserted into the line edit.
See also QTextEdit, QLabel, QComboBox, GUI Design Handbook: Field, Entry, and Line Edits Example.
#include "widget.h"
#include <QPushButton>
#include <QLabel>
#include <QLineEdit>
#include <qdebug.h>


Widget::Widget(QWidget *parent)
    : QWidget(parent)
{
    //Fisrt Name
    QLabel * firstNameLabel = new QLabel("First Name", this);
    firstNameLabel->setMinimumSize(70,50);
    firstNameLabel->move(10,10);

    QLineEdit * firstNameLineEdit = new QLineEdit(this);
    firstNameLineEdit->setMinimumSize(200,50);
    firstNameLineEdit->move(100,10);

    //Last Name
    QLabel * lastNameLabel = new QLabel("Last Name", this);
    lastNameLabel->setMinimumSize(70,50);
    lastNameLabel->move(10,70);

    QLineEdit * lastNameLineEdit = new QLineEdit(this);
    lastNameLineEdit->setMinimumSize(200,50);
    lastNameLineEdit->move(100,70);

    //City Name
    QLabel * cityNameLabel = new QLabel("City", this);
    cityNameLabel->setMinimumSize(70,50);
    cityNameLabel->move(10,130);

    QLineEdit * cityNameLineEdit = new QLineEdit(this);
    cityNameLineEdit->setMinimumSize(200,50);
    cityNameLineEdit->move(100,130);

    //Grab Data Button
    QFont buttonFont("Times", 20, QFont::Bold);
    QPushButton * button = new QPushButton("Grab Data", this);
    button->setFont(buttonFont);
    button->move(80,190);

    connect(button, &QPushButton::clicked, [=](){
        QString firstName = firstNameLineEdit->text();
        QString lastName = lastNameLineEdit->text();
        QString city = cityNameLineEdit->text();

        qDebug() << "First name is: " << firstName;
        qDebug() << "Last name is: " << lastName;
        qDebug() << "City name is: " << city;
    });
}


Widget::~Widget()
{
}
2
3
4
5
6
7
8
9
10
11
12
13
14
15
16
17
18
19
20
21
22
23
24
25
26
27
28
29
30
31
32
33
34
35
36
37
38
39
40
41
42
43
44
45
46
47
48
49
50
51
52
53
54
55
56
57
58
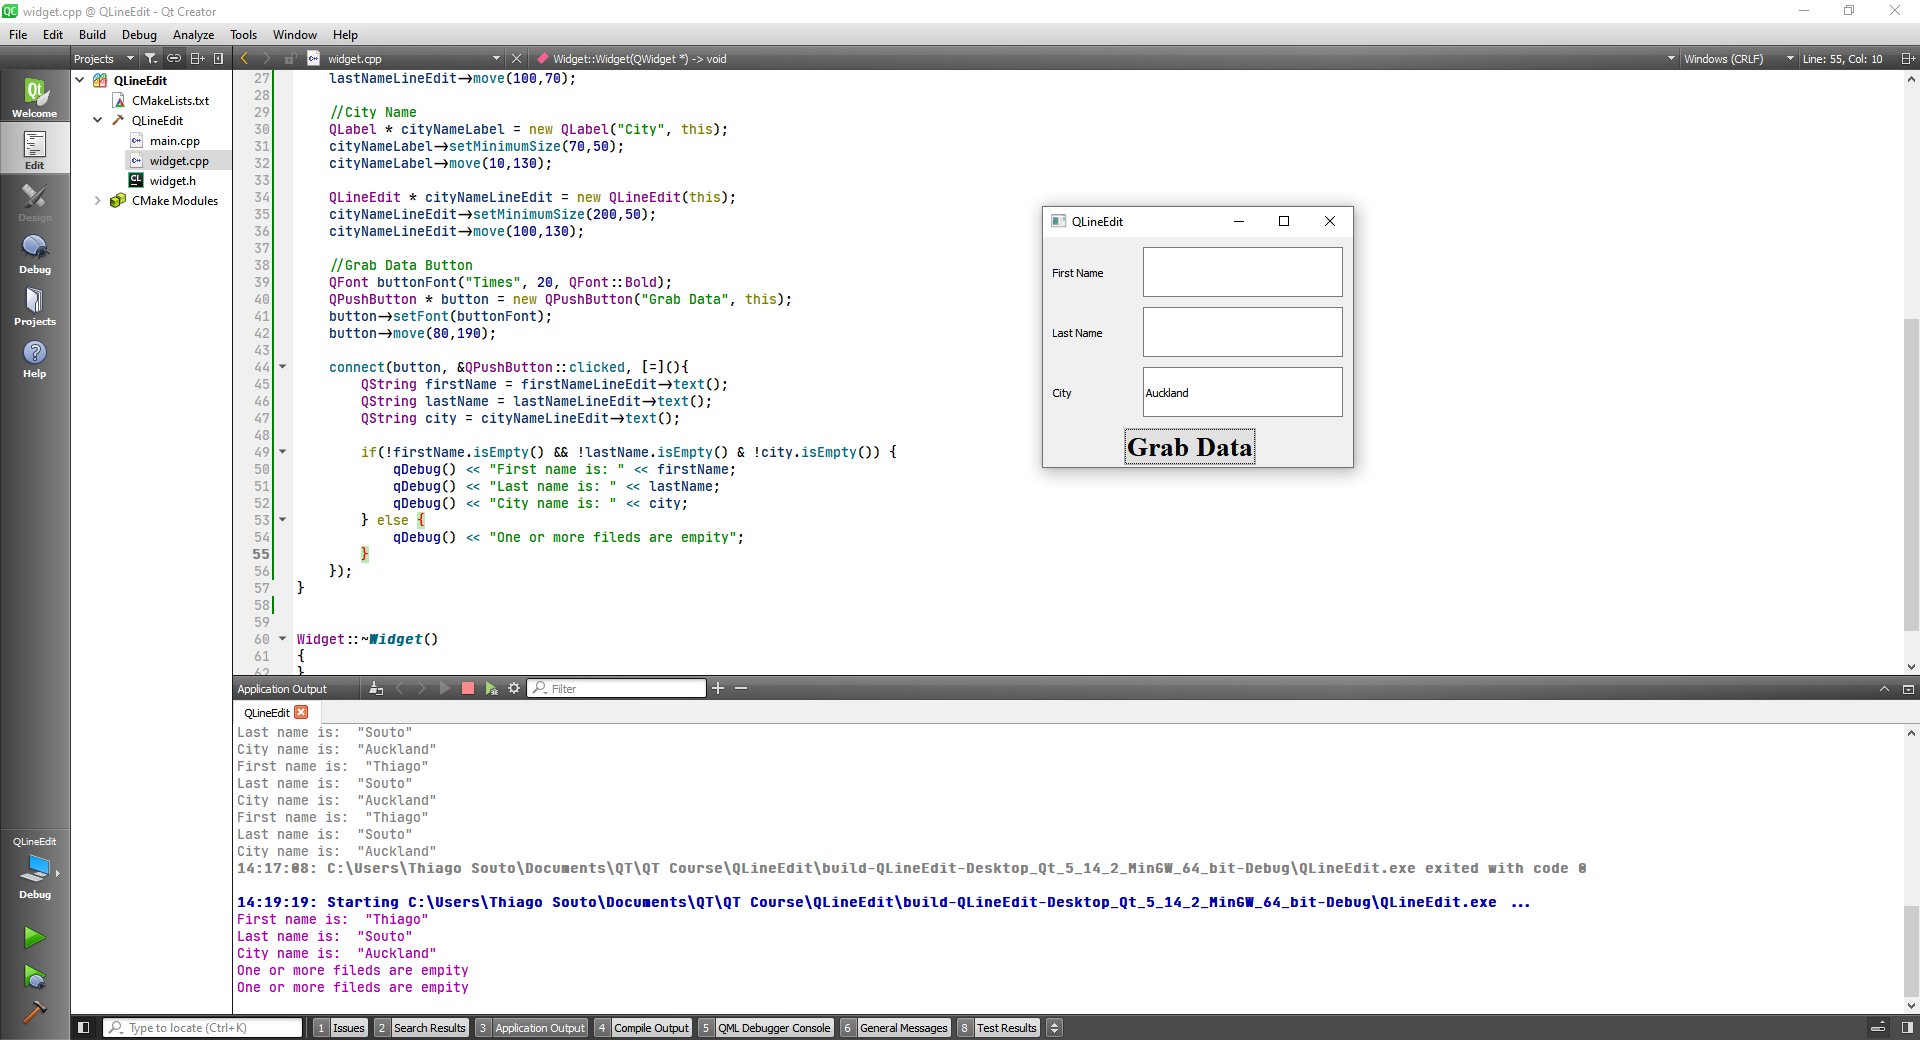
# Input data validation
#include "widget.h"
#include <QPushButton>
#include <QLabel>
#include <QLineEdit>
#include <qdebug.h>


Widget::Widget(QWidget *parent)
    : QWidget(parent)
{
    //Fisrt Name
    QLabel * firstNameLabel = new QLabel("First Name", this);
    firstNameLabel->setMinimumSize(70,50);
    firstNameLabel->move(10,10);

    QLineEdit * firstNameLineEdit = new QLineEdit(this);
    firstNameLineEdit->setMinimumSize(200,50);
    firstNameLineEdit->move(100,10);

    //Last Name
    QLabel * lastNameLabel = new QLabel("Last Name", this);
    lastNameLabel->setMinimumSize(70,50);
    lastNameLabel->move(10,70);

    QLineEdit * lastNameLineEdit = new QLineEdit(this);
    lastNameLineEdit->setMinimumSize(200,50);
    lastNameLineEdit->move(100,70);

    //City Name
    QLabel * cityNameLabel = new QLabel("City", this);
    cityNameLabel->setMinimumSize(70,50);
    cityNameLabel->move(10,130);

    QLineEdit * cityNameLineEdit = new QLineEdit(this);
    cityNameLineEdit->setMinimumSize(200,50);
    cityNameLineEdit->move(100,130);

    //Grab Data Button
    QFont buttonFont("Times", 20, QFont::Bold);
    QPushButton * button = new QPushButton("Grab Data", this);
    button->setFont(buttonFont);
    button->move(80,190);

    connect(button, &QPushButton::clicked, [=](){
        QString firstName = firstNameLineEdit->text();
        QString lastName = lastNameLineEdit->text();
        QString city = cityNameLineEdit->text();

        if(!firstName.isEmpty() && !lastName.isEmpty() & !city.isEmpty()) {
            qDebug() << "First name is: " << firstName;
            qDebug() << "Last name is: " << lastName;
            qDebug() << "City name is: " << city;
        } else {
            qDebug() << "One or more fileds are empity";
        }
    });
}


Widget::~Widget()
{
}
2
3
4
5
6
7
8
9
10
11
12
13
14
15
16
17
18
19
20
21
22
23
24
25
26
27
28
29
30
31
32
33
34
35
36
37
38
39
40
41
42
43
44
45
46
47
48
49
50
51
52
53
54
55
56
57
58
59
60
61
62
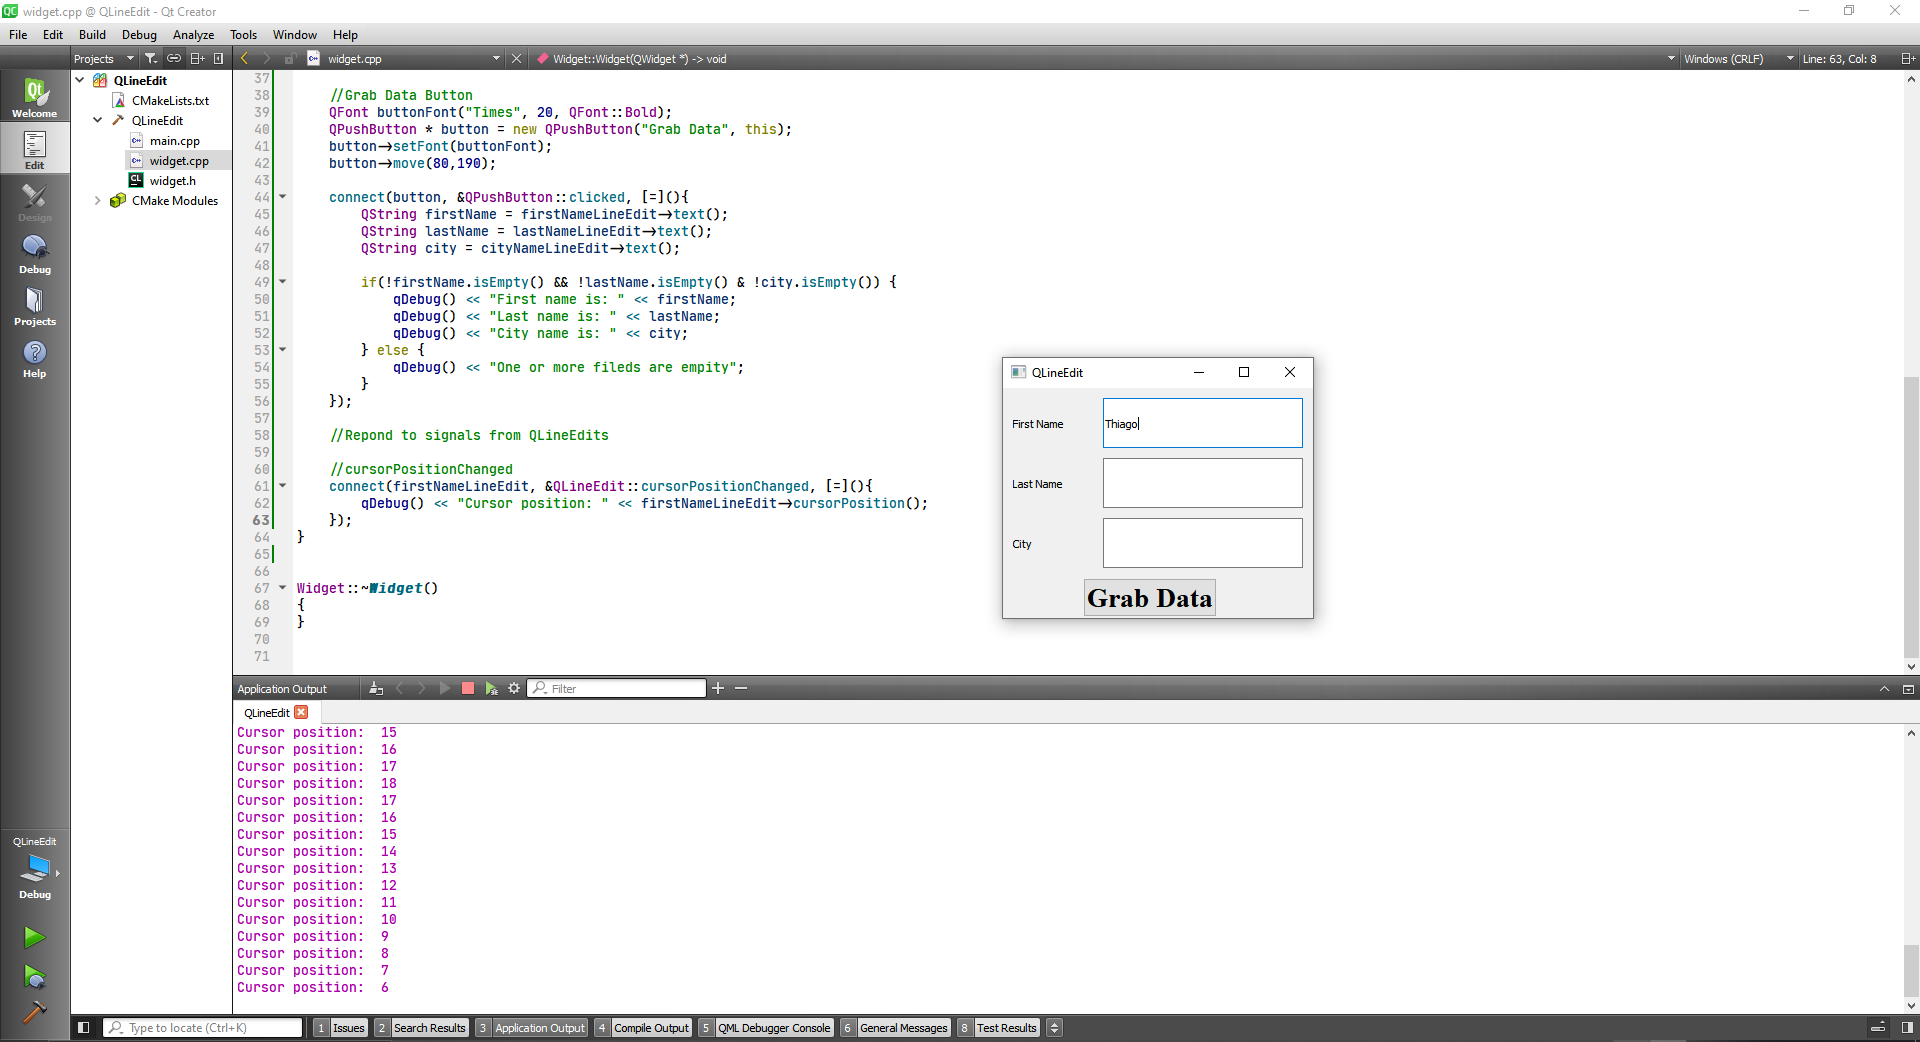
# Respond to signals from QLineEdit
- void
cursorPositionChanged(int oldPos, int newPos) - void
editingFinished() - void
inputRejected() - void
returnPressed() - void
selectionChanged() - void
textChanged(const QString &text) - void
textEdited(const QString &text)
#include "widget.h"
#include <QPushButton>
#include <QLabel>
#include <QLineEdit>
#include <qdebug.h>


Widget::Widget(QWidget *parent)
    : QWidget(parent)
{
    //Fisrt Name
    QLabel * firstNameLabel = new QLabel("First Name", this);
    firstNameLabel->setMinimumSize(70,50);
    firstNameLabel->move(10,10);

    QLineEdit * firstNameLineEdit = new QLineEdit(this);
    firstNameLineEdit->setMinimumSize(200,50);
    firstNameLineEdit->move(100,10);

    //Last Name
    QLabel * lastNameLabel = new QLabel("Last Name", this);
    lastNameLabel->setMinimumSize(70,50);
    lastNameLabel->move(10,70);

    QLineEdit * lastNameLineEdit = new QLineEdit(this);
    lastNameLineEdit->setMinimumSize(200,50);
    lastNameLineEdit->move(100,70);

    //City Name
    QLabel * cityNameLabel = new QLabel("City", this);
    cityNameLabel->setMinimumSize(70,50);
    cityNameLabel->move(10,130);

    QLineEdit * cityNameLineEdit = new QLineEdit(this);
    cityNameLineEdit->setMinimumSize(200,50);
    cityNameLineEdit->move(100,130);

    //Grab Data Button
    QFont buttonFont("Times", 20, QFont::Bold);
    QPushButton * button = new QPushButton("Grab Data", this);
    button->setFont(buttonFont);
    button->move(80,190);

    connect(button, &QPushButton::clicked, [=](){
        QString firstName = firstNameLineEdit->text();
        QString lastName = lastNameLineEdit->text();
        QString city = cityNameLineEdit->text();

        if(!firstName.isEmpty() && !lastName.isEmpty() & !city.isEmpty()) {
            qDebug() << "First name is: " << firstName;
            qDebug() << "Last name is: " << lastName;
            qDebug() << "City name is: " << city;
        } else {
            qDebug() << "One or more fileds are empity";
        }
    });

    //Repond to signals from QLineEdits

    //cursorPositionChanged
    connect(firstNameLineEdit, &QLineEdit::cursorPositionChanged, [=](){
        qDebug() << "Cursor position: " << firstNameLineEdit->cursorPosition();
    });
}


Widget::~Widget()
{
}
2
3
4
5
6
7
8
9
10
11
12
13
14
15
16
17
18
19
20
21
22
23
24
25
26
27
28
29
30
31
32
33
34
35
36
37
38
39
40
41
42
43
44
45
46
47
48
49
50
51
52
53
54
55
56
57
58
59
60
61
62
63
64
65
66
67
68
69
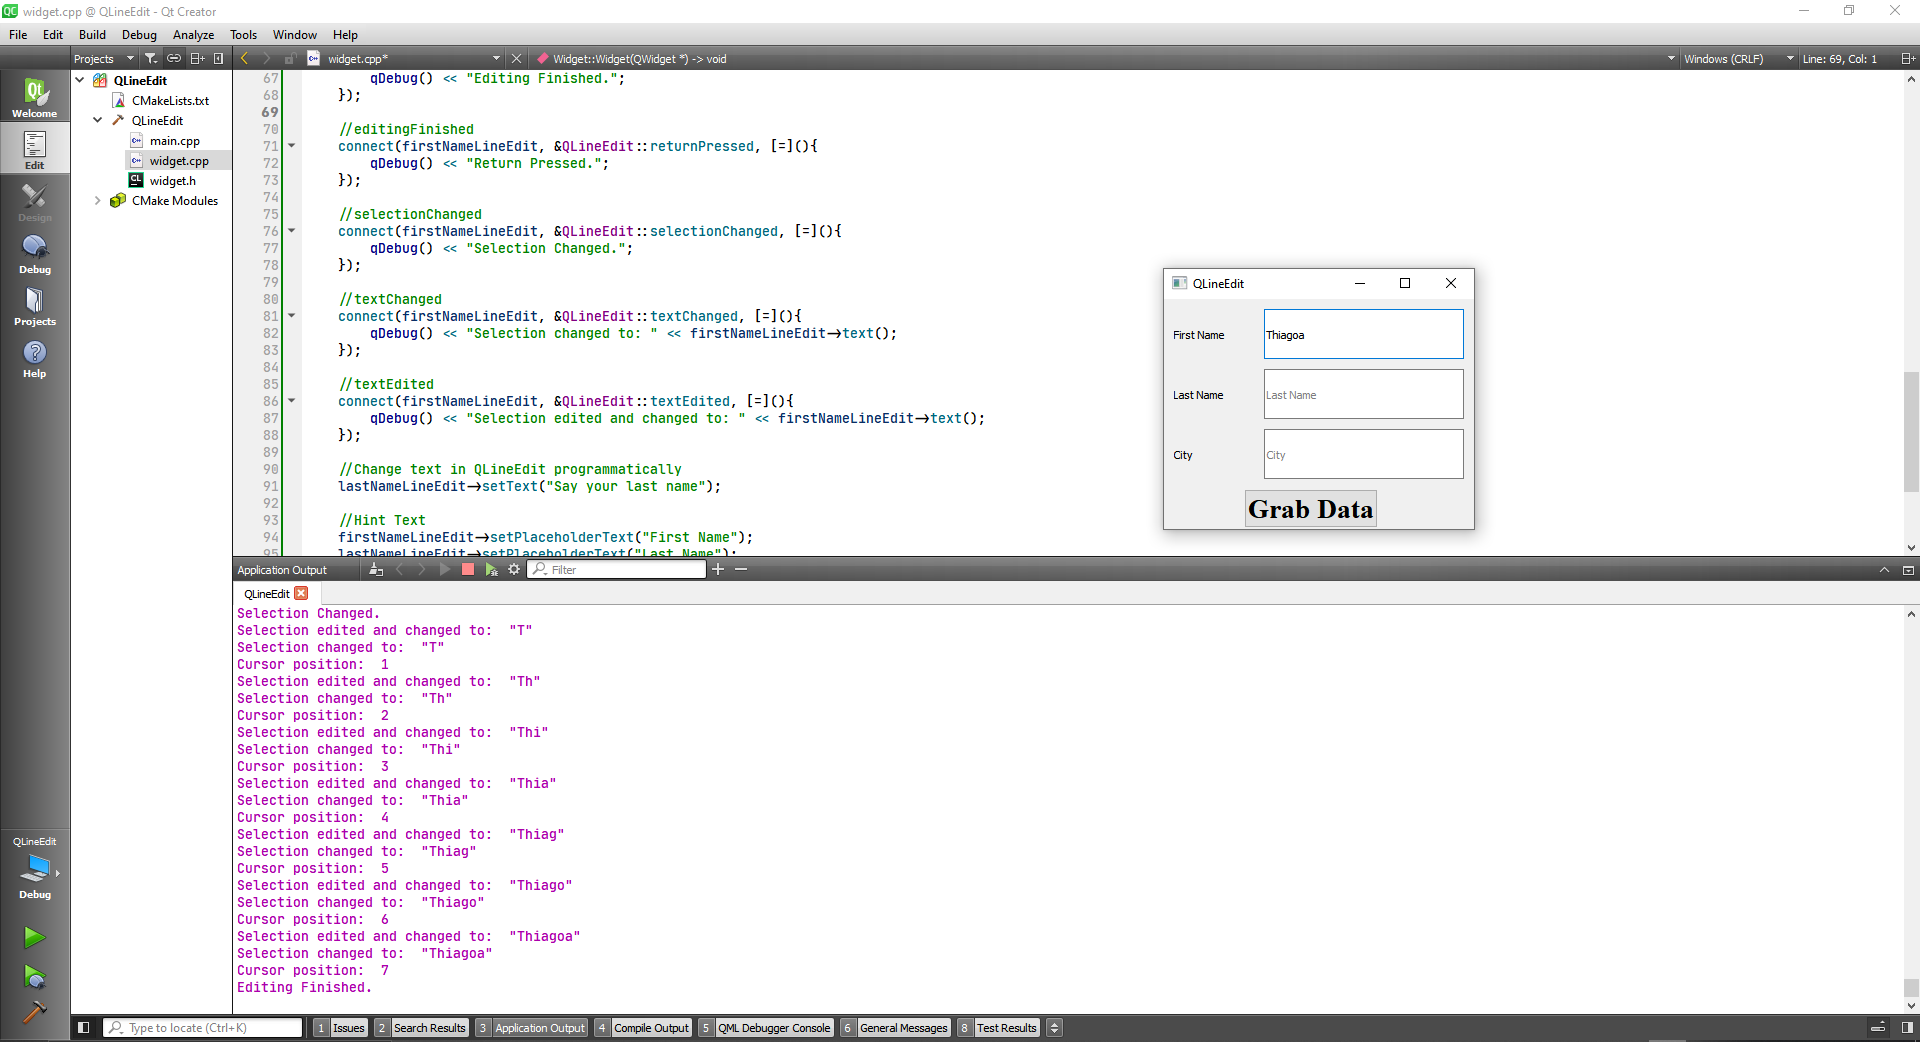
Some more cool things to do:
//Repond to signals from QLineEdits

//cursorPositionChanged
connect(firstNameLineEdit, &QLineEdit::cursorPositionChanged, [=](){
    qDebug() << "Cursor position: " << firstNameLineEdit->cursorPosition();
});

//editingFinished
connect(firstNameLineEdit, &QLineEdit::editingFinished, [=](){
    qDebug() << "Editing Finished.";
});

//editingFinished
connect(firstNameLineEdit, &QLineEdit::returnPressed, [=](){
    qDebug() << "Return Pressed.";
});

//selectionChanged
connect(firstNameLineEdit, &QLineEdit::selectionChanged, [=](){
    qDebug() << "Selection Changed.";
});

//textChanged
connect(firstNameLineEdit, &QLineEdit::textChanged, [=](){
    qDebug() << "Selection changed to: " << firstNameLineEdit->text();
});

//textEdited
connect(firstNameLineEdit, &QLineEdit::textEdited, [=](){
    qDebug() << "Selection edited and changed to: " << firstNameLineEdit->text();
});

//Change text in QLineEdit programmatically
lastNameLineEdit->setText("Say your last name");

//Hint Text
firstNameLineEdit->setPlaceholderText("First Name");
lastNameLineEdit->setPlaceholderText("Last Name");
cityNameLineEdit->setPlaceholderText("City");
2
3
4
5
6
7
8
9
10
11
12
13
14
15
16
17
18
19
20
21
22
23
24
25
26
27
28
29
30
31
32
33
34
35
36
37
38
39
# QTextEdit Class
The QTextEdit class provides a widget that is used to edit and display both plain and rich text.
DETAILS
QTextEdit is an advanced WYSIWYG viewer/editor supporting rich text formatting using HTML-style tags, or Markdown format. It is optimized to handle large documents and to respond quickly to user input.
QTextEdit works on paragraphs and characters. A paragraph is a formatted string which is word-wrapped to fit into the width of the widget. By default when reading plain text, one newline signifies a paragraph. A document consists of zero or more paragraphs. The words in the paragraph are aligned in accordance with the paragraph's alignment. Paragraphs are separated by hard line breaks. Each character within a paragraph has its own attributes, for example, font and color.
QTextEdit can display images, lists and tables. If the text is too large to view within the text edit's viewport, scroll bars will appear. The text edit can load both plain text and rich text files. Rich text can be described using a subset of HTML 4 markup; refer to the Supported HTML Subset page for more information.
If you just need to display a small piece of rich text use QLabel.
The rich text support in Qt is designed to provide a fast, portable and efficient way to add reasonable online help facilities to applications, and to provide a basis for rich text editors. If you find the HTML support insufficient for your needs you may consider the use of Qt WebKit, which provides a full-featured web browser widget.
The shape of the mouse cursor on a QTextEdit is Qt::IBeamCursor by default. It can be changed through the viewport()'s cursor property.
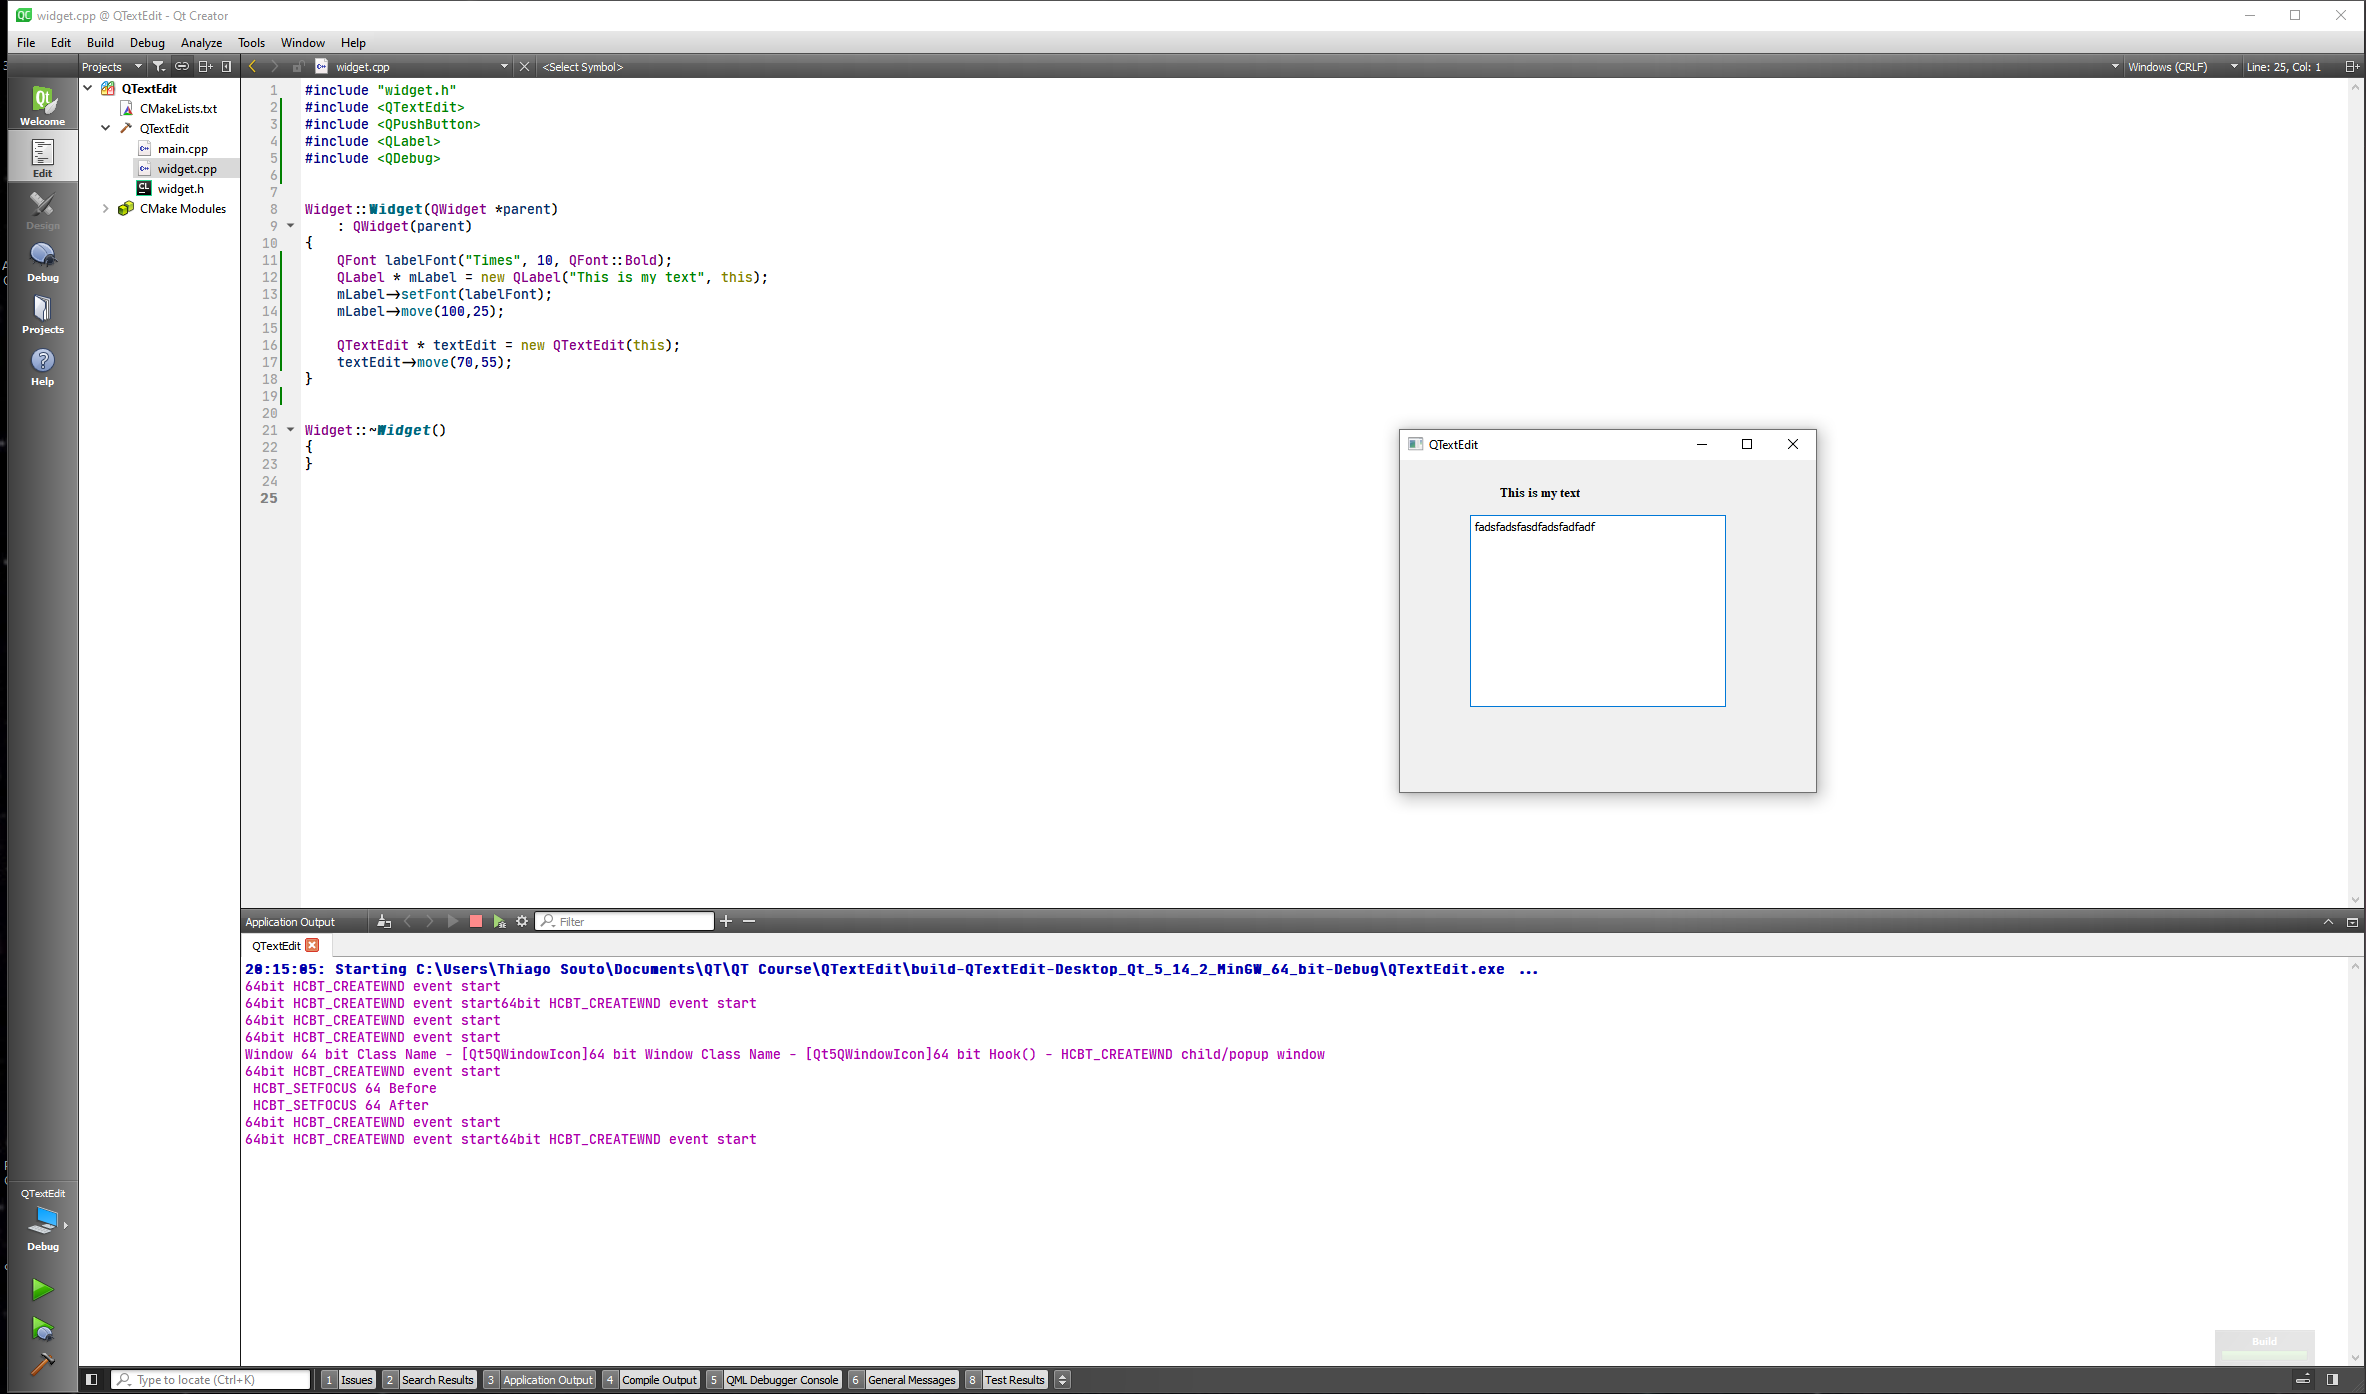
First let's do a simple text edit.
#include "widget.h"
#include <QTextEdit>
#include <QPushButton>
#include <QLabel>
#include <QDebug>


Widget::Widget(QWidget *parent)
    : QWidget(parent)
{
    QFont labelFont("Times", 10, QFont::Bold);
    QLabel * mLabel = new QLabel("This is my text", this);
    mLabel->setFont(labelFont);
    mLabel->move(100,25);

    QTextEdit * textEdit = new QTextEdit(this);
    textEdit->move(70,55);
}


Widget::~Widget()
{
}
2
3
4
5
6
7
8
9
10
11
12
13
14
15
16
17
18
19
20
21
22
23
Now let's create some buttons, Copy, Cut and Paste for now.
#include "widget.h"
#include <QTextEdit>
#include <QPushButton>
#include <QLabel>
#include <QDebug>


Widget::Widget(QWidget *parent)
    : QWidget(parent)
{
    QFont labelFont("Times", 10, QFont::Bold);
    QLabel * mLabel = new QLabel("This is my text", this);
    mLabel->setFont(labelFont);
    mLabel->move(100,25);

    QTextEdit * textEdit = new QTextEdit(this);
    textEdit->move(70,55);

    //textChanged
    connect(textEdit, &QTextEdit::textChanged, [=](){
        qDebug() << "Text Changed";
    });

    //Copy, Cut and Paste
    QPushButton * copyButton = new QPushButton("Copy", this);
    copyButton->setMinimumSize(50,25);
    copyButton->move(10,250);

    QPushButton * cutButton = new QPushButton("Cut", this);
    cutButton->setMinimumSize(50,25);
    cutButton->move(110,250);

    QPushButton * pasteButton = new QPushButton("Paste", this);
    pasteButton->setMinimumSize(50,25);
    pasteButton->move(210,250);
}


Widget::~Widget()
{
}

QSize Widget::sizeHint() const
{
    return QSize(500,500);
}
2
3
4
5
6
7
8
9
10
11
12
13
14
15
16
17
18
19
20
21
22
23
24
25
26
27
28
29
30
31
32
33
34
35
36
37
38
39
40
41
42
43
44
45
46
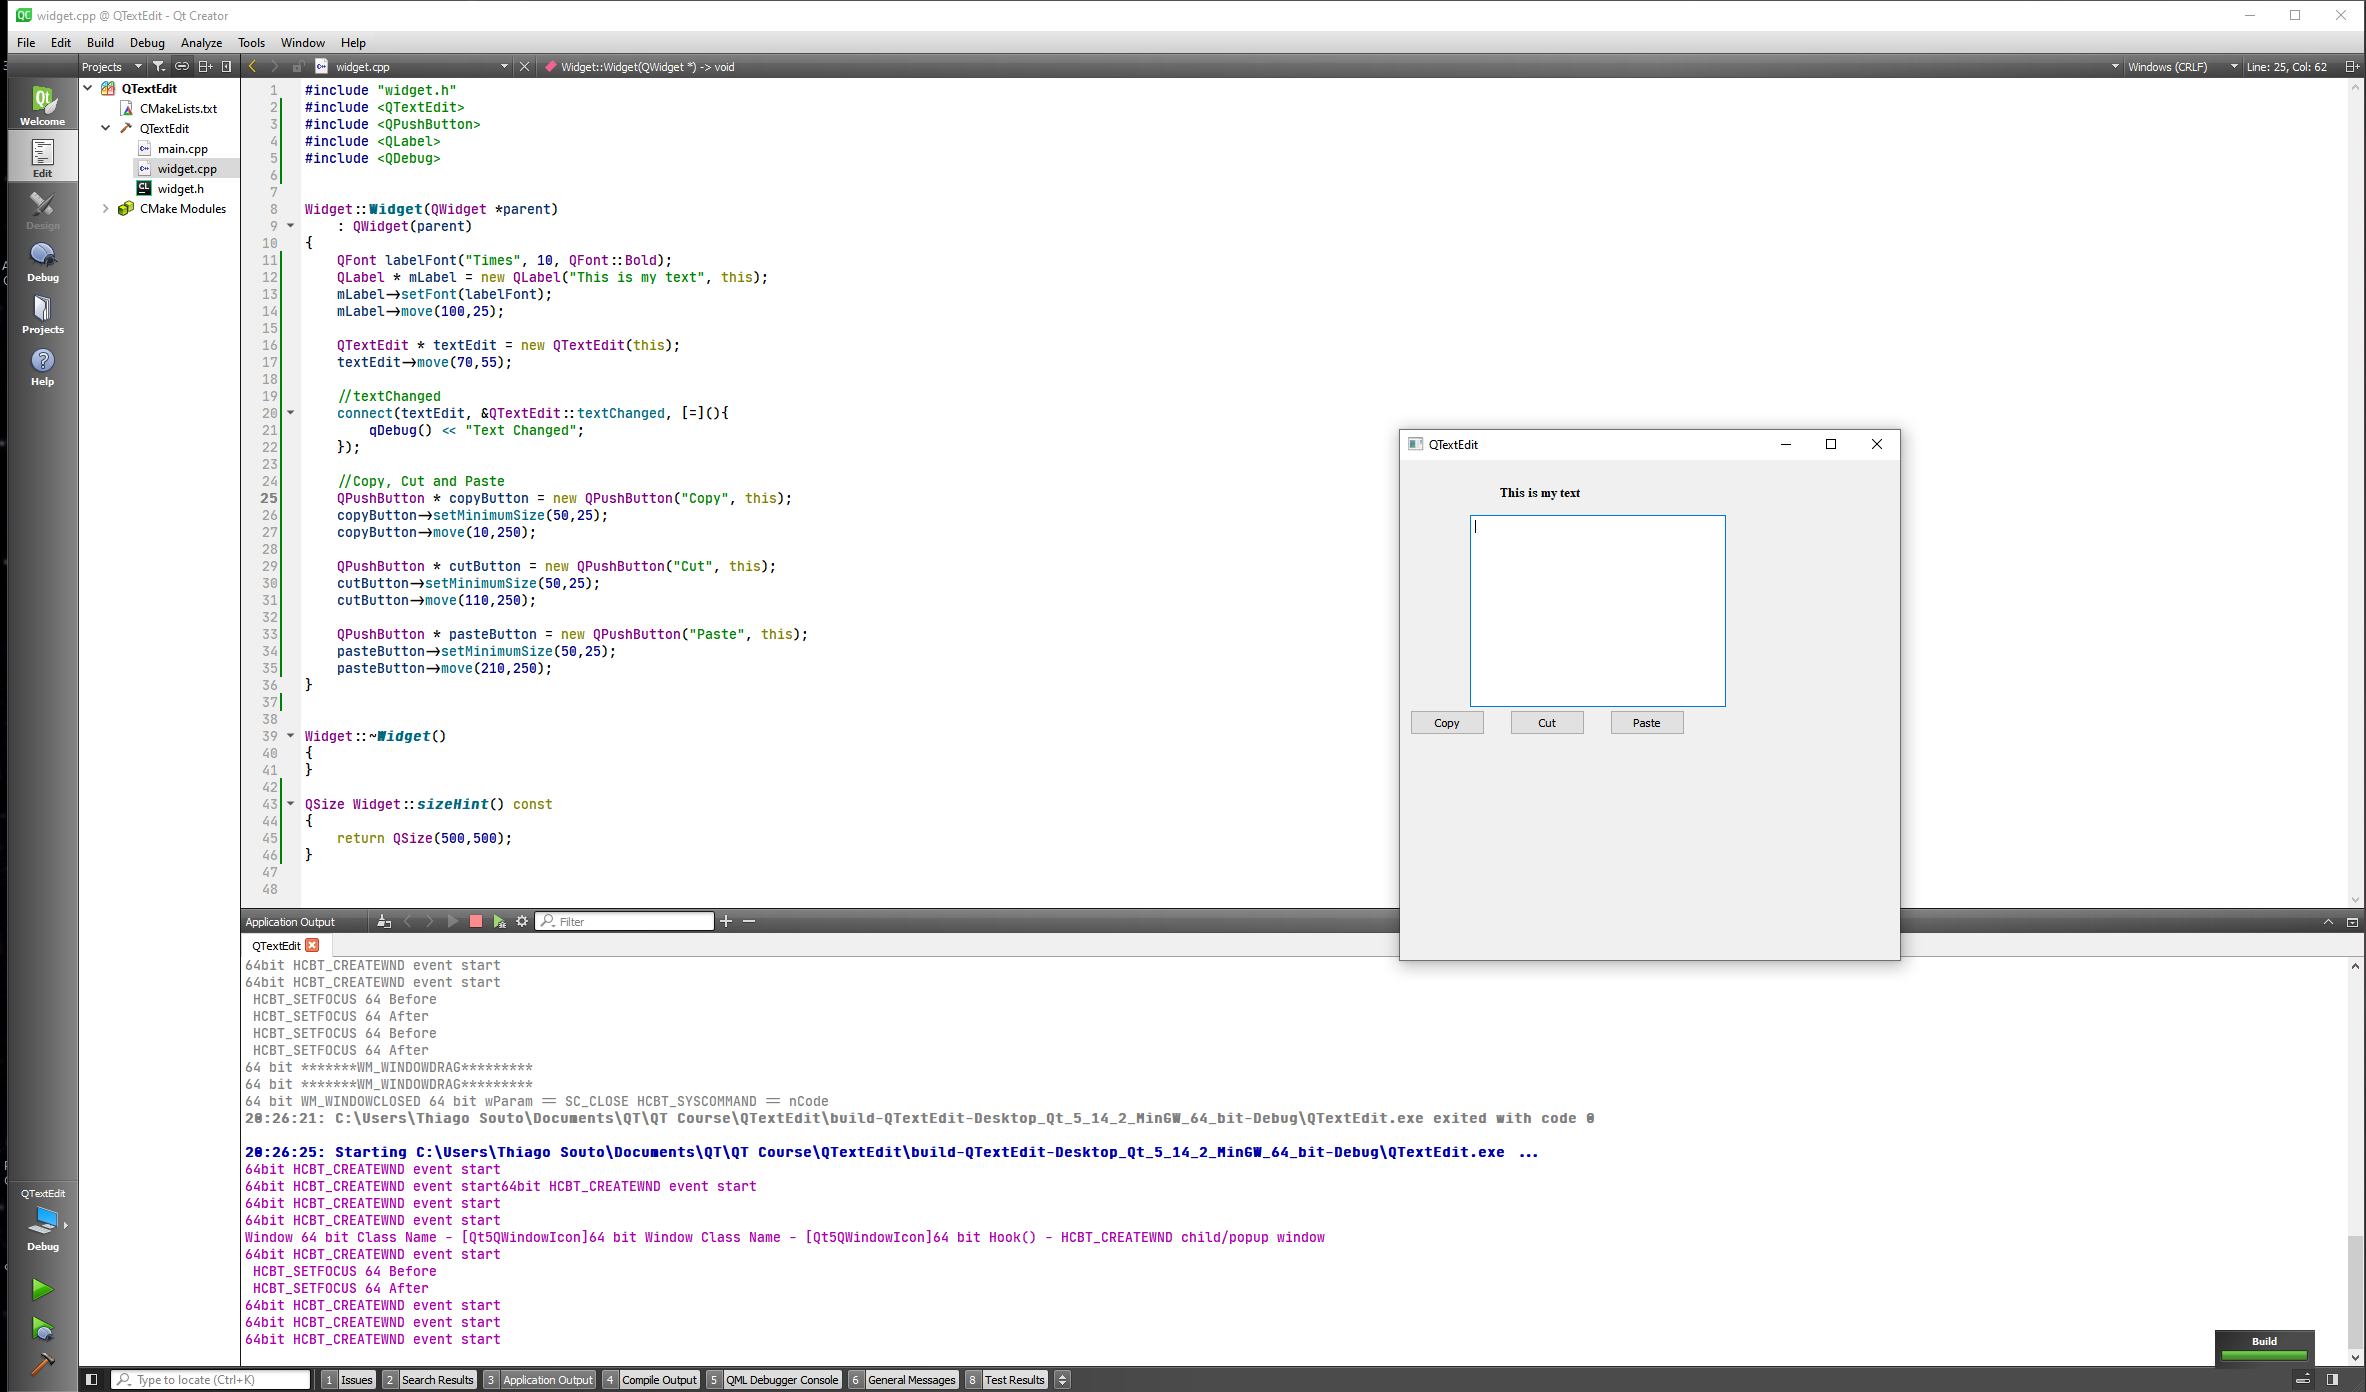
Now we are going to connect slots to these signals
#include "widget.h"
#include <QTextEdit>
#include <QPushButton>
#include <QLabel>
#include <QDebug>


Widget::Widget(QWidget *parent)
    : QWidget(parent)
{
    QFont labelFont("Times", 10, QFont::Bold);
    QLabel * mLabel = new QLabel("This is my text", this);
    mLabel->setFont(labelFont);
    mLabel->move(100,25);

    QTextEdit * textEdit = new QTextEdit(this);
    textEdit->move(70,55);

    //textChanged
    connect(textEdit, &QTextEdit::textChanged, [=](){
        qDebug() << "Text Changed";
    });

    //Copy, Cut and Paste
    QPushButton * copyButton = new QPushButton("Copy", this);
    copyButton->setMinimumSize(50,25);
    copyButton->move(10,250);
    connect(copyButton, &QPushButton::clicked, [=](){
        textEdit->copy();
    });

    QPushButton * cutButton = new QPushButton("Cut", this);
    cutButton->setMinimumSize(50,25);
    cutButton->move(110,250);
    connect(cutButton, &QPushButton::clicked, [=](){
        textEdit->cut();
    });

    QPushButton * pasteButton = new QPushButton("Paste", this);
    pasteButton->setMinimumSize(50,25);
    pasteButton->move(210,250);
    connect(pasteButton, &QPushButton::clicked, [=](){
        textEdit->paste();
    });
}


Widget::~Widget()
{
}

QSize Widget::sizeHint() const
{
    return QSize(500,500);
}
2
3
4
5
6
7
8
9
10
11
12
13
14
15
16
17
18
19
20
21
22
23
24
25
26
27
28
29
30
31
32
33
34
35
36
37
38
39
40
41
42
43
44
45
46
47
48
49
50
51
52
53
54
55
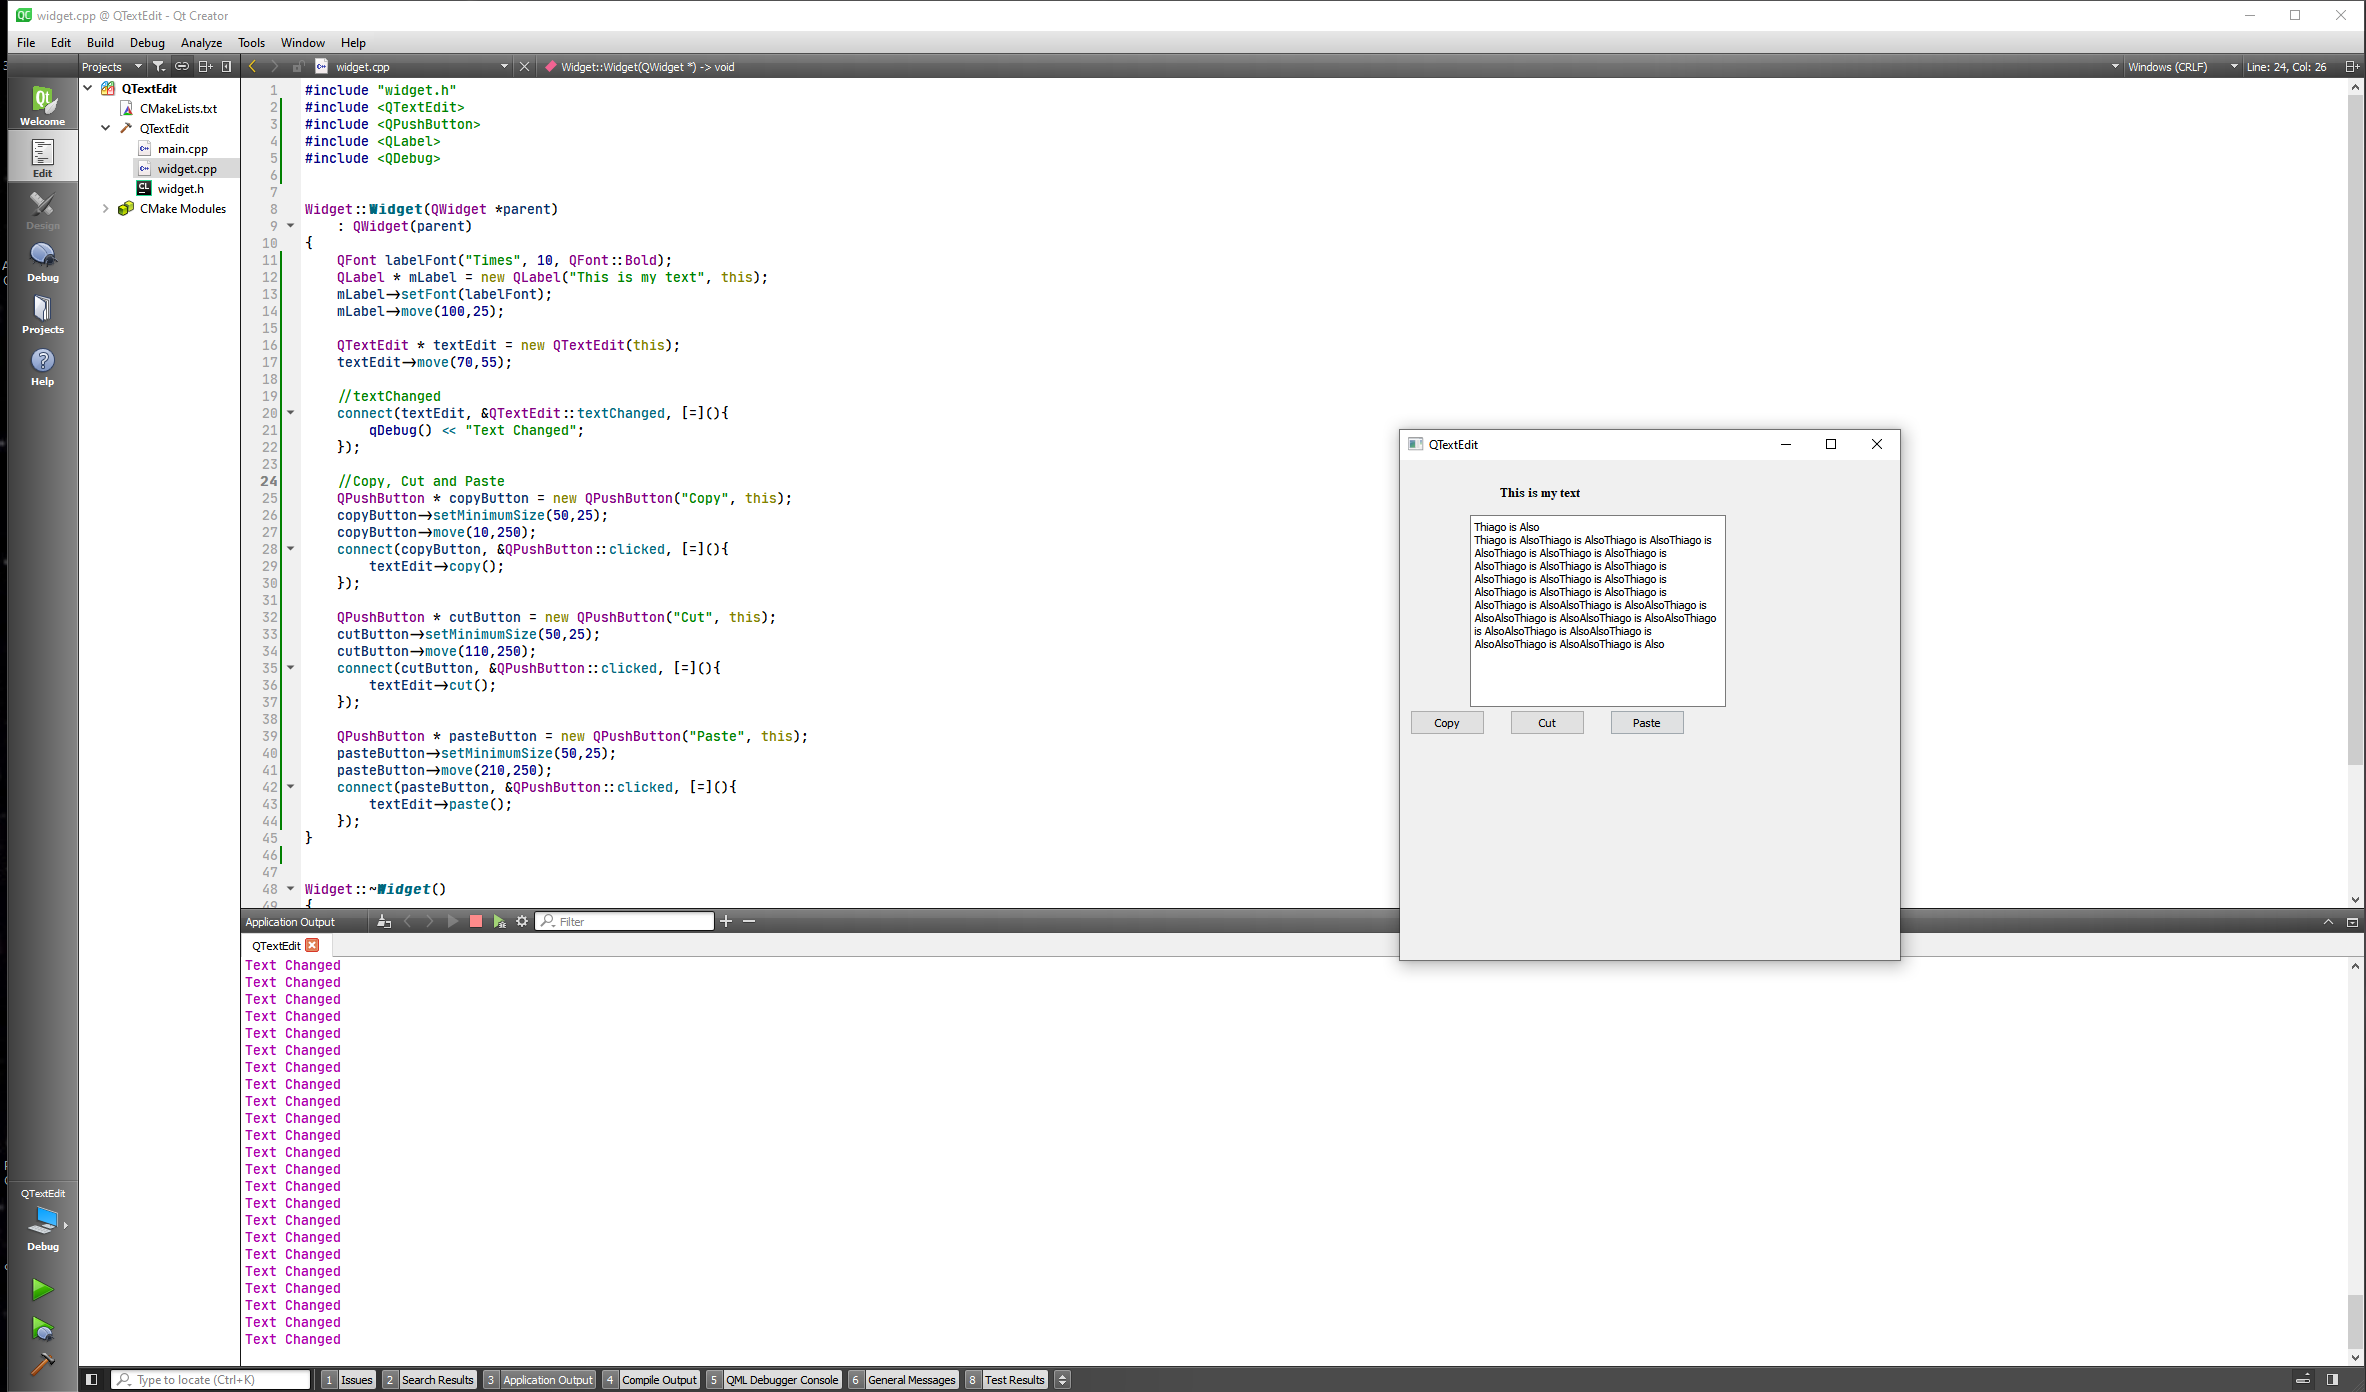
Also Undo and redo buttons
#include "widget.h"
#include <QTextEdit>
#include <QPushButton>
#include <QLabel>
#include <QDebug>


Widget::Widget(QWidget *parent)
    : QWidget(parent)
{
    QFont labelFont("Times", 10, QFont::Bold);
    QLabel * mLabel = new QLabel("This is my text", this);
    mLabel->setFont(labelFont);
    mLabel->move(100,25);

    QTextEdit * textEdit = new QTextEdit(this);
    textEdit->move(70,55);

    //textChanged
    connect(textEdit, &QTextEdit::textChanged, [=](){
        qDebug() << "Text Changed";
    });

    //Copy, Cut and Paste
    QPushButton * copyButton = new QPushButton("Copy", this);
    copyButton->setMinimumSize(50,25);
    copyButton->move(10,250);
    connect(copyButton, &QPushButton::clicked, [=](){
        textEdit->copy();
    });

    QPushButton * cutButton = new QPushButton("Cut", this);
    cutButton->setMinimumSize(50,25);
    cutButton->move(110,250);
    connect(cutButton, &QPushButton::clicked, [=](){
        textEdit->cut();
    });

    QPushButton * pasteButton = new QPushButton("Paste", this);
    pasteButton->setMinimumSize(50,25);
    pasteButton->move(210,250);
    connect(pasteButton, &QPushButton::clicked, [=](){
        textEdit->paste();
    });

    QPushButton * undoButton = new QPushButton("Undo", this);
    undoButton->setMinimumSize(50,25);
    undoButton->move(10,280);
    connect(undoButton, &QPushButton::clicked, [=](){
        textEdit->undo();
    });

    QPushButton * redoButton = new QPushButton("Redo", this);
    redoButton->setMinimumSize(50,25);
    redoButton->move(110,280);
    connect(redoButton, &QPushButton::clicked, [=](){
        textEdit->redo();
    });
}


Widget::~Widget()
{
}

QSize Widget::sizeHint() const
{
    return QSize(500,500);
}
2
3
4
5
6
7
8
9
10
11
12
13
14
15
16
17
18
19
20
21
22
23
24
25
26
27
28
29
30
31
32
33
34
35
36
37
38
39
40
41
42
43
44
45
46
47
48
49
50
51
52
53
54
55
56
57
58
59
60
61
62
63
64
65
66
67
68
69
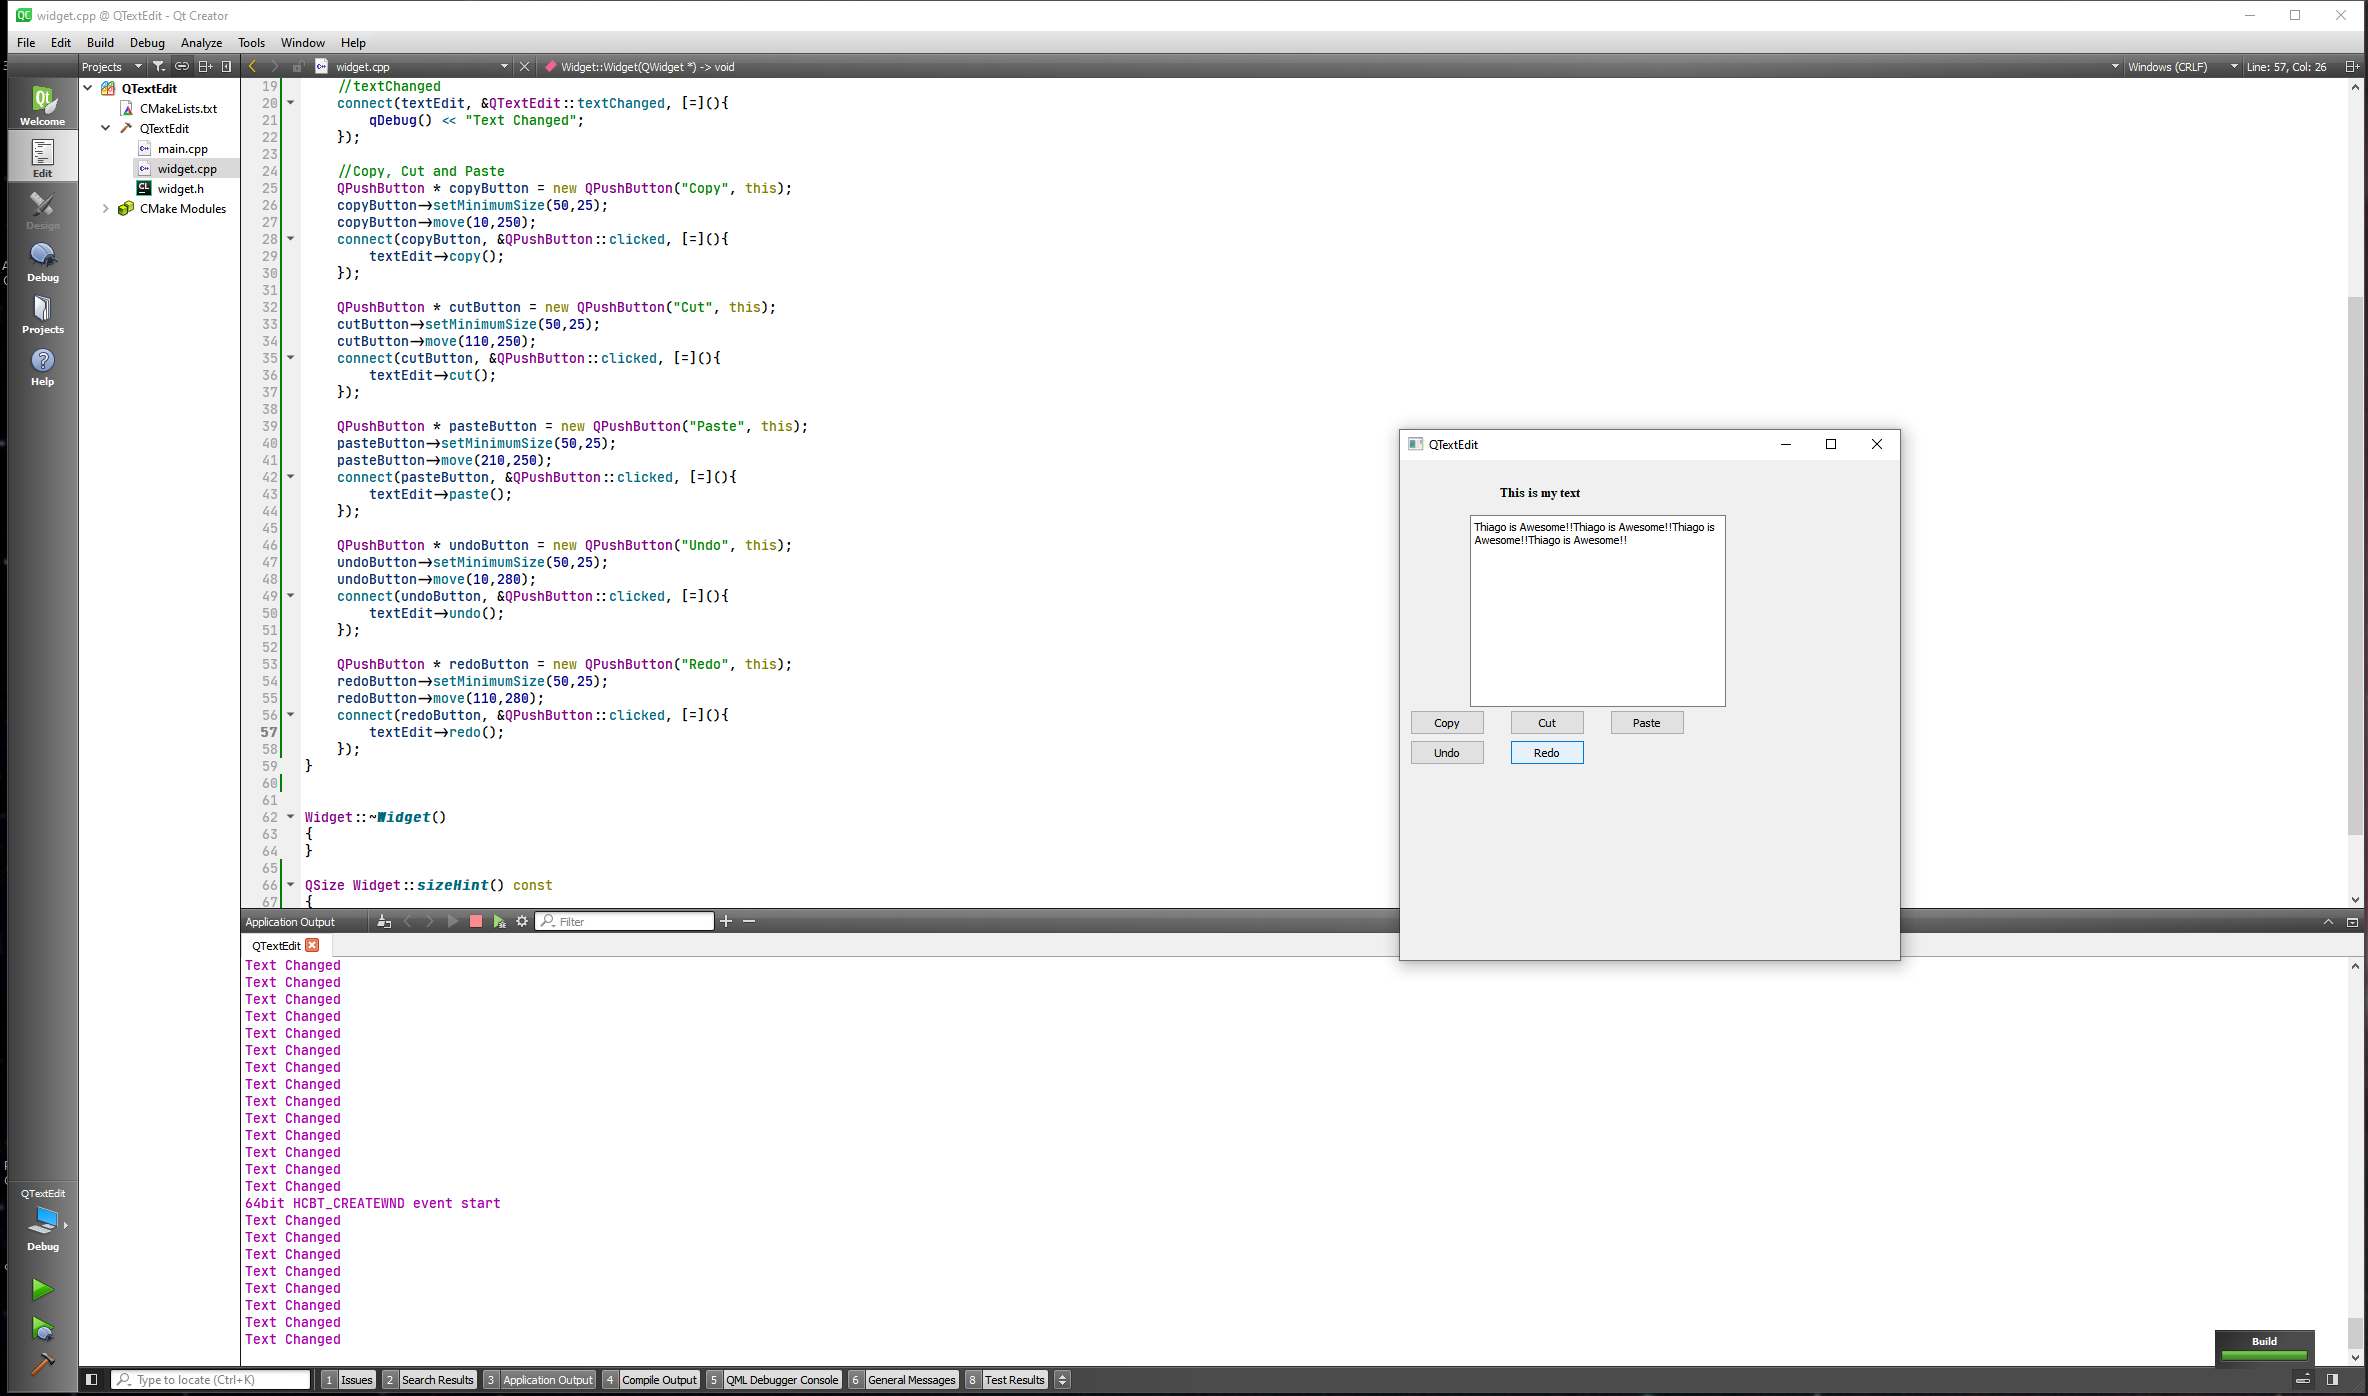
Let's now set a plaintext button and a html that will paste into the TextEdit.
#include "widget.h"
#include <QTextEdit>
#include <QPushButton>
#include <QLabel>
#include <QDebug>


Widget::Widget(QWidget *parent)
    : QWidget(parent)
{
    QFont labelFont("Times", 10, QFont::Bold);
    QLabel * mLabel = new QLabel("This is my text", this);
    mLabel->setFont(labelFont);
    mLabel->move(100,25);

    QTextEdit * textEdit = new QTextEdit(this);
    textEdit->move(70,55);

    //textChanged
    connect(textEdit, &QTextEdit::textChanged, [=](){
        qDebug() << "Text Changed";
    });

    //Copy, Cut and Paste
    QPushButton * copyButton = new QPushButton("Copy", this);
    copyButton->setMinimumSize(50,25);
    copyButton->move(10,250);
    connect(copyButton, &QPushButton::clicked, [=](){
        textEdit->copy();
    });

    QPushButton * cutButton = new QPushButton("Cut", this);
    cutButton->setMinimumSize(50,25);
    cutButton->move(110,250);
    connect(cutButton, &QPushButton::clicked, [=](){
        textEdit->cut();
    });

    QPushButton * pasteButton = new QPushButton("Paste", this);
    pasteButton->setMinimumSize(50,25);
    pasteButton->move(210,250);
    connect(pasteButton, &QPushButton::clicked, [=](){
        textEdit->paste();
    });

    QPushButton * undoButton = new QPushButton("Undo", this);
    undoButton->setMinimumSize(50,25);
    undoButton->move(10,280);
    connect(undoButton, &QPushButton::clicked, [=](){
        textEdit->undo();
    });

    QPushButton * redoButton = new QPushButton("Redo", this);
    redoButton->setMinimumSize(50,25);
    redoButton->move(110,280);
    connect(redoButton, &QPushButton::clicked, [=](){
        textEdit->redo();
    });

    //Set text and HTML to the text edit
    QPushButton * plainTextButton = new QPushButton("Plain Text", this);
    plainTextButton->setMinimumSize(100,25);
    plainTextButton->move(10,310);
    connect(plainTextButton, &QPushButton::clicked, [=](){
        textEdit->setPlainText("dfads fasdfadsfasdfa  fasdfasdfasd   fasdfasdfasd  fasdfasdfa  afsdfasdfadsf fasdfasdfadsf");
    });

    //Set text and HTML to the text edit
    QPushButton * htmlButton = new QPushButton("Html", this);
    htmlButton->setMinimumSize(100,25);
    htmlButton->move(120,310);
    connect(htmlButton, &QPushButton::clicked, [=](){
        textEdit->setHtml("<h1>Kigali Districts</h1><p>The city of Kigali has three districts:</p></br> <ul> <li>Nyarugenge</li> <li> Rio de janeiro</li> <li>Sao paulo</li>");
    });

}


Widget::~Widget()
{
}

QSize Widget::sizeHint() const
{
    return QSize(500,500);
}
2
3
4
5
6
7
8
9
10
11
12
13
14
15
16
17
18
19
20
21
22
23
24
25
26
27
28
29
30
31
32
33
34
35
36
37
38
39
40
41
42
43
44
45
46
47
48
49
50
51
52
53
54
55
56
57
58
59
60
61
62
63
64
65
66
67
68
69
70
71
72
73
74
75
76
77
78
79
80
81
82
83
84
85
86
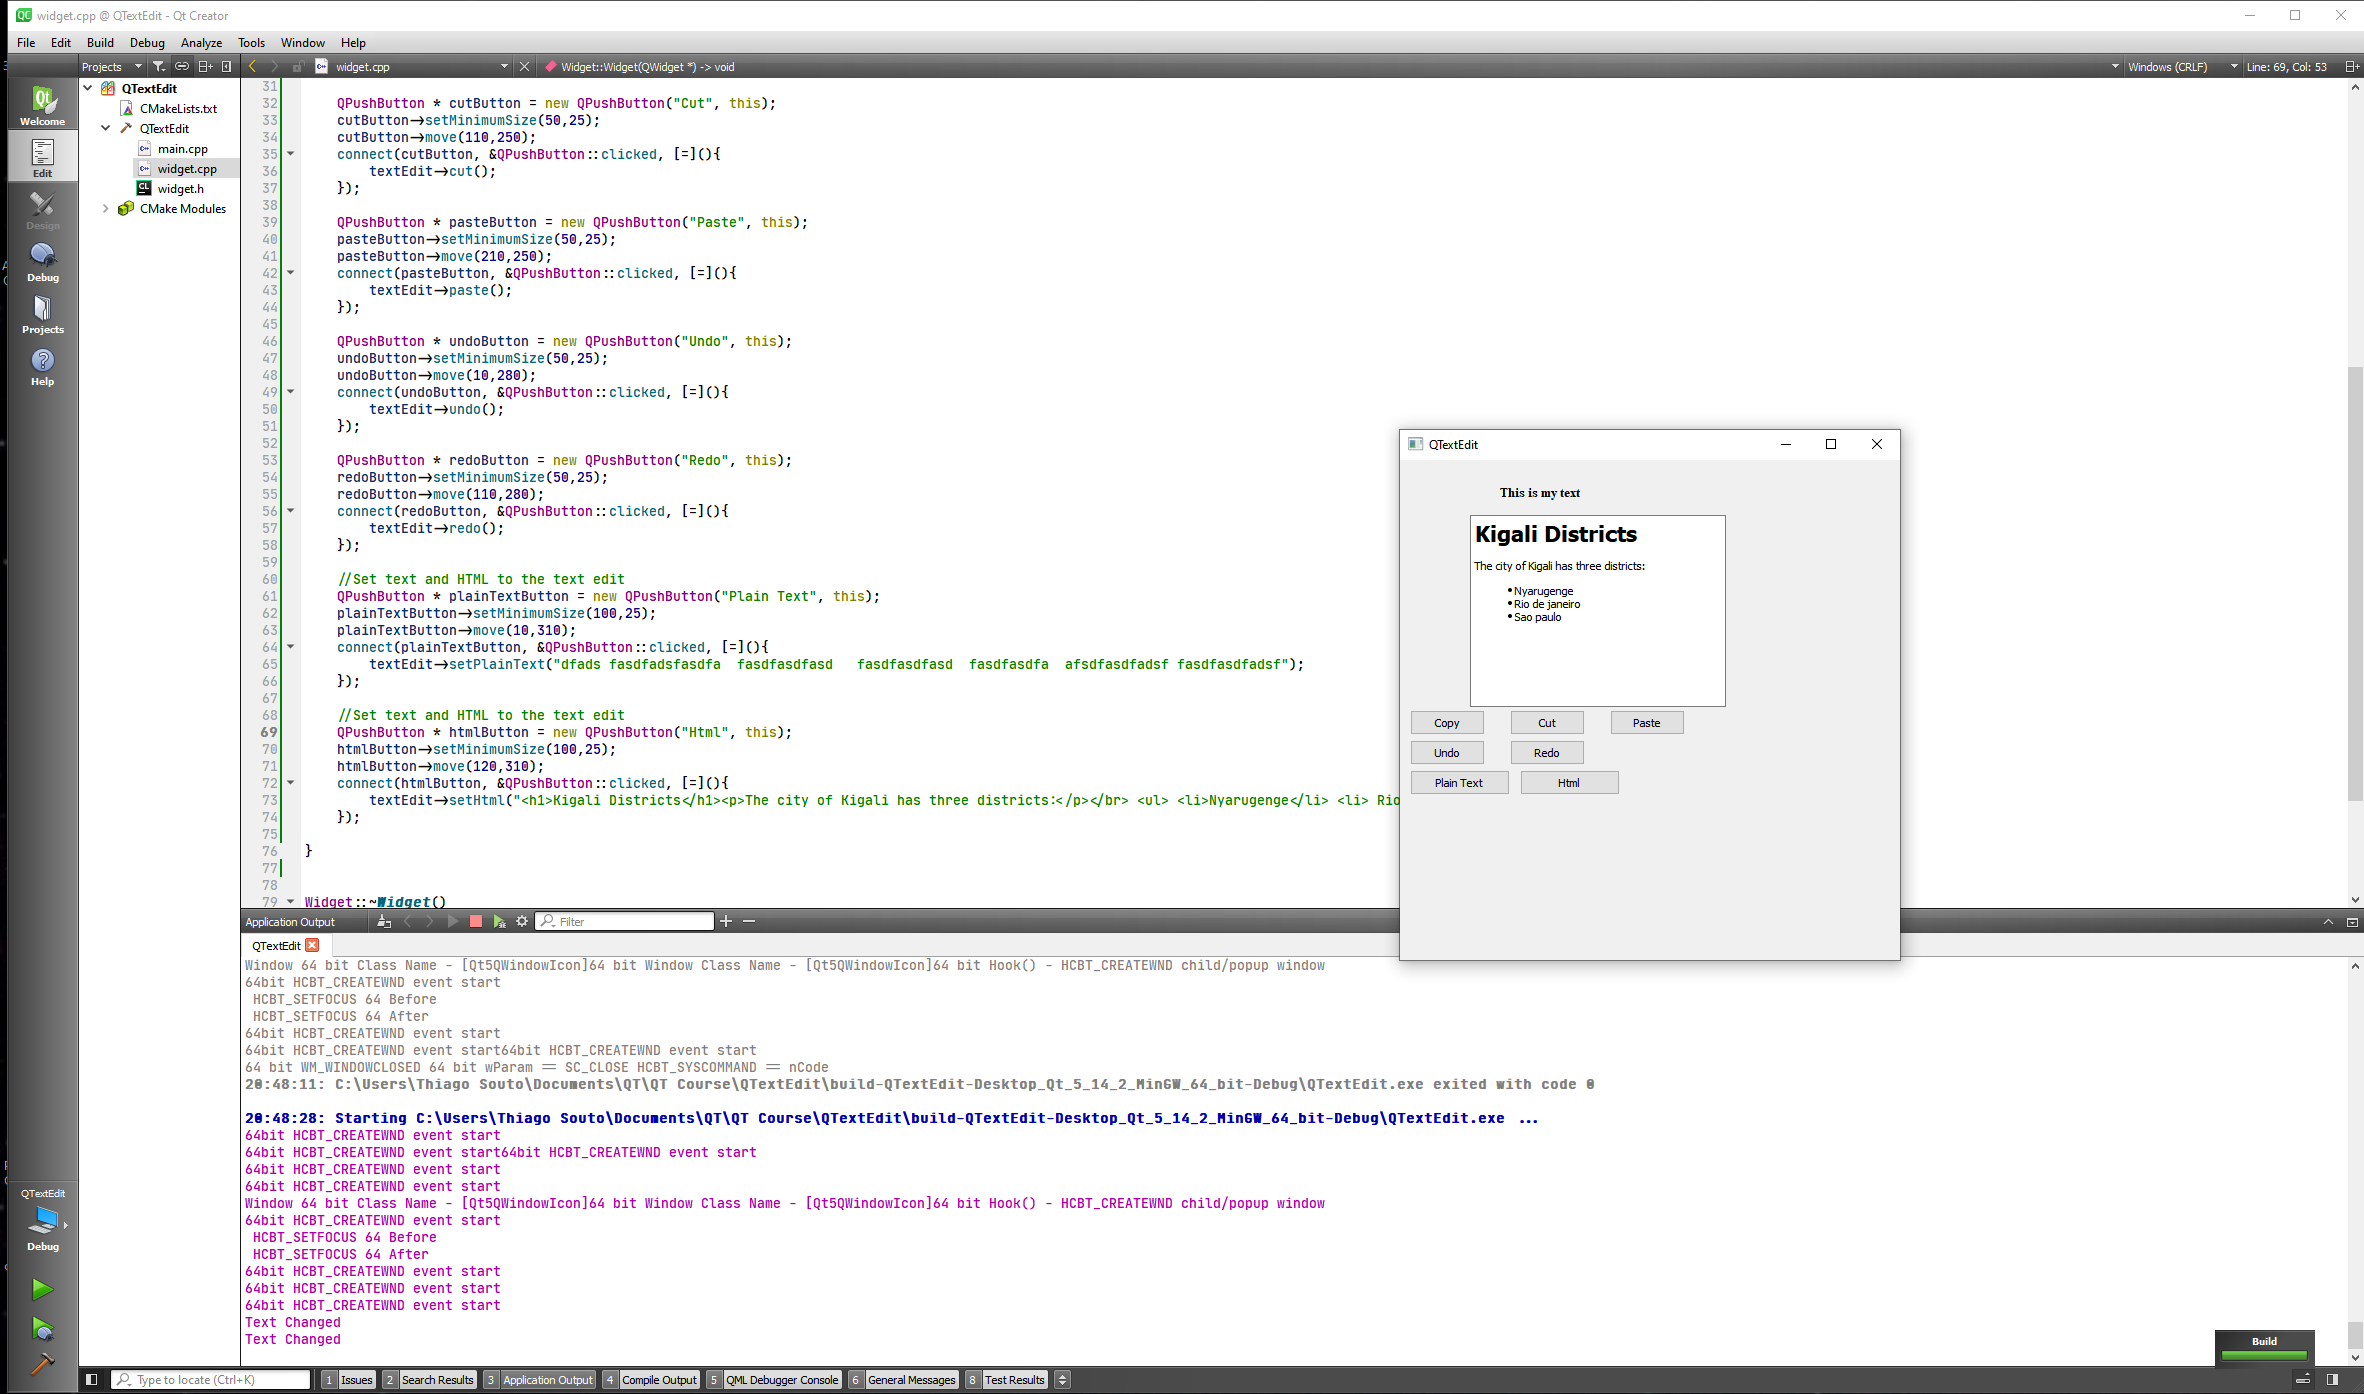
Now we will grab the text that is in the Text Edit.
#include "widget.h"
#include <QTextEdit>
#include <QPushButton>
#include <QLabel>
#include <QDebug>


Widget::Widget(QWidget *parent)
    : QWidget(parent)
{
    QFont labelFont("Times", 10, QFont::Bold);
    QLabel * mLabel = new QLabel("This is my text", this);
    mLabel->setFont(labelFont);
    mLabel->move(100,25);

    QTextEdit * textEdit = new QTextEdit(this);
    textEdit->move(70,55);

    //textChanged
    connect(textEdit, &QTextEdit::textChanged, [=](){
        qDebug() << "Text Changed";
    });

    //Copy, Cut and Paste
    QPushButton * copyButton = new QPushButton("Copy", this);
    copyButton->setMinimumSize(50,25);
    copyButton->move(10,250);
    connect(copyButton, &QPushButton::clicked, [=](){
        textEdit->copy();
    });

    QPushButton * cutButton = new QPushButton("Cut", this);
    cutButton->setMinimumSize(50,25);
    cutButton->move(110,250);
    connect(cutButton, &QPushButton::clicked, [=](){
        textEdit->cut();
    });

    QPushButton * pasteButton = new QPushButton("Paste", this);
    pasteButton->setMinimumSize(50,25);
    pasteButton->move(210,250);
    connect(pasteButton, &QPushButton::clicked, [=](){
        textEdit->paste();
    });

    QPushButton * undoButton = new QPushButton("Undo", this);
    undoButton->setMinimumSize(50,25);
    undoButton->move(10,280);
    connect(undoButton, &QPushButton::clicked, [=](){
        textEdit->undo();
    });

    QPushButton * redoButton = new QPushButton("Redo", this);
    redoButton->setMinimumSize(50,25);
    redoButton->move(110,280);
    connect(redoButton, &QPushButton::clicked, [=](){
        textEdit->redo();
    });

    //Set text and HTML to the text edit
    QPushButton * plainTextButton = new QPushButton("Plain Text", this);
    plainTextButton->setMinimumSize(100,25);
    plainTextButton->move(10,310);
    connect(plainTextButton, &QPushButton::clicked, [=](){
        textEdit->setPlainText("dfads fasdfadsfasdfa  fasdfasdfasd   fasdfasdfasd  fasdfasdfa  afsdfasdfadsf fasdfasdfadsf");
    });

    //Set text and HTML to the text edit
    QPushButton * htmlButton = new QPushButton("Html", this);
    htmlButton->setMinimumSize(100,25);
    htmlButton->move(120,310);
    connect(htmlButton, &QPushButton::clicked, [=](){
        textEdit->setHtml("<h1>Kigali Districts</h1><p>The city of Kigali has three districts:</p></br> <ul> <li>Nyarugenge</li> <li> Rio de janeiro</li> <li>Sao paulo</li>");
    });

    //Grab Text and HTML
    QPushButton * grabTextButton = new QPushButton("Html", this);
    grabTextButton->setMinimumSize(100,25);
    grabTextButton->move(10,340);
    connect(grabTextButton, &QPushButton::clicked, [=](){
        qDebug() << "The plain text is: " << textEdit->toPlainText();
    });

    QPushButton * grabHTMLButton = new QPushButton("Html", this);
    grabHTMLButton->setMinimumSize(100,25);
    grabHTMLButton->move(120,340);
    connect(grabHTMLButton, &QPushButton::clicked, [=](){
        qDebug() << "The HTML text is: " << textEdit->toHtml();
    });
}


Widget::~Widget()
{
}

QSize Widget::sizeHint() const
{
    return QSize(500,500);
}
2
3
4
5
6
7
8
9
10
11
12
13
14
15
16
17
18
19
20
21
22
23
24
25
26
27
28
29
30
31
32
33
34
35
36
37
38
39
40
41
42
43
44
45
46
47
48
49
50
51
52
53
54
55
56
57
58
59
60
61
62
63
64
65
66
67
68
69
70
71
72
73
74
75
76
77
78
79
80
81
82
83
84
85
86
87
88
89
90
91
92
93
94
95
96
97
98
99
100
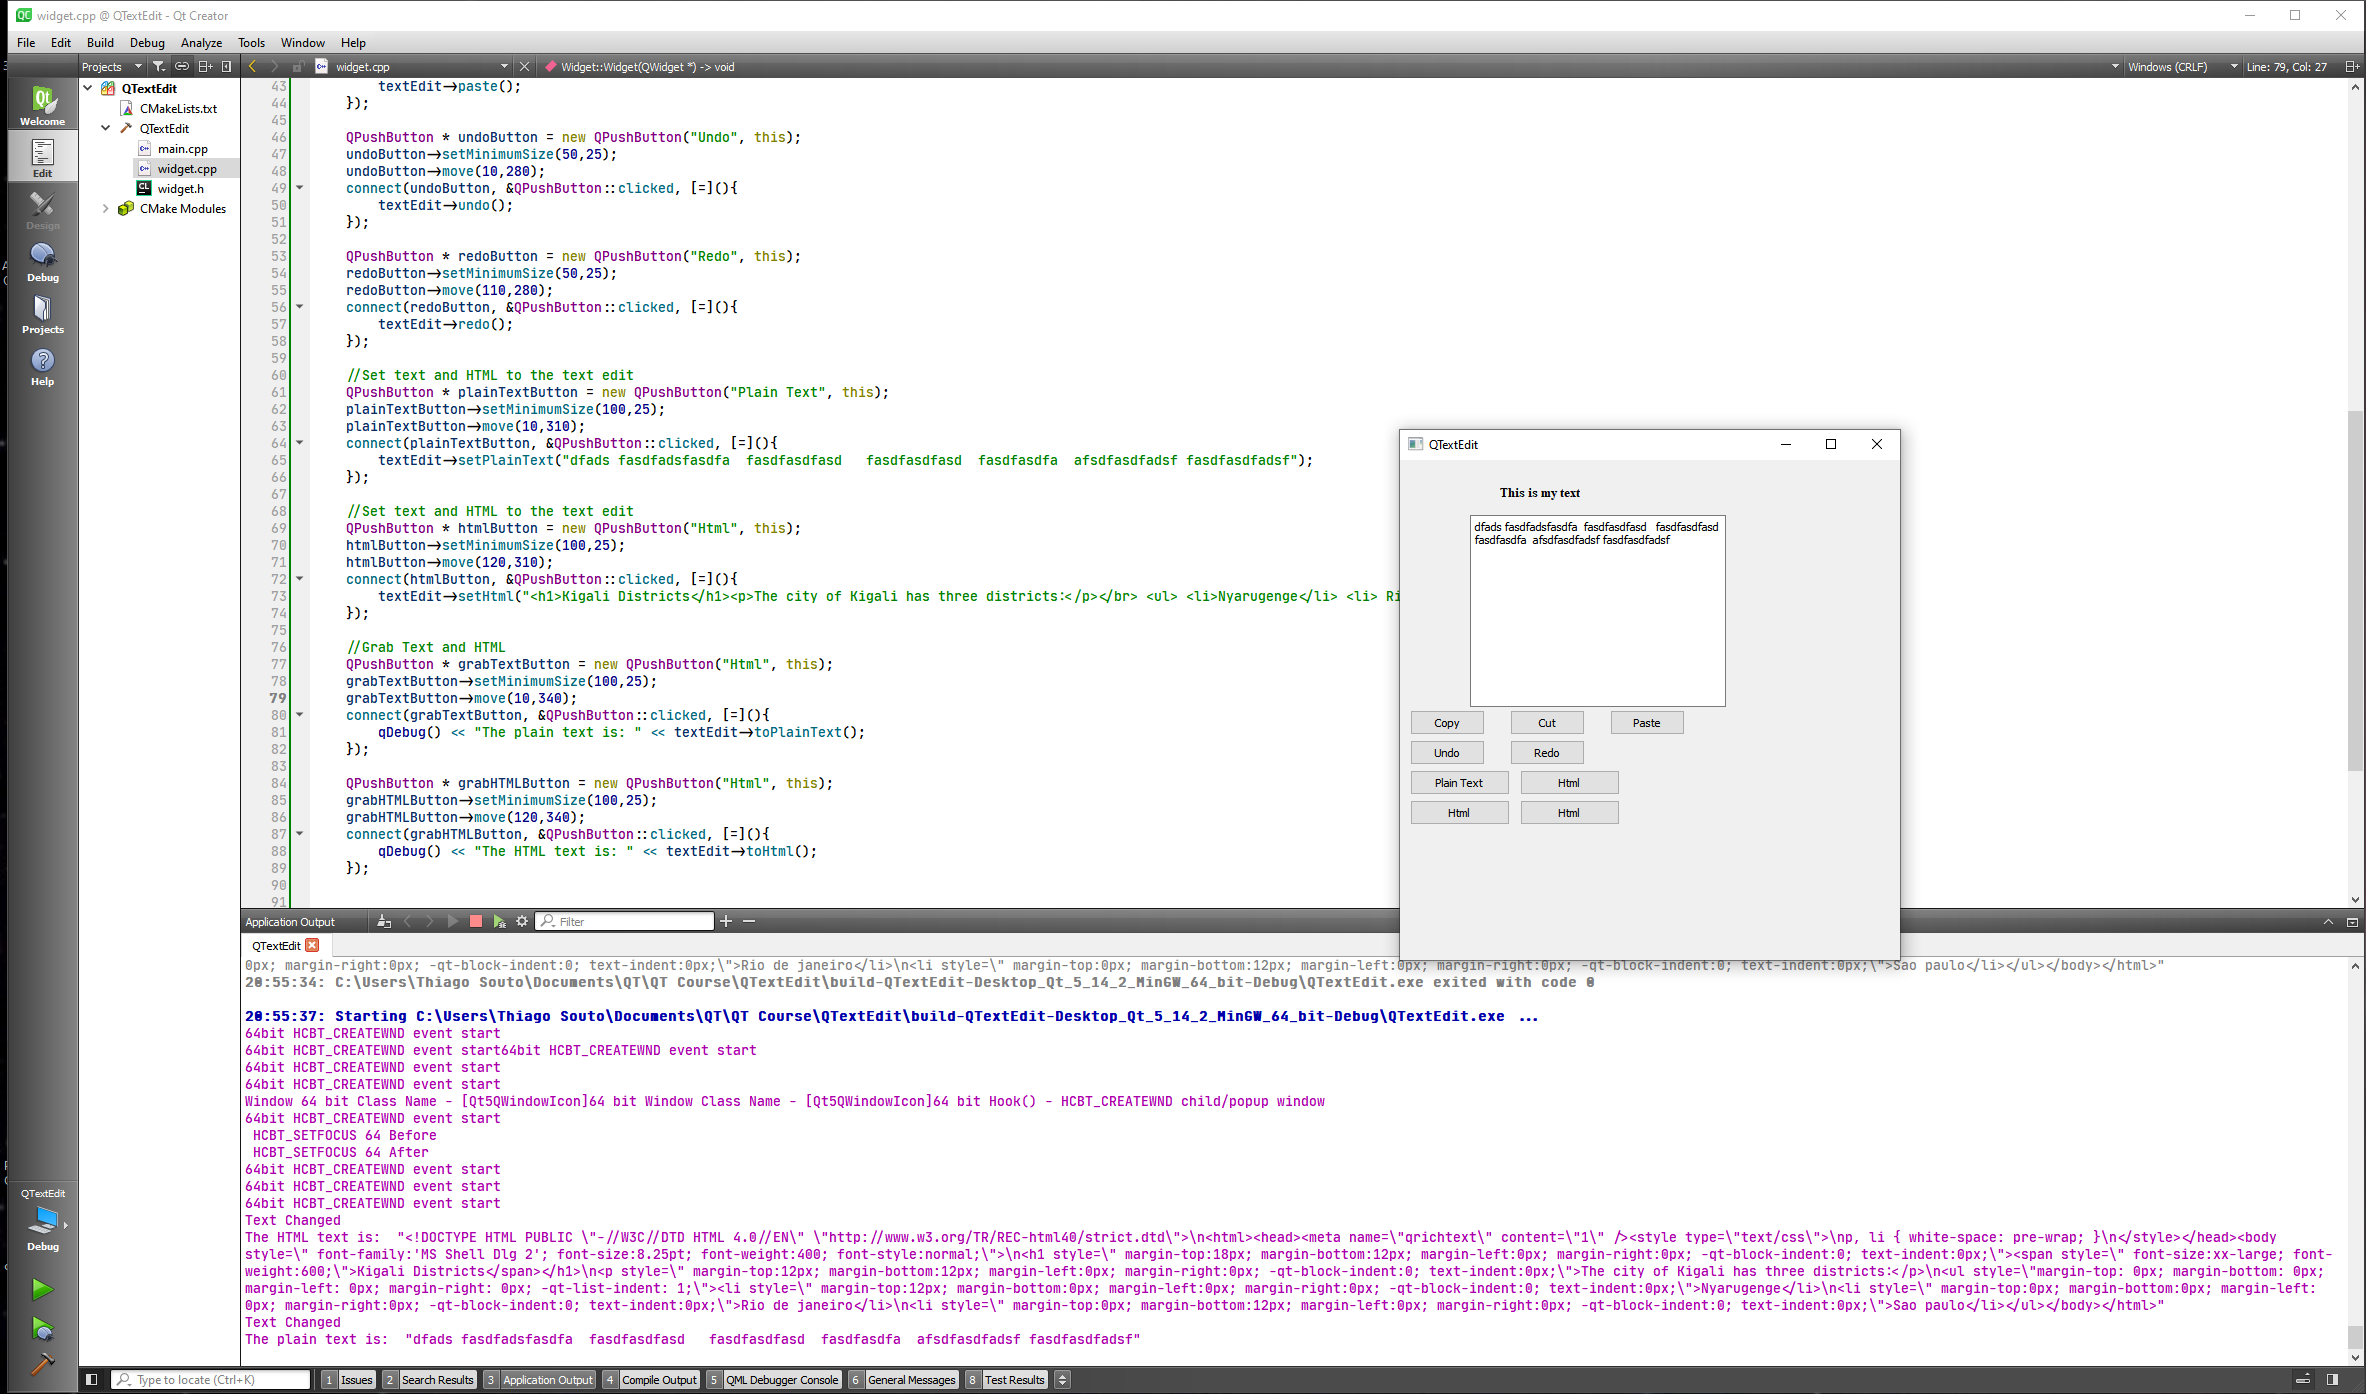
# QLabel Class
The QLabel widget provides a text or image display.
DETAILS
QLabel is used for displaying text or an image. No user interaction functionality is provided. The visual appearance of the label can be configured in various ways, and it can be used for specifying a focus mnemonic key for another widget. A QLabel can contain any of the following content types:
| Content | Setting |
|---|---|
| Plain text | Pass a QString to setText(). |
| Rich text | Pass a QString that contains rich text to setText(). |
| A pixmap | Pass a QPixmap to setPixmap(). |
| A movie | Pass a QMovie to setMovie(). |
| A number | Pass an int or a double to setNum(), which converts the number to plain text. |
| Nothing | The same as an empty plain text. This is the default. Set by clear(). |
Warning: When passing a QString to the constructor or calling setText(), make sure to sanitize your input, as QLabel tries to guess whether it displays the text as plain text or as rich text, a subset of HTML 4 markup. You may want to call setTextFormat() explicitly, e.g. in case you expect the text to be in plain format but cannot control the text source (for instance when displaying data loaded from the Web).
When the content is changed using any of these functions, any previous content is cleared. By default, labels display left-aligned, vertically-centered text and images, where any tabs in the text to be displayed are automatically expanded. However, the look of a QLabel can be adjusted and fine-tuned in several ways.
The positioning of the content within the QLabel widget area can be tuned with setAlignment() and setIndent(). Text content can also wrap lines along word boundaries with setWordWrap(). For example, this code sets up a sunken panel with a two-line text in the bottom right corner (both lines being flush with the right side of the label):
  QLabel *label = new QLabel(this);
  label->setFrameStyle(QFrame::Panel | QFrame::Sunken);
  label->setText("first line\nsecond line");
  label->setAlignment(Qt::AlignBottom | Qt::AlignRight);
2
3
4
The properties and functions QLabel inherits from QFrame can also be used to specify the widget frame to be used for any given label. A QLabel is often used as a label for an interactive widget. For this use QLabel provides a useful mechanism for adding an mnemonic (see QKeySequence) that will set the keyboard focus to the other widget (called the QLabel's "buddy"). For example:
  QLineEdit *phoneEdit = new QLineEdit(this);
  QLabel *phoneLabel = new QLabel("&Phone:", this);
  phoneLabel->setBuddy(phoneEdit);
2
3
In this example, keyboard focus is transferred to the label's buddy (the QLineEdit) when the user presses Alt+P. If the buddy was a button (inheriting from QAbstractButton), triggering the mnemonic would emulate a button click.
See also QLineEdit, QTextEdit, QPixmap, QMovie, and GUI Design Handbook: Label.
For this one we are going to create a QTApplication with the form.
We are going to create two Labels and include a resource, a picture to the project.
Remember to click the scaledContents checkbox.
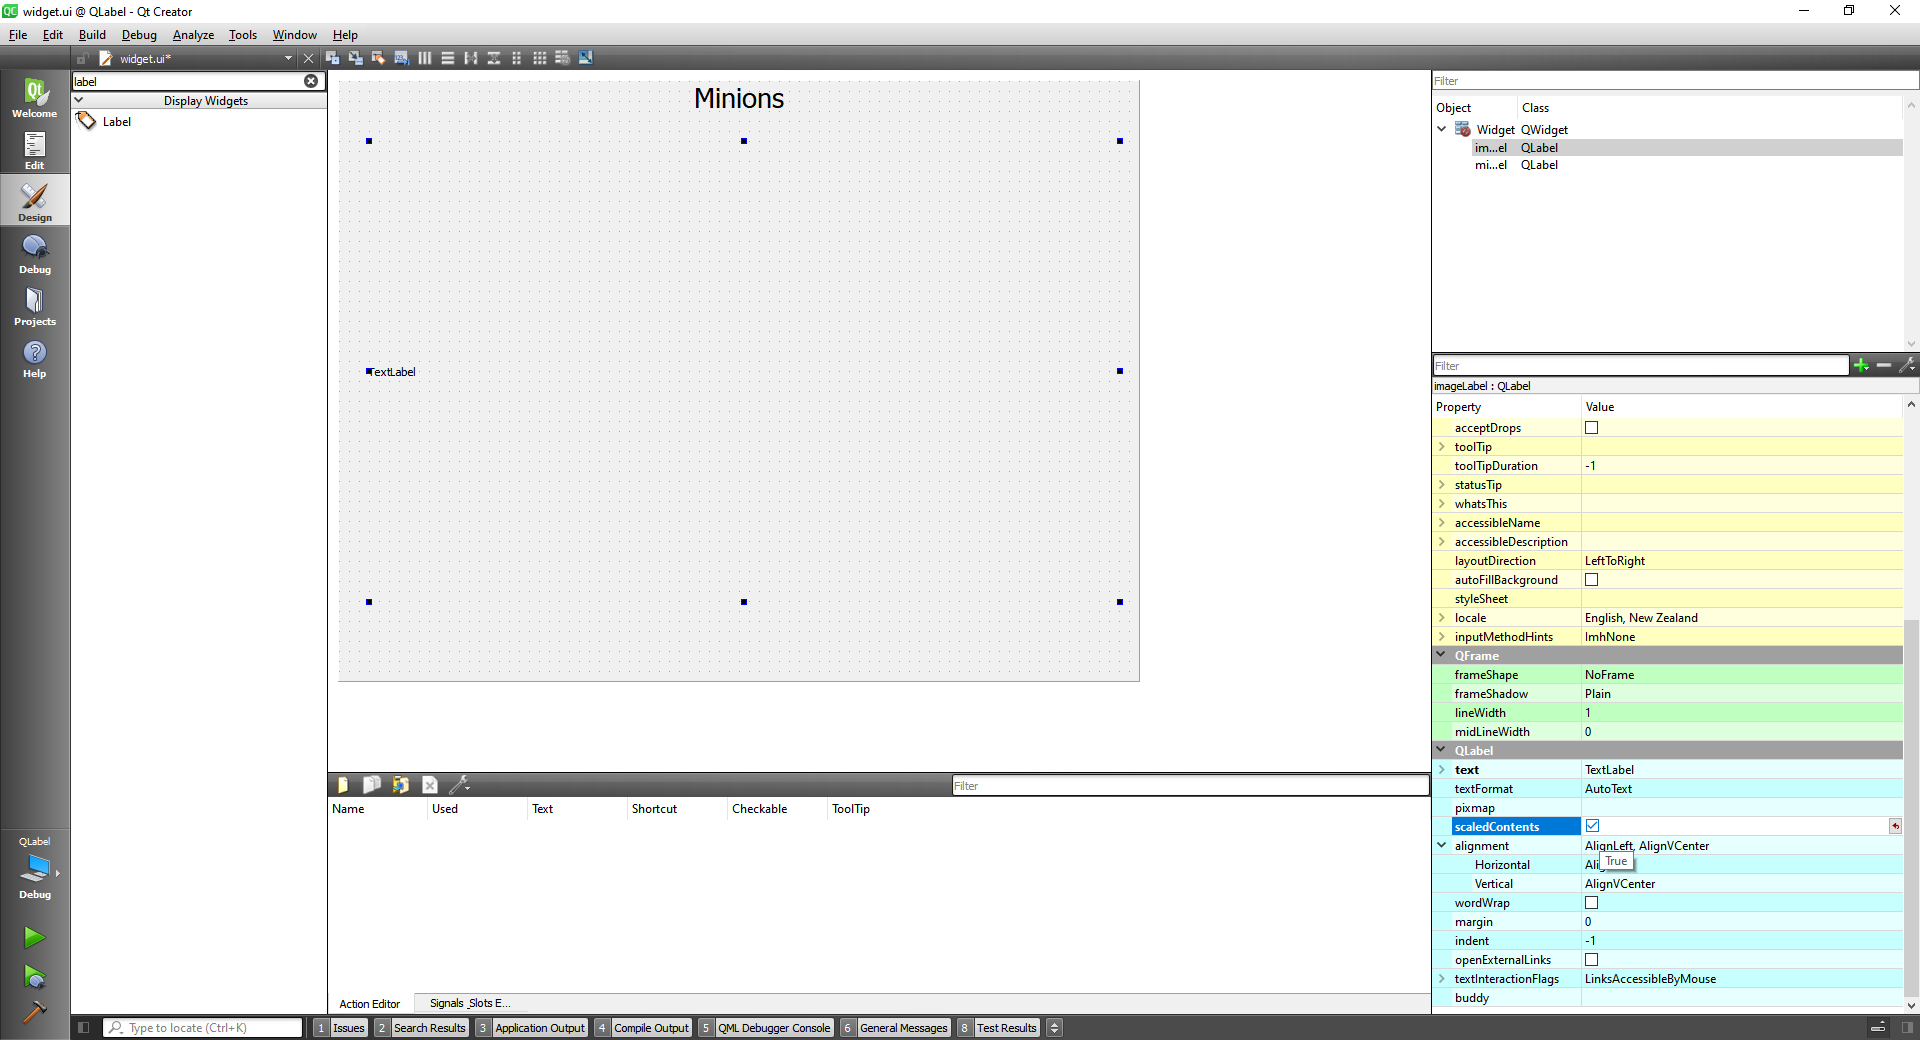
widget.cpp
#include "widget.h"
#include "./ui_widget.h"

Widget::Widget(QWidget *parent)
    : QWidget(parent)
    , ui(new Ui::Widget)
{
    ui->setupUi(this);

    ui->miniontextLabel->move(100,30);

    //Add Image to the label
    QPixmap minionPixmap("://images/minions.png");

    ui->imageLabel->move(0,70);
    ui->imageLabel->setPixmap(minionPixmap.scaled(400,400));
}

Widget::~Widget()
{
    delete ui;
}
2
3
4
5
6
7
8
9
10
11
12
13
14
15
16
17
18
19
20
21
22
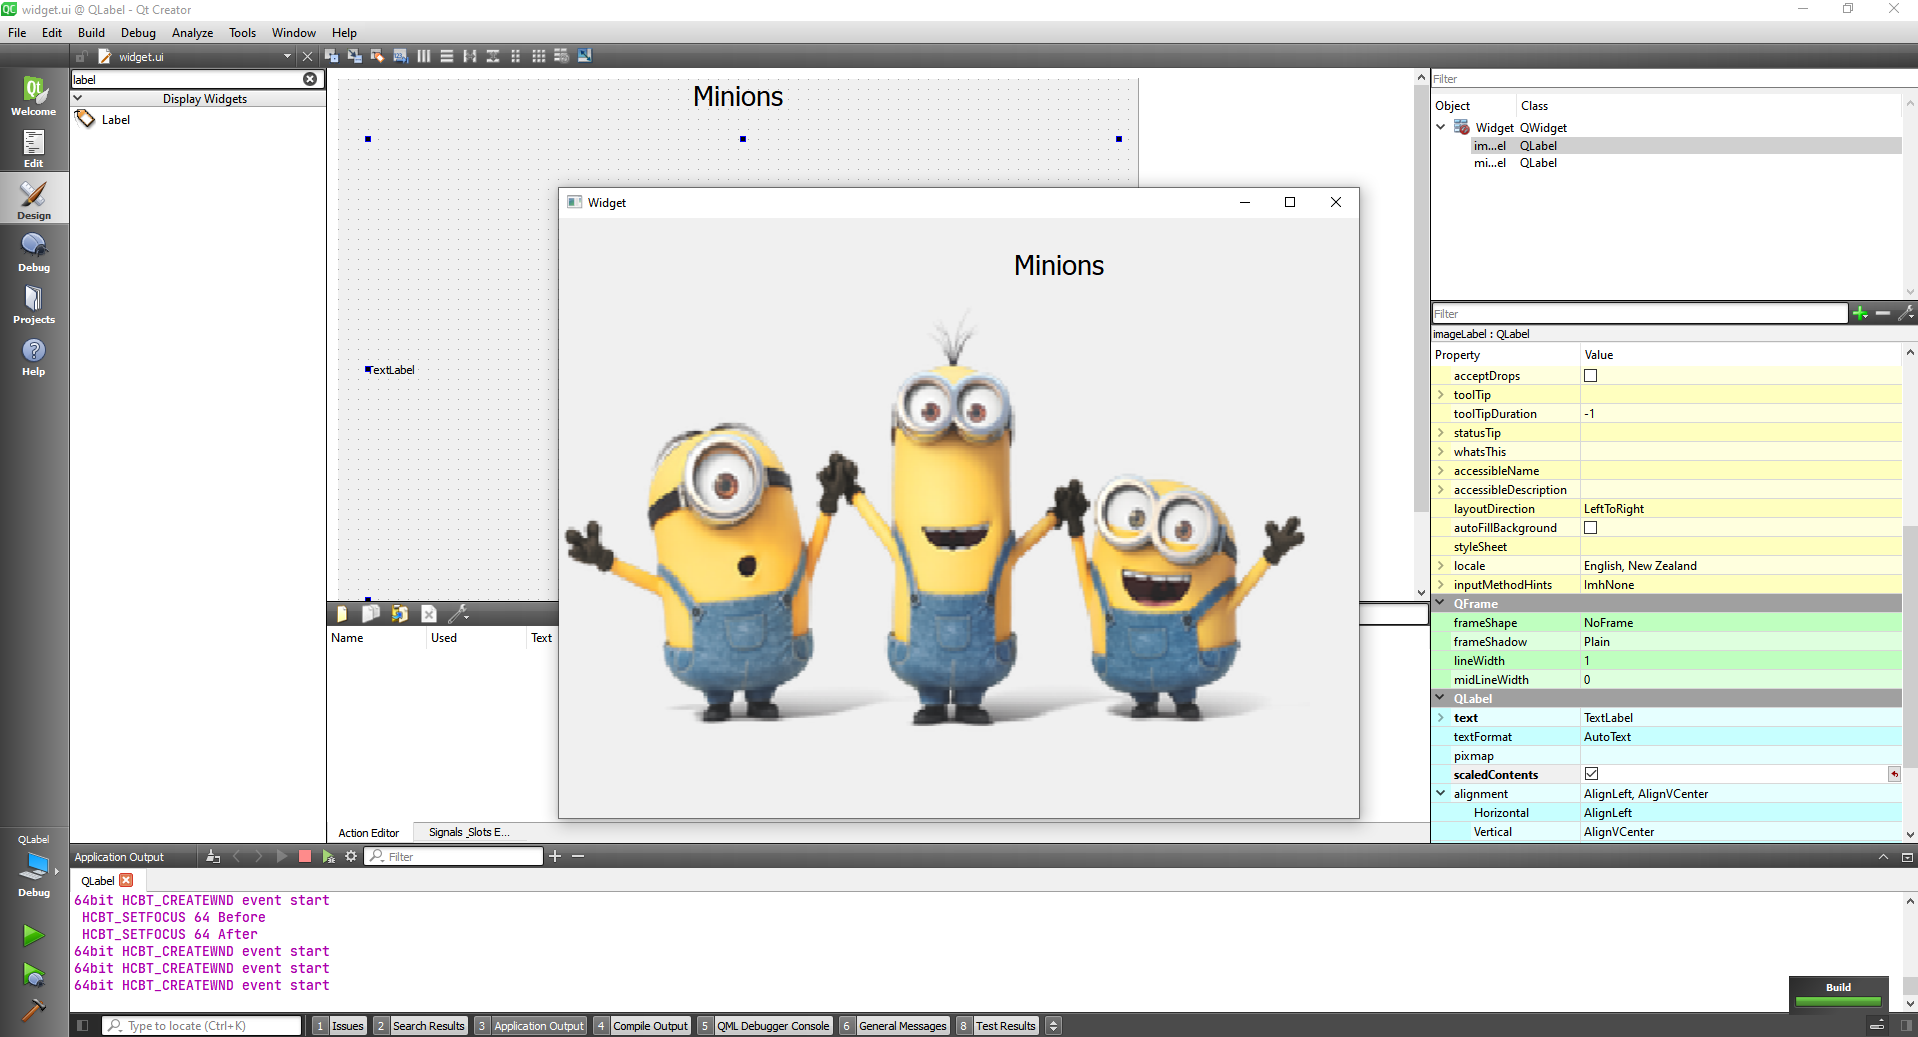
# Qt Layout Management
The Qt layout system provides a simple and powerful way of automatically arranging child widgets within a widget to ensure that they make good use of the available space.
- Positioning of child widgets
- Sensible default sizes for windows
- Sensible minimum sizes for windows
- Resize handling
- Automatic updates when contents change:
- Font size, text or other contents of child widgets
- Hiding or showing a child widget
- Removal of child widgets
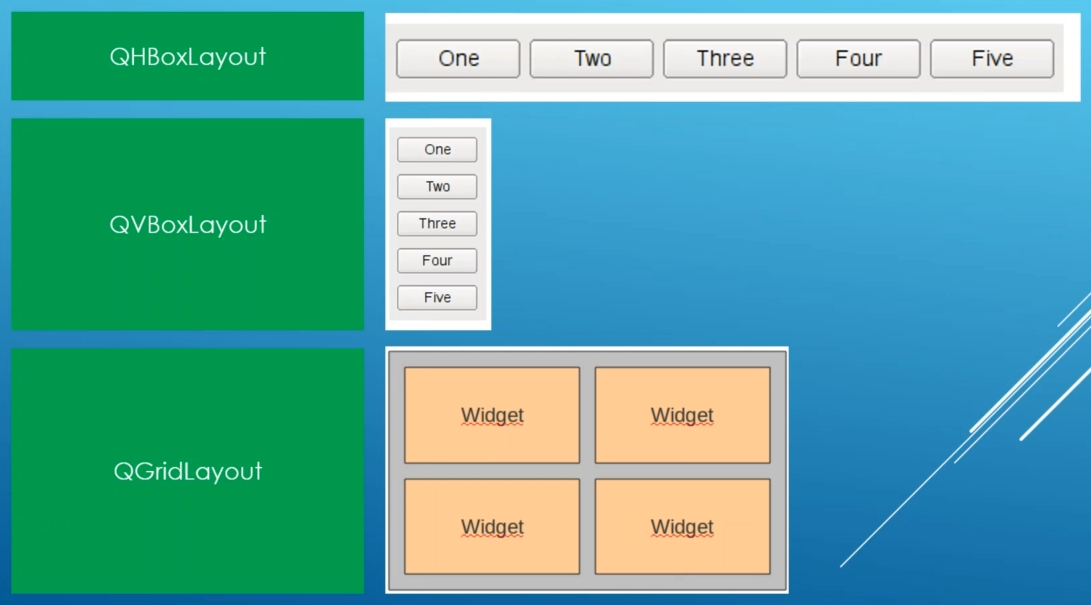
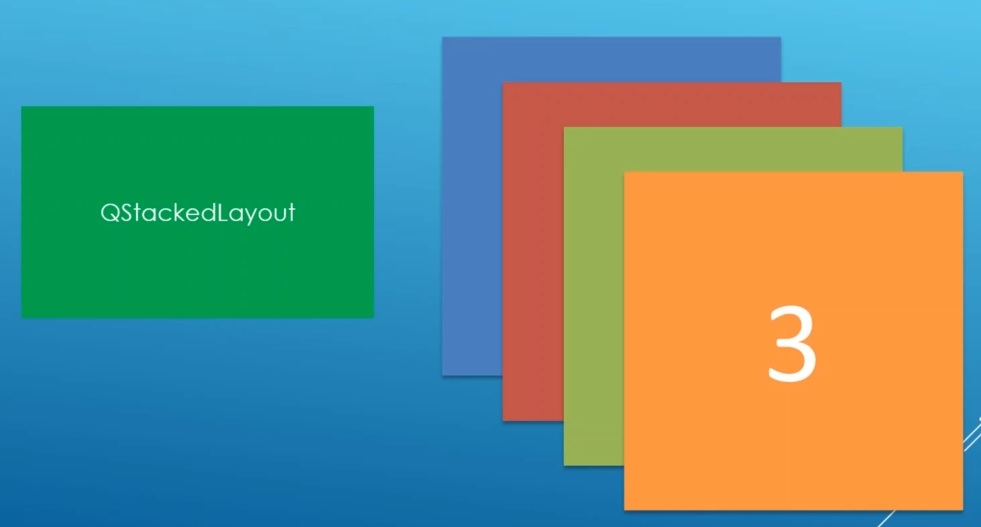
# QLayout Class
The QLayout class is the base class of geometry managers.
This is an abstract base class inherited by the concrete classes QBoxLayout, QGridLayout, QFormLayout, and QStackedLayout.
For users of QLayout subclasses or of QMainWindow there is seldom any need to use the basic functions provided by QLayout, such as setSizeConstraint() or setMenuBar(). See Layout Management for more information.
To make your own layout manager, implement the functions addItem(), sizeHint(), setGeometry(), itemAt()and takeAt(). You should also implement minimumSize() to ensure your layout isn't resized to zero size if there is too little space. To support children whose heights depend on their widths, implement hasHeightForWidth() and heightForWidth(). See the Border Layout and Flow Layout examples for more information about implementing custom layout managers.
Geometry management stops when the layout manager is deleted.
# QHBoxLayout class
The QHBoxLayout class lines up widgets horizontally.
This class is used to construct horizontal box layout objects. See QBoxLayout for details. The simplest use of the class is like this:
QWidget *window = new QWidget;
QPushButton *button1 = new QPushButton("One");
QPushButton *button2 = new QPushButton("Two");
QPushButton *button3 = new QPushButton("Three");
QPushButton *button4 = new QPushButton("Four");
QPushButton *button5 = new QPushButton("Five");

QHBoxLayout *layout = new QHBoxLayout;
layout->addWidget(button1);
layout->addWidget(button2);
layout->addWidget(button3);
layout->addWidget(button4);
layout->addWidget(button5);

window->setLayout(layout);
window->show();
2
3
4
5
6
7
8
9
10
11
12
13
14
15
16
First, we create the widgets we want in the layout. Then, we create the QHBoxLayout object and add the widgets into the layout. Finally, we call QWidget::setLayout() to install the QHBoxLayout object onto the widget. At that point, the widgets in the layout are reparented to have window as their parent.

For our Example we are going to align the buttons using code first. Let's create 5 buttons and rename them.
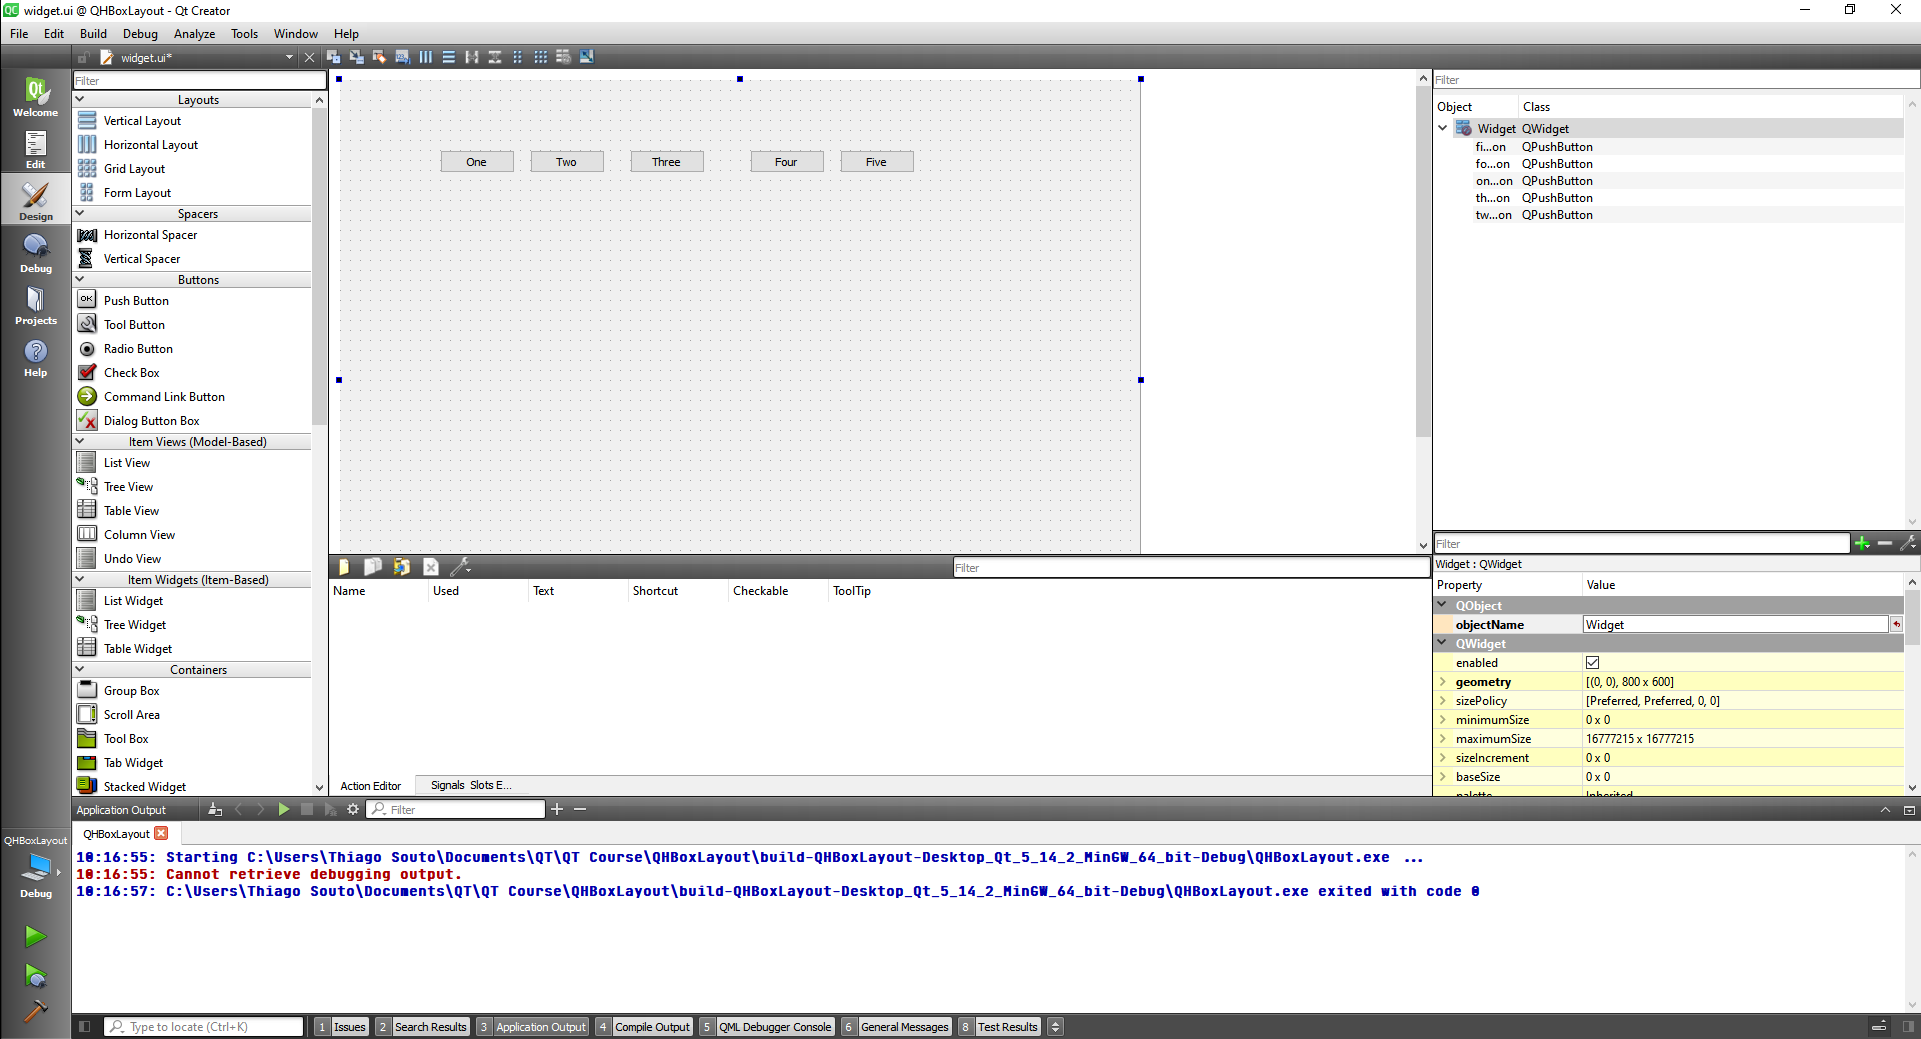
#include "widget.h"
#include "./ui_widget.h"
#include <QHBoxLayout>

Widget::Widget(QWidget *parent)
    : QWidget(parent)
    , ui(new Ui::Widget)
{
    ui->setupUi(this);

    //Define the layout
    QHBoxLayout * layout = new QHBoxLayout();

    //Add things to the layout
    layout->addWidget(ui->oneButton);
    layout->addWidget(ui->twoButton);
    layout->addWidget(ui->threeButton);
    layout->addWidget(ui->fourButton);
    layout->addWidget(ui->fiveButton);

    //Set layout to widget
    setLayout(layout);
}

Widget::~Widget()
{
    delete ui;
}
2
3
4
5
6
7
8
9
10
11
12
13
14
15
16
17
18
19
20
21
22
23
24
25
26
27
28
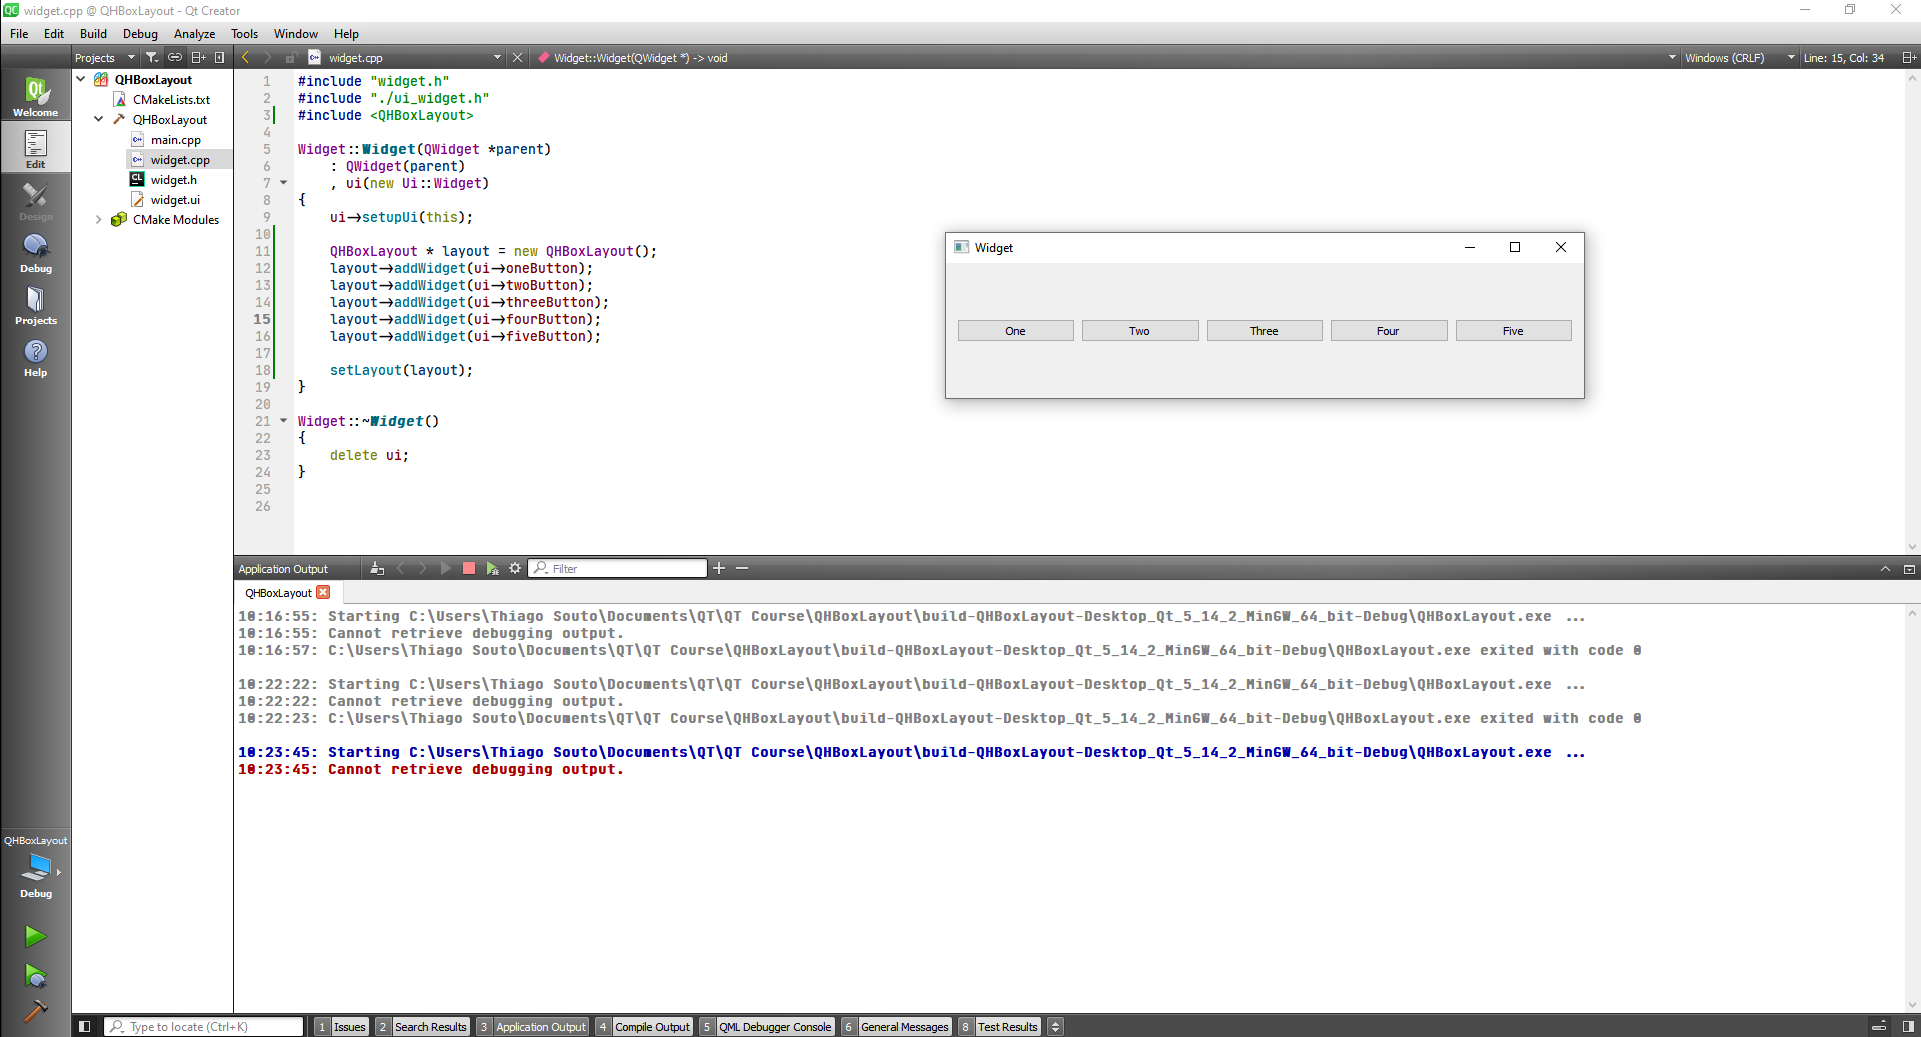
To create a horizontal layout on the form we click as below
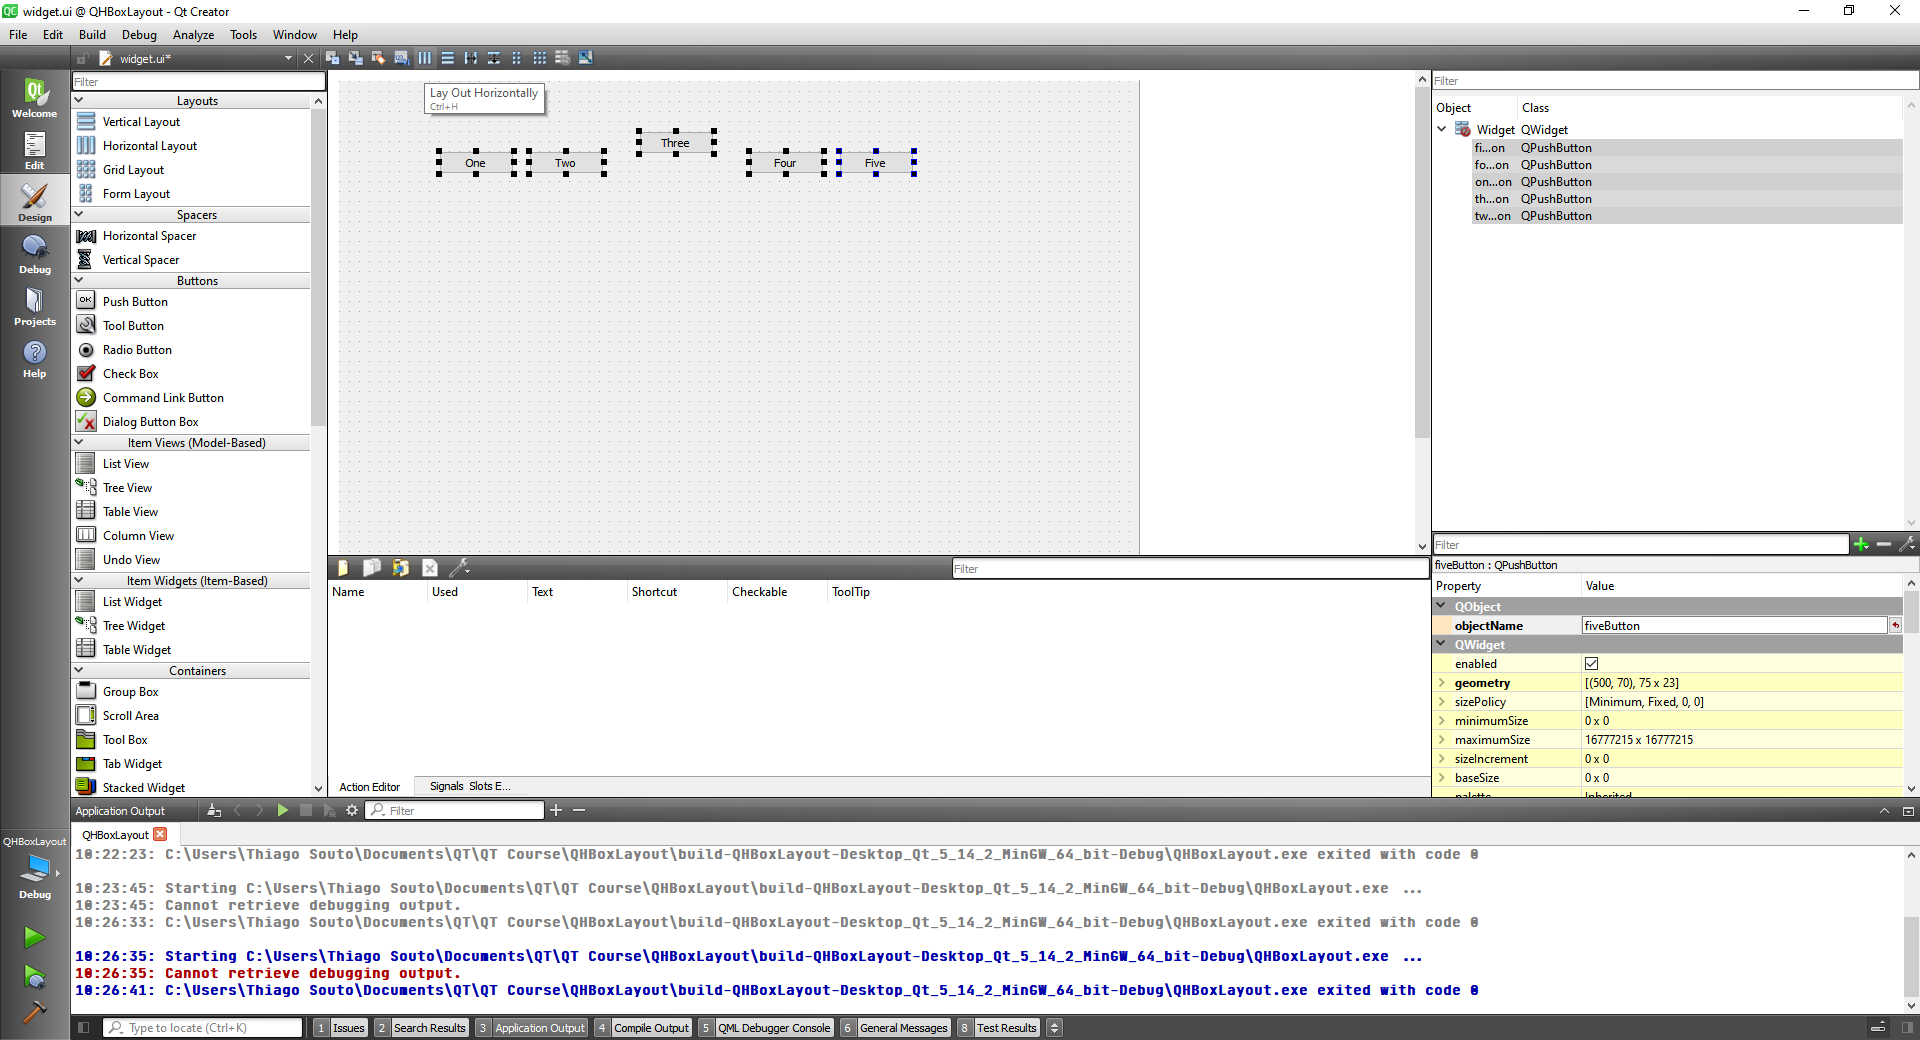
The buttons will be aligned but not bound to the borders

To make them all we have to apply the horizontal layout to the form as well
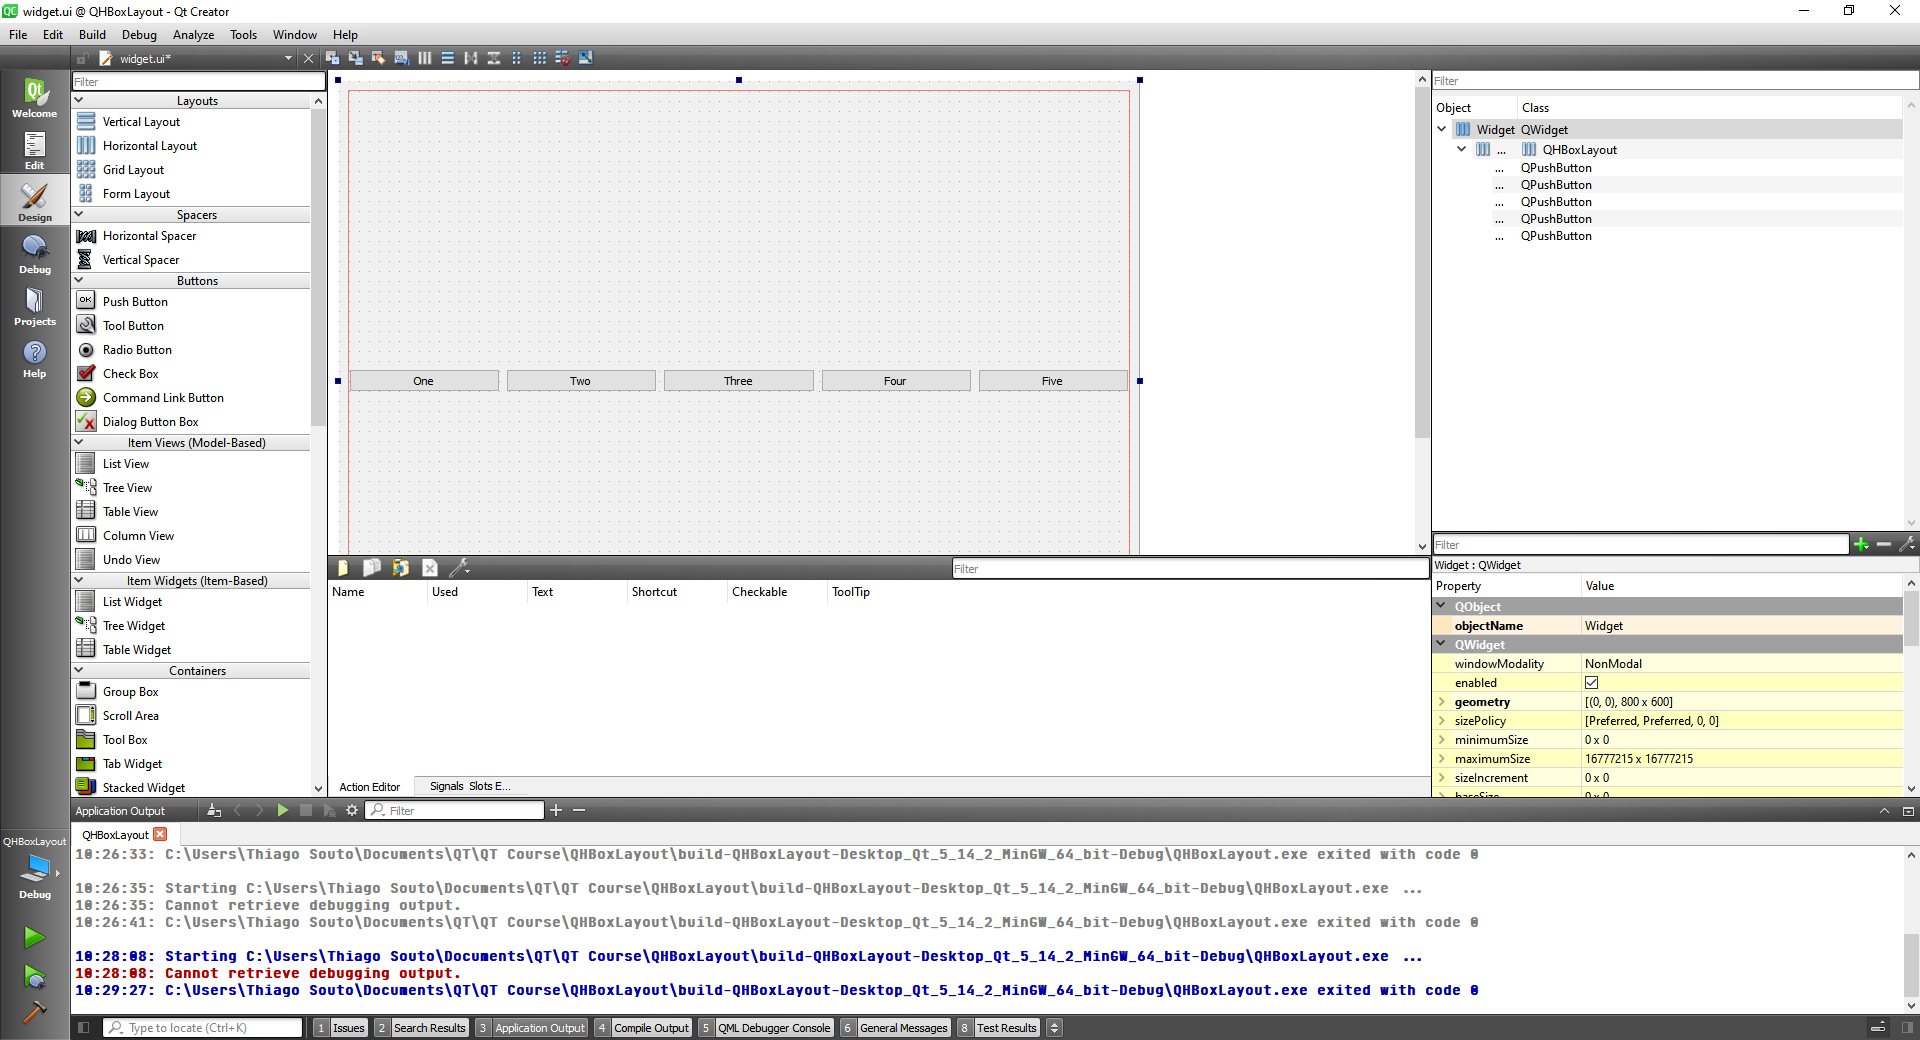
The result

# QVBoxLayout class
The QVBoxLayout class lines up widgets vertically.
This class is used to construct vertical box layout objects. See QBoxLayout for details. The simplest use of the class is like this:
QWidget *window = new QWidget;
QPushButton *button1 = new QPushButton("One");
QPushButton *button2 = new QPushButton("Two");
QPushButton *button3 = new QPushButton("Three");
QPushButton *button4 = new QPushButton("Four");
QPushButton *button5 = new QPushButton("Five");

QVBoxLayout *layout = new QVBoxLayout;
layout->addWidget(button1);
layout->addWidget(button2);
layout->addWidget(button3);
layout->addWidget(button4);
layout->addWidget(button5);

window->setLayout(layout);
window->show();
2
3
4
5
6
7
8
9
10
11
12
13
14
15
16
First, we create the widgets we want in the layout. Then, we create the QVBoxLayout object and add the widgets into the layout. Finally, we call QWidget::setLayout() to install the QVBoxLayout object onto the widget. At that point, the widgets in the layout are reparented to have window as their parent.

Now we are going to create a vertical layout with code
#include "widget.h"
#include "./ui_widget.h"
#include <QVBoxLayout>

Widget::Widget(QWidget *parent)
    : QWidget(parent)
    , ui(new Ui::Widget)
{
    ui->setupUi(this);

    //Create Layout
    QVBoxLayout * layout = new QVBoxLayout;

    //Add Widgets to layout
    layout->addWidget(ui->oneButton);
    layout->addWidget(ui->twoButton);
    layout->addWidget(ui->threeButton);
    layout->addWidget(ui->fourButton);
    layout->addWidget(ui->fiveButton);

    //Set layout to the widget
    setLayout(layout);

}

Widget::~Widget()
{
    delete ui;
}
2
3
4
5
6
7
8
9
10
11
12
13
14
15
16
17
18
19
20
21
22
23
24
25
26
27
28
29
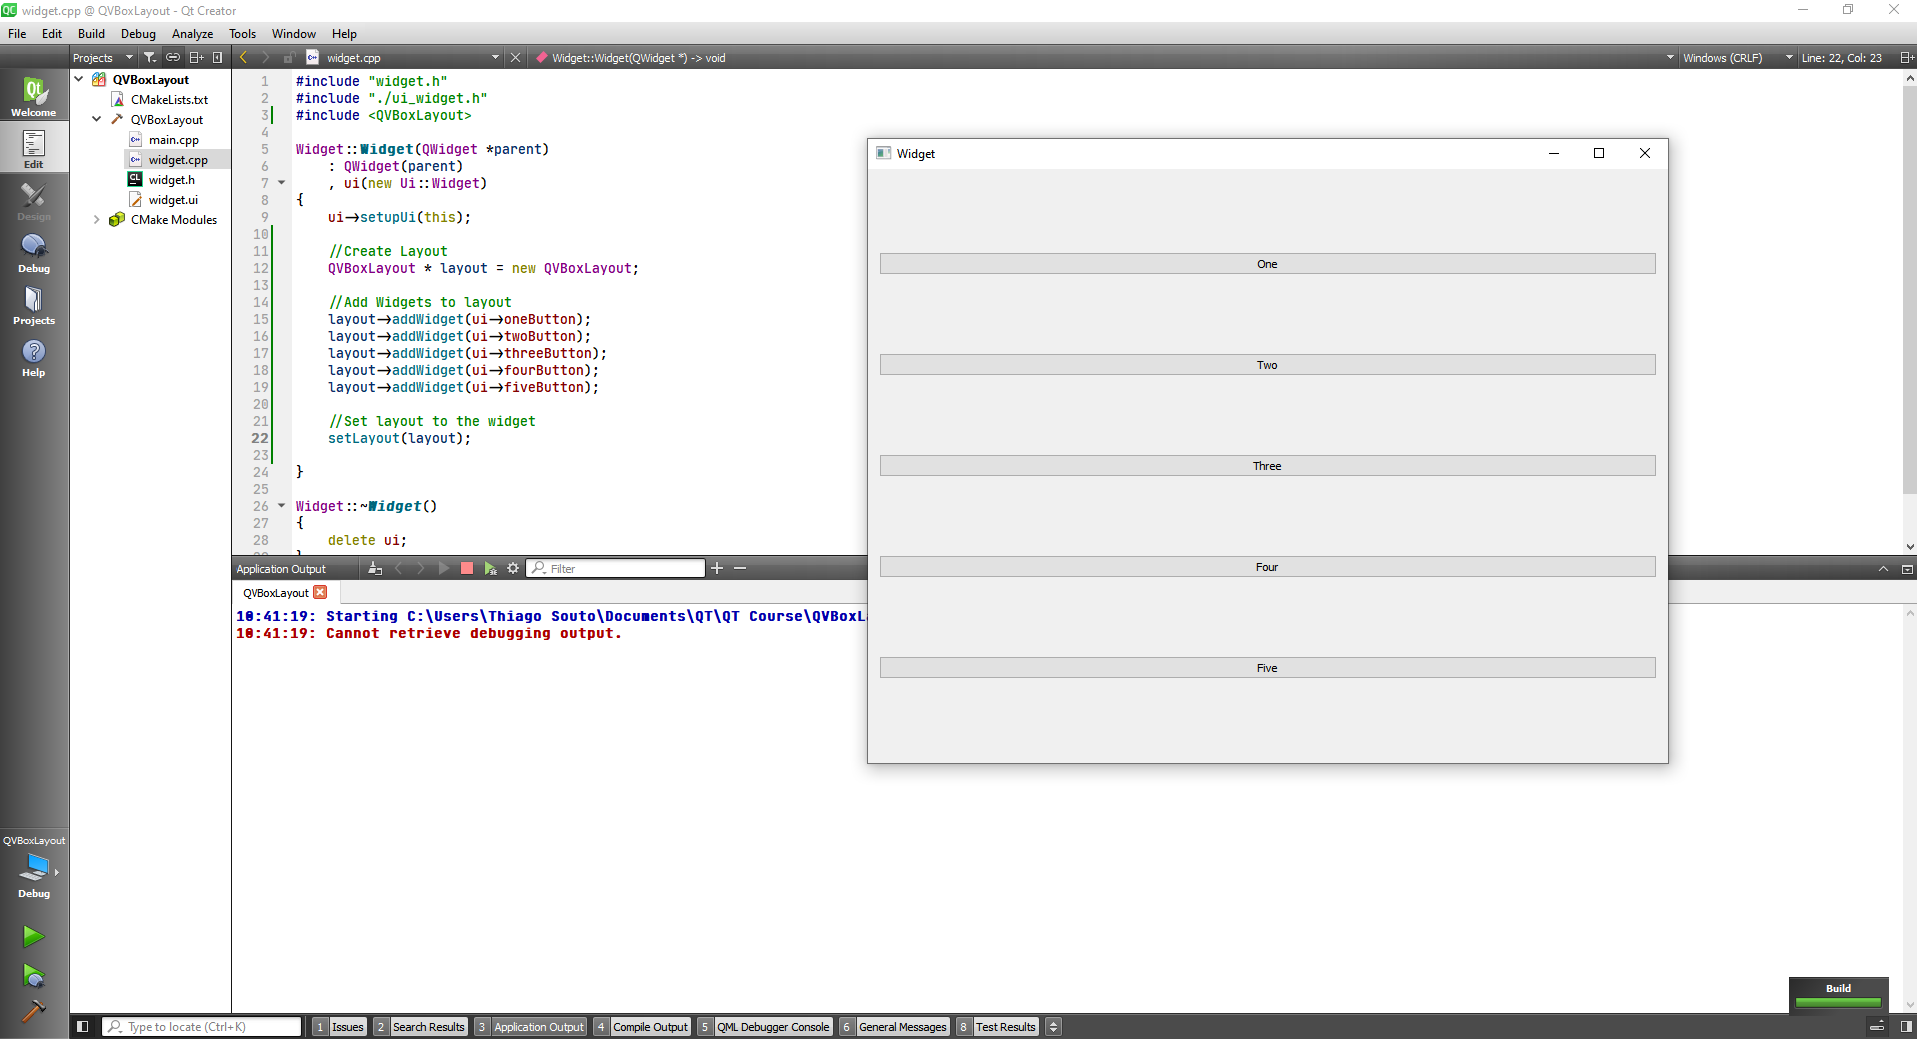
As before we have to add the layout to both the buttons and the form
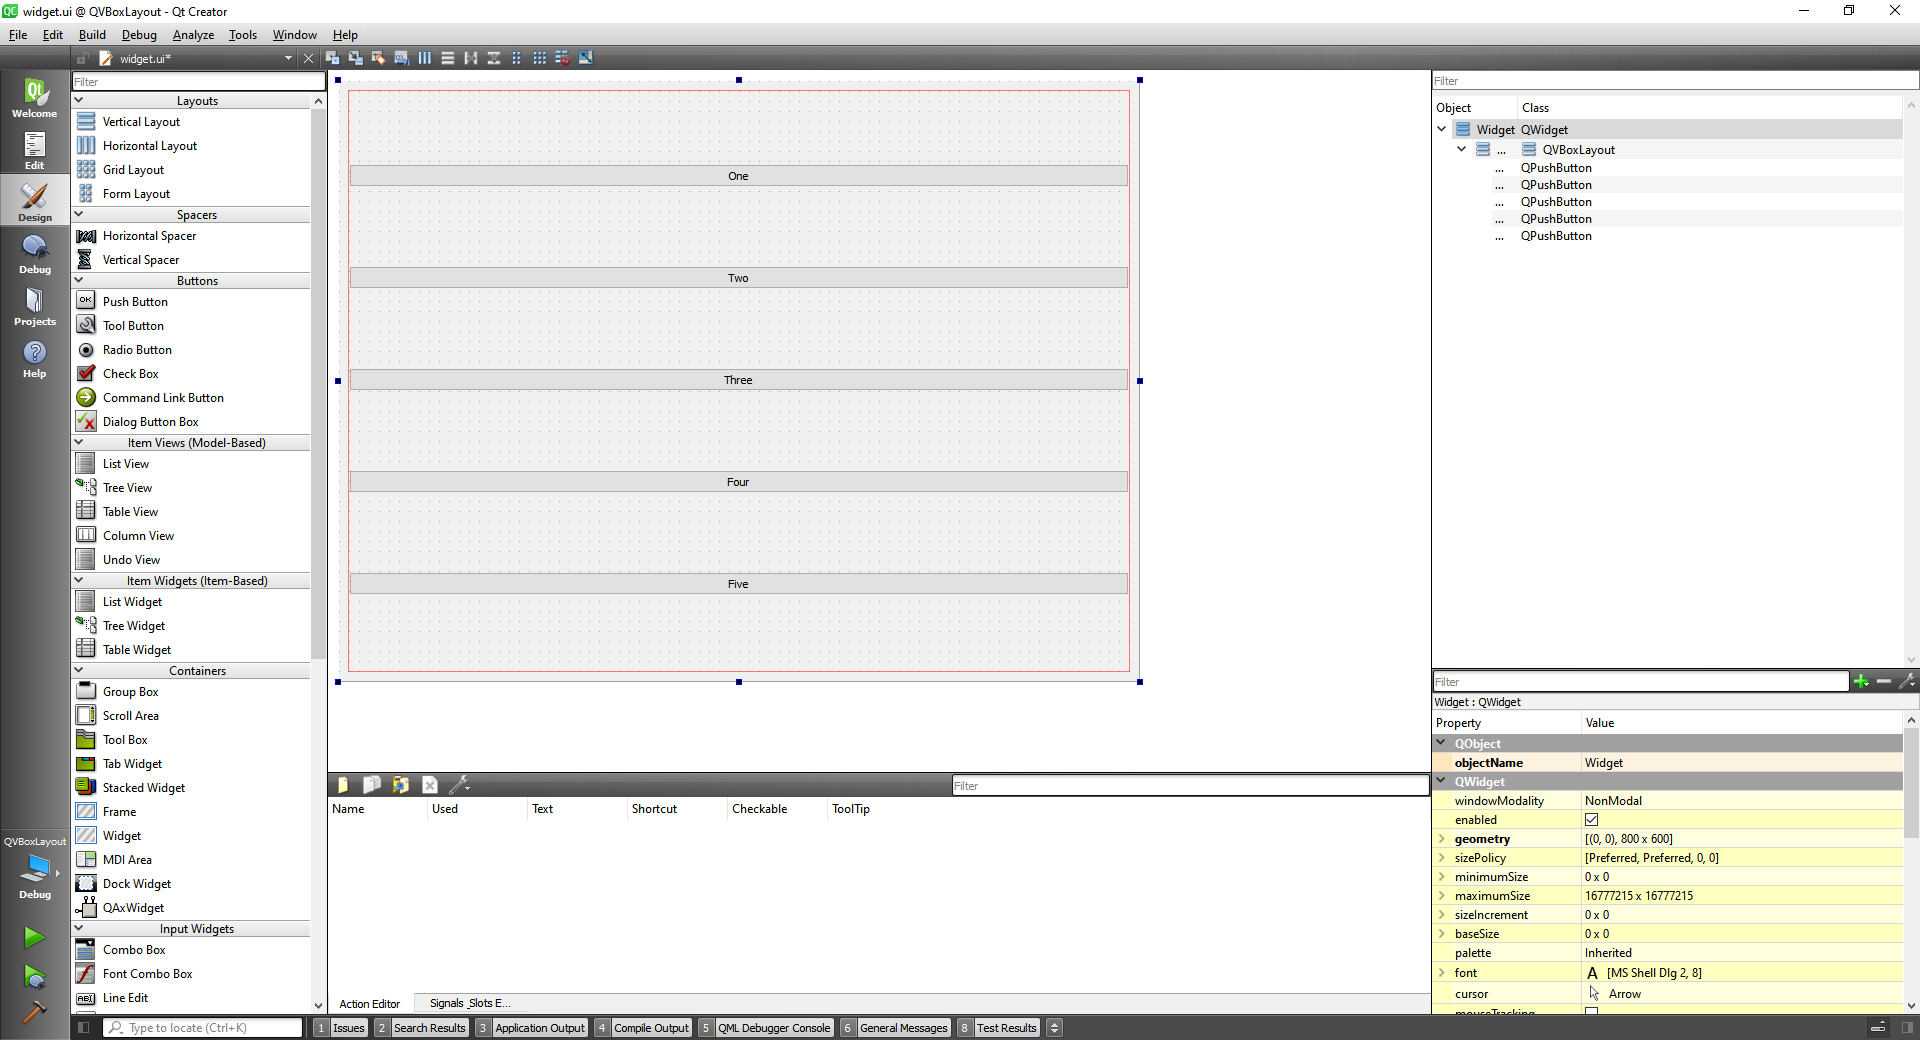
# Size Policy and Stretches
The QSizePolicy class is a layout attribute describing horizontal and vertical resizing policy.
On this topic we are going to work with group boxes.
Then we apply a horizontal layout to the textlabel and line text, then we apply the horizontal layout to the box.

With two groups and a vertical spacer, and the groups with horizontal loyout and the widget with a vertical layout we have:
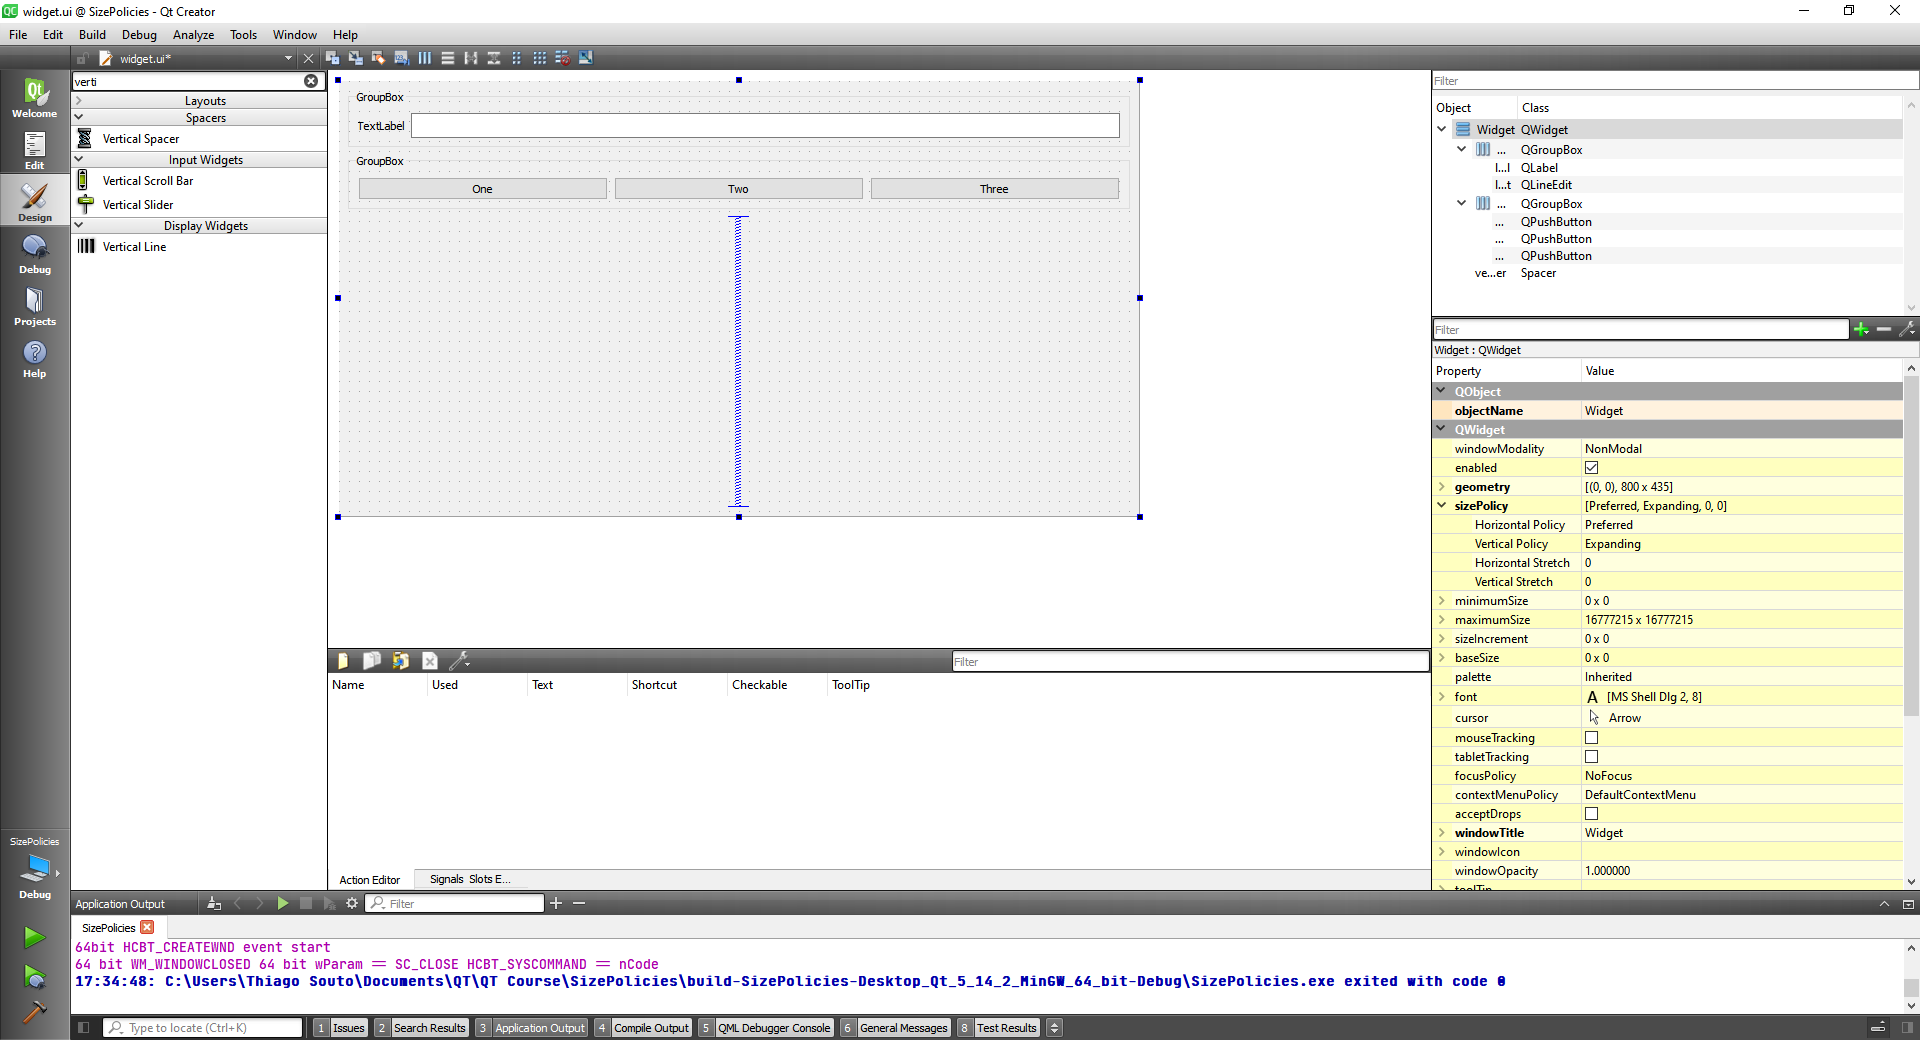
TIP
Take a look at the hierarchy at the top right panel.
About the stretches you give values to the buttons and the total area is the sum of the stretches value in this example button 2 and 3 have 1 each and button one have 2.

# QGridLayout
The QGridLayout class lays out widgets in a grid.
QGridLayout takes the space made available to it (by its parent layout or by the parentWidget()), divides it up into rows and columns, and puts each widget it manages into the correct cell.
Columns and rows behave identically; we will discuss columns, but there are equivalent functions for rows.
Each column has a minimum width and a stretch factor. The minimum width is the greatest of that set using setColumnMinimumWidth() and the minimum width of each widget in that column. The stretch factor is set using setColumnStretch() and determines how much of the available space the column will get over and above its necessary minimum.
Normally, each managed widget or layout is put into a cell of its own using addWidget(). It is also possible for a widget to occupy multiple cells using the row and column spanning overloads of addItem() and addWidget(). If you do this, QGridLayout will guess how to distribute the size over the columns/rows (based on the stretch factors).
To remove a widget from a layout, call removeWidget(). Calling QWidget::hide() on a widget also effectively removes the widget from the layout until QWidget::show() is called.
This illustration shows a fragment of a dialog with a five-column, three-row grid (the grid is shown overlaid in magenta):

Columns 0, 2 and 4 in this dialog fragment are made up of a QLabel, a QLineEdit, and a QListBox. Columns 1 and 3 are placeholders made with setColumnMinimumWidth(). Row 0 consists of three QLabel objects, row 1 of three QLineEdit objects and row 2 of three QListBox objects. We used placeholder columns (1 and 3) to get the right amount of space between the columns.
Note that the columns and rows are not equally wide or tall. If you want two columns to have the same width, you must set their minimum widths and stretch factors to be the same yourself. You do this using setColumnMinimumWidth() and setColumnStretch().
If the QGridLayout is not the top-level layout (i.e. does not manage all of the widget's area and children), you must add it to its parent layout when you create it, but before you do anything with it. The normal way to add a layout is by calling addLayout() on the parent layout.
Once you have added your layout you can start putting widgets and other layouts into the cells of your grid layout using addWidget(), addItem(), and addLayout().
QGridLayout also includes two margin widths: the contents margin and the spacing(). The contents margin is the width of the reserved space along each of the QGridLayout's four sides. The spacing() is the width of the automatically allocated spacing between neighboring boxes.
The default contents margin values are provided by the style. The default value Qt styles specify is 9 for child widgets and 11 for windows. The spacing defaults to the same as the margin width for a top-level layout, or to the same as the parent layout.
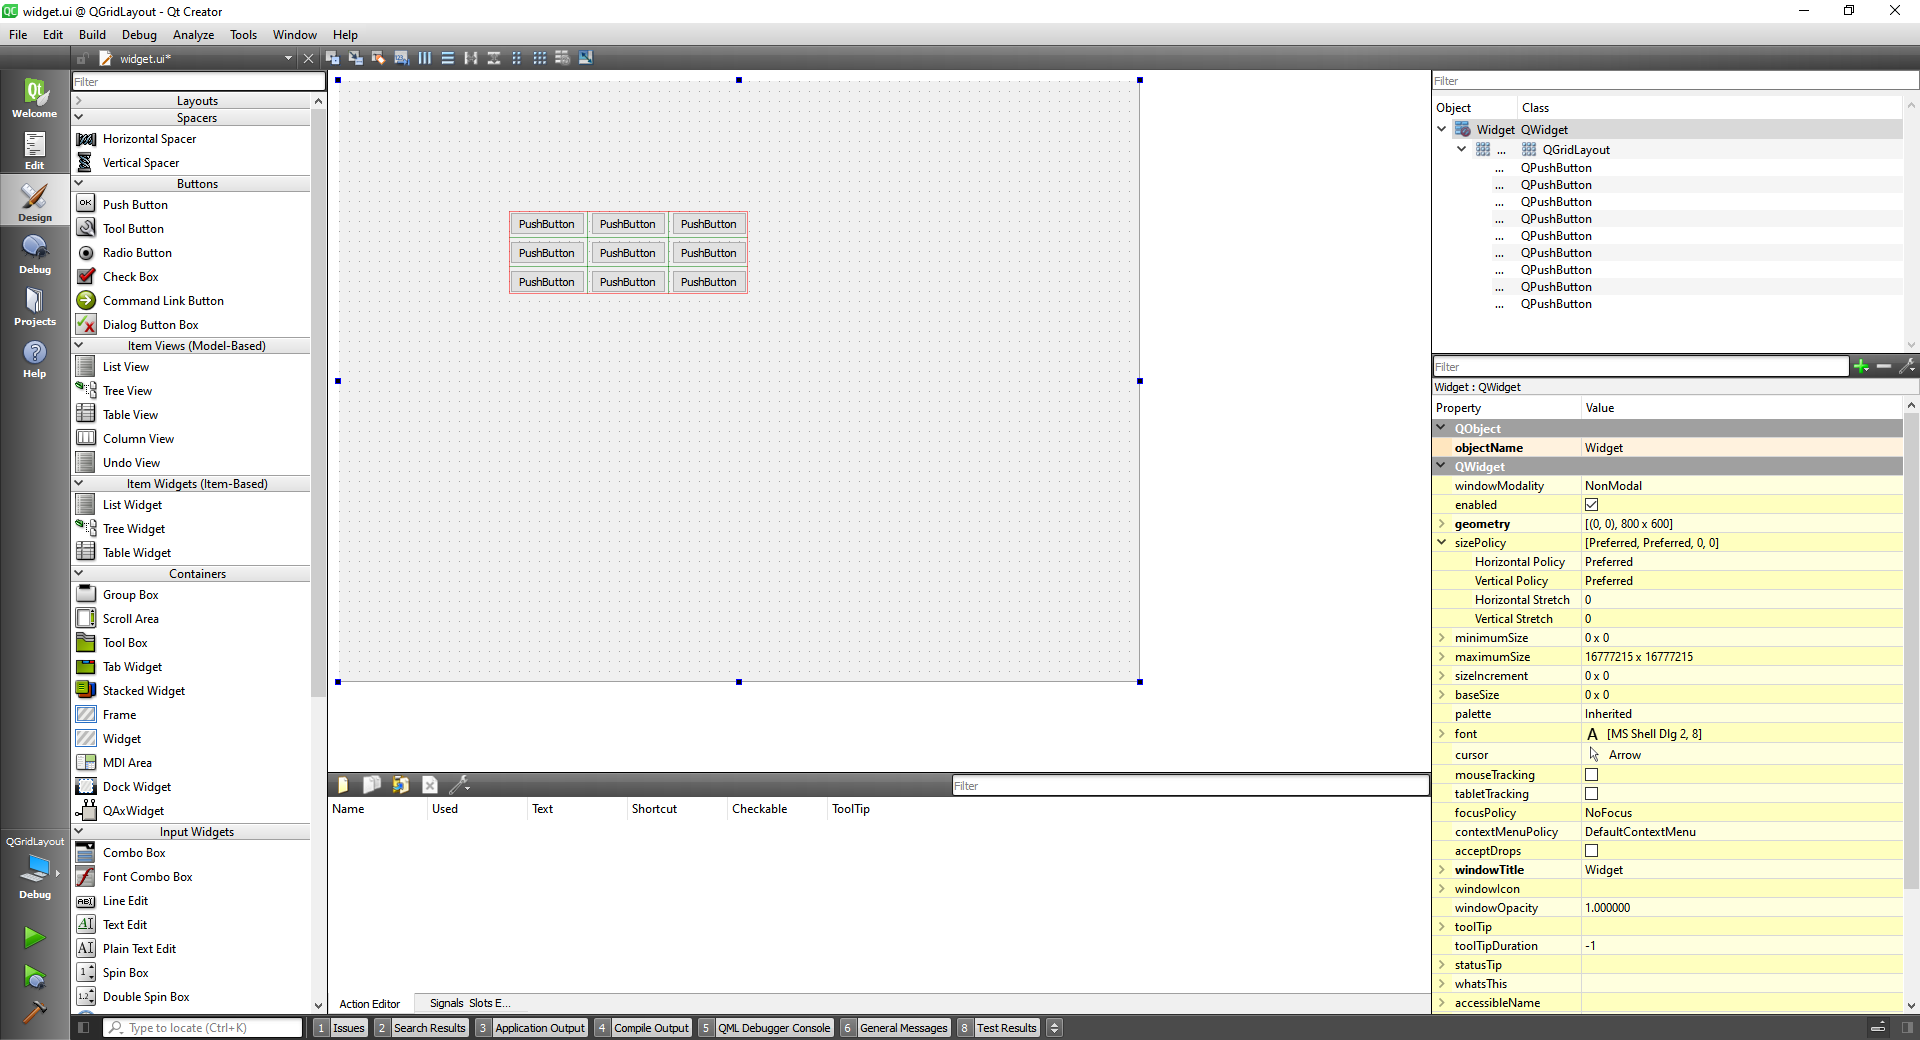
We can do it with code only as well
widget.cpp
#include "widget.h"
#include "./ui_widget.h"
#include <QGridLayout>

Widget::Widget(QWidget *parent)
    : QWidget(parent)
    , ui(new Ui::Widget)
{
    ui->setupUi(this);

    QGridLayout * layout = new QGridLayout(this);

    //First Row
    layout->addWidget(ui->pushButton_1,0,0);
    layout->addWidget(ui->pushButton_2,0,1);
    layout->addWidget(ui->pushButton_3,0,2);

    //Second Row
    layout->addWidget(ui->pushButton_4,1,0);
    layout->addWidget(ui->pushButton_5,1,1);
    layout->addWidget(ui->pushButton_6,1,2);

    //Third Row
    layout->addWidget(ui->pushButton_7,2,0);
    layout->addWidget(ui->pushButton_8,2,1);
    layout->addWidget(ui->pushButton_9,2,2);
}

Widget::~Widget()
{
    delete ui;
}
2
3
4
5
6
7
8
9
10
11
12
13
14
15
16
17
18
19
20
21
22
23
24
25
26
27
28
29
30
31
32
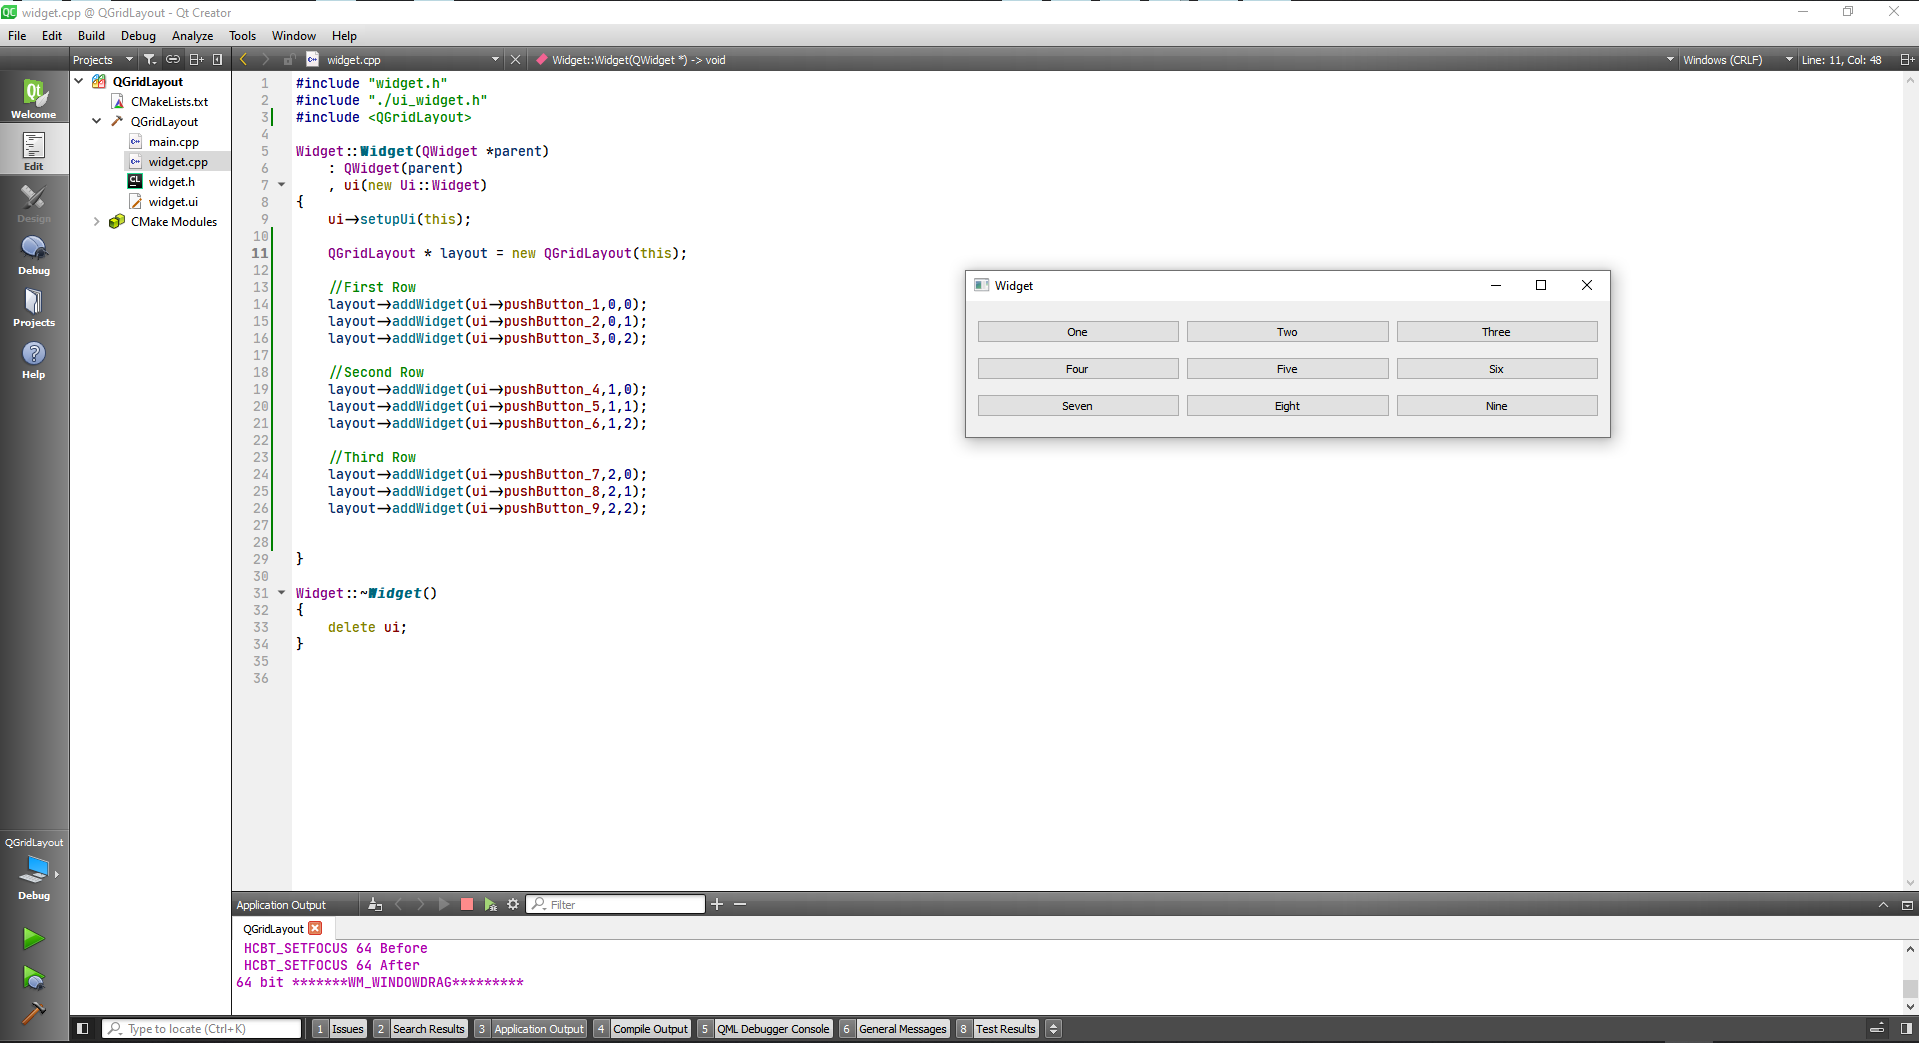
Or we can do it by not specifying the layout on the new QGridLayout and declaring it later wi setLayout(this).
#include "widget.h"
#include "./ui_widget.h"
#include <QGridLayout>

Widget::Widget(QWidget *parent)
    : QWidget(parent)
    , ui(new Ui::Widget)
{
    ui->setupUi(this);

    QGridLayout * layout = new QGridLayout();

    //First Row
    layout->addWidget(ui->pushButton_1,0,0);
    layout->addWidget(ui->pushButton_2,0,1);
    layout->addWidget(ui->pushButton_3,0,2);

    //Second Row
    layout->addWidget(ui->pushButton_4,1,0);
    layout->addWidget(ui->pushButton_5,1,1);
    layout->addWidget(ui->pushButton_6,1,2);

    //Third Row
    layout->addWidget(ui->pushButton_7,2,0);
    layout->addWidget(ui->pushButton_8,2,1);
    layout->addWidget(ui->pushButton_9,2,2);

    setLayout(layout);
}

Widget::~Widget()
{
    delete ui;
}
2
3
4
5
6
7
8
9
10
11
12
13
14
15
16
17
18
19
20
21
22
23
24
25
26
27
28
29
30
31
32
33
34
We can also make a button occupy more than one column or row with rowSpan or columnSpan
#include "widget.h"
#include "./ui_widget.h"
#include <QGridLayout>

Widget::Widget(QWidget *parent)
    : QWidget(parent)
    , ui(new Ui::Widget)
{
    ui->setupUi(this);

    QGridLayout * layout = new QGridLayout();

    //First Row
    layout->addWidget(ui->pushButton_1,0,0);
    layout->addWidget(ui->pushButton_2,0,1);
    layout->addWidget(ui->pushButton_3,0,2,2,1);

    //Second Row
    layout->addWidget(ui->pushButton_4,1,0);
    layout->addWidget(ui->pushButton_5,1,1);

    //Third Row
    layout->addWidget(ui->pushButton_7,2,0,1,2);
    layout->addWidget(ui->pushButton_9,2,2);

    setLayout(layout);
}

Widget::~Widget()
{
    delete ui;
}
2
3
4
5
6
7
8
9
10
11
12
13
14
15
16
17
18
19
20
21
22
23
24
25
26
27
28
29
30
31
32

We can change the size policy in Button Three from other than fixed to see the best layout, expanding in this case.

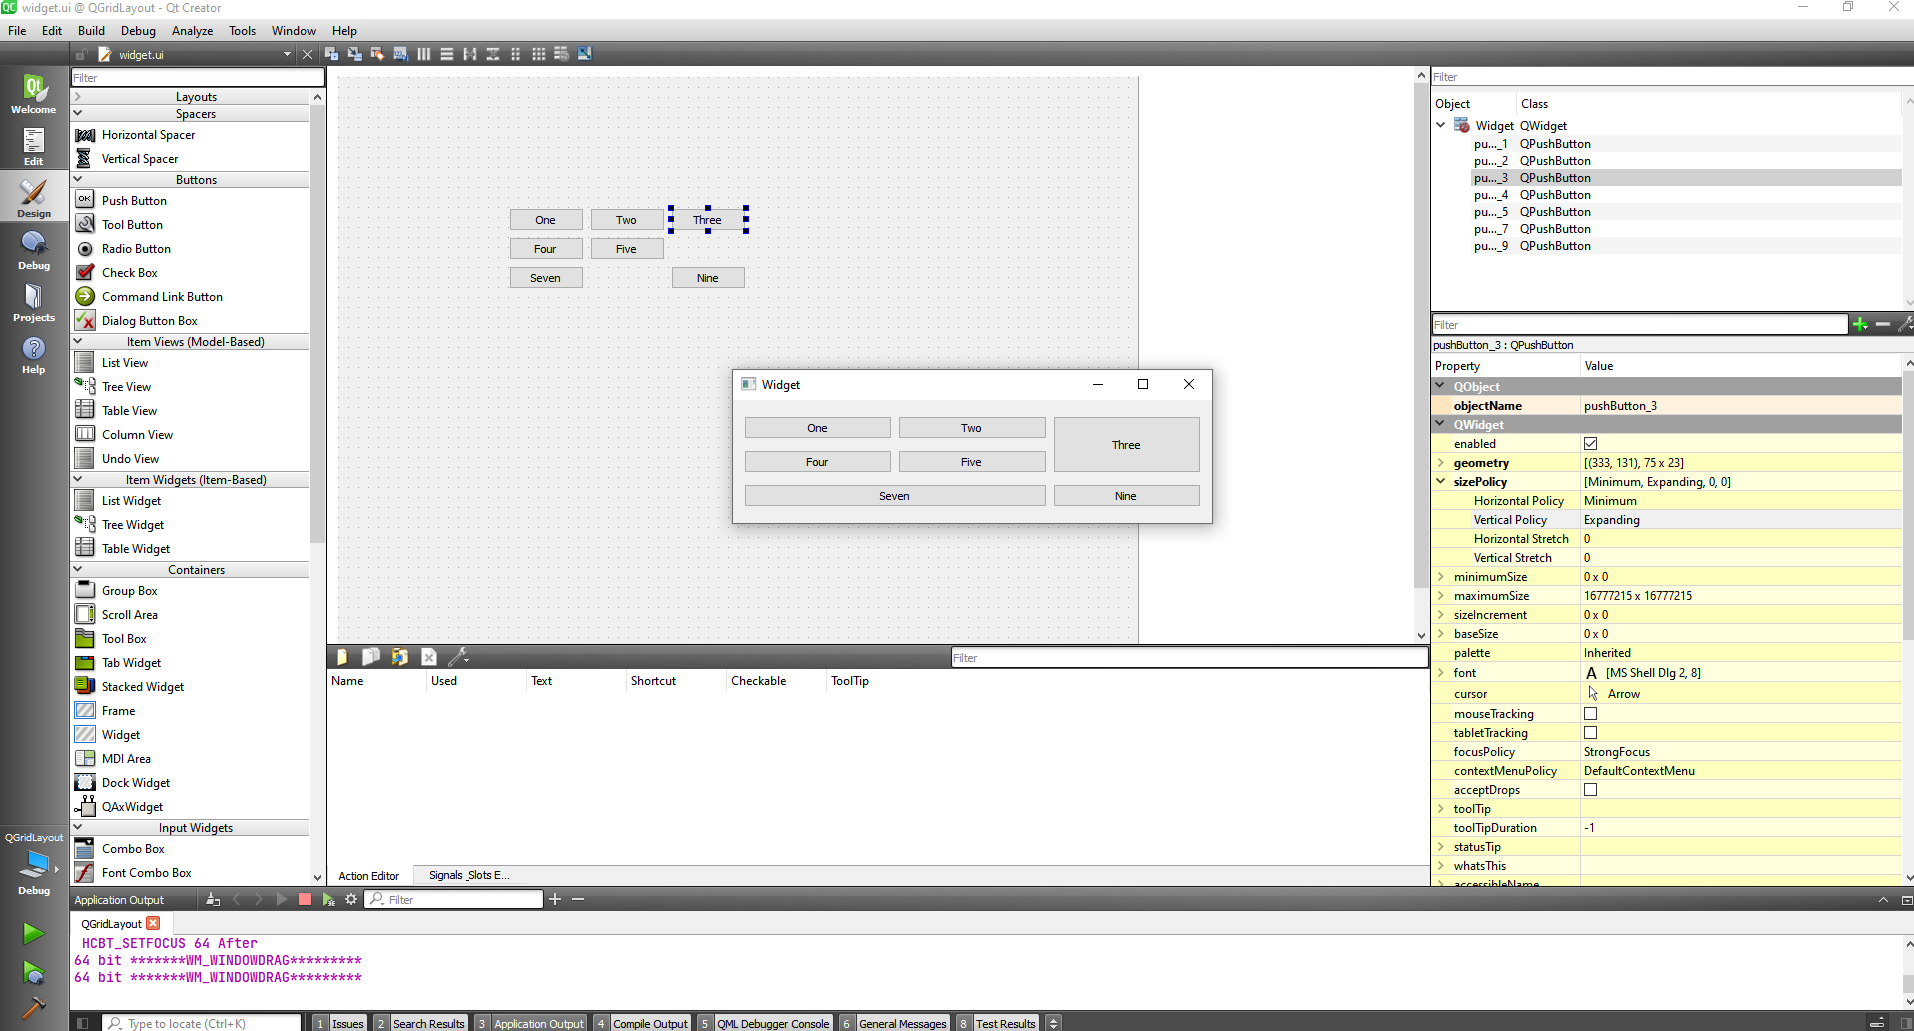
# QCheckBox
and
# QRadioButton Classes.
For these we are going to use QButtonGroup, and we are going to make them exclusive.
#include "widget.h"
#include "./ui_widget.h"
#include <QButtonGroup>

Widget::Widget(QWidget *parent)
    : QWidget(parent)
    , ui(new Ui::Widget)
{
    ui->setupUi(this);

    QButtonGroup * buttonGroup = new QButtonGroup(this);
    buttonGroup->addButton(ui->WindowsCheckBox);
    buttonGroup->addButton(ui->LinuxCheckBox);
    buttonGroup->addButton(ui->MacCheckBox);

    buttonGroup->setExclusive(true);
}

Widget::~Widget()
{
    delete ui;
}
2
3
4
5
6
7
8
9
10
11
12
13
14
15
16
17
18
19
20
21
22

Aligning the layout we have:
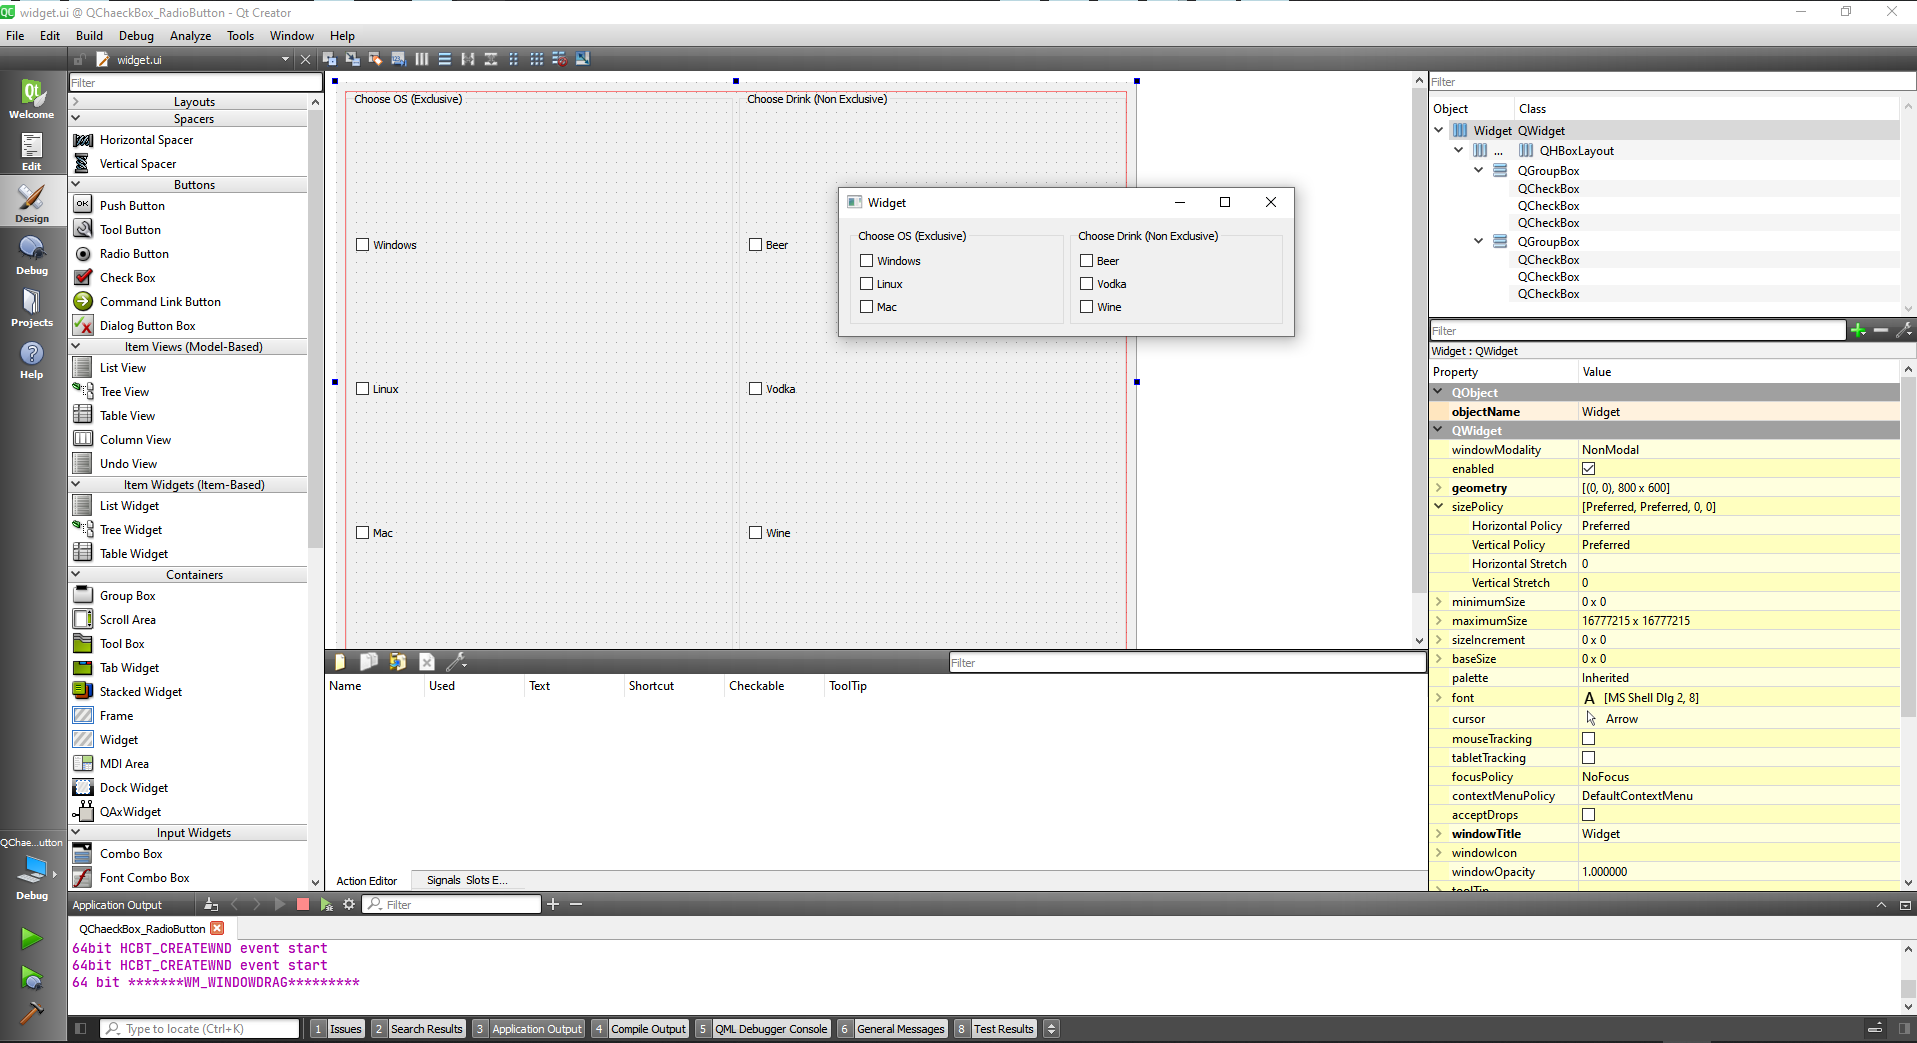
Let's add some radio buttons and push buttons:
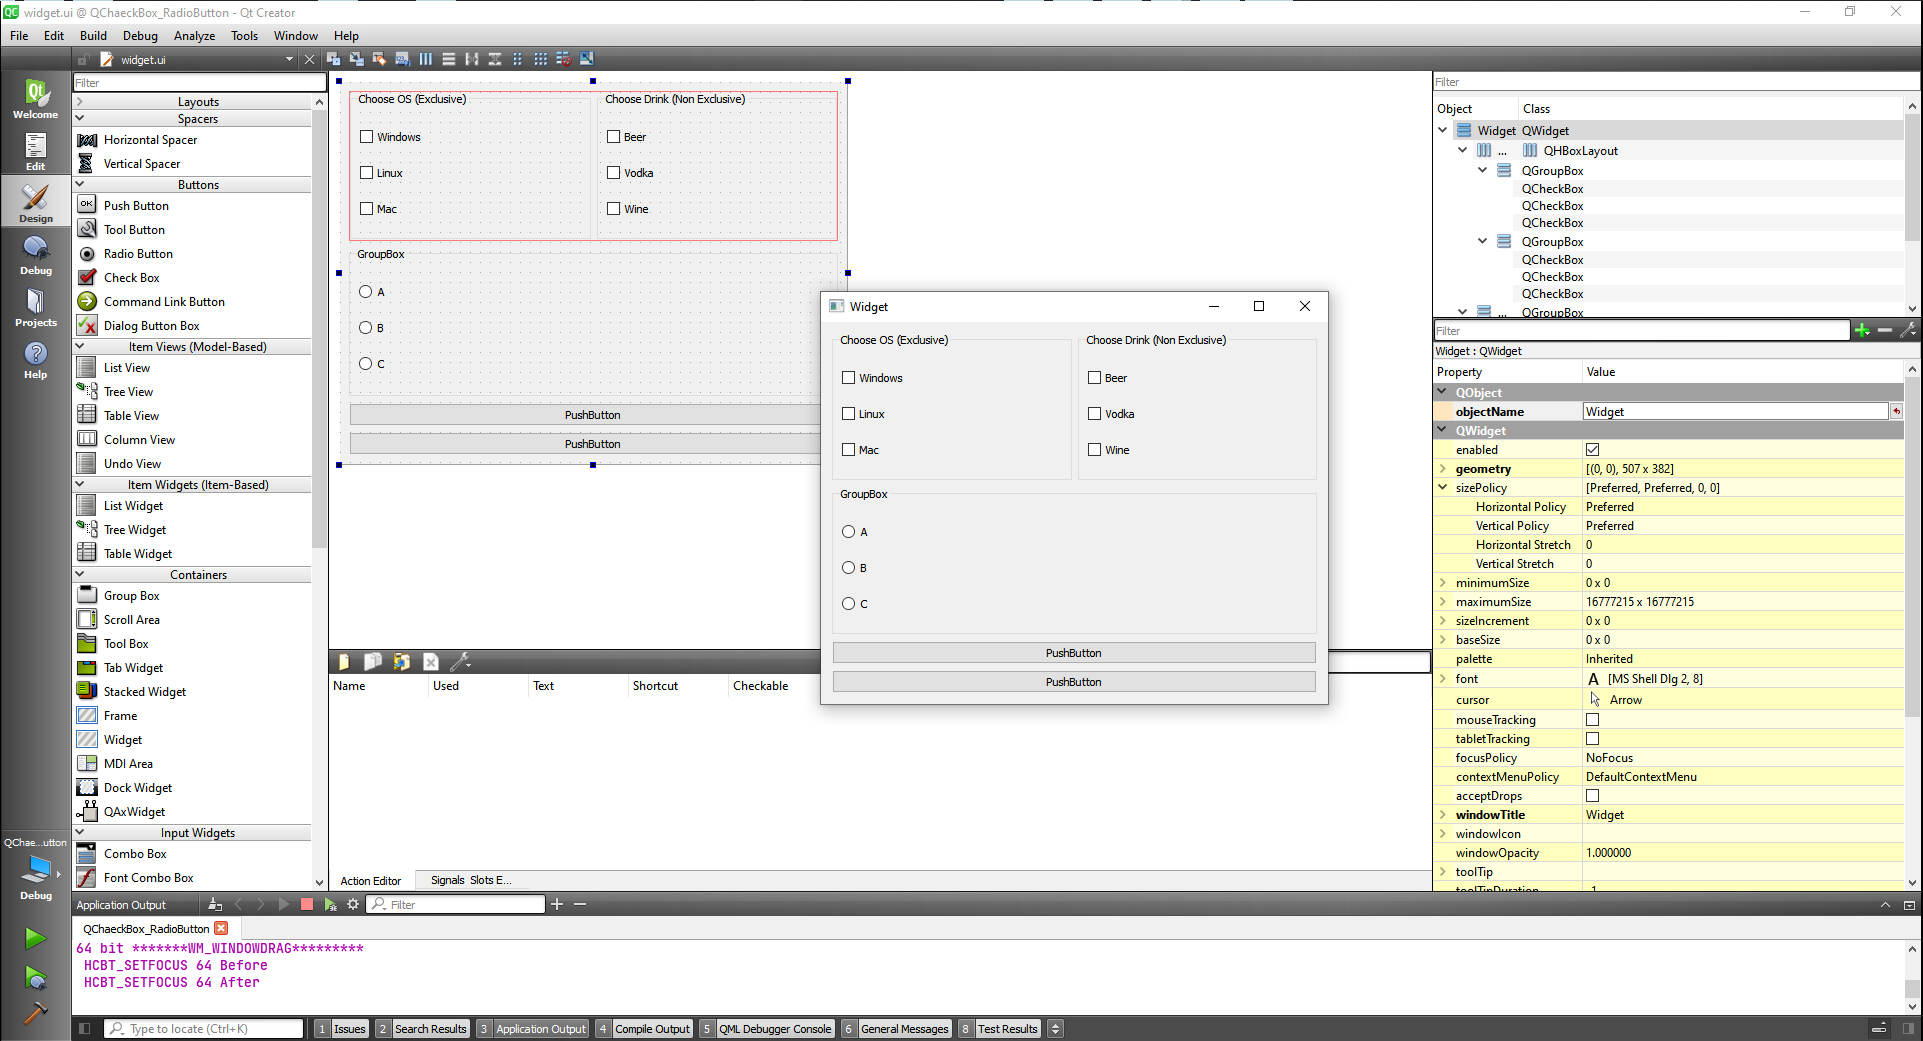
And now let's start capturing some signals.
To do that we can right click on the button and choose go to slot.
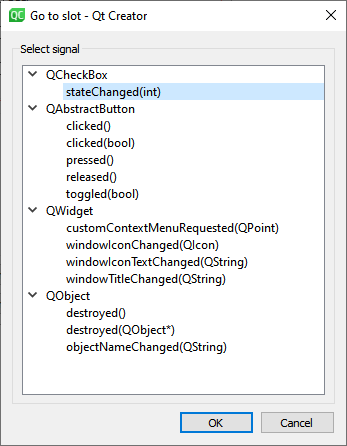
Let's choose a toggled(bool) and test if it's checked.
widget.h
#ifndef WIDGET_H
#define WIDGET_H

#include <QWidget>

QT_BEGIN_NAMESPACE
namespace Ui { class Widget; }
QT_END_NAMESPACE

class Widget : public QWidget
{
    Q_OBJECT

public:
    Widget(QWidget *parent = nullptr);
    ~Widget();

private slots:
    void on_WindowsCheckBox_toggled(bool checked);

private:
    Ui::Widget *ui;
};
#endif // WIDGET_H
2
3
4
5
6
7
8
9
10
11
12
13
14
15
16
17
18
19
20
21
22
23
24
widget.cpp
#include "widget.h"
#include "./ui_widget.h"
#include <QButtonGroup>
#include <QDebug>

Widget::Widget(QWidget *parent)
    : QWidget(parent)
    , ui(new Ui::Widget)
{
    ui->setupUi(this);

    QButtonGroup * buttonGroup = new QButtonGroup(this);
    buttonGroup->addButton(ui->WindowsCheckBox);
    buttonGroup->addButton(ui->LinuxCheckBox);
    buttonGroup->addButton(ui->MacCheckBox);

    buttonGroup->setExclusive(true);
}

Widget::~Widget()
{
    delete ui;
}


void Widget::on_WindowsCheckBox_toggled(bool checked)
{
    if(checked) {
        qDebug() << "Checkbox is checked";
    } else {
        qDebug() << "Checkbox is unchecked";
    }
}
2
3
4
5
6
7
8
9
10
11
12
13
14
15
16
17
18
19
20
21
22
23
24
25
26
27
28
29
30
31
32
33
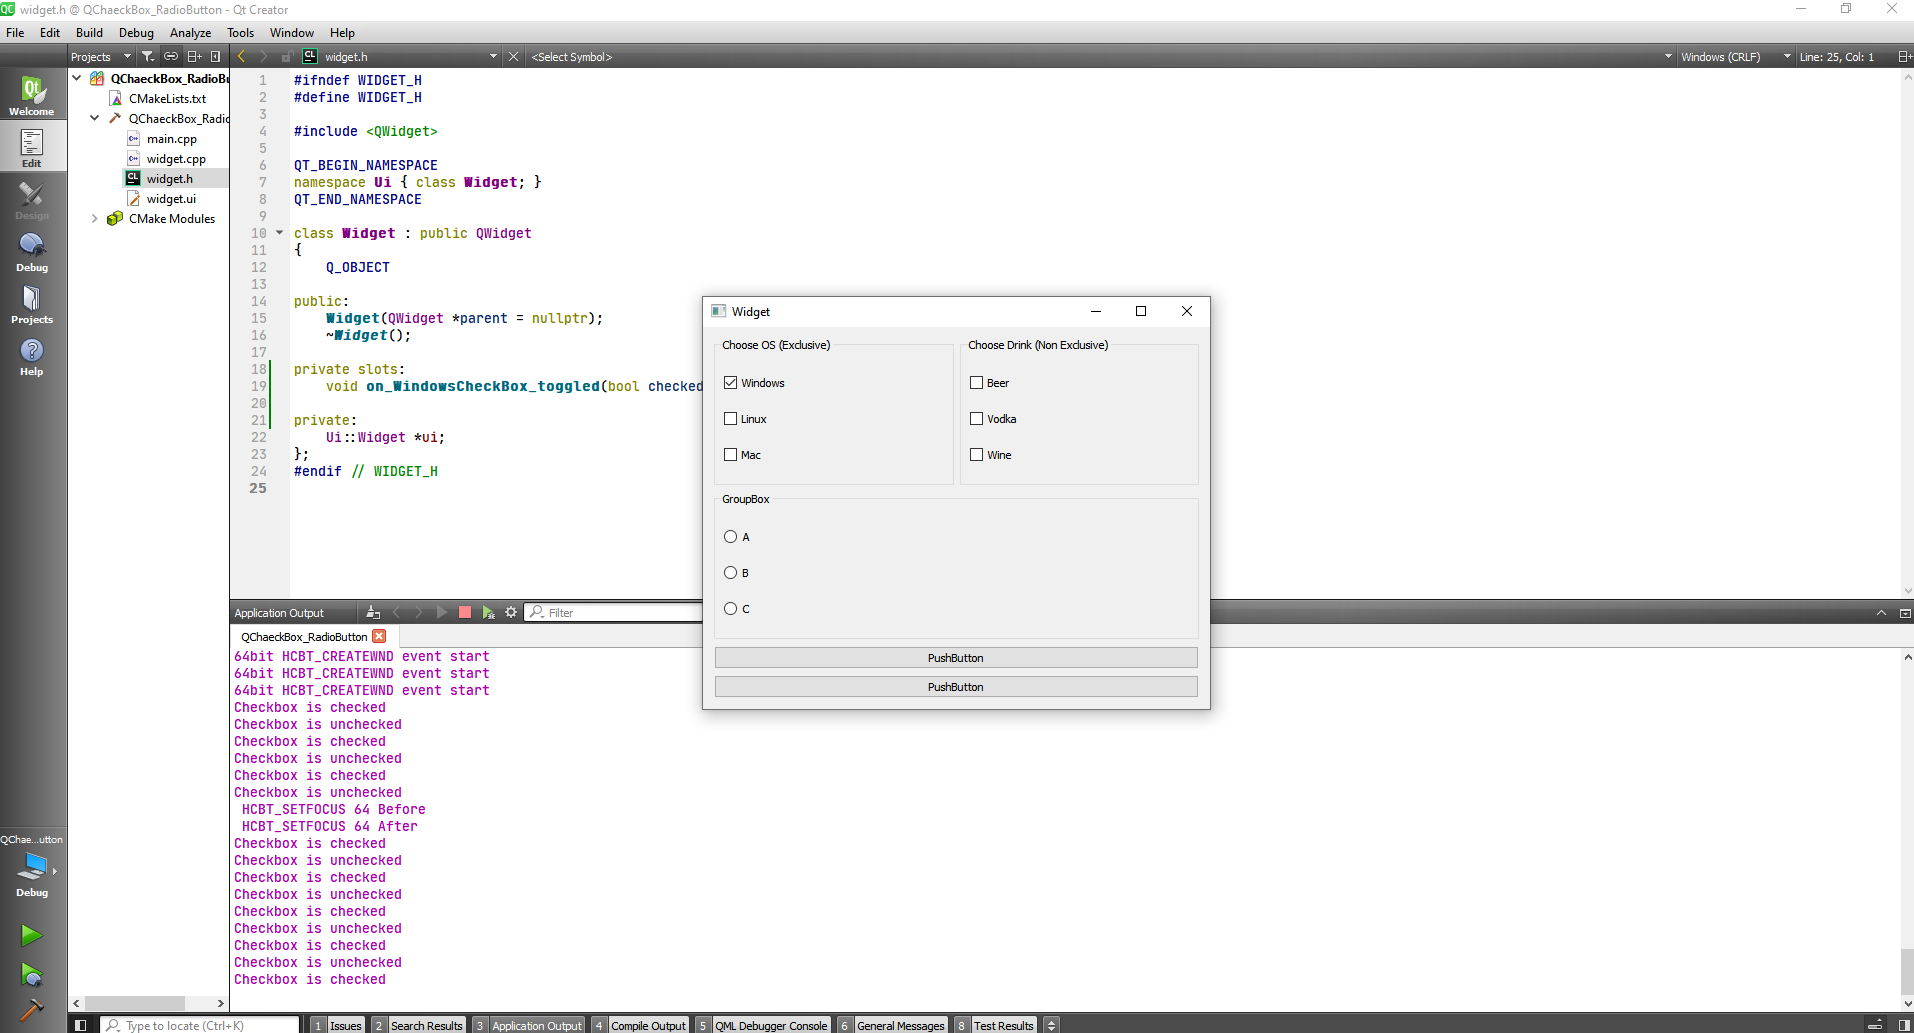
Now with the Windows, Beer and A buttons all giving us signals we can add an action to the button.
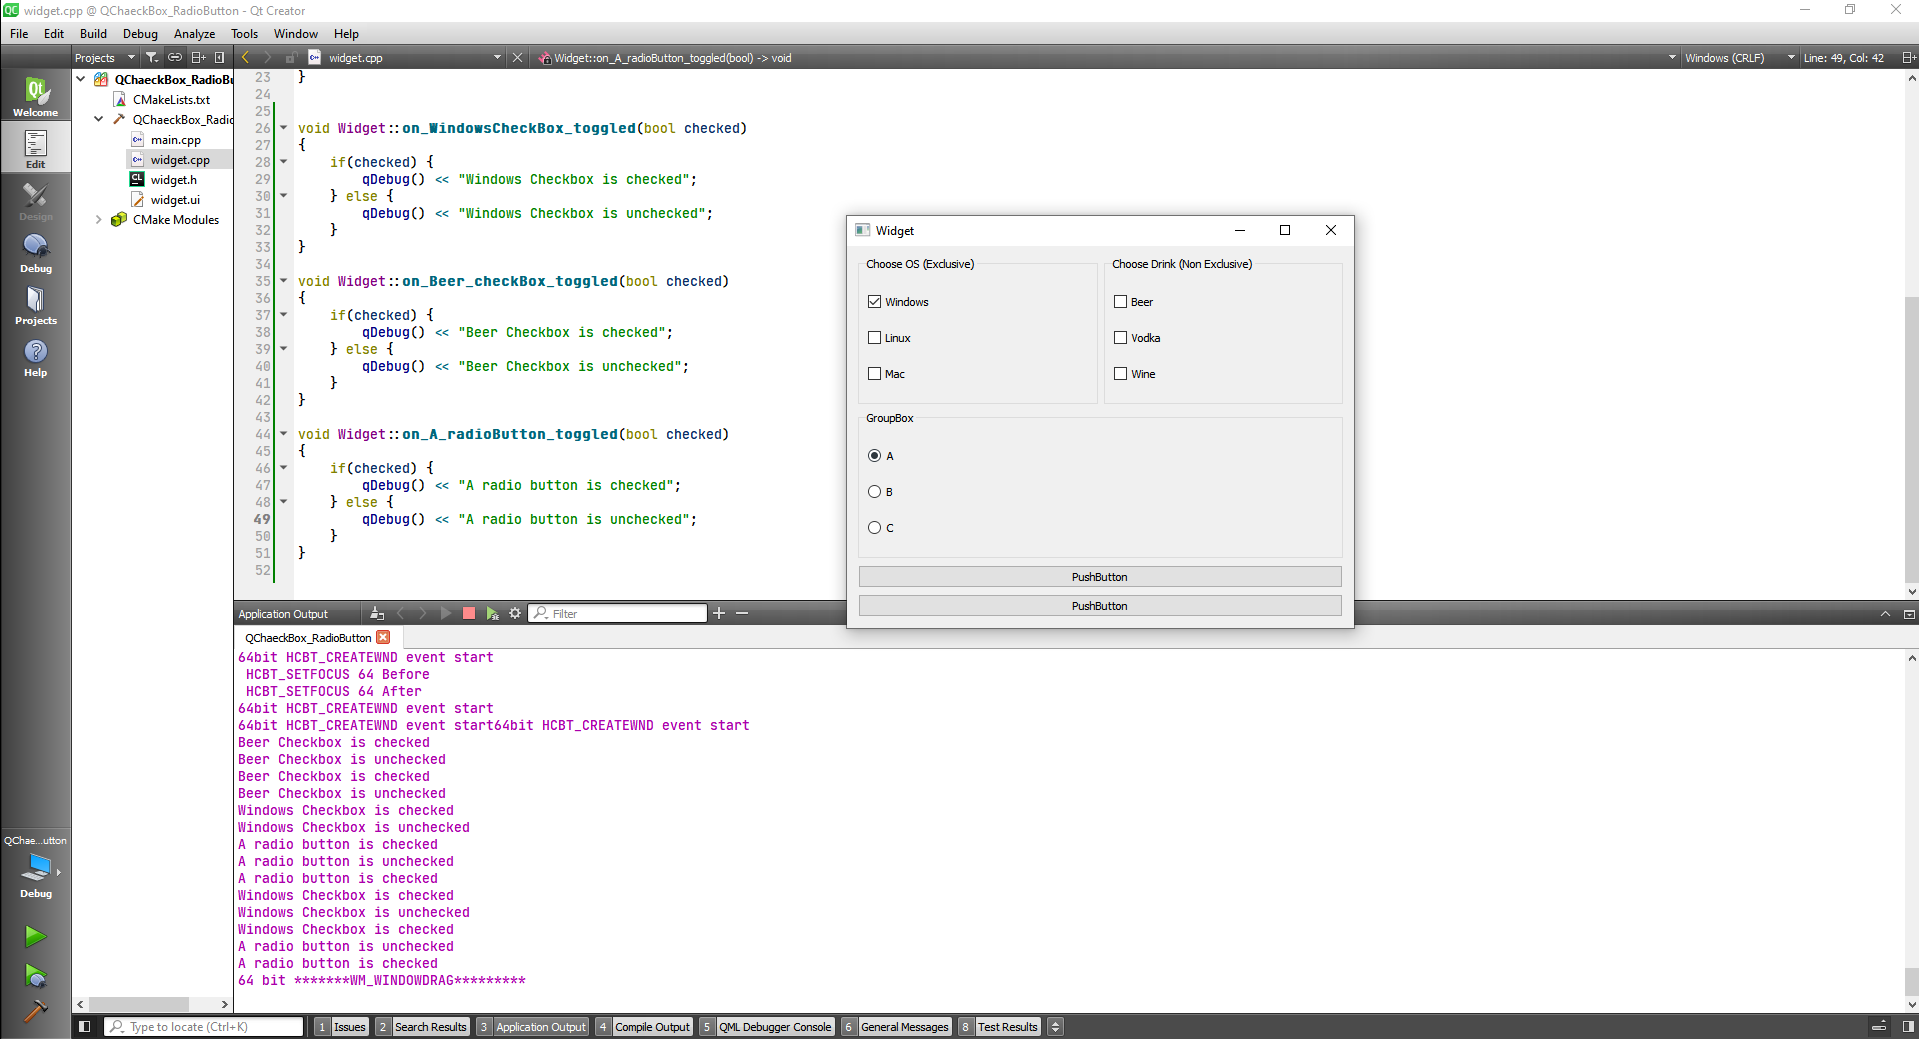
#include "widget.h"
#include "./ui_widget.h"
#include <QButtonGroup>
#include <QDebug>

Widget::Widget(QWidget *parent)
    : QWidget(parent)
    , ui(new Ui::Widget)
{
    ui->setupUi(this);

    QButtonGroup * buttonGroup = new QButtonGroup(this);
    buttonGroup->addButton(ui->WindowsCheckBox);
    buttonGroup->addButton(ui->LinuxCheckBox);
    buttonGroup->addButton(ui->MacCheckBox);

    buttonGroup->setExclusive(true);
}

Widget::~Widget()
{
    delete ui;
}


void Widget::on_WindowsCheckBox_toggled(bool checked)
{
    if(checked) {
        qDebug() << "Windows Checkbox is checked";
    } else {
        qDebug() << "Windows Checkbox is unchecked";
    }
}

void Widget::on_Beer_checkBox_toggled(bool checked)
{
    if(checked) {
        qDebug() << "Beer Checkbox is checked";
    } else {
        qDebug() << "Beer Checkbox is unchecked";
    }
}

void Widget::on_A_radioButton_toggled(bool checked)
{
    if(checked) {
        qDebug() << "A radio button is checked";
    } else {
        qDebug() << "A radio button is unchecked";
    }
}

void Widget::on_grabData_clicked()
{
    if(ui->WindowsCheckBox->isChecked()){
        qDebug() << "Windows Checkbox is checked";
    } else {
        qDebug() << "Windows Checkbox is unchecked";
    }
}
2
3
4
5
6
7
8
9
10
11
12
13
14
15
16
17
18
19
20
21
22
23
24
25
26
27
28
29
30
31
32
33
34
35
36
37
38
39
40
41
42
43
44
45
46
47
48
49
50
51
52
53
54
55
56
57
58
59
60
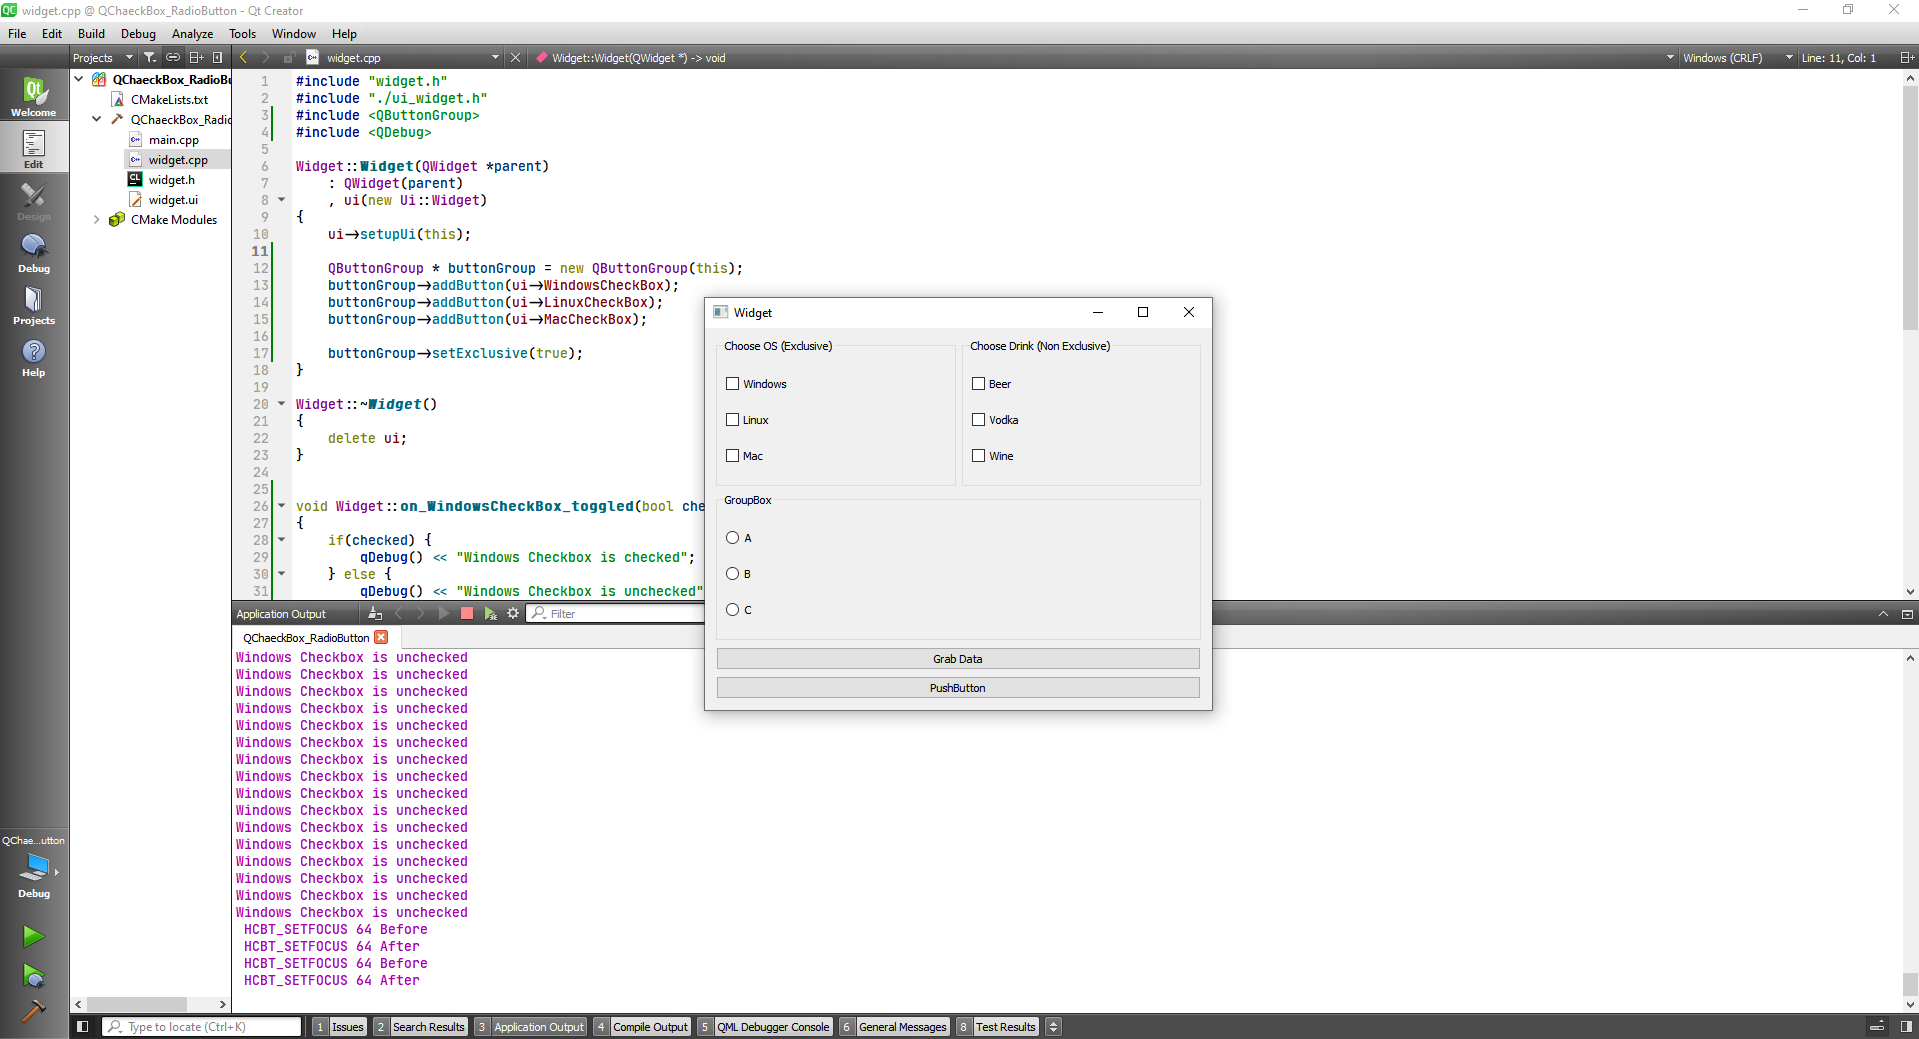
Las thing let's make the second button a set states button and set some states.
#include "widget.h"
#include "./ui_widget.h"
#include <QButtonGroup>
#include <QDebug>

Widget::Widget(QWidget *parent)
    : QWidget(parent)
    , ui(new Ui::Widget)
{
    ui->setupUi(this);

    QButtonGroup * buttonGroup = new QButtonGroup(this);
    buttonGroup->addButton(ui->WindowsCheckBox);
    buttonGroup->addButton(ui->LinuxCheckBox);
    buttonGroup->addButton(ui->MacCheckBox);

    buttonGroup->setExclusive(true);
}

Widget::~Widget()
{
    delete ui;
}


void Widget::on_WindowsCheckBox_toggled(bool checked)
{
    if(checked) {
        qDebug() << "Windows Checkbox is checked";
    } else {
        qDebug() << "Windows Checkbox is unchecked";
    }
}

void Widget::on_Beer_checkBox_toggled(bool checked)
{
    if(checked) {
        qDebug() << "Beer Checkbox is checked";
    } else {
        qDebug() << "Beer Checkbox is unchecked";
    }
}

void Widget::on_A_radioButton_toggled(bool checked)
{
    if(checked) {
        qDebug() << "A radio button is checked";
    } else {
        qDebug() << "A radio button is unchecked";
    }
}

void Widget::on_grabData_clicked()
{
    if(ui->WindowsCheckBox->isChecked()){
        qDebug() << "Windows Checkbox is checked";
    } else {
        qDebug() << "Windows Checkbox is unchecked";
    }
}

void Widget::on_setStatesButton_clicked()
{
    //Exclusive
    if(ui->WindowsCheckBox->isChecked()){
        ui->WindowsCheckBox->setChecked(false);
    } else {
        ui->WindowsCheckBox->setChecked(true);
    }

    //Non Exclusive
    if(ui->Beer_checkBox->isChecked()){
        ui->Beer_checkBox->setChecked(false);
    } else {
        ui->Beer_checkBox->setChecked(true);
    }
}
2
3
4
5
6
7
8
9
10
11
12
13
14
15
16
17
18
19
20
21
22
23
24
25
26
27
28
29
30
31
32
33
34
35
36
37
38
39
40
41
42
43
44
45
46
47
48
49
50
51
52
53
54
55
56
57
58
59
60
61
62
63
64
65
66
67
68
69
70
71
72
73
74
75
76
77
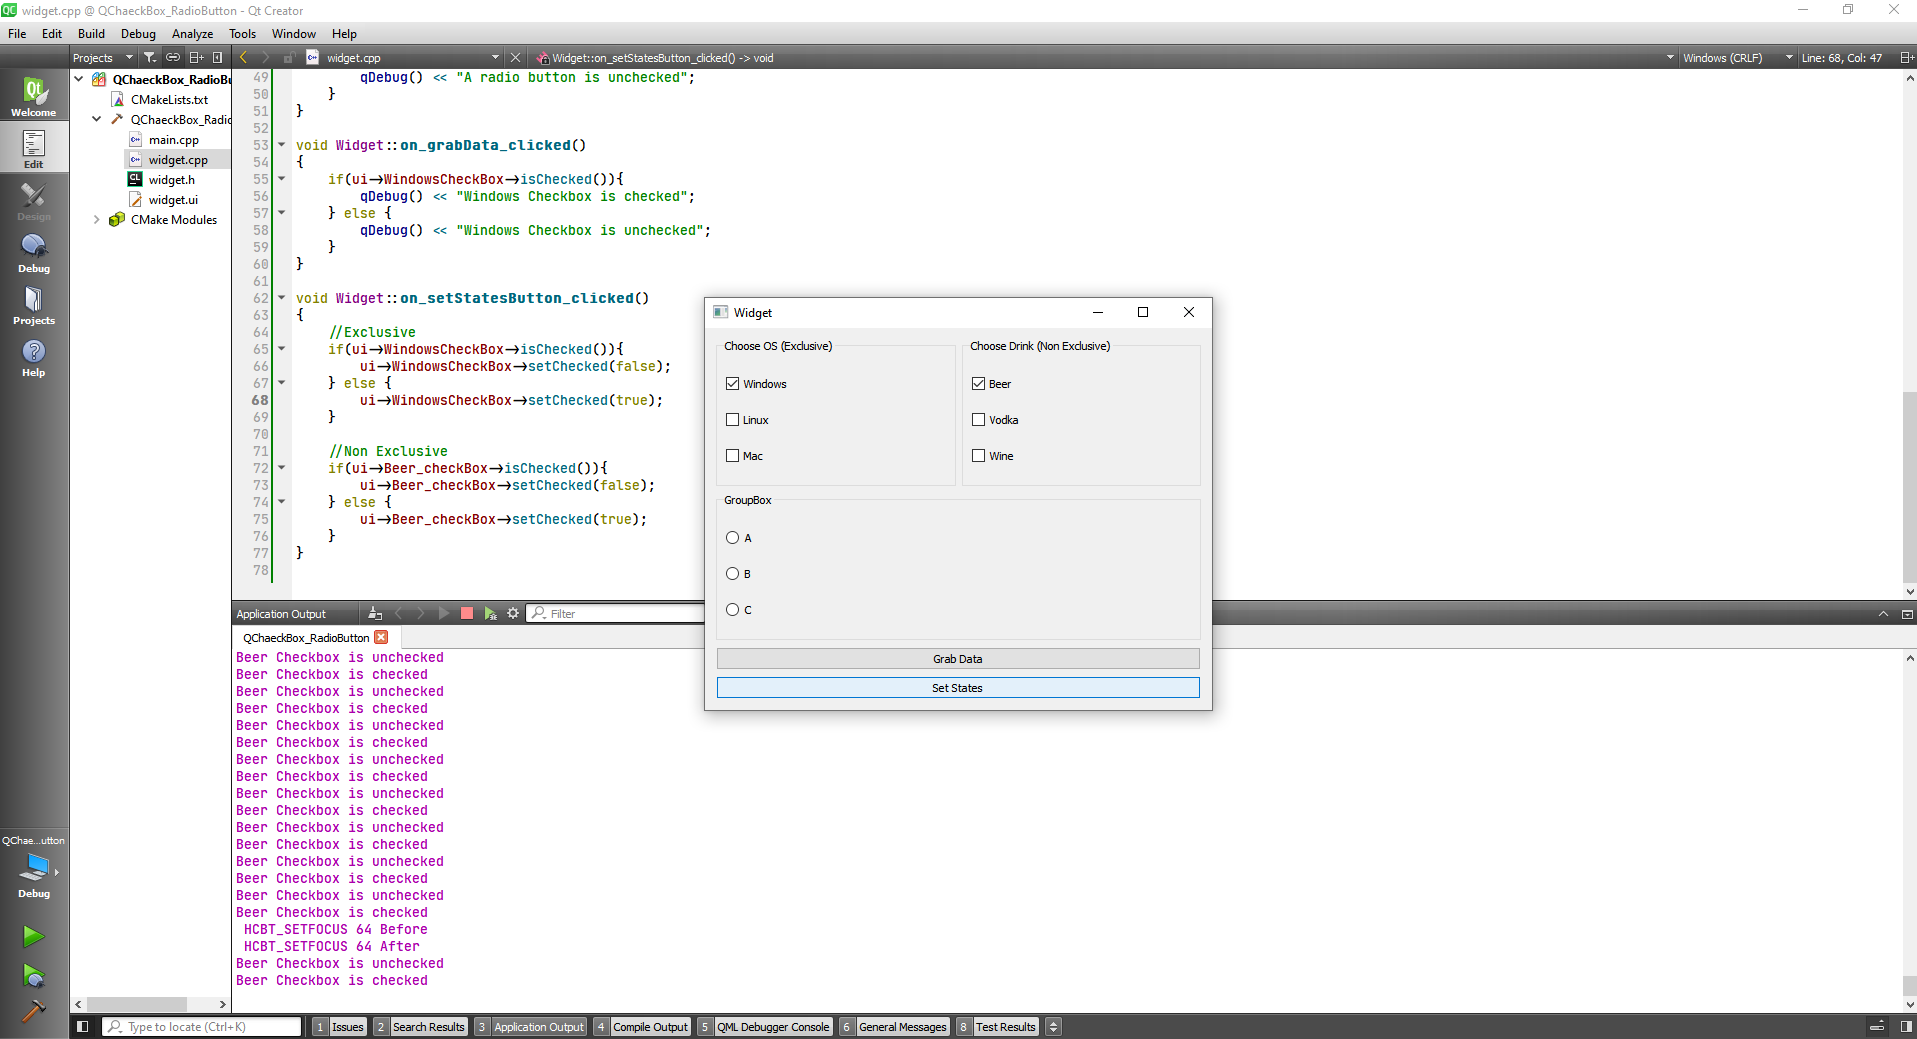
# QList class
The QList class is a template class that provides lists.
TIP
Idex starts from 0
Now let's creat a QtConsole application
#include <QCoreApplication>
#include <QDebug>
#include <QList>

int main(int argc, char *argv[])
{
    QCoreApplication a(argc, argv);

    //Declare List
    QList<QString> stringList;

    //Put data in the list
    stringList << "I am " << " Lovin " << " Qt";
    // ["I am ", " Lovin ", " Qt"]
    stringList.append(" a ");
    stringList.append(" lot ! ");

    qDebug() << stringList[0];

    return a.exec();
}
2
3
4
5
6
7
8
9
10
11
12
13
14
15
16
17
18
19
20
21
"I am "
Another things we can do include:
#include <QCoreApplication>
#include <QDebug>
#include <QList>

int main(int argc, char *argv[])
{
    QCoreApplication a(argc, argv);

    //Declare List
    QList<QString> stringList;

    //Put data in the list
    stringList << "I am " << " Lovin " << " Qt";
    // ["I am ", " Lovin ", " Qt"]
    stringList.append(" a ");
    stringList.append(" lot ! ");

    //Get data from the list
    qDebug() << "The first Element is: " << stringList[0];
    qDebug() << "The second Element is: " << stringList[1];
    qDebug() << "The third Element is: " << stringList[2];

    //Get the number of elements
    qDebug() << "The number of elements of my list is: " << stringList.count();

    //Loop through the elements in the list
    for(int i=0; i<stringList.count(); i++) {
        qDebug() << "The element at index " << QString::number(i) << "is " << stringList.at(i);
    }

    return a.exec();
}
2
3
4
5
6
7
8
9
10
11
12
13
14
15
16
17
18
19
20
21
22
23
24
25
26
27
28
29
30
31
32
The first Element is:  "I am "
The second Element is:  " Lovin "
The third Element is:  " Qt"
The number of elements of my list is:  5
The element at index  "0" is  "I am "
The element at index  "1" is  " Lovin "
The element at index  "2" is  " Qt"
The element at index  "3" is  " a "
The element at index  "4" is  " lot ! "
2
3
4
5
6
7
8
9
# QComboBox Class
The QComboBox widget is a combined button and popup list.
First let's design the following layout:

Now we can add some options via code:
#include "widget.h"
#include "./ui_widget.h"

Widget::Widget(QWidget *parent)
    : QWidget(parent)
    , ui(new Ui::Widget)
{
    ui->setupUi(this);
    //Add planets to the combobox
    ui->comboBox->addItem("Earth");
    ui->comboBox->addItem("Mars");
    ui->comboBox->addItem("Jupiter");
    ui->comboBox->addItem("Saturn");
    ui->comboBox->addItem("Pluto");
}

Widget::~Widget()
{
    delete ui;
}
2
3
4
5
6
7
8
9
10
11
12
13
14
15
16
17
18
19
20

Now we are going to Get the value and index on the get value button and set the value on the set value button.
#include "widget.h"
#include "./ui_widget.h"
#include <QDebug>


Widget::Widget(QWidget *parent)
    : QWidget(parent)
    , ui(new Ui::Widget)
{
    ui->setupUi(this);
    //Add planets to the combobox
    ui->comboBox->addItem("Earth");
    ui->comboBox->addItem("Mars");
    ui->comboBox->addItem("Jupiter");
    ui->comboBox->addItem("Saturn");
    ui->comboBox->addItem("Pluto");
}

Widget::~Widget()
{
    delete ui;
}


void Widget::on_CaptureValueButton_clicked()
{
    qDebug() << "The currently selected item in the combo is: " << ui->comboBox->currentText() <<
            "and the index is: " << QString::number(ui->comboBox->currentIndex());

}

void Widget::on_SetValueButton_clicked()
{
    ui->comboBox->setCurrentIndex(3);
}
2
3
4
5
6
7
8
9
10
11
12
13
14
15
16
17
18
19
20
21
22
23
24
25
26
27
28
29
30
31
32
33
34
35
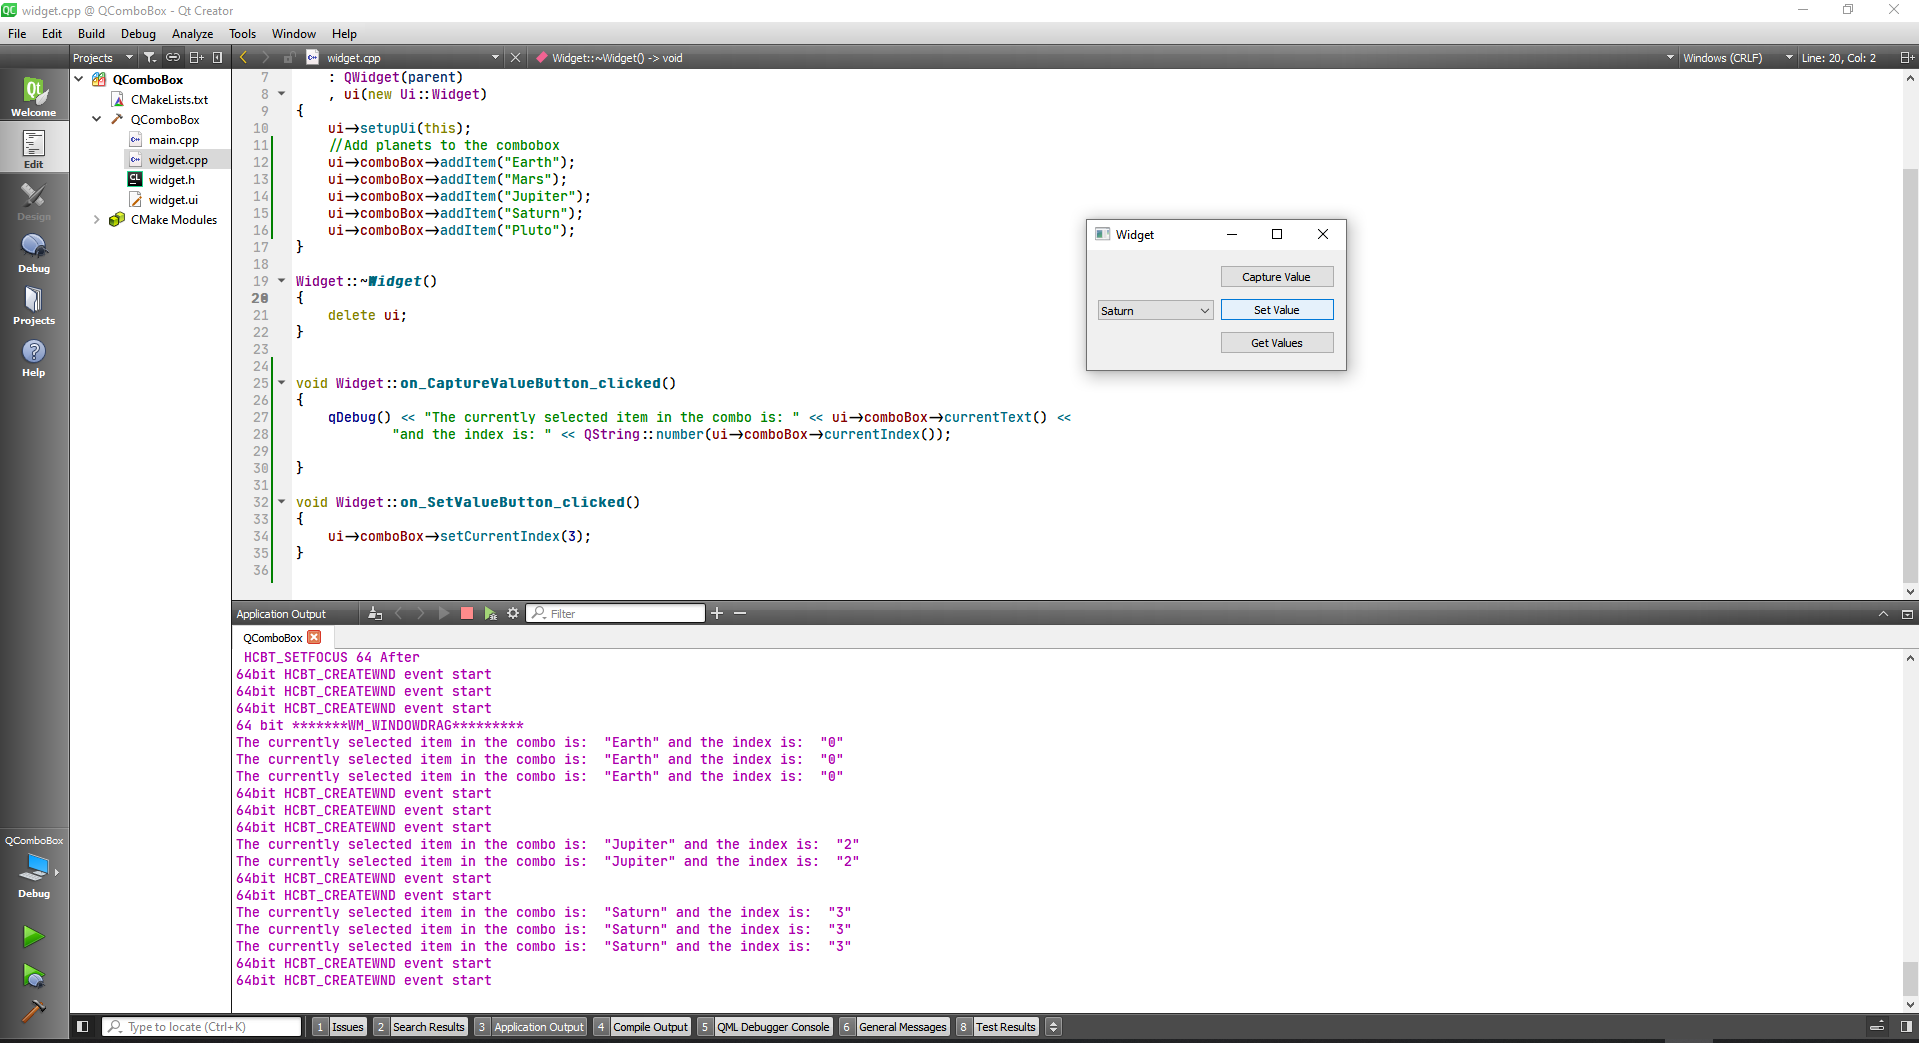
We can also Make the combobox editable with
ui->comboBox->setEditable(true);

To get the values we do:
void Widget::on_SetValueButton_2_clicked()
{
    qDebug() << "The combobox currently has " << QString::number(ui->comboBox->count()) << " Items. They are:";
    for(int i=0; i<ui->comboBox->count(); i++) {
        qDebug() << "Index " << QString::number(i) << " : " << ui->comboBox->itemText(i);
    }
}
2
3
4
5
6
7
The combobox currently has  "5"  Items. They are:
Index  "0"  :  "Earth"
Index  "1"  :  "Mars"
Index  "2"  :  "Jupiter"
Index  "3"  :  "Saturn"
Index  "4"  :  "Pluto"
2
3
4
5
6
# QListWidget Class
The QListWidget class provides an item-based list widget.
Now we are going to enter a List Widget, a vertical spacer and 3 buttons on our layout.
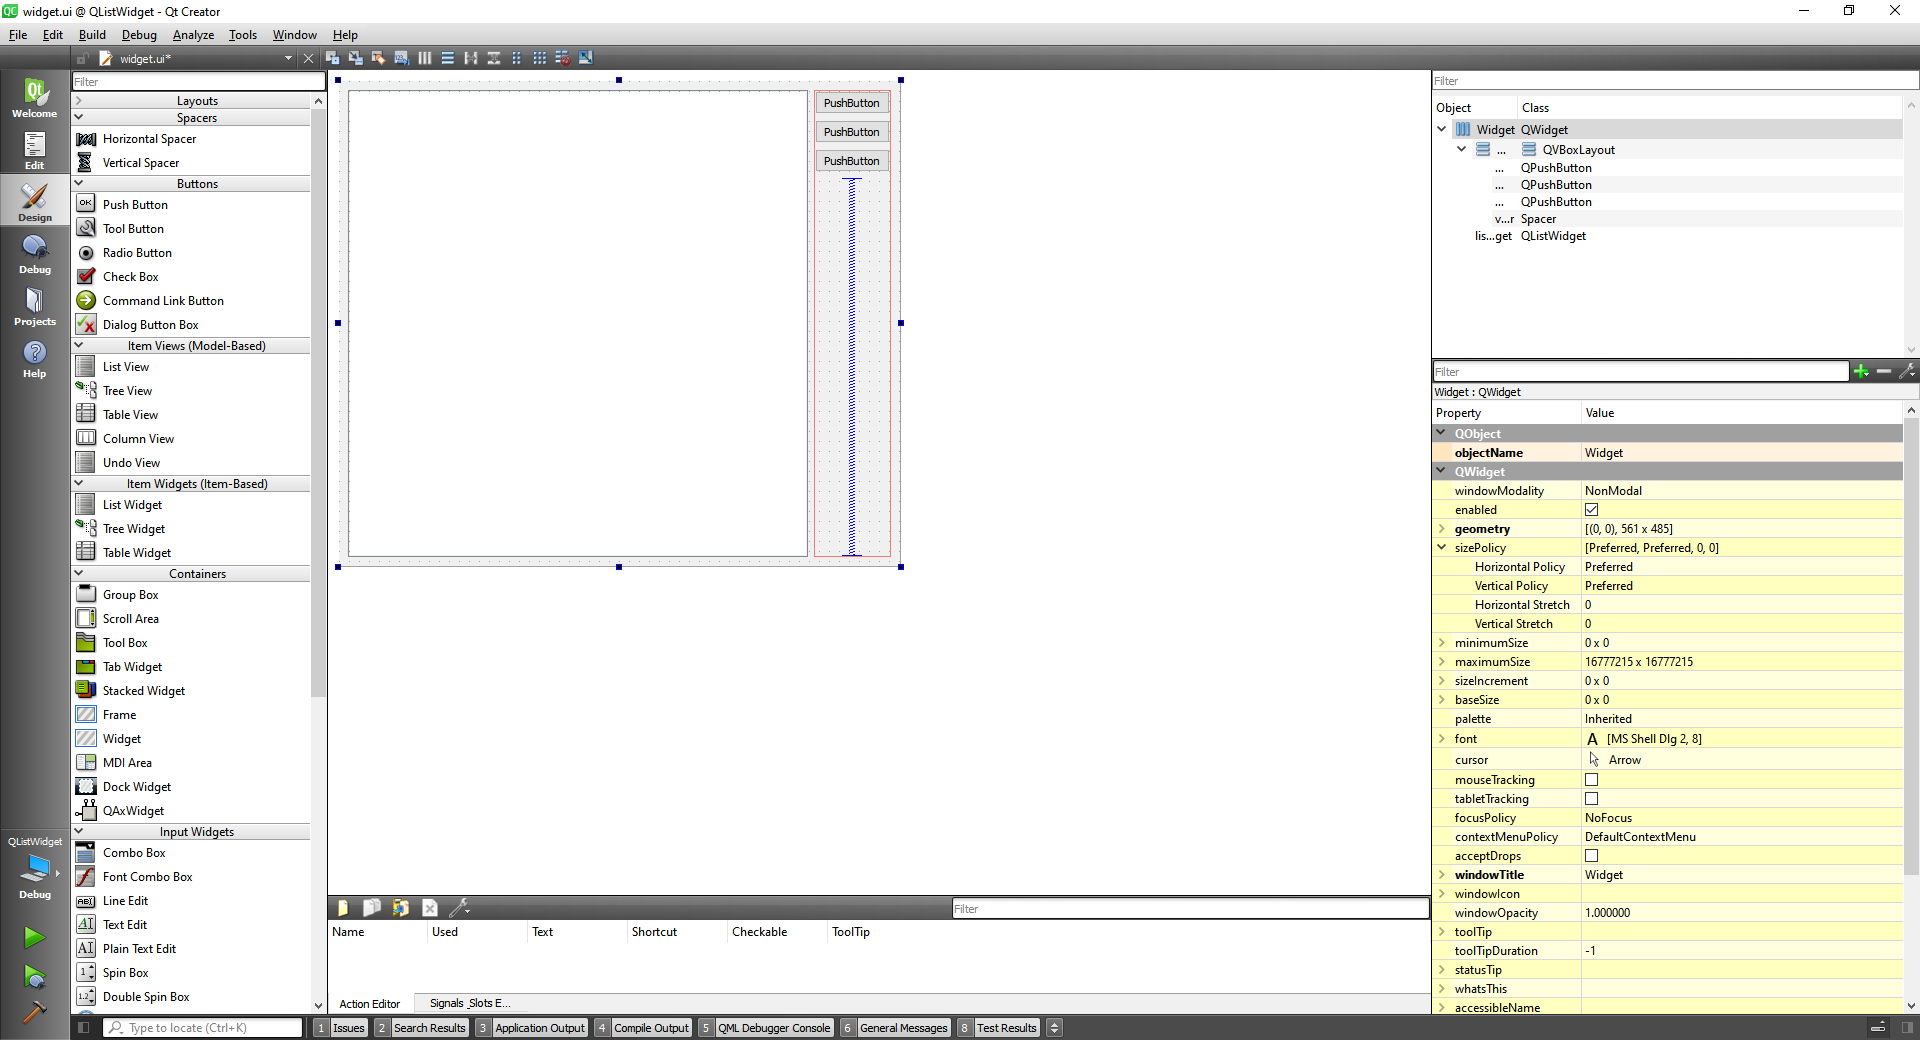
We can add items by double clicking in the ListWidget and using this box:

Or we can do it through code, as well as deleting an item:
void Widget::on_addItemButton_clicked()
{
    ui->listWidget->addItem("MyItem");
}

void Widget::on_deleteItemButton_clicked()
{
    //Delete item: use takeItem
    ui->listWidget->takeItem(ui->listWidget->currentRow());
}
2
3
4
5
6
7
8
9
10

Now to add a multiselection on the items we use at the constructor, the setSelectionMode:
Widget::Widget(QWidget *parent)
    : QWidget(parent)
    , ui(new Ui::Widget)
{
    ui->setupUi(this);
    ui->listWidget->setSelectionMode(QAbstractItemView::MultiSelection);
}
2
3
4
5
6
7
And to return the selected items we can do:
void Widget::on_selectedItemsButton_clicked()
{
    //Get the list of selected items
    QList <QListWidgetItem *> list = ui->listWidget->selectedItems();

    for(int i=0; i<list.count(); i++) {
        qDebug() << "Selected item: " << list.at(i)->text() << " , row number id: " <<
                    ui->listWidget->row(list.at(i));
    }
}
2
3
4
5
6
7
8
9
10
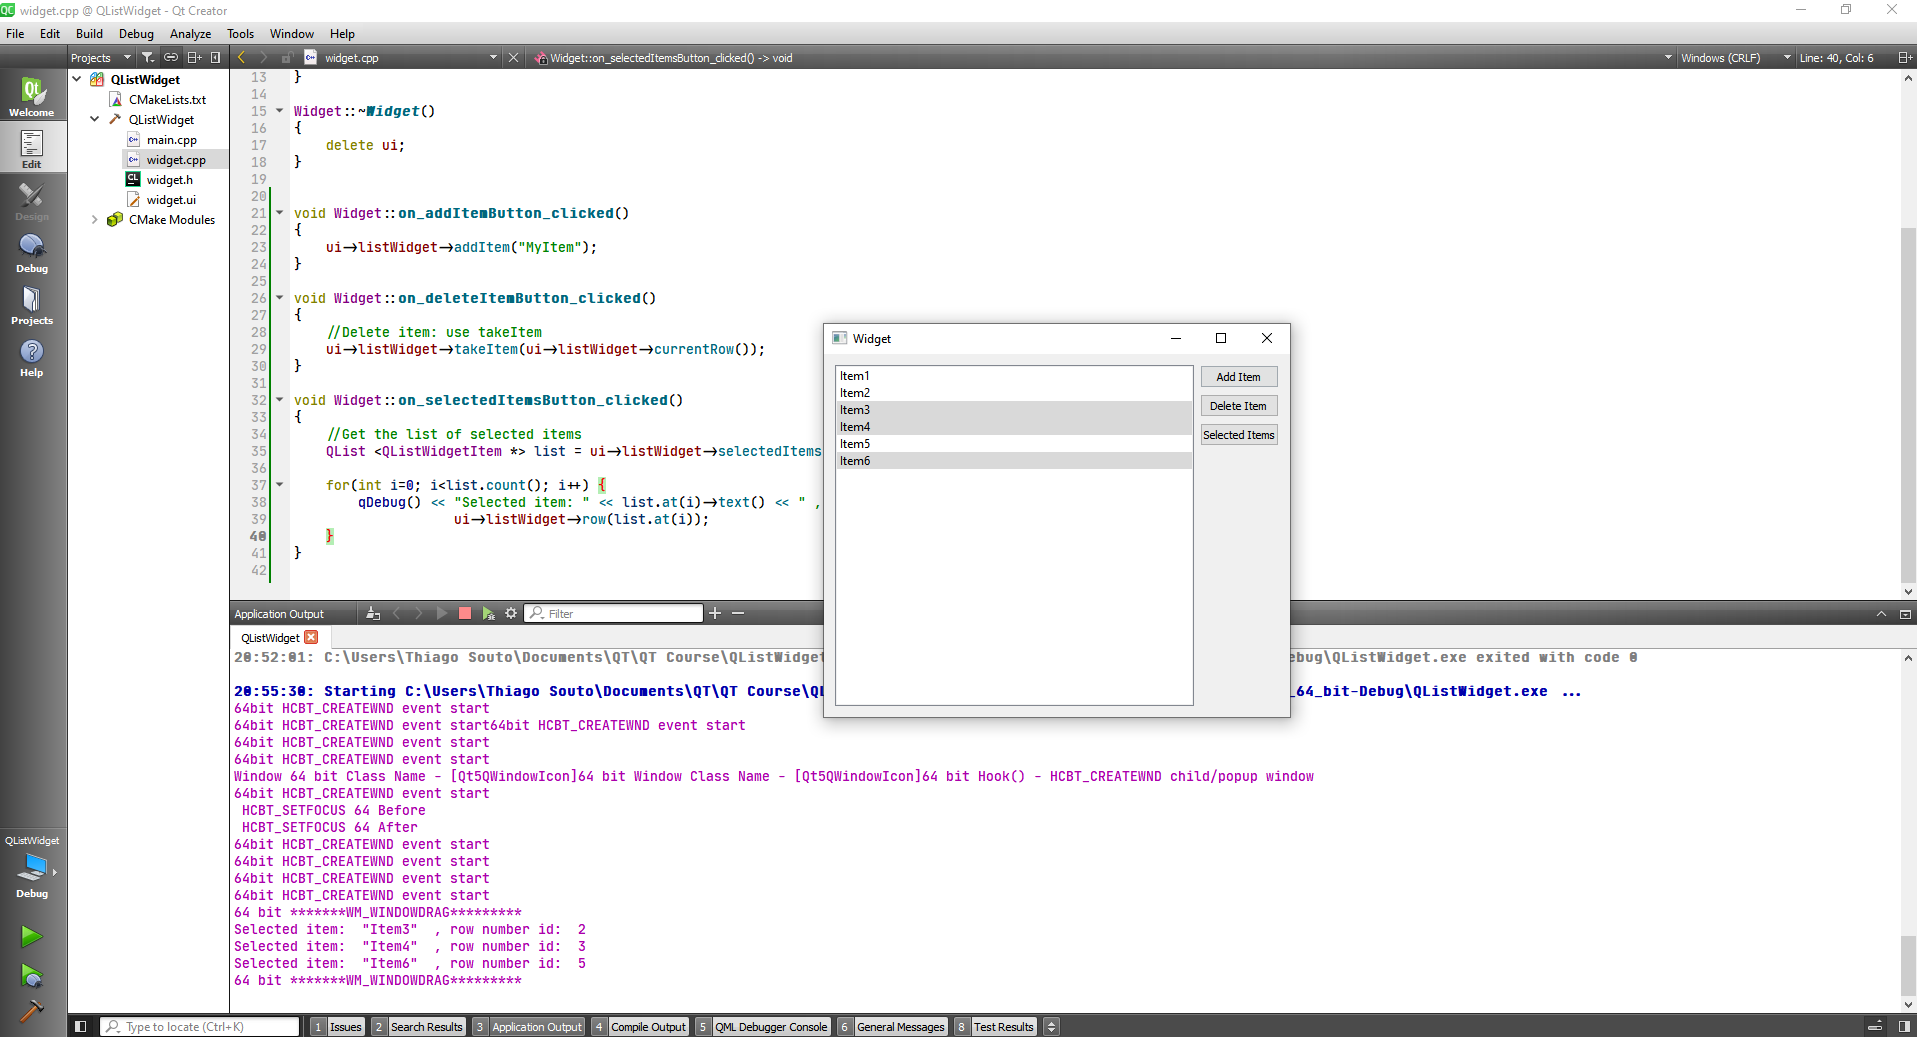
The full program:
#include "widget.h"
#include "./ui_widget.h"

#include <QDebug>


Widget::Widget(QWidget *parent)
    : QWidget(parent)
    , ui(new Ui::Widget)
{
    ui->setupUi(this);
    ui->listWidget->setSelectionMode(QAbstractItemView::MultiSelection);
}

Widget::~Widget()
{
    delete ui;
}


void Widget::on_addItemButton_clicked()
{
    ui->listWidget->addItem("MyItem");
}

void Widget::on_deleteItemButton_clicked()
{
    //Delete item: use takeItem
    ui->listWidget->takeItem(ui->listWidget->currentRow());
}

void Widget::on_selectedItemsButton_clicked()
{
    //Get the list of selected items
    QList <QListWidgetItem *> list = ui->listWidget->selectedItems();

    for(int i=0; i<list.count(); i++) {
        qDebug() << "Selected item: " << list.at(i)->text() << " , row number id: " <<
                    ui->listWidget->row(list.at(i));
    }
}
2
3
4
5
6
7
8
9
10
11
12
13
14
15
16
17
18
19
20
21
22
23
24
25
26
27
28
29
30
31
32
33
34
35
36
37
38
39
40
41
# QTabWidget Class
The QTabWidget class provides a stack of tabbed widgets.
Let's make an widget application and include two tabs, at the first one we are going to include four radio buttons, a vertical spacer, and a push button on a group box. And also change the sizePolicy for the puch button to expanding.

After setting up the layout we have:


We can add action to the button:
void Widget::on_tab1Button_clicked()
{
    qDebug() << "Tab 1 button Clicked!";
}
2
3
4
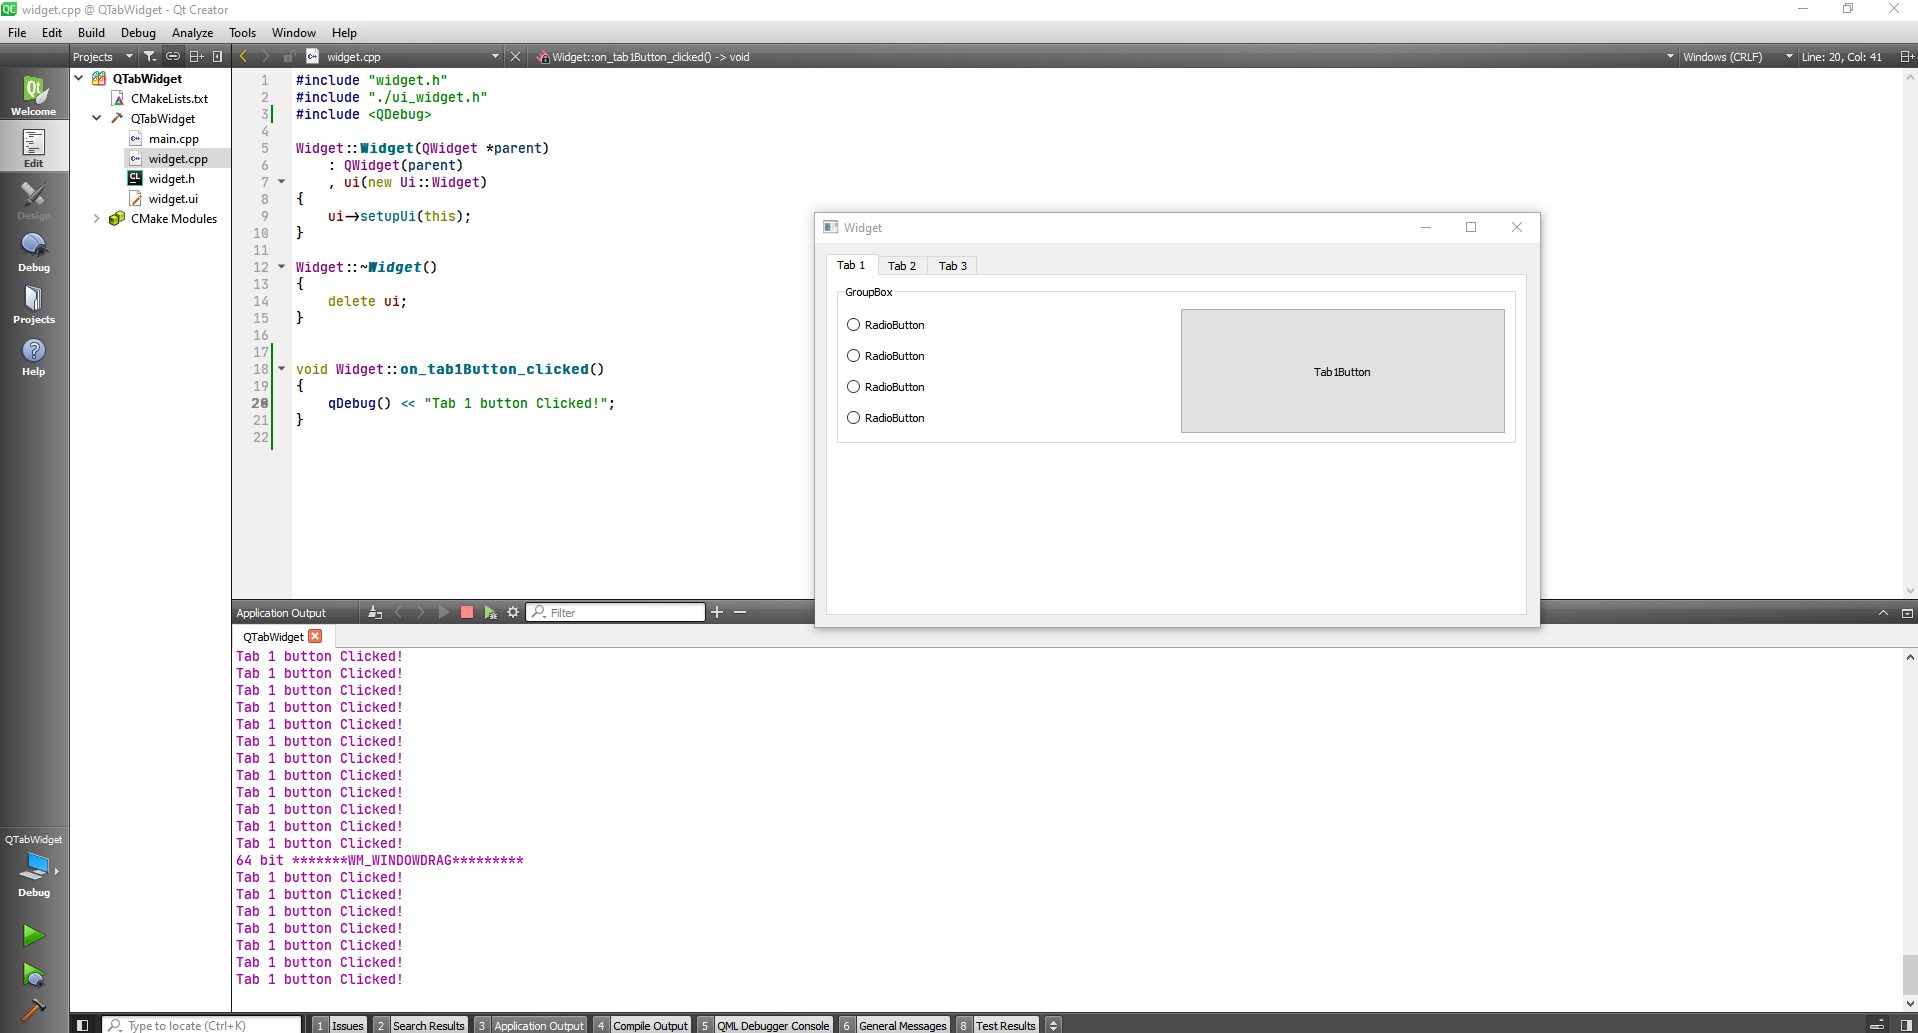
And also add tabs:
#include "widget.h"
#include "./ui_widget.h"
#include <QDebug>
#include <QVBoxLayout>

Widget::Widget(QWidget *parent)
    : QWidget(parent)
    , ui(new Ui::Widget)
{
    ui->setupUi(this);

    //Declare the widget
    QWidget * widget = new QWidget(this);

    //Declare the layout for the widget
    QVBoxLayout * layout = new QVBoxLayout();

    layout->addWidget(new QPushButton("Button1", this));
    layout->addWidget(new QPushButton("Button2", this));
    layout->addWidget(new QPushButton("Button3", this));
    QPushButton * button4 = new QPushButton("Button4", this);
    connect(button4, &QPushButton::clicked, [=](){
        qDebug() << "Button4 from custom tab clicked";
    });
    layout->addWidget(button4);
    layout->addSpacerItem(new QSpacerItem(100,200));

    //Set the layout to the widget
    widget->setLayout(layout);

    //Add the widget to the layout
    ui->tabWidget->addTab(widget, "Tab 4");
}

Widget::~Widget()
{
    delete ui;
}


void Widget::on_tab1Button_clicked()
{
    qDebug() << "Tab 1 button Clicked!";
}
2
3
4
5
6
7
8
9
10
11
12
13
14
15
16
17
18
19
20
21
22
23
24
25
26
27
28
29
30
31
32
33
34
35
36
37
38
39
40
41
42
43
44

Las thing is that you can insert the tab wherever you want.
ui->tabWidget->insertTab(1, widget, "Tab 4");

# Menus Toolbars and action
First we are going to creat a main window and add the tabs we want, then add resources and select some icons for the actions created when we add the menus.
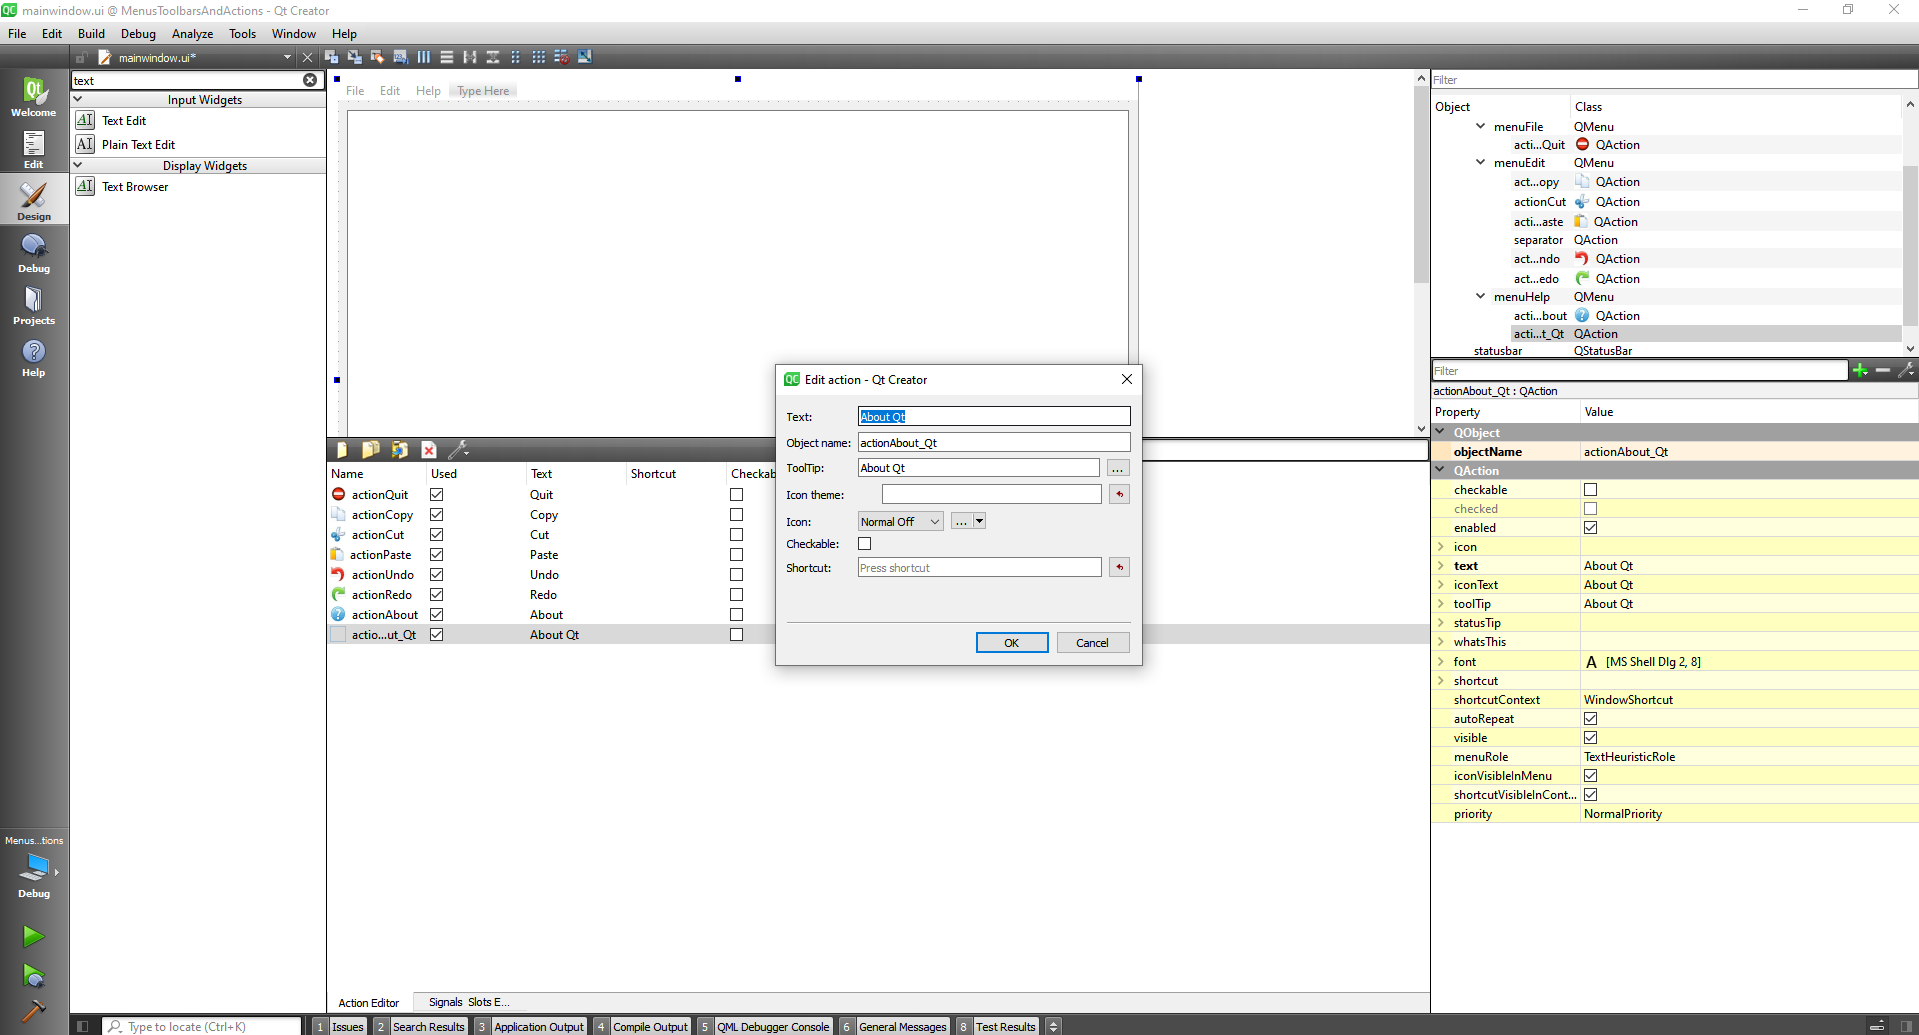
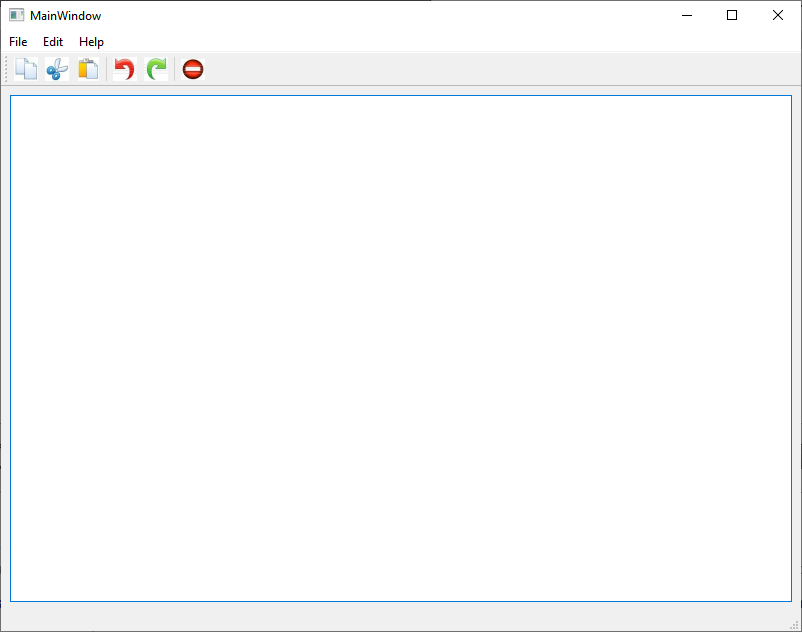
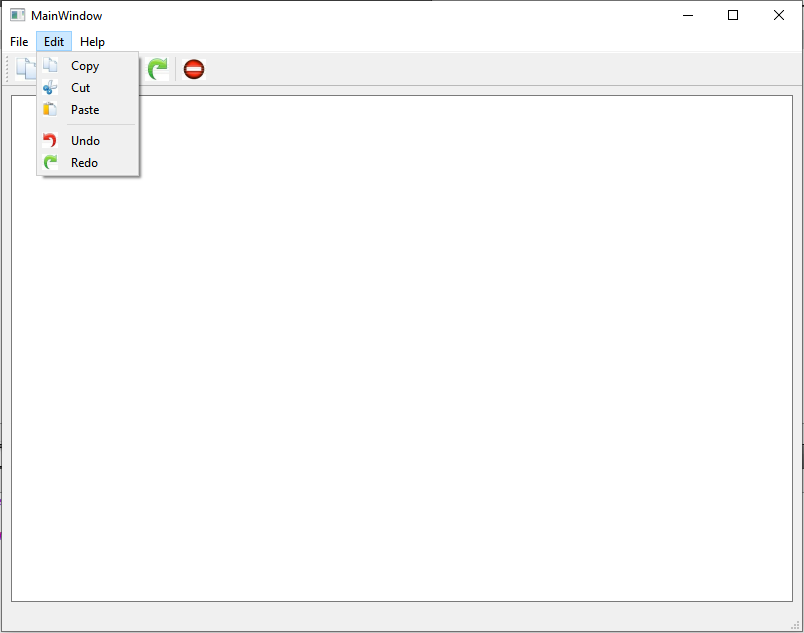
at last:
#include "mainwindow.h"
#include "./ui_mainwindow.h"
#include <QApplication>
#include <QDebug>
#include <QMessageBox>

MainWindow::MainWindow(QWidget *parent)
    : QMainWindow(parent)
    , ui(new Ui::MainWindow)
{
    ui->setupUi(this);
}

MainWindow::~MainWindow()
{
    delete ui;
}

void MainWindow::on_actionQuit_triggered()
{
    //qDebug() << "Quit action Triggered";
    QApplication::quit();
}

void MainWindow::on_actionCopy_triggered()
{
    ui->textEdit->copy();
}

void MainWindow::on_actionCut_triggered()
{
    ui->textEdit->cut();
}

void MainWindow::on_actionPaste_triggered()
{
    ui->textEdit->paste();
}

void MainWindow::on_actionUndo_triggered()
{
    ui->textEdit->undo();
}

void MainWindow::on_actionRedo_triggered()
{
    ui->textEdit->redo();
}

void MainWindow::on_actionAbout_triggered()
{
    QMessageBox::about(this, "Message", "This is a demo app to show how to use menus tool bars and actions in Qt");
}

void MainWindow::on_actionAbout_Qt_triggered()
{
    QApplication::aboutQt();
}
2
3
4
5
6
7
8
9
10
11
12
13
14
15
16
17
18
19
20
21
22
23
24
25
26
27
28
29
30
31
32
33
34
35
36
37
38
39
40
41
42
43
44
45
46
47
48
49
50
51
52
53
54
55
56
57
58
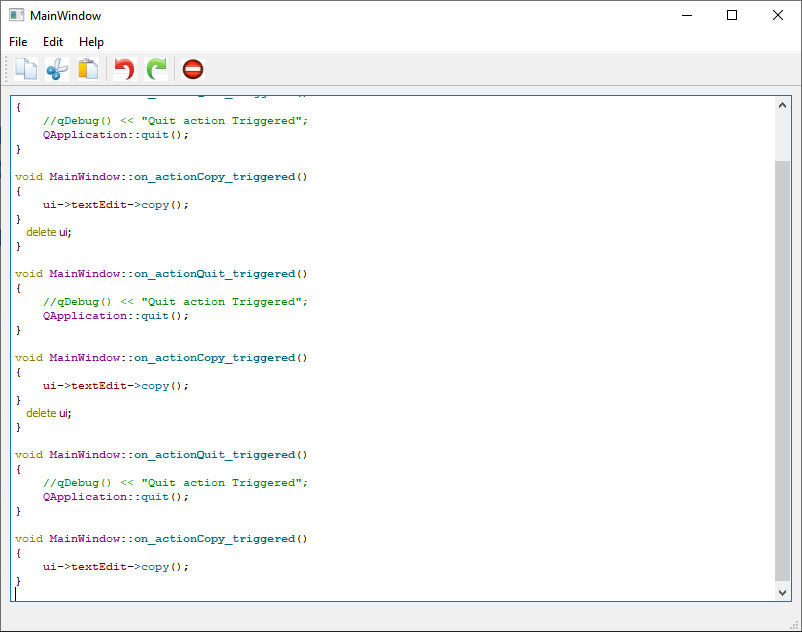
To finalize we are going to quit in 5 seconds with Qtimer.
#ifndef MAINWINDOW_H
#define MAINWINDOW_H

#include <QMainWindow>

QT_BEGIN_NAMESPACE
namespace Ui { class MainWindow; }
QT_END_NAMESPACE

class MainWindow : public QMainWindow
{
    Q_OBJECT

public:
    MainWindow(QWidget *parent = nullptr);
    ~MainWindow();

private slots:
    void on_actionQuit_triggered();

    void on_actionCopy_triggered();

    void on_actionCut_triggered();

    void on_actionPaste_triggered();

    void on_actionUndo_triggered();

    void on_actionRedo_triggered();

    void on_actionAbout_triggered();

    void on_actionAbout_Qt_triggered();

    void quitApp();

private:
    Ui::MainWindow *ui;
};
#endif // MAINWINDOW_H
2
3
4
5
6
7
8
9
10
11
12
13
14
15
16
17
18
19
20
21
22
23
24
25
26
27
28
29
30
31
32
33
34
35
36
37
38
39
40
#include "mainwindow.h"
#include "./ui_mainwindow.h"
#include <QApplication>
#include <QDebug>
#include <QMessageBox>
#include <QTimer>

MainWindow::MainWindow(QWidget *parent)
    : QMainWindow(parent)
    , ui(new Ui::MainWindow)
{
    ui->setupUi(this);
}

MainWindow::~MainWindow()
{
    delete ui;
}

void MainWindow::on_actionQuit_triggered()
{
    //qDebug() << "Quit action Triggered";
    //QApplication::quit();
    statusBar()->showMessage("App will be killed in 3 seconds...");
    QTimer::singleShot(3000, this, SLOT(quitApp()));
}

void MainWindow::on_actionCopy_triggered()
{
    ui->textEdit->copy();
}

void MainWindow::on_actionCut_triggered()
{
    ui->textEdit->cut();
}

void MainWindow::on_actionPaste_triggered()
{
    ui->textEdit->paste();
}

void MainWindow::on_actionUndo_triggered()
{
    ui->textEdit->undo();
}

void MainWindow::on_actionRedo_triggered()
{
    ui->textEdit->redo();
}

void MainWindow::on_actionAbout_triggered()
{
    QMessageBox::about(this, "Message", "This is a demo app to show how to use menus tool bars and actions in Qt");
}

void MainWindow::on_actionAbout_Qt_triggered()
{
    QApplication::aboutQt();
}

void MainWindow::quitApp()
{
    QApplication::quit();
}
2
3
4
5
6
7
8
9
10
11
12
13
14
15
16
17
18
19
20
21
22
23
24
25
26
27
28
29
30
31
32
33
34
35
36
37
38
39
40
41
42
43
44
45
46
47
48
49
50
51
52
53
54
55
56
57
58
59
60
61
62
63
64
65
66
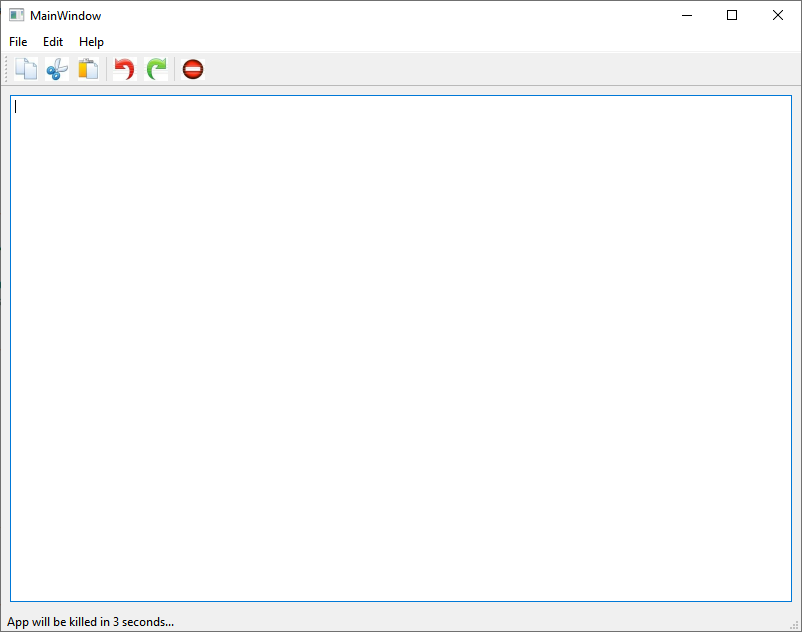
# QDialog class
The QDialog class is the base class of dialog windows.
A dialog window is a top-level window mostly used for short-term tasks and brief communications with the user. QDialogs may be modal or modeless. QDialogs can provide a return value, and they can have default buttons. QDialogs can also have a QSizeGrip in their lower-right corner, using setSizeGripEnabled().
Note that QDialog (and any other widget that has type Qt::Dialog) uses the parent widget slightly differently from other classes in Qt. A dialog is always a top-level widget, but if it has a parent, its default location is centered on top of the parent's top-level widget (if it is not top-level itself). It will also share the parent's taskbar entry.
Use the overload of the QWidget::setParent() function to change the ownership of a QDialog widget. This function allows you to explicitly set the window flags of the reparented widget; using the overloaded function will clear the window flags specifying the window-system properties for the widget (in particular it will reset the Qt::Dialog flag).
Note: The parent relationship of the dialog does not imply that the dialog will always be stacked on top of the parent window. To ensure that the dialog is always on top, make the dialog modal. This also applies for child windows of the dialog itself. To ensure that child windows of the dialog stay on top of the dialog, make the child windows modal as well.
Now we are going to create a QWidget application and add another Qt Designer Form Class.
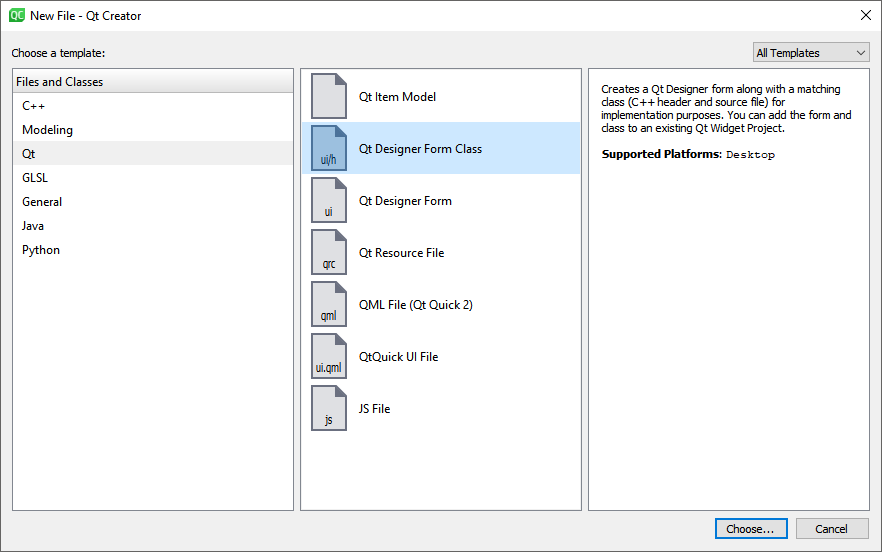
With this we have created a QDialog. We can confirm by looking at the botton right corner and see the Qdialog options:
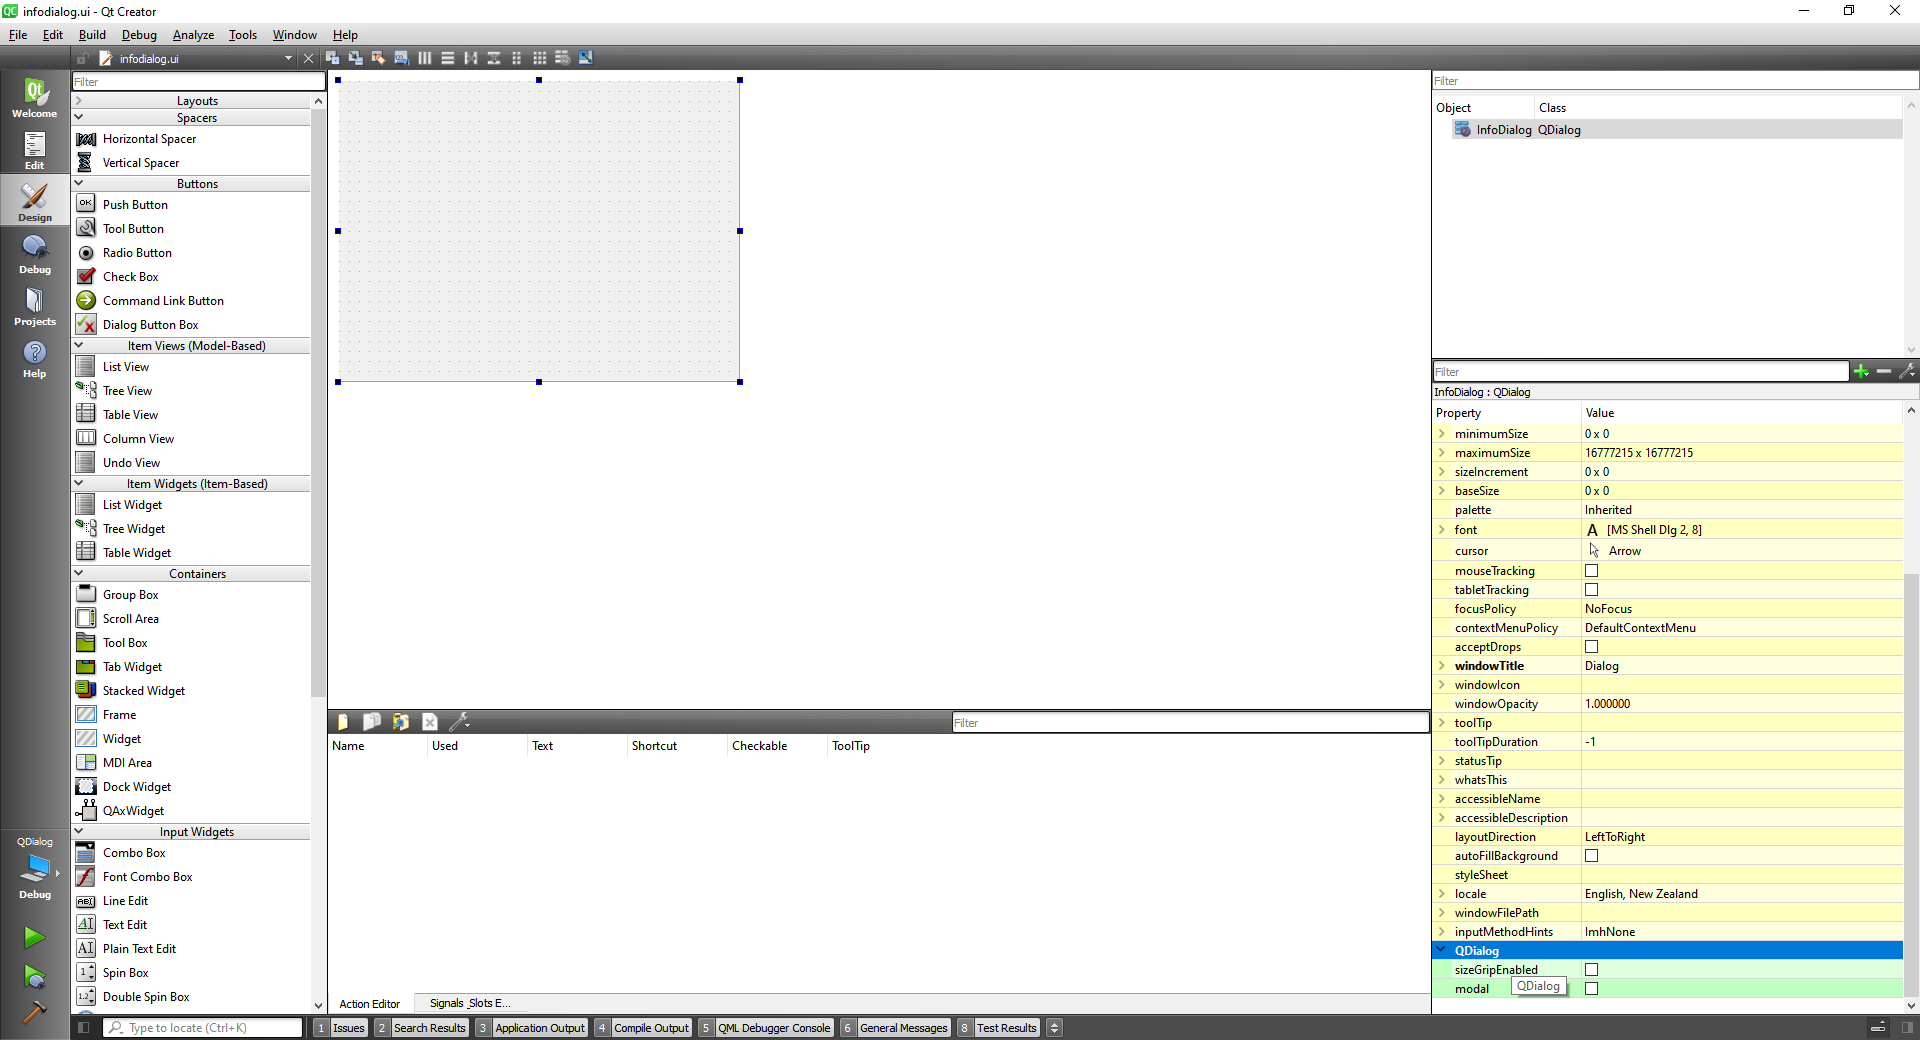
Or in the program Itself:
infoDialog.cpp
#ifndef INFODIALOG_H
#define INFODIALOG_H

#include <QDialog>

namespace Ui {
class InfoDialog;
}

class InfoDialog : public QDialog
{
    Q_OBJECT

public:
    explicit InfoDialog(QWidget *parent = nullptr);
    ~InfoDialog();

private:
    Ui::InfoDialog *ui;
};

#endif // INFODIALOG_H
2
3
4
5
6
7
8
9
10
11
12
13
14
15
16
17
18
19
20
21
22
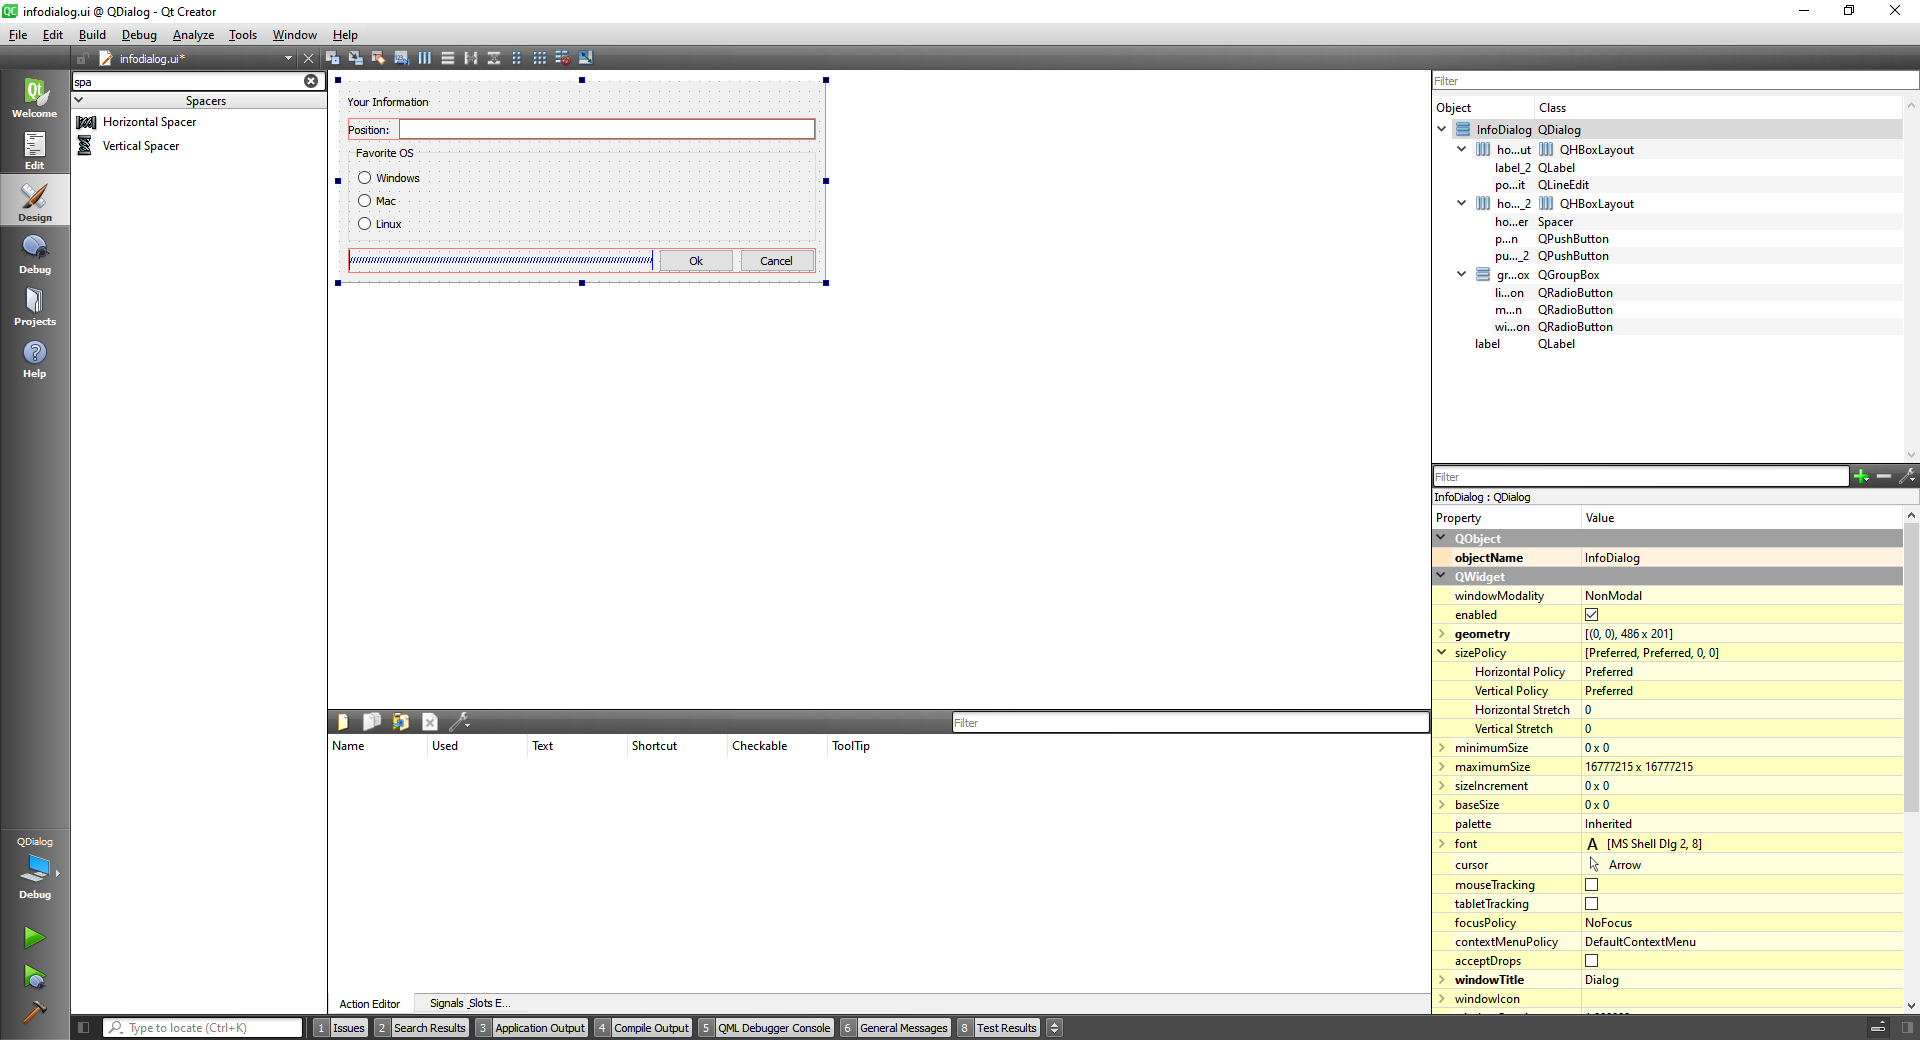
Now we are going to creat a button on the main ui and link it to the dialog we've just created.
#include "widget.h"
#include "./ui_widget.h"
#include "infodialog.h"

Widget::Widget(QWidget *parent)
    : QWidget(parent)
    , ui(new Ui::Widget)
{
    ui->setupUi(this);
}

Widget::~Widget()
{
    delete ui;
}


void Widget::on_provideInfoButton_clicked()
{
    InfoDialog * dialog = new InfoDialog(this);

    dialog->exec();
}
2
3
4
5
6
7
8
9
10
11
12
13
14
15
16
17
18
19
20
21
22
23
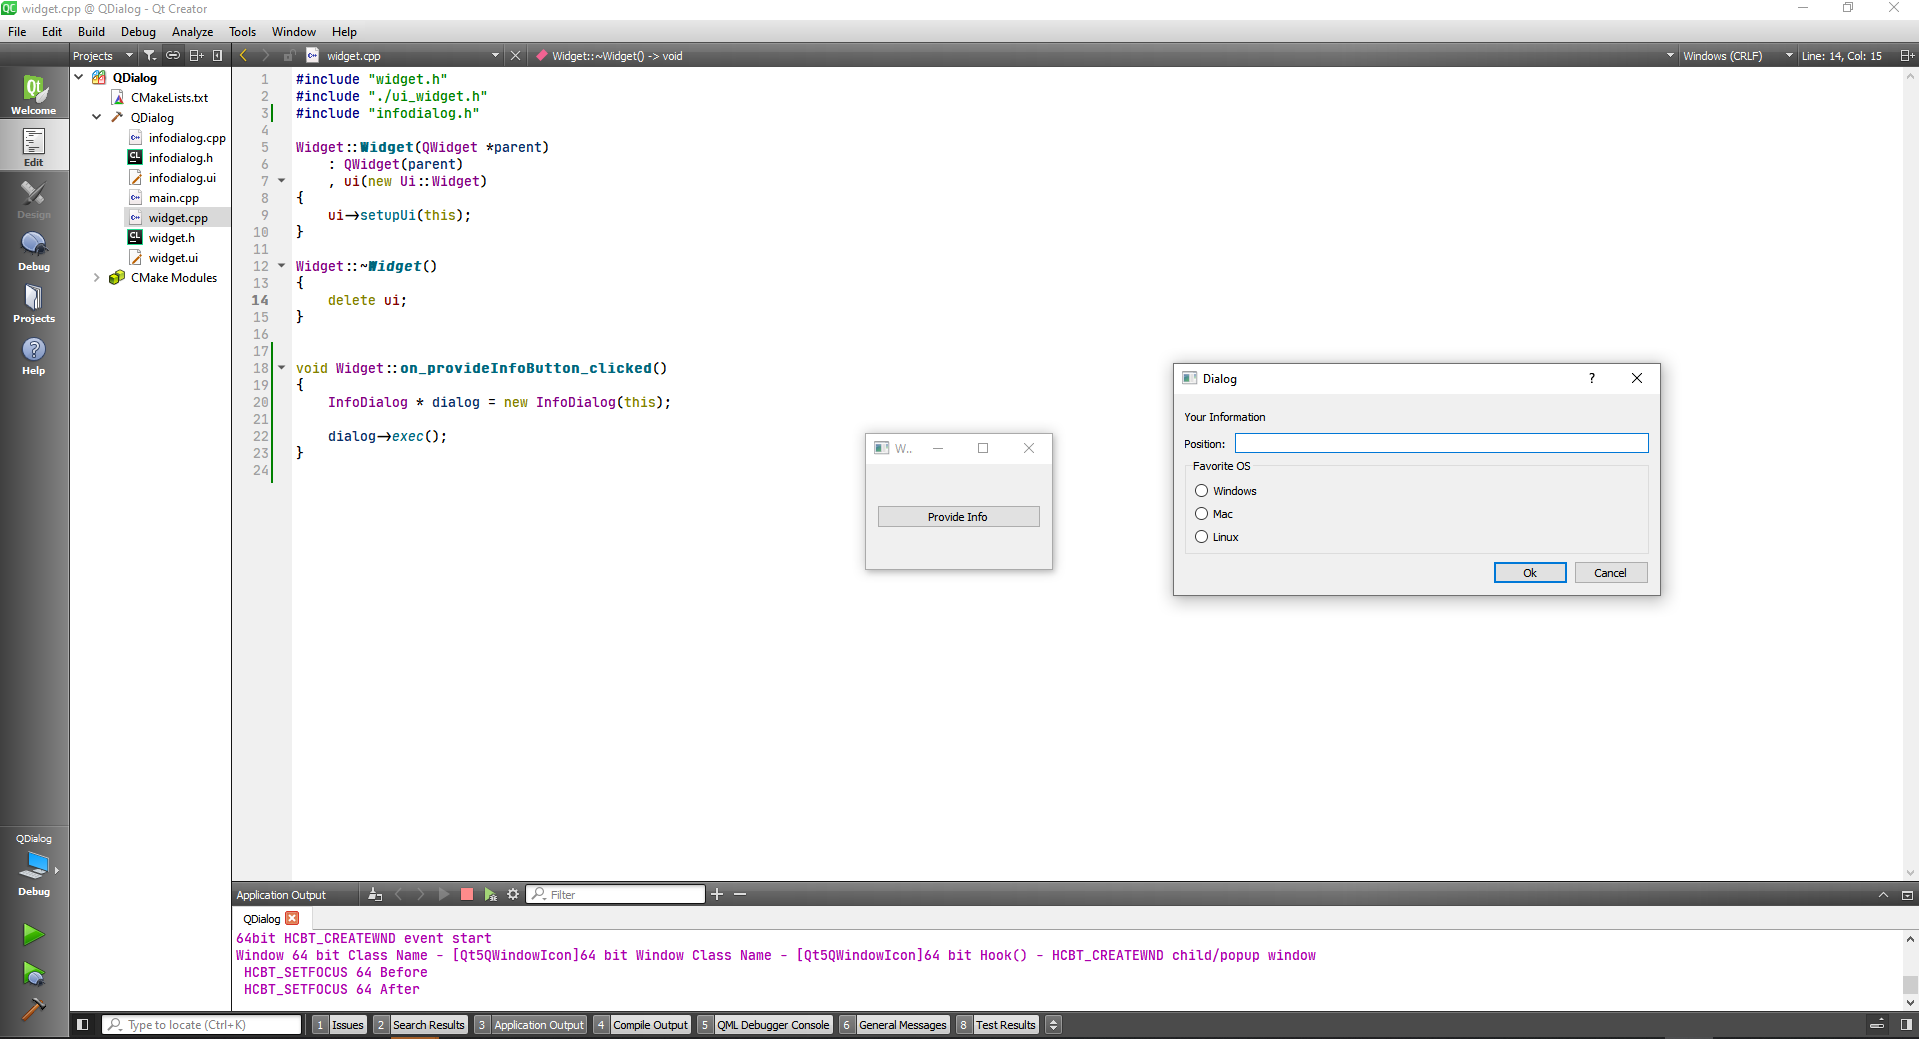
Now Let's capture when the dialog's buttons are clicked. for this we have to define to strings so we can store our information.
infodialog.h
#ifndef INFODIALOG_H
#define INFODIALOG_H

#include <QDialog>

namespace Ui {
class InfoDialog;
}

class InfoDialog : public QDialog
{
    Q_OBJECT

public:
    explicit InfoDialog(QWidget *parent = nullptr);
    ~InfoDialog();

private slots:
    void on_pushButton_clicked();

    void on_pushButton_2_clicked();

private:
    QString position;
    QString favoriteOs;
    Ui::InfoDialog *ui;
};

#endif // INFODIALOG_H
2
3
4
5
6
7
8
9
10
11
12
13
14
15
16
17
18
19
20
21
22
23
24
25
26
27
28
29
infodialog.cpp
#include "infodialog.h"
#include "ui_infodialog.h"

InfoDialog::InfoDialog(QWidget *parent) :
    QDialog(parent),
    ui(new Ui::InfoDialog)
{
    ui->setupUi(this);
}

InfoDialog::~InfoDialog()
{
    delete ui;
}

void InfoDialog::on_pushButton_clicked()
{
    //Clooect Information
    QString userPosition = ui->positionLineEdit->text();
    if(!userPosition.isEmpty()) {
        position = userPosition;

        if(ui->windowsRadioButton->isChecked()) {
            favoriteOs = "Windows";
        }
        if(ui->macRadioButton->isChecked()) {
            favoriteOs = "Mac";
        }
        if(ui->linuxRadioButton->isChecked()) {
            favoriteOs = "Linux";
        }
    }

    //Accept the dialog
    accept();
}

void InfoDialog::on_pushButton_2_clicked()
{
    //
    reject();
}
2
3
4
5
6
7
8
9
10
11
12
13
14
15
16
17
18
19
20
21
22
23
24
25
26
27
28
29
30
31
32
33
34
35
36
37
38
39
40
41
42
With that done we can check if the user accepted the dialog.
widget.cpp
#include "widget.h"
#include "./ui_widget.h"
#include "infodialog.h"
#include <QDebug>

Widget::Widget(QWidget *parent)
    : QWidget(parent)
    , ui(new Ui::Widget)
{
    ui->setupUi(this);
}

Widget::~Widget()
{
    delete ui;
}


void Widget::on_provideInfoButton_clicked()
{
    InfoDialog * dialog = new InfoDialog(this);

    int ret = dialog->exec();

    if(ret==QDialog::Accepted){
        qDebug() << "Dialog accepted";
    }

    if(ret==QDialog::Rejected){
        qDebug() << "Dialog rejected";
    }
}
2
3
4
5
6
7
8
9
10
11
12
13
14
15
16
17
18
19
20
21
22
23
24
25
26
27
28
29
30
31
32
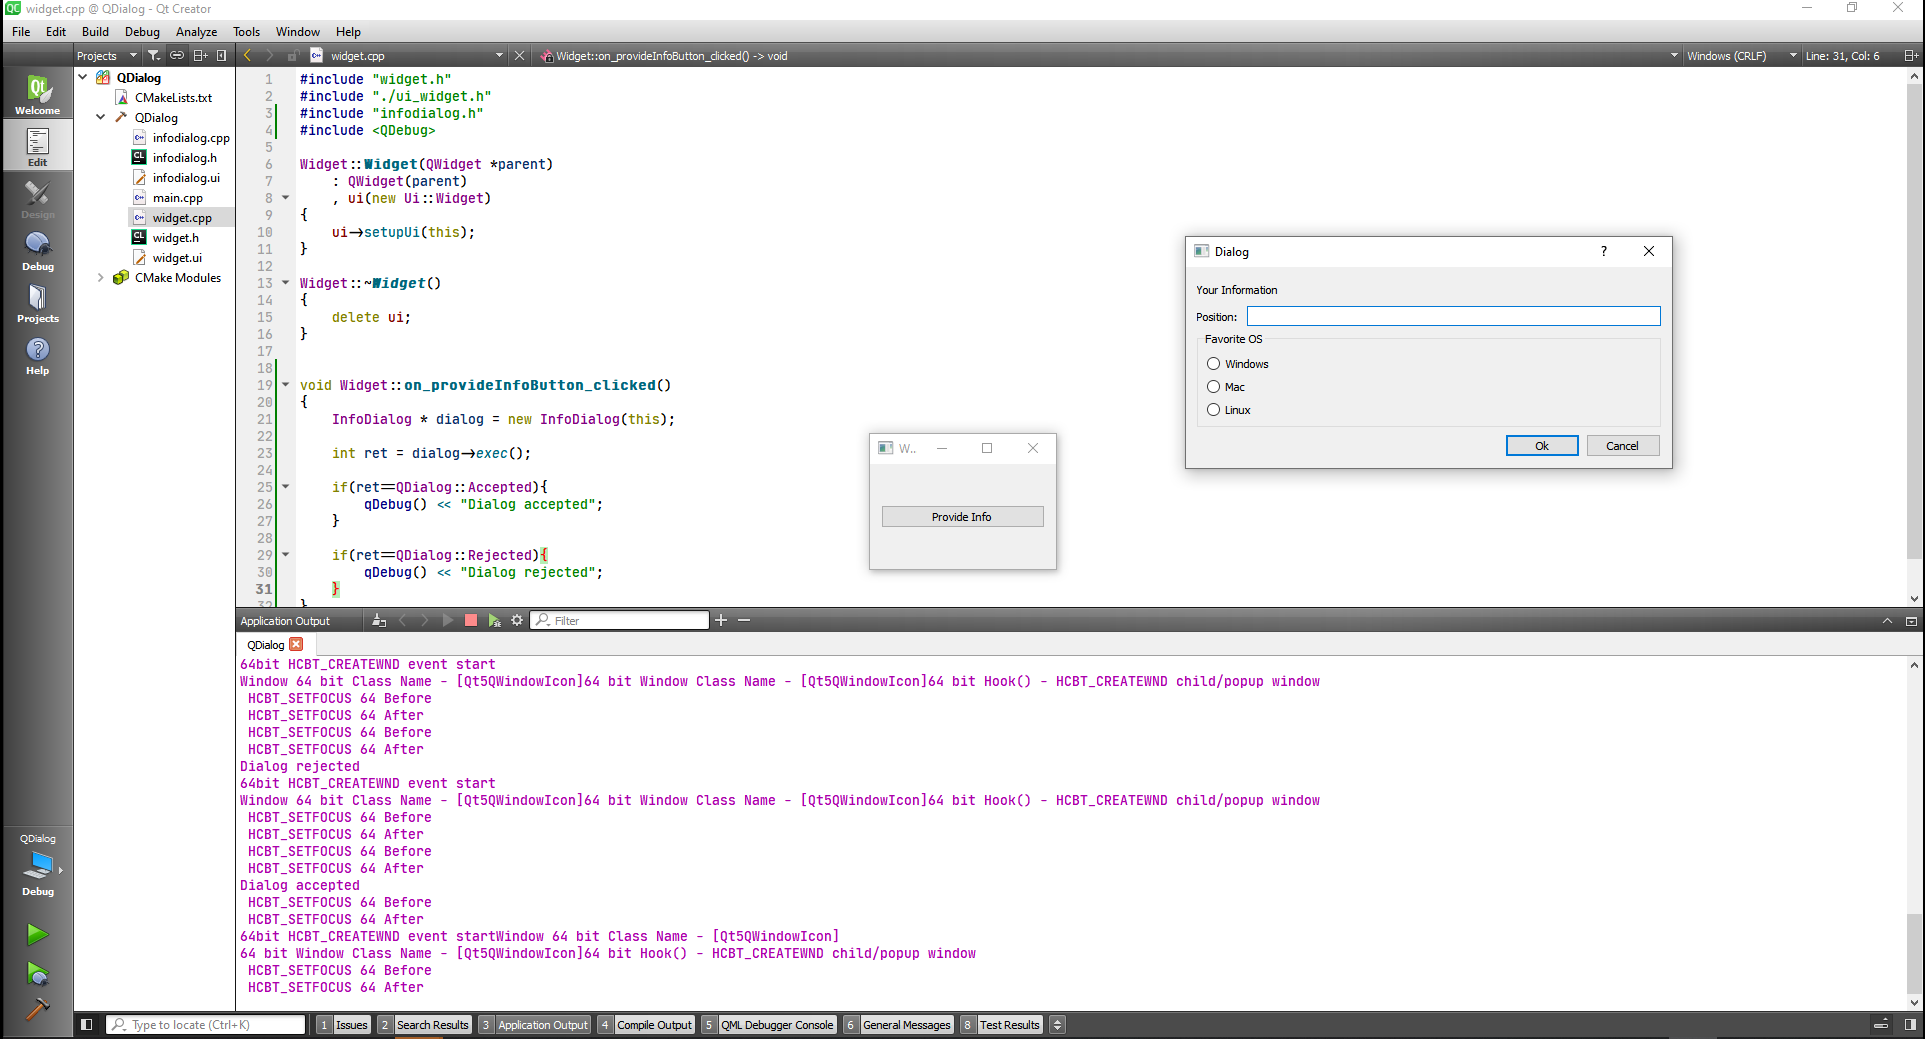
Now we can collect the information on the Dialog.
We can add a Getter to get the information from the variables favoriteOs and position. By right clicking Refactor on the variable and choosing Create Getter.
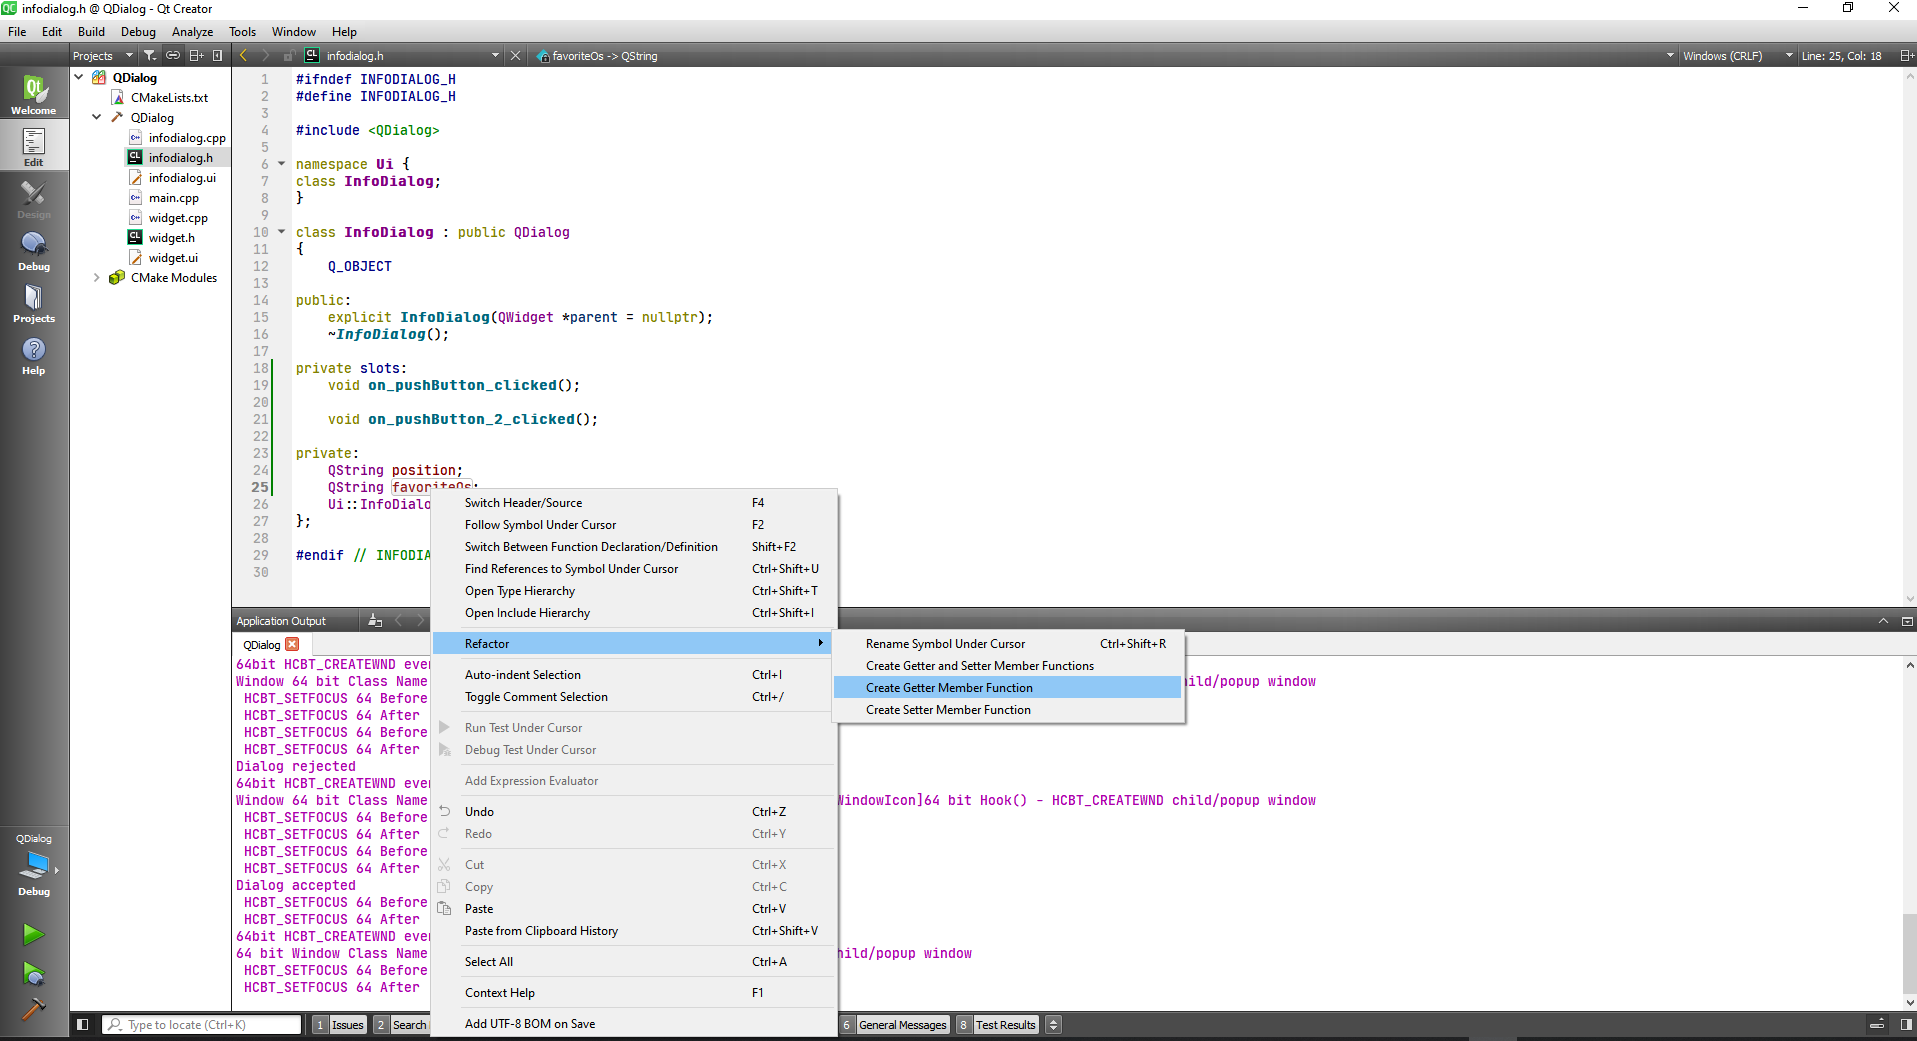
#ifndef INFODIALOG_H
#define INFODIALOG_H

#include <QDialog>

namespace Ui {
class InfoDialog;
}

class InfoDialog : public QDialog
{
    Q_OBJECT

public:
    explicit InfoDialog(QWidget *parent = nullptr);
    ~InfoDialog();

    QString getFavoriteOs() const;

    QString getPosition() const;

private slots:
    void on_pushButton_clicked();

    void on_pushButton_2_clicked();

private:
    QString position;
    QString favoriteOs;
    Ui::InfoDialog *ui;
};

#endif // INFODIALOG_H
2
3
4
5
6
7
8
9
10
11
12
13
14
15
16
17
18
19
20
21
22
23
24
25
26
27
28
29
30
31
32
33
Now we can call the methods and store in local variables at widget.cpp.
#include "widget.h"
#include "./ui_widget.h"
#include "infodialog.h"
#include <QDebug>

Widget::Widget(QWidget *parent)
    : QWidget(parent)
    , ui(new Ui::Widget)
{
    ui->setupUi(this);
}

Widget::~Widget()
{
    delete ui;
}


void Widget::on_provideInfoButton_clicked()
{
    InfoDialog * dialog = new InfoDialog(this);

    int ret = dialog->exec();

    if(ret==QDialog::Accepted){
        QString position = dialog->getPosition();
        QString os = dialog->getFavoriteOs();

        qDebug() << "Dialog accepted, position is: " << position << "Favorite OS is: " << os;
    }

    if(ret==QDialog::Rejected){
        qDebug() << "Dialog rejected";
    }
}
2
3
4
5
6
7
8
9
10
11
12
13
14
15
16
17
18
19
20
21
22
23
24
25
26
27
28
29
30
31
32
33
34
35
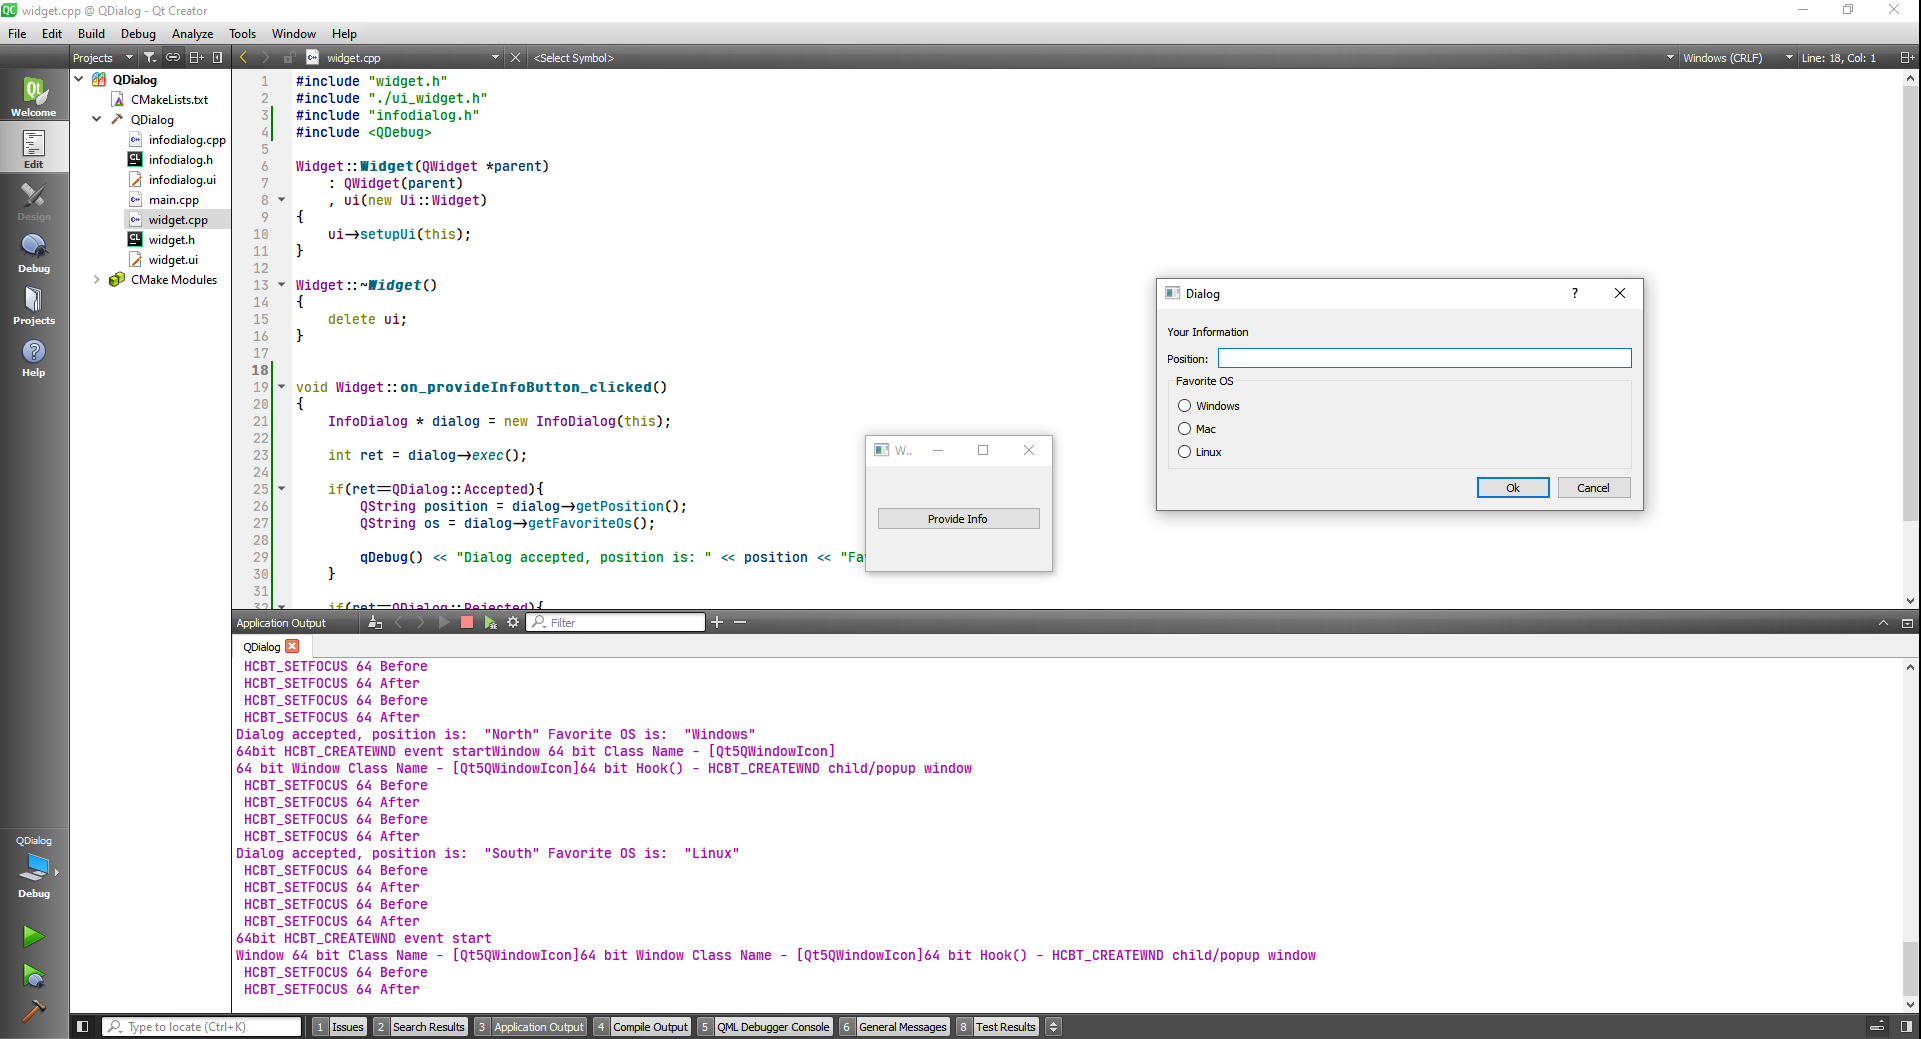
Also we can add a label to the widget interface and display the result.
#include "widget.h"
#include "./ui_widget.h"
#include "infodialog.h"
#include <QDebug>

Widget::Widget(QWidget *parent)
    : QWidget(parent)
    , ui(new Ui::Widget)
{
    ui->setupUi(this);
}

Widget::~Widget()
{
    delete ui;
}


void Widget::on_provideInfoButton_clicked()
{
    InfoDialog * dialog = new InfoDialog(this);

    int ret = dialog->exec();

    if(ret==QDialog::Accepted){
        QString position = dialog->getPosition();
        QString os = dialog->getFavoriteOs();

        qDebug() << "Dialog accepted, position is: " << position << "Favorite OS is: " << os;
        ui->infoLabel->setText("Your position is: " + position + " and your favorite OS is: " + os);
    }

    if(ret==QDialog::Rejected){
        qDebug() << "Dialog rejected";
    }
}
2
3
4
5
6
7
8
9
10
11
12
13
14
15
16
17
18
19
20
21
22
23
24
25
26
27
28
29
30
31
32
33
34
35
36

And we can also wrap the label text, by checking the workWrap option.

Now let's explore the non mode dialog. Although to capture the result we have to connect slots to some signals.
#include "widget.h"
#include "./ui_widget.h"
#include "infodialog.h"
#include <QDebug>

Widget::Widget(QWidget *parent)
    : QWidget(parent)
    , ui(new Ui::Widget)
{
    ui->setupUi(this);
}

Widget::~Widget()
{
    delete ui;
}


void Widget::on_provideInfoButton_clicked()
{
    InfoDialog * dialog = new InfoDialog(this);

    //Show the dialog non Modal
    connect(dialog, &InfoDialog::accepted, [=](){

        QString position = dialog->getPosition();
        QString os = dialog->getFavoriteOs();

        qDebug() << "Dialog accepted, position is: " << position << "Favorite OS is: " << os;
        ui->infoLabel->setText("Your position is: " + position + " and your favorite OS is: " + os);

    });

    connect(dialog, &InfoDialog::rejected, [=](){
        qDebug() << "Dialog rejected";
    });

    //Show the dialog
    dialog->show();
    dialog->raise();
    dialog->activateWindow();
}
2
3
4
5
6
7
8
9
10
11
12
13
14
15
16
17
18
19
20
21
22
23
24
25
26
27
28
29
30
31
32
33
34
35
36
37
38
39
40
41
42
After doing this we can move the parent widget and even open more dialog boxes.
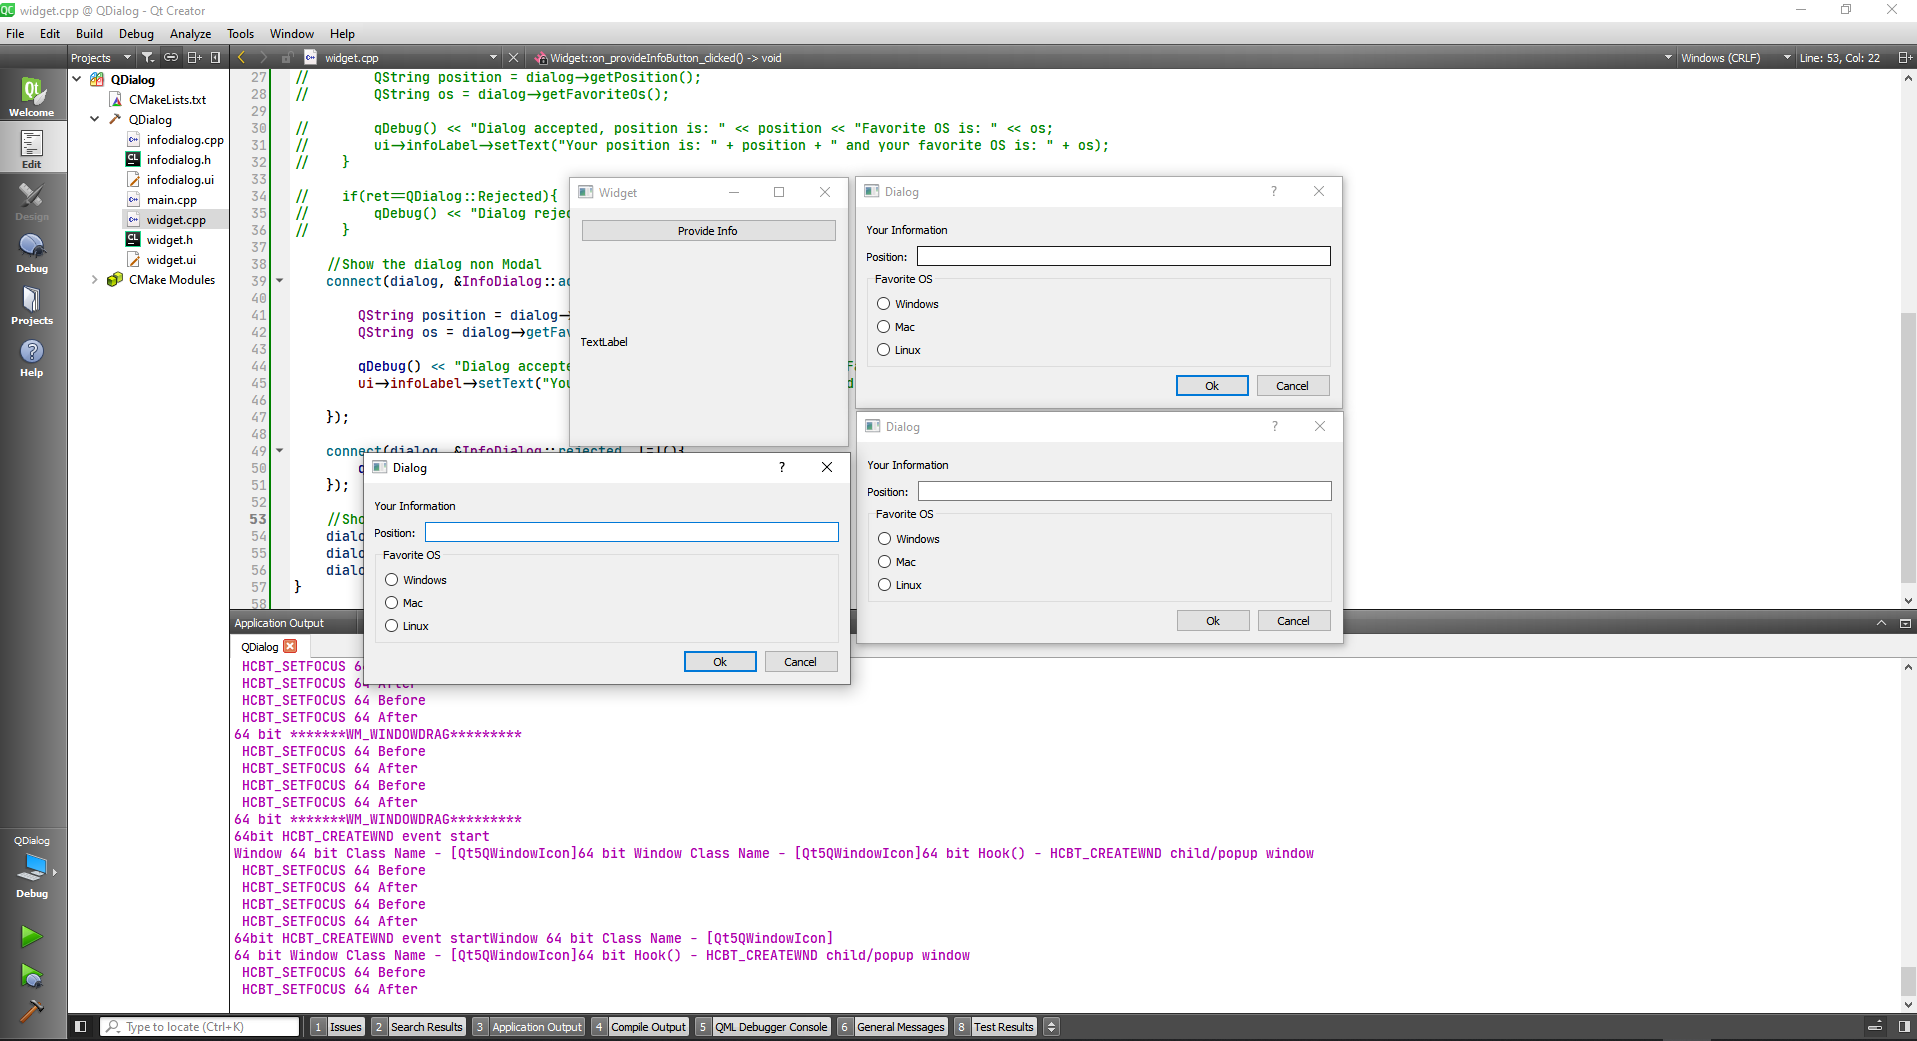
Last thing we are going to get rid of the question mark in the top of the dialog. We can do that by adding to the infodialog.cpp file the following commands.
#include "infodialog.h"
#include "ui_infodialog.h"

InfoDialog::InfoDialog(QWidget *parent) :
    QDialog(parent, Qt::WindowSystemMenuHint | Qt::WindowTitleHint),
    ui(new Ui::InfoDialog)
{
    ui->setupUi(this);
}
.
.
.
2
3
4
5
6
7
8
9
10
11
12

# QDialogButtonBox
The QDialogButtonBox class is a widget that presents buttons in a layout that is appropriate to the current widget style.
First we creat a QWidget application and add another ui form with the Qt Designer Form Class option.
TIP
Dont forget to add to the CMake file:
cmake_minimum_required(VERSION 3.5)

project(QDialogButtonBox LANGUAGES CXX)

set(CMAKE_INCLUDE_CURRENT_DIR ON)

set(CMAKE_AUTOUIC ON)
set(CMAKE_AUTOMOC ON)
set(CMAKE_AUTORCC ON)

set(CMAKE_CXX_STANDARD 11)
set(CMAKE_CXX_STANDARD_REQUIRED ON)

# QtCreator supports the following variables for Android, which are identical to qmake Android variables.
# Check http://doc.qt.io/qt-5/deployment-android.html for more information.
# They need to be set before the find_package(Qt5 ...) call.

#if(ANDROID)
#    set(ANDROID_PACKAGE_SOURCE_DIR "${CMAKE_CURRENT_SOURCE_DIR}/android")
#    if (ANDROID_ABI STREQUAL "armeabi-v7a")
#        set(ANDROID_EXTRA_LIBS
#            ${CMAKE_CURRENT_SOURCE_DIR}/path/to/libcrypto.so
#            ${CMAKE_CURRENT_SOURCE_DIR}/path/to/libssl.so)
#    endif()
#endif()

find_package(Qt5 COMPONENTS Widgets REQUIRED)

if(ANDROID)
  add_library(QDialogButtonBox SHARED
    main.cpp
    widget.cpp
    widget.h
    widget.ui
    infodialog.cpp
    infodialog.h
    infodialog.ui
  )
else()
  add_executable(QDialogButtonBox
    main.cpp
    widget.cpp
    widget.h
    widget.ui
    infodialog.cpp
    infodialog.h
    infodialog.ui
  )
endif()

target_link_libraries(QDialogButtonBox PRIVATE Qt5::Widgets)
2
3
4
5
6
7
8
9
10
11
12
13
14
15
16
17
18
19
20
21
22
23
24
25
26
27
28
29
30
31
32
33
34
35
36
37
38
39
40
41
42
43
44
45
46
47
48
49
50
51
now we can add a dialog button box with some dialog buttons and link them to the widget.cpp file
#include "widget.h"
#include "./ui_widget.h"
#include "infodialog.h"
#include <QDebug>

Widget::Widget(QWidget *parent)
    : QWidget(parent)
    , ui(new Ui::Widget)
{
    ui->setupUi(this);
}

Widget::~Widget()
{
    delete ui;
}


void Widget::on_showInfoButton_clicked()
{
    InfoDialog * dialog = new InfoDialog(this);

    connect(dialog, &InfoDialog::accepted, [=](){
        qDebug() << "Dialog Accepted";
    });

    connect(dialog, &InfoDialog::rejected, [=](){
        qDebug() << "Dialog Rejected";
    });

    dialog->exec();
}
2
3
4
5
6
7
8
9
10
11
12
13
14
15
16
17
18
19
20
21
22
23
24
25
26
27
28
29
30
31
32

We can add more standard buttons from the ui
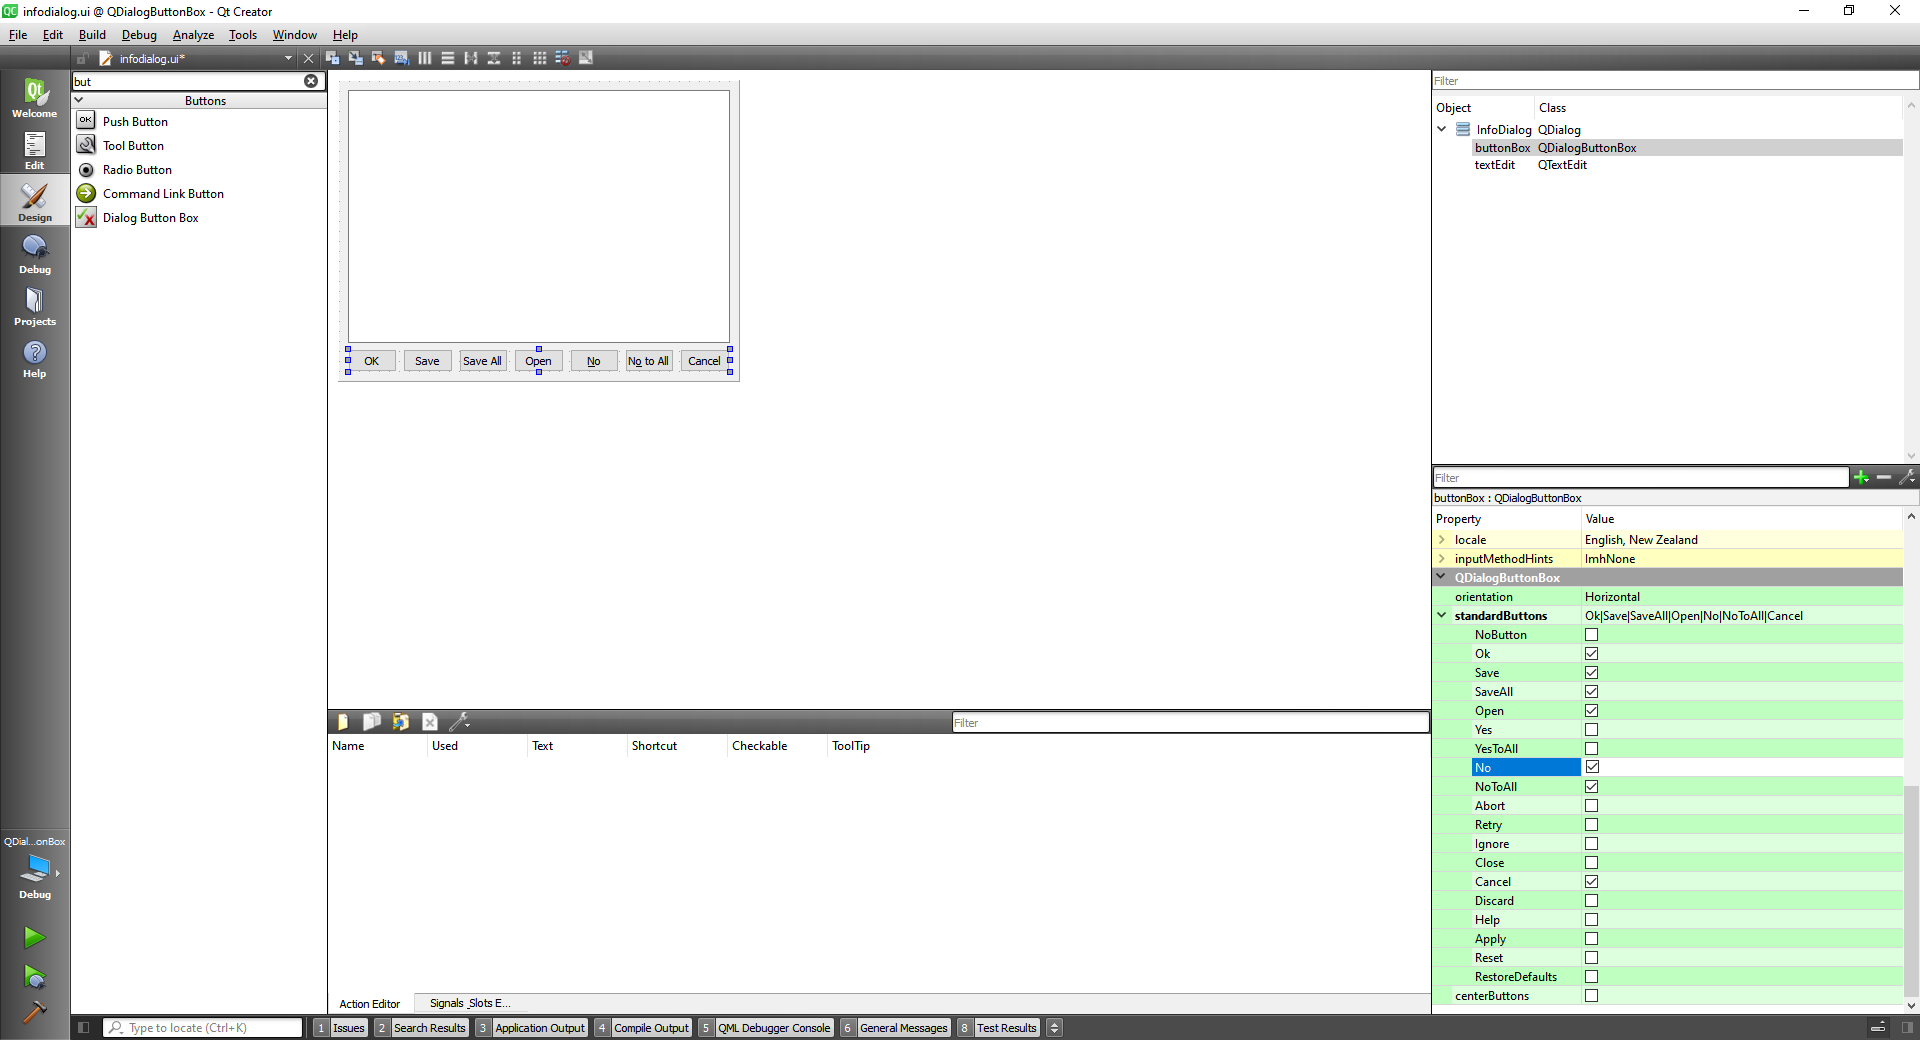
Two interesting, methods are:
The method QDialogButtonBox::ButtonRole, This enum describes the roles that can be used to describe buttons in the button box. Combinations of these roles are as flags used to describe different aspects of their behavior.
And the QDialogButtonBox::StandardButton, These enums describe flags for standard buttons. Each button has a defined ButtonRole.
Now we can attach a slot to the buttons boxes.
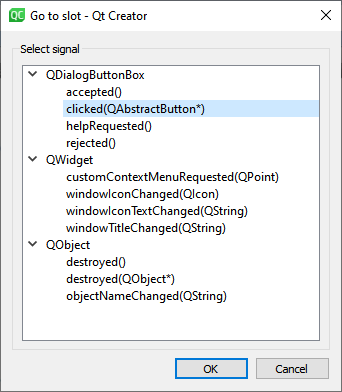
infodialog.cpp
#include "infodialog.h"
#include "ui_infodialog.h"
#include <QDebug>

InfoDialog::InfoDialog(QWidget *parent) :
    QDialog(parent),
    ui(new Ui::InfoDialog)
{
    ui->setupUi(this);
}

InfoDialog::~InfoDialog()
{
    delete ui;
}

void InfoDialog::on_buttonBox_clicked(QAbstractButton *button)
{
    QDialogButtonBox::StandardButton stdButton = ui->buttonBox->standardButton(button);

    if(stdButton == QDialogButtonBox::Ok) {
        qDebug() << "Ok button Clicked";
    }
}
2
3
4
5
6
7
8
9
10
11
12
13
14
15
16
17
18
19
20
21
22
23
24
infodialog.h
#ifndef INFODIALOG_H
#define INFODIALOG_H

#include <QDialog>
#include <QAbstractButton>

namespace Ui {
class InfoDialog;
}

class InfoDialog : public QDialog
{
    Q_OBJECT

public:
    explicit InfoDialog(QWidget *parent = nullptr);
    ~InfoDialog();

private slots:
    void on_buttonBox_clicked(QAbstractButton *button);

private:
    Ui::InfoDialog *ui;
};

#endif // INFODIALOG_H
2
3
4
5
6
7
8
9
10
11
12
13
14
15
16
17
18
19
20
21
22
23
24
25
26
Now we can see that the Ok button Clicked message is being shown.
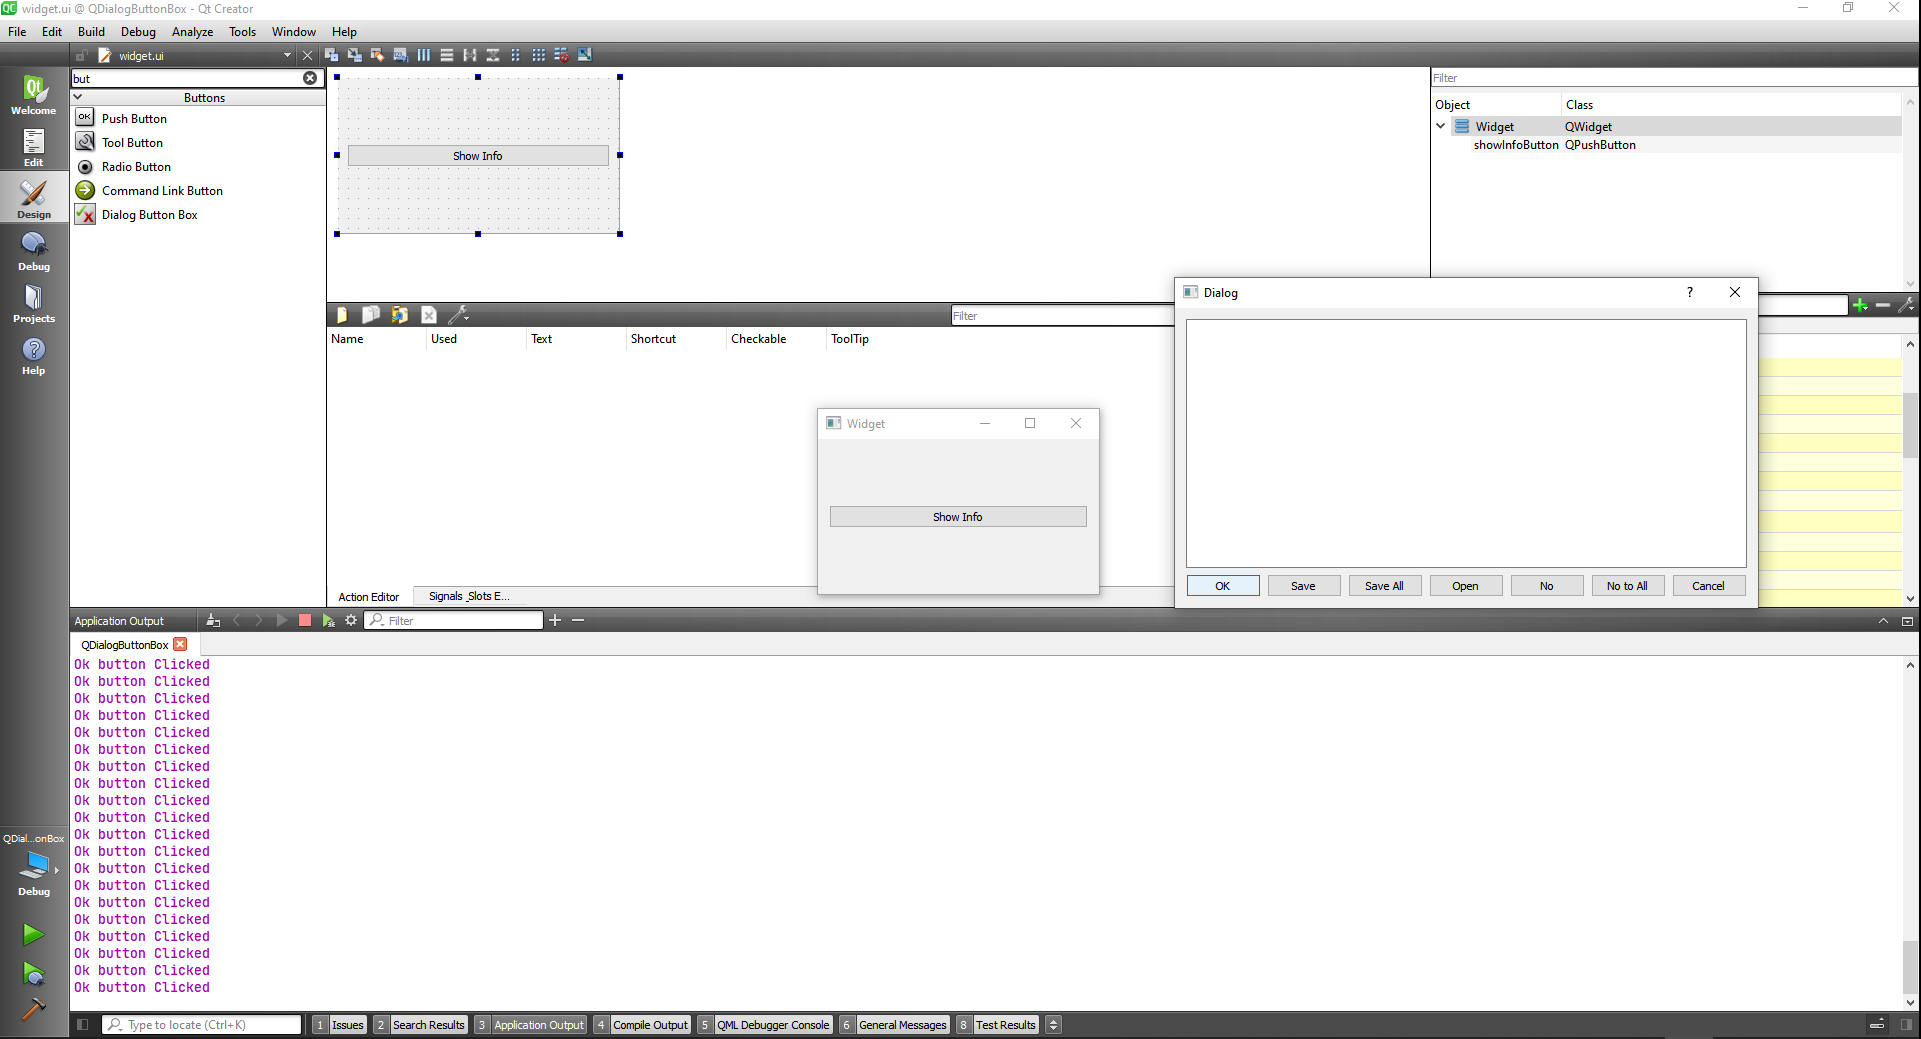
Now we can do this to all the buttons
#include "infodialog.h"
#include "ui_infodialog.h"
#include <QDebug>

InfoDialog::InfoDialog(QWidget *parent) :
    QDialog(parent),
    ui(new Ui::InfoDialog)
{
    ui->setupUi(this);
}

InfoDialog::~InfoDialog()
{
    delete ui;
}

void InfoDialog::on_buttonBox_clicked(QAbstractButton *button)
{
    QDialogButtonBox::StandardButton stdButton = ui->buttonBox->standardButton(button);

    if(stdButton == QDialogButtonBox::Ok) {
        accept();
        qDebug() << "Ok button Clicked";
    }

    if(stdButton == QDialogButtonBox::Save) {
        qDebug() << "Save button Clicked";
    }

    if(stdButton == QDialogButtonBox::SaveAll) {
        qDebug() << "SaveAll button Clicked";
    }

    if(stdButton == QDialogButtonBox::Open) {
        qDebug() << "Open button Clicked";
    }

    if(stdButton == QDialogButtonBox::No) {
        qDebug() << "No button Clicked";
    }

    if(stdButton == QDialogButtonBox::NoToAll) {
        qDebug() << "NoToAll button Clicked";
    }

    if(stdButton == QDialogButtonBox::Cancel) {
        reject();
        qDebug() << "Cancel button Clicked";
    }
}
2
3
4
5
6
7
8
9
10
11
12
13
14
15
16
17
18
19
20
21
22
23
24
25
26
27
28
29
30
31
32
33
34
35
36
37
38
39
40
41
42
43
44
45
46
47
48
49
50
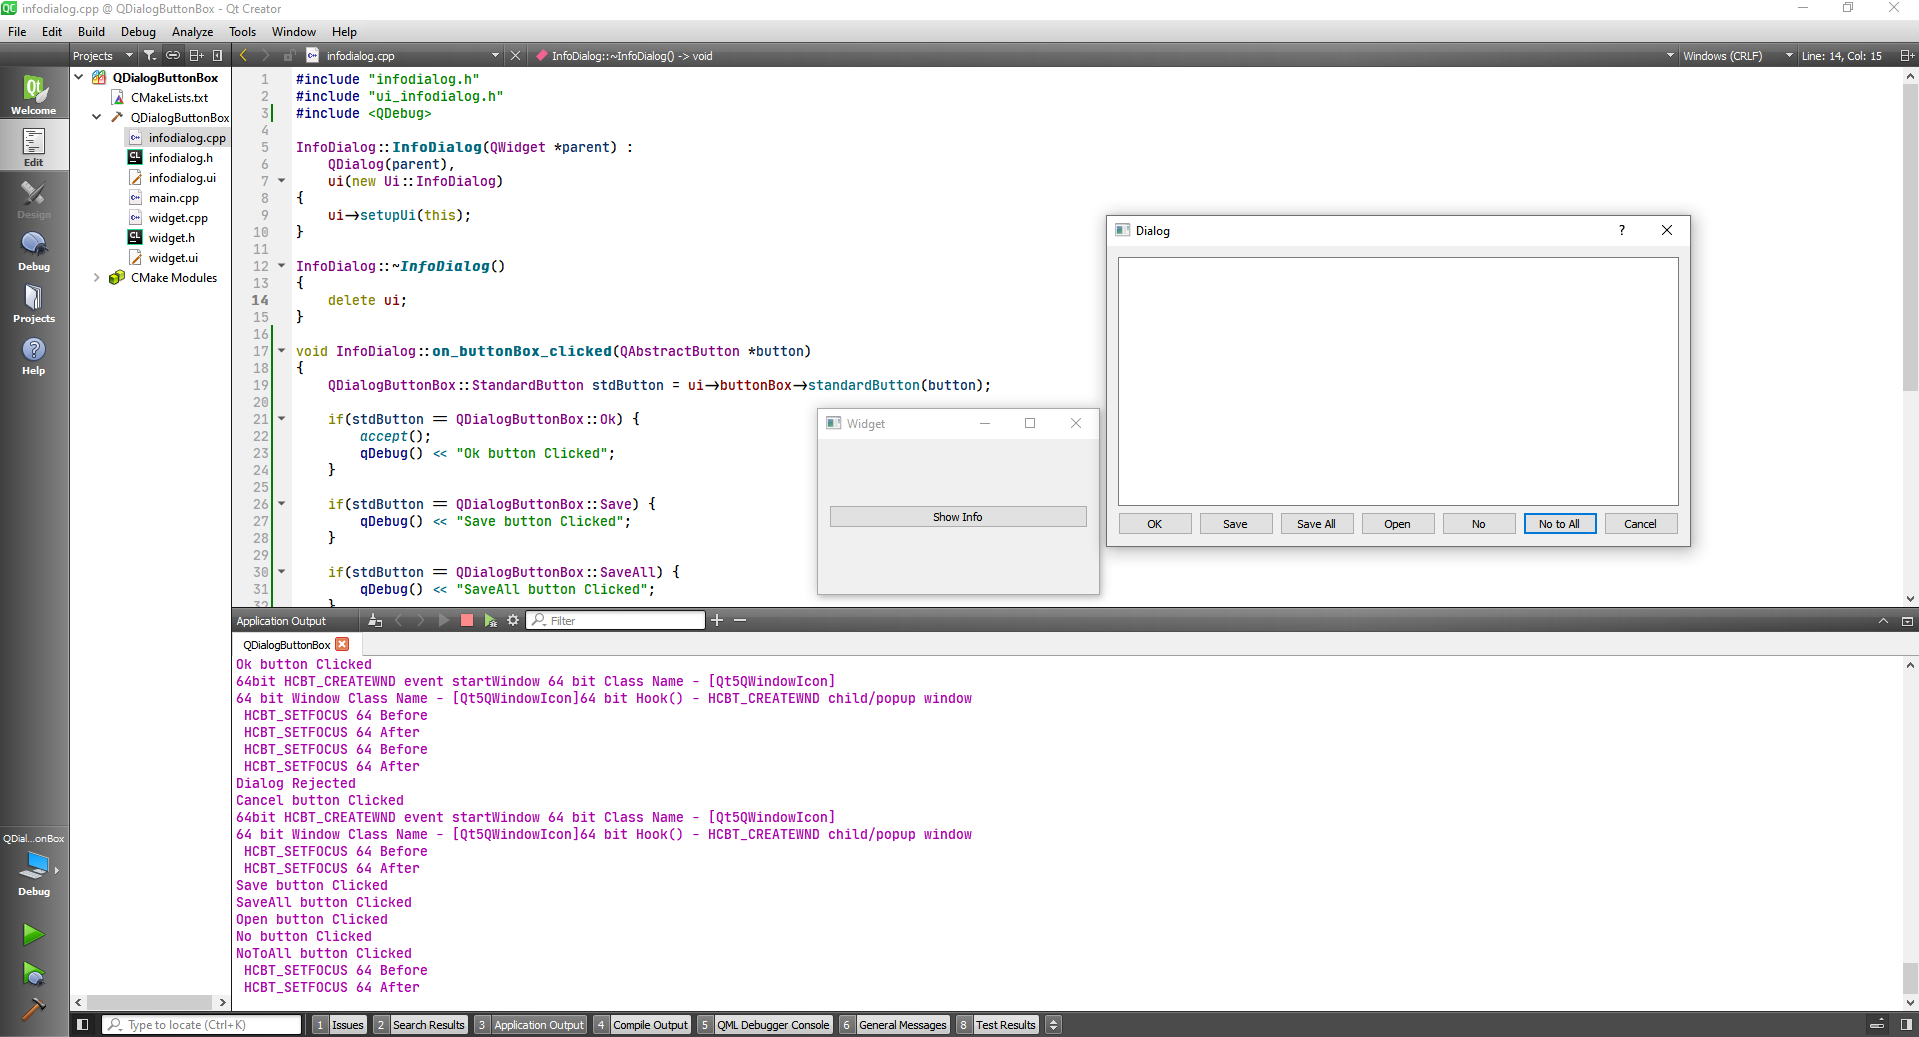
Now let's orginize the buttons vertically.
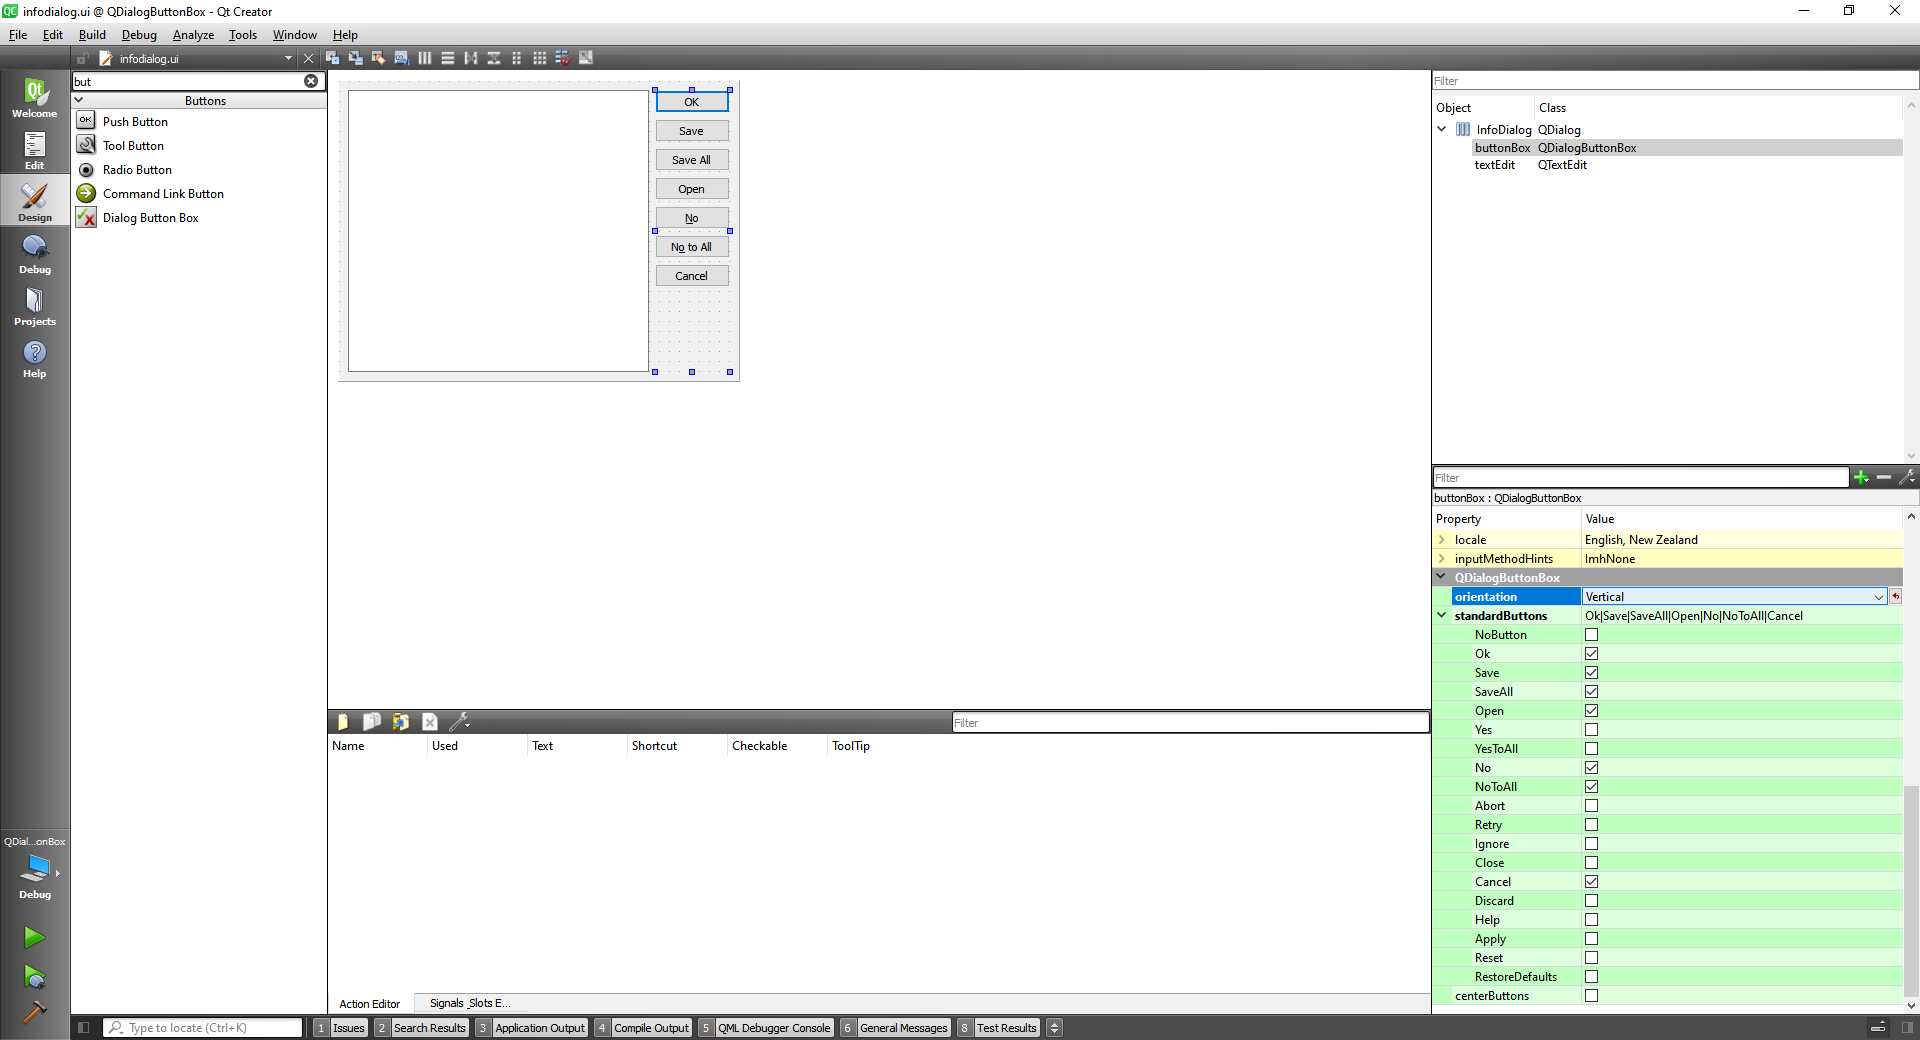
TIP
The QMessageBox class provides a modal dialog for informing the user or for asking the user a question and receiving an answer.
The QFileDialog class provides a dialog that allow users to select files or directories.
#include "widget.h"
#include "./ui_widget.h"
#include <QFileDialog>
#include <QDebug>

Widget::Widget(QWidget *parent)
    : QWidget(parent)
    , ui(new Ui::Widget)
{
    ui->setupUi(this);
}

Widget::~Widget()
{
    delete ui;
}


void Widget::on_pushButton_clicked()
{
    QString dir = QFileDialog::getExistingDirectory(this, tr("Open Directory"),
                                                      "/home",
                                                      QFileDialog::ShowDirsOnly
                                                      | QFileDialog::DontResolveSymlinks);
    qDebug() << "You chosen dir is: " << dir;
}
2
3
4
5
6
7
8
9
10
11
12
13
14
15
16
17
18
19
20
21
22
23
24
25
26

You chosen dir is: "C:/googletest"
To get a chosen file name we do
#include "widget.h"
#include "./ui_widget.h"
#include <QFileDialog>
#include <QDebug>

Widget::Widget(QWidget *parent)
    : QWidget(parent)
    , ui(new Ui::Widget)
{
    ui->setupUi(this);
}

Widget::~Widget()
{
    delete ui;
}


void Widget::on_pushButton_clicked()
{
    //getOpenFileName
    QString fileName = QFileDialog::getOpenFileName(this, tr("Open File"),
                                                      "/home",
                                                      tr("Images (*.png *.xpm *.jpg)"));
    qDebug() << "You chosen file is: " << fileName;
}
2
3
4
5
6
7
8
9
10
11
12
13
14
15
16
17
18
19
20
21
22
23
24
25
26
To chose multiple file we can use the QFileDialog::getOpenFileNames.
We can also specify multiple types of files to look for with "Images (*.png *.xpm *.jpg);;Text files (*.txt);;XML files (*.xml)"
#include "widget.h"
#include "./ui_widget.h"
#include <QFileDialog>
#include <QDebug>

Widget::Widget(QWidget *parent)
    : QWidget(parent)
    , ui(new Ui::Widget)
{
    ui->setupUi(this);
}

Widget::~Widget()
{
    delete ui;
}


void Widget::on_pushButton_clicked()
{
    //getOpenFileNames
    QStringList files = QFileDialog::getOpenFileNames(
                              this,
                              "Select one or more files to open",
                              "/home",
                              "Images (*.png *.xpm *.jpg);;Text files (*.txt);;XML files (*.xml)";
    qDebug() << "Your chosen files are: " << files;
}
2
3
4
5
6
7
8
9
10
11
12
13
14
15
16
17
18
19
20
21
22
23
24
25
26
27
28
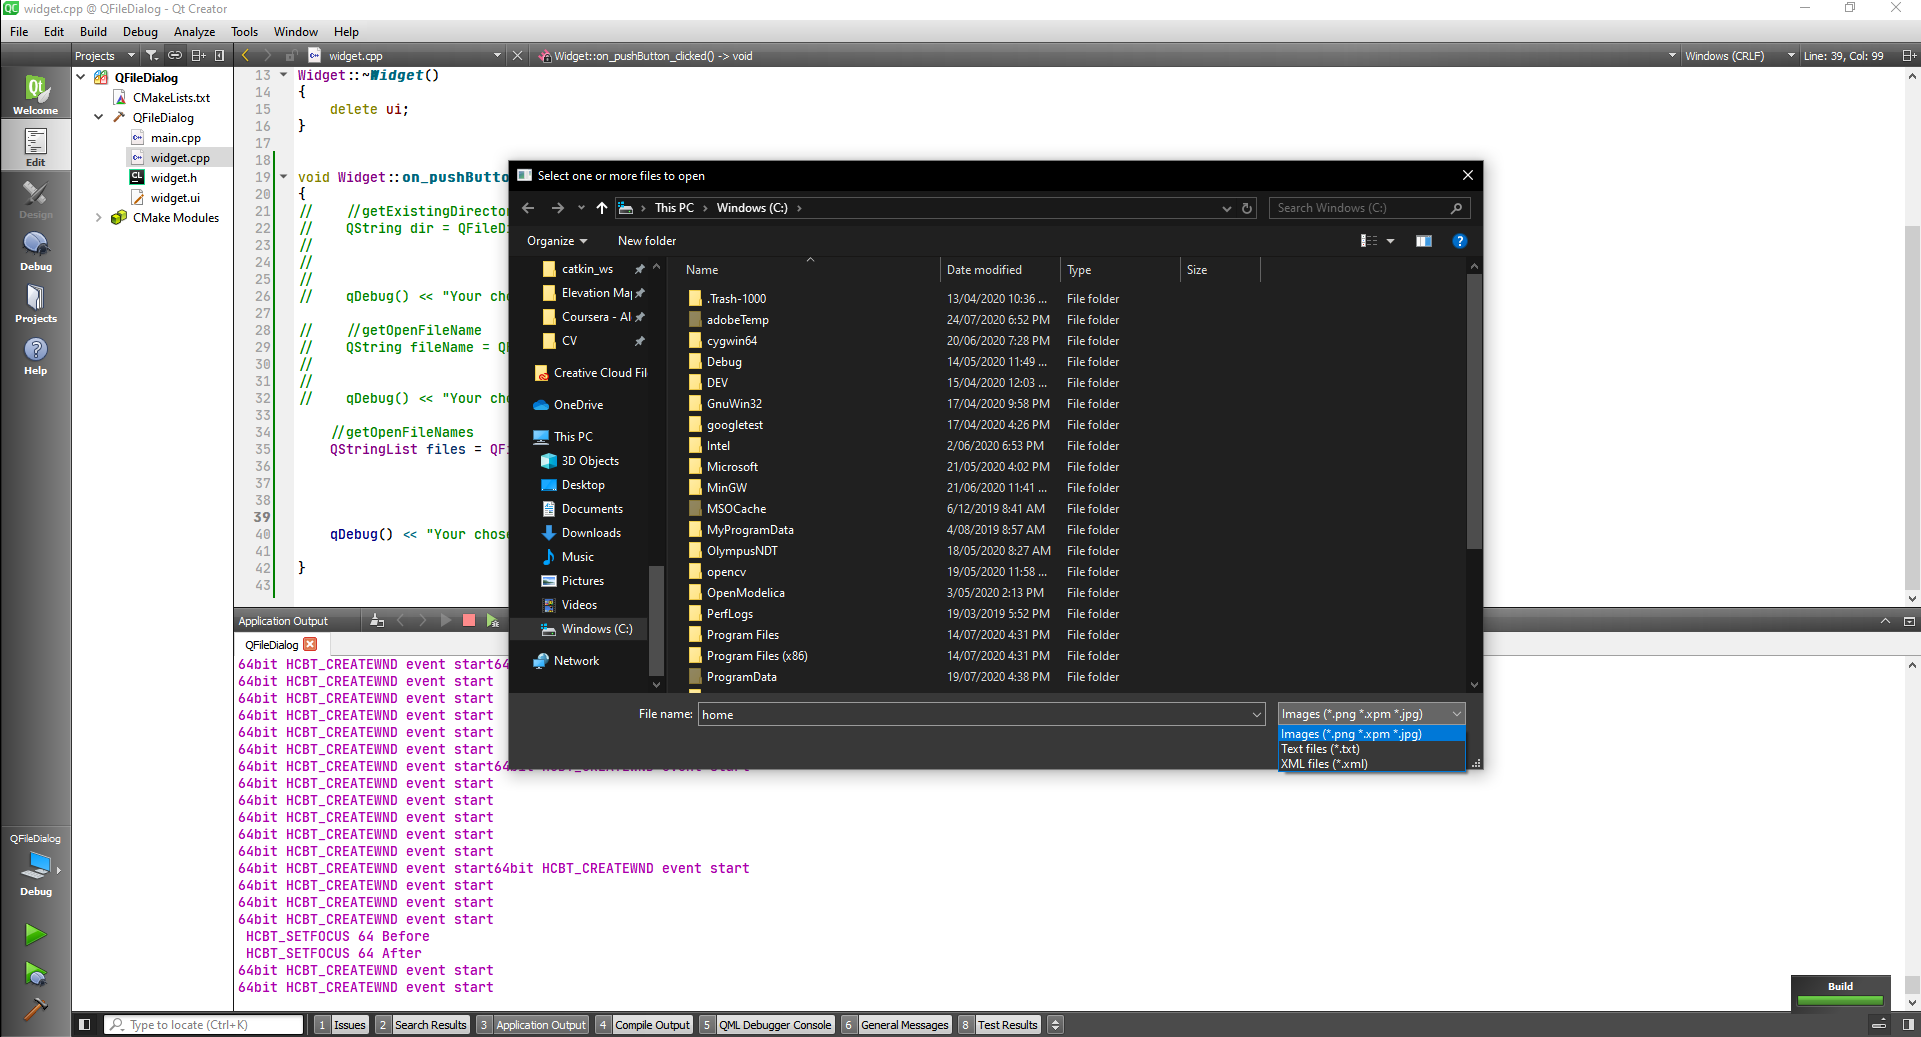
We can also get saved file name
QString fileName = QFileDialog::getSaveFileName(this, tr("Save File"),
                             "/home/jana/untitled.png",
                             tr("Images (*.png *.xpm *.jpg)"));
qDebug() << "Your chosen file name are: " << fileName;
2
3
4
# QFontDialog class
The QFontDialog class provides a dialog widget for selecting a font.
#include "widget.h"
#include "./ui_widget.h"
#include <QFontDialog>
#include <QMessageBox>

Widget::Widget(QWidget *parent)
    : QWidget(parent)
    , ui(new Ui::Widget)
{
    ui->setupUi(this);
}

Widget::~Widget()
{
    delete ui;
}


void Widget::on_chooseFontButton_clicked()
{
    bool ok;
      QFont font = QFontDialog::getFont(
                      &ok, QFont("Helvetica [Cronyx]", 10), this);
      if (ok) {
          ui->label->setFont(font);
      } else {
          QMessageBox::information(this, "Message", "User did not choose a font");
      }
}
2
3
4
5
6
7
8
9
10
11
12
13
14
15
16
17
18
19
20
21
22
23
24
25
26
27
28
29
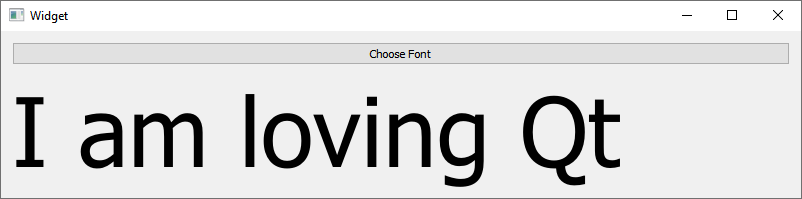


# QColorDialog class
The QColorDialog class provides a dialog widget for specifying colors.
#include "widget.h"
#include "./ui_widget.h"
#include <QColorDialog>
#include <QDebug>

Widget::Widget(QWidget *parent)
    : QWidget(parent)
    , ui(new Ui::Widget)
{
    ui->setupUi(this);
    ui->label->setAutoFillBackground(true);
}

Widget::~Widget()
{
    delete ui;
}


void Widget::on_backgroundButton_clicked()
{

}

void Widget::on_fontButton_clicked()
{

}

void Widget::on_textColorButton_clicked()
{
    QPalette palette = ui->label->palette();

    QColor color = palette.color(QPalette::WindowText);

    QColor chosenColor = QColorDialog::getColor(color, this, "Choose text color");

    if(chosenColor.isValid()) {
        palette.setColor(QPalette::WindowText, chosenColor);
        ui->label->setPalette(palette);
        qDebug() << "User Chose a valid color";
    } else {
        qDebug() << "User Chose a invalid color";
    }
}
2
3
4
5
6
7
8
9
10
11
12
13
14
15
16
17
18
19
20
21
22
23
24
25
26
27
28
29
30
31
32
33
34
35
36
37
38
39
40
41
42
43
44
45
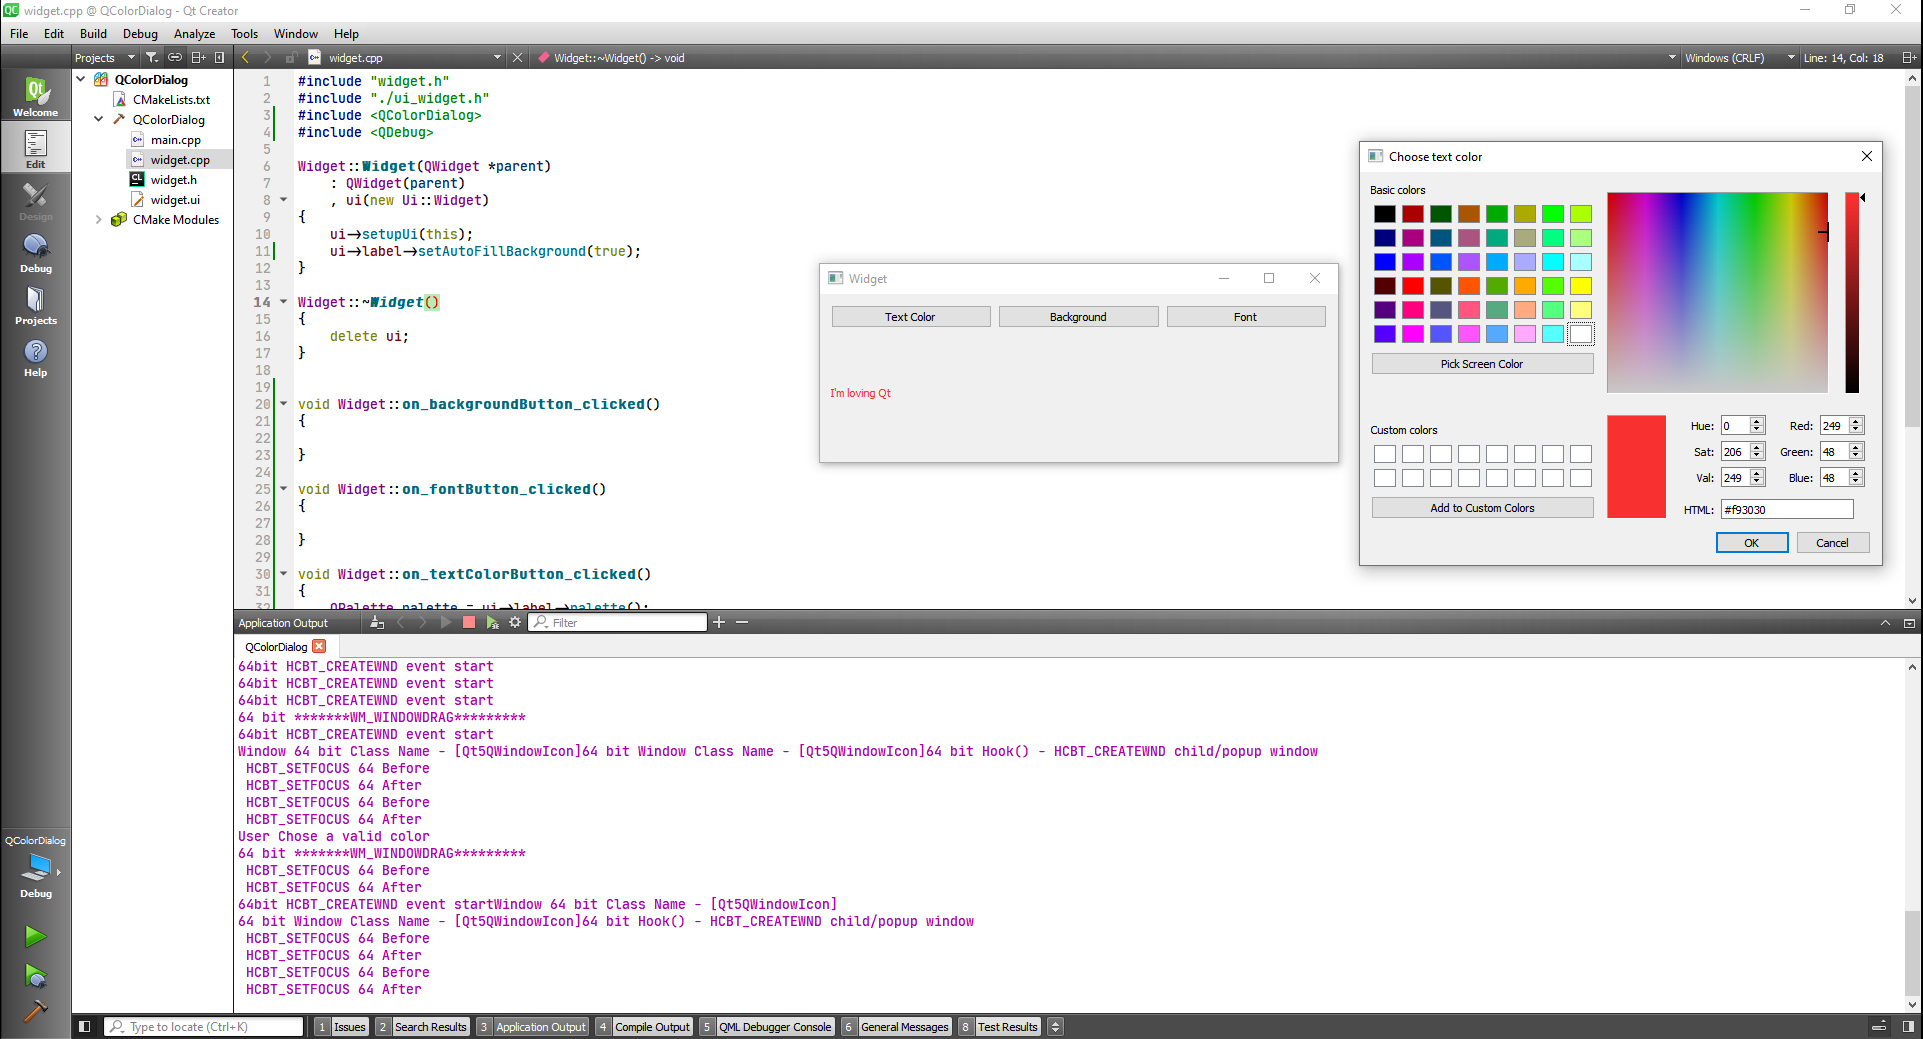
Now completing the rest of the buttons:
#include "widget.h"
#include "./ui_widget.h"
#include <QColorDialog>
#include <QDebug>
#include <QFontDialog>

Widget::Widget(QWidget *parent)
    : QWidget(parent)
    , ui(new Ui::Widget)
{
    ui->setupUi(this);
    ui->label->setAutoFillBackground(true);
}

Widget::~Widget()
{
    delete ui;
}


void Widget::on_backgroundButton_clicked()
{
    QPalette palette = ui->label->palette();

    QColor color = palette.color(QPalette::Window);

    QColor chosenColor = QColorDialog::getColor(color, this, "Choose text color");

    if(chosenColor.isValid()) {
        palette.setColor(QPalette::Window, chosenColor);
        ui->label->setPalette(palette);
        qDebug() << "User Chose a valid color";
    } else {
        qDebug() << "User Chose a invalid color";
    }
}

void Widget::on_fontButton_clicked()
{
    bool ok;
      QFont font = QFontDialog::getFont(
                      &ok, QFont("Helvetica [Cronyx]", 10), this);
      if (ok) {
          ui->label->setFont(font);
      } else {

      }
}

void Widget::on_textColorButton_clicked()
{
    QPalette palette = ui->label->palette();

    QColor color = palette.color(QPalette::WindowText);

    QColor chosenColor = QColorDialog::getColor(color, this, "Choose text color");

    if(chosenColor.isValid()) {
        palette.setColor(QPalette::WindowText, chosenColor);
        ui->label->setPalette(palette);
        qDebug() << "User Chose a valid color";
    } else {
        qDebug() << "User Chose a invalid color";
    }
}
2
3
4
5
6
7
8
9
10
11
12
13
14
15
16
17
18
19
20
21
22
23
24
25
26
27
28
29
30
31
32
33
34
35
36
37
38
39
40
41
42
43
44
45
46
47
48
49
50
51
52
53
54
55
56
57
58
59
60
61
62
63
64
65

# QInputDialog class
The QInputDialog class provides a simple convenience dialog to get a single value from the user.
#include "widget.h"
#include "./ui_widget.h"
#include <QInputDialog>
#include <QDebug>

Widget::Widget(QWidget *parent)
    : QWidget(parent)
    , ui(new Ui::Widget)
{
    ui->setupUi(this);
}

Widget::~Widget()
{
    delete ui;
}


void Widget::on_pushButton_clicked()
{
    bool ok;
      double d = QInputDialog::getDouble(this, tr("QInputDialog::getDouble()"),
                                         tr("Amount:"), 37.56, -10000, 10000, 2, &ok);
      if (ok) {
          qDebug() << "Your Double value is: " << QString::number(d);
      }
}
2
3
4
5
6
7
8
9
10
11
12
13
14
15
16
17
18
19
20
21
22
23
24
25
26
27
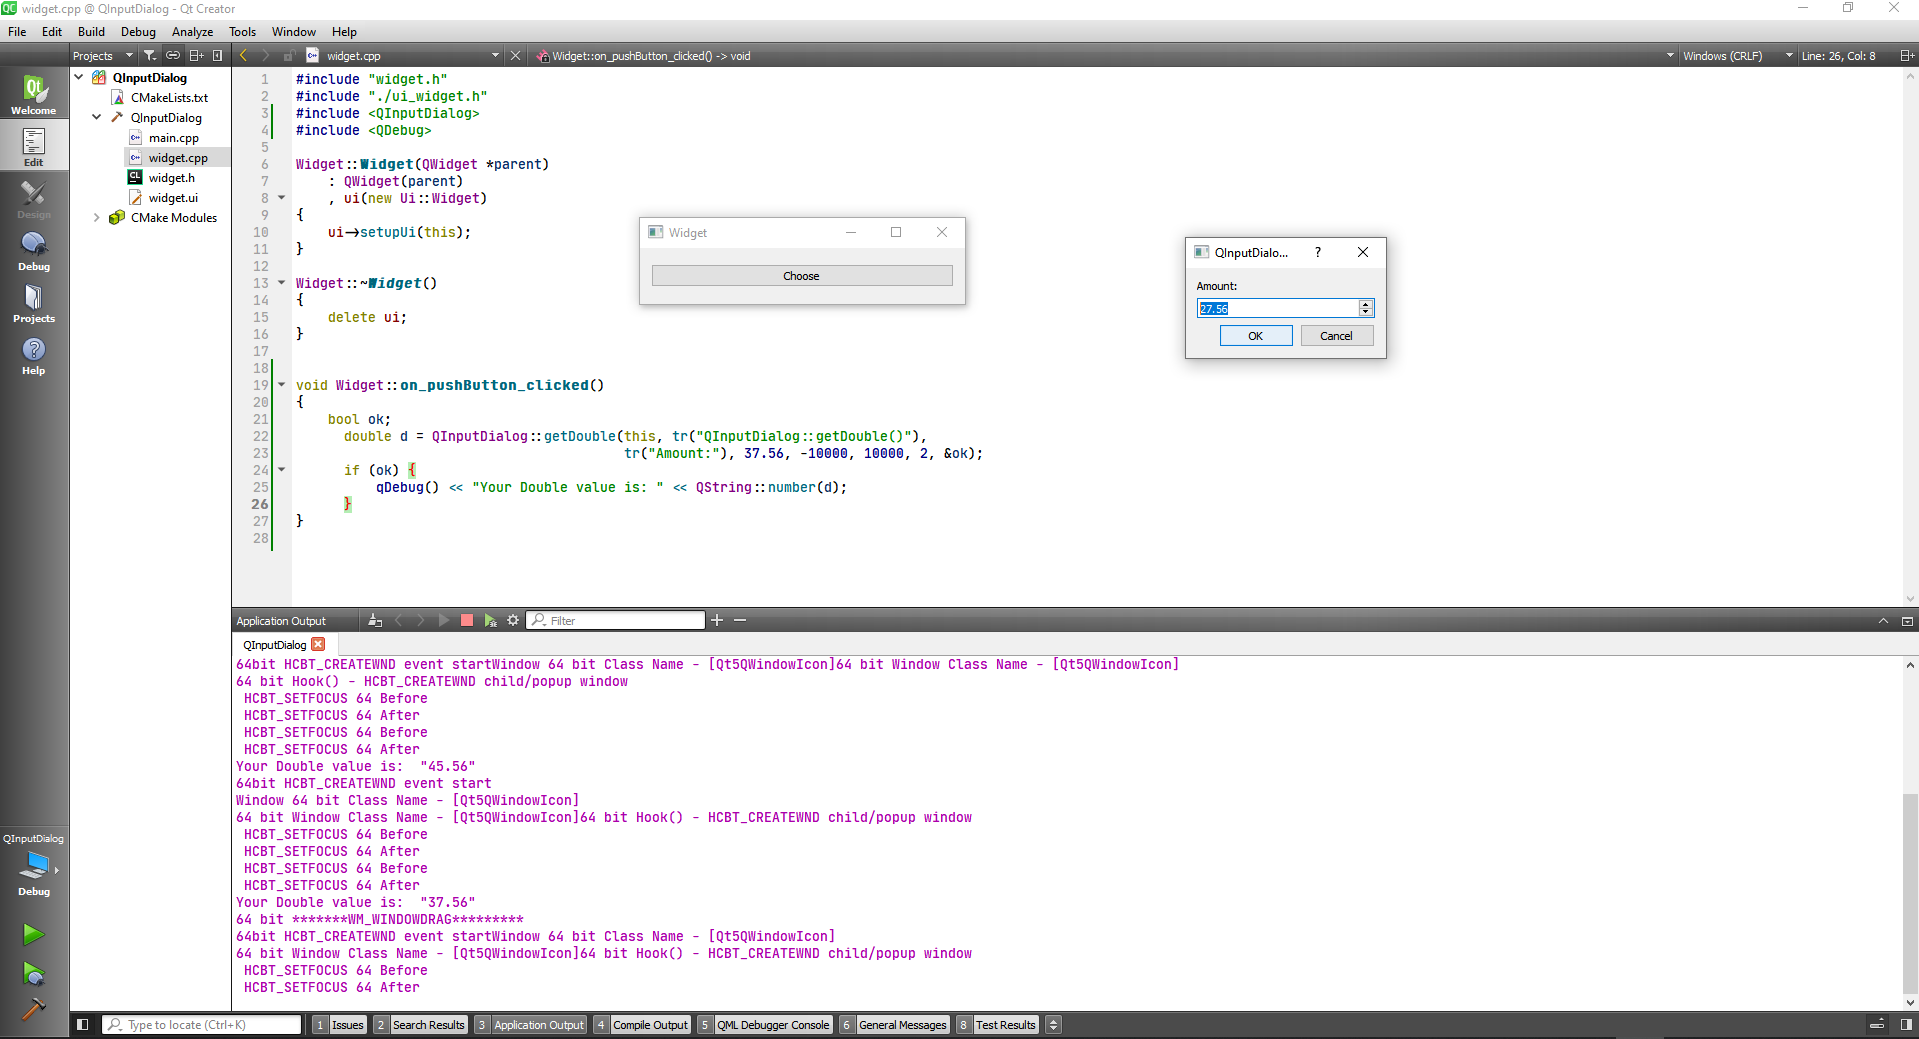
The other methods are the same, although the getItem is an interesting one.
#include "widget.h"
#include "./ui_widget.h"
#include <QInputDialog>
#include <QDebug>

Widget::Widget(QWidget *parent)
    : QWidget(parent)
    , ui(new Ui::Widget)
{
    ui->setupUi(this);
}

Widget::~Widget()
{
    delete ui;
}


void Widget::on_pushButton_clicked()
{
    QStringList items;
          items << tr("Spring") << tr("Summer") << tr("Fall") << tr("Winter");

    bool ok;
    QString item = QInputDialog::getItem(this, tr("QInputDialog::getItem()"),
                                         tr("Season:"), items, 0, false, &ok);
    if (ok && !item.isEmpty()){
        qDebug() << "Your chosen item is: " << item;
    }
}
2
3
4
5
6
7
8
9
10
11
12
13
14
15
16
17
18
19
20
21
22
23
24
25
26
27
28
29
30
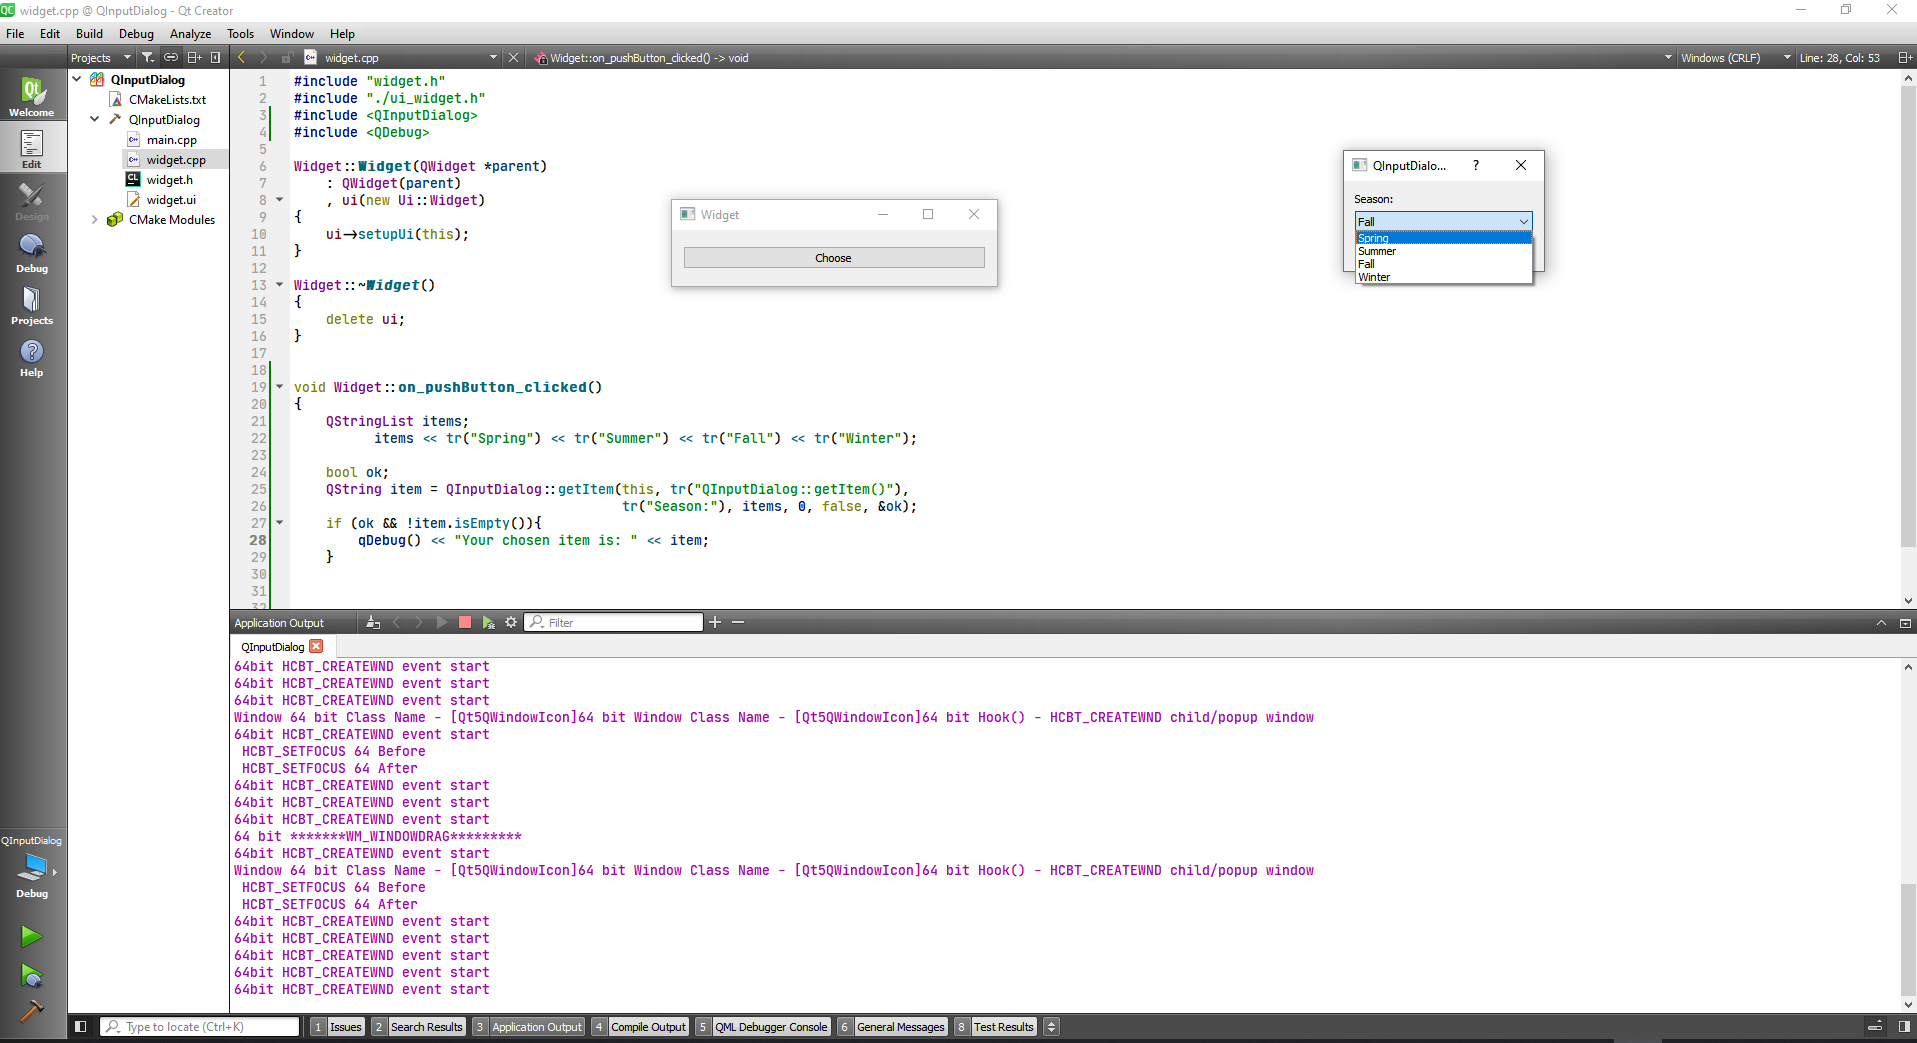
# Qt Resource System
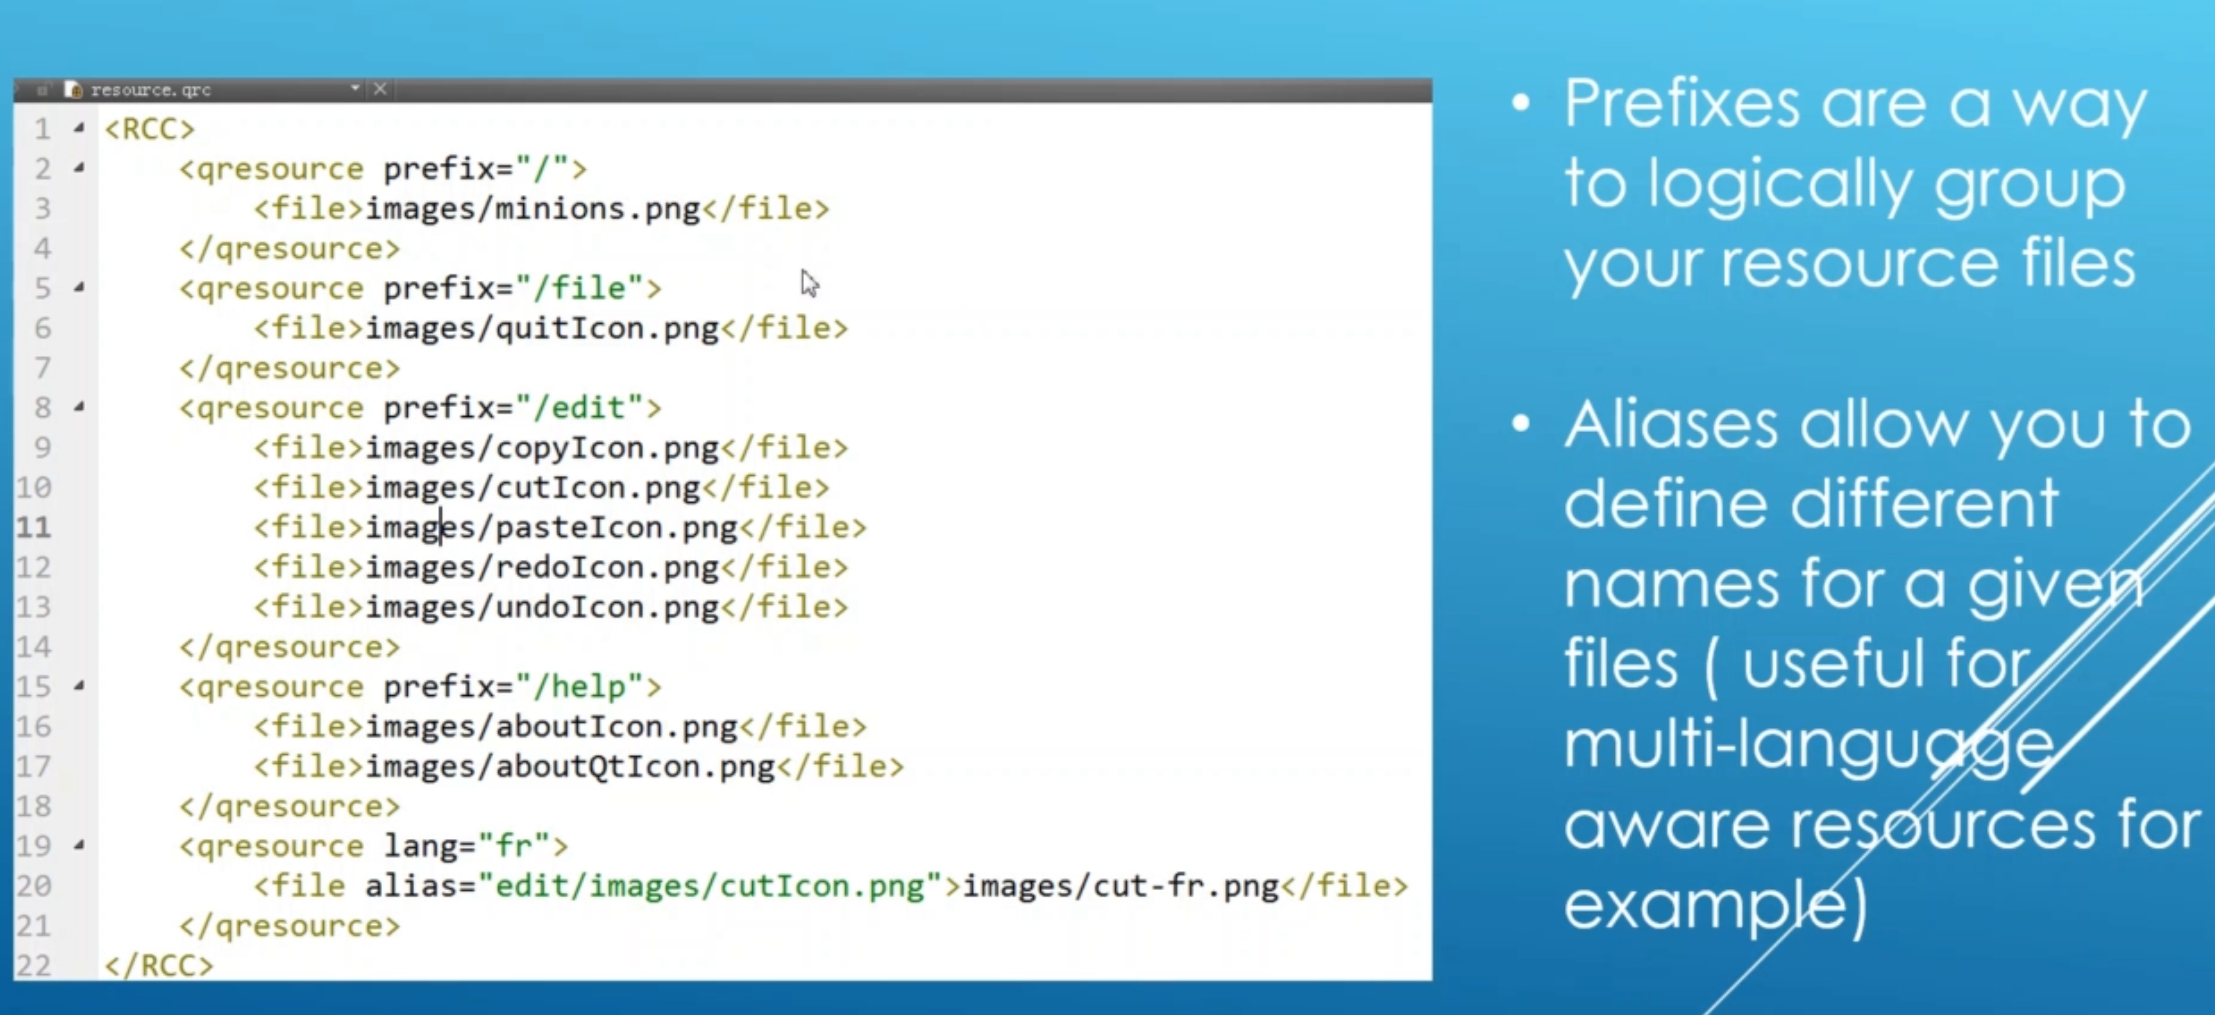
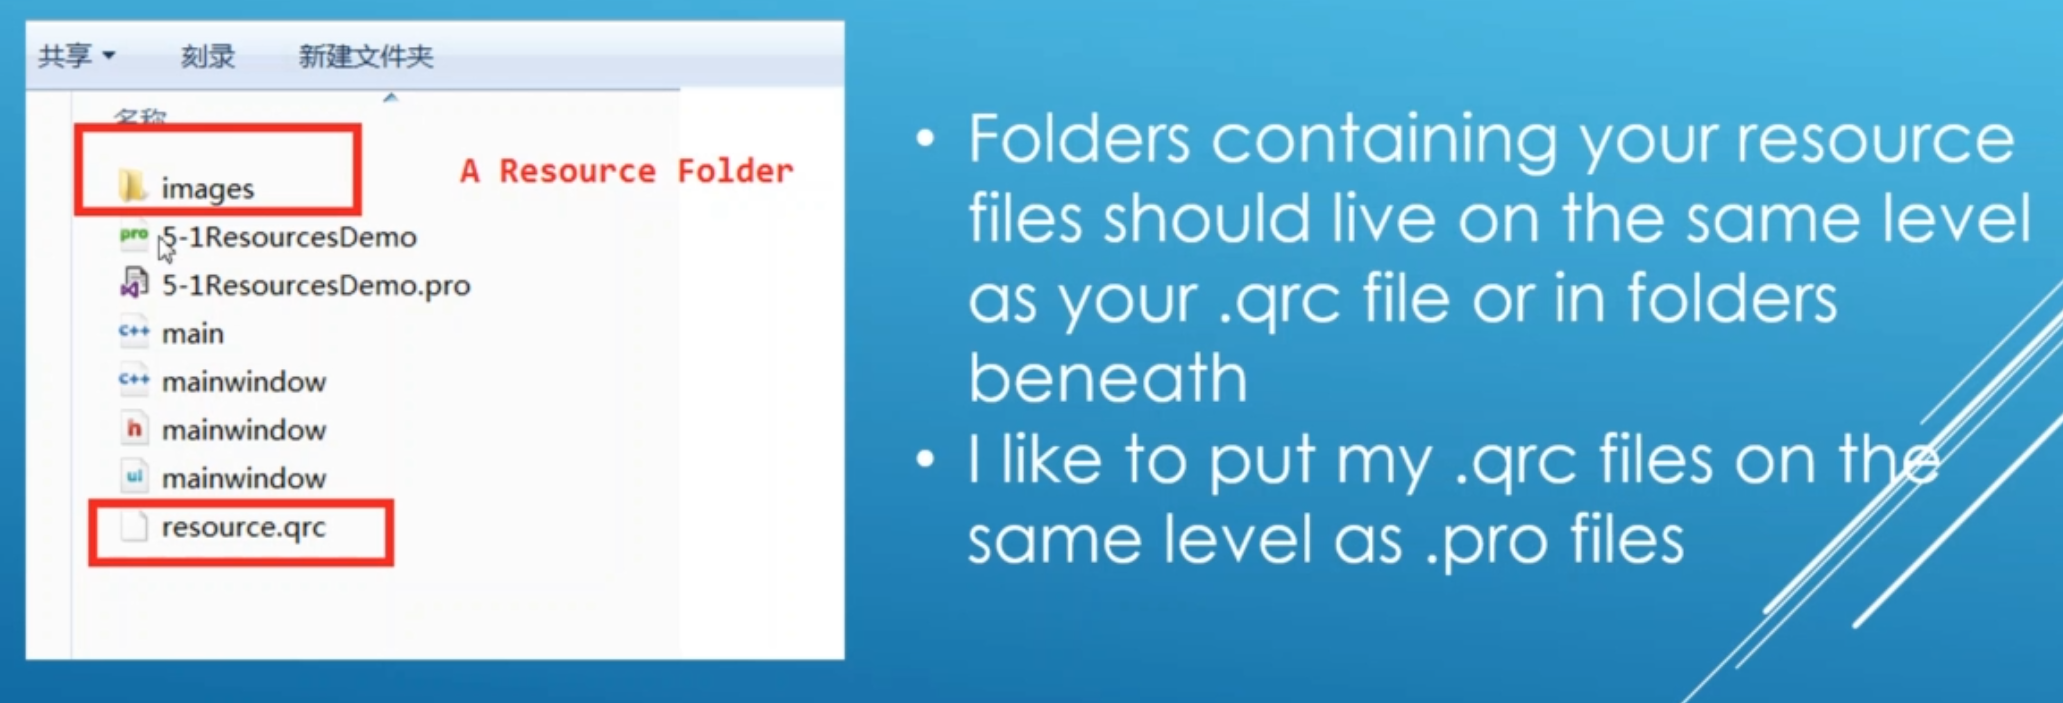

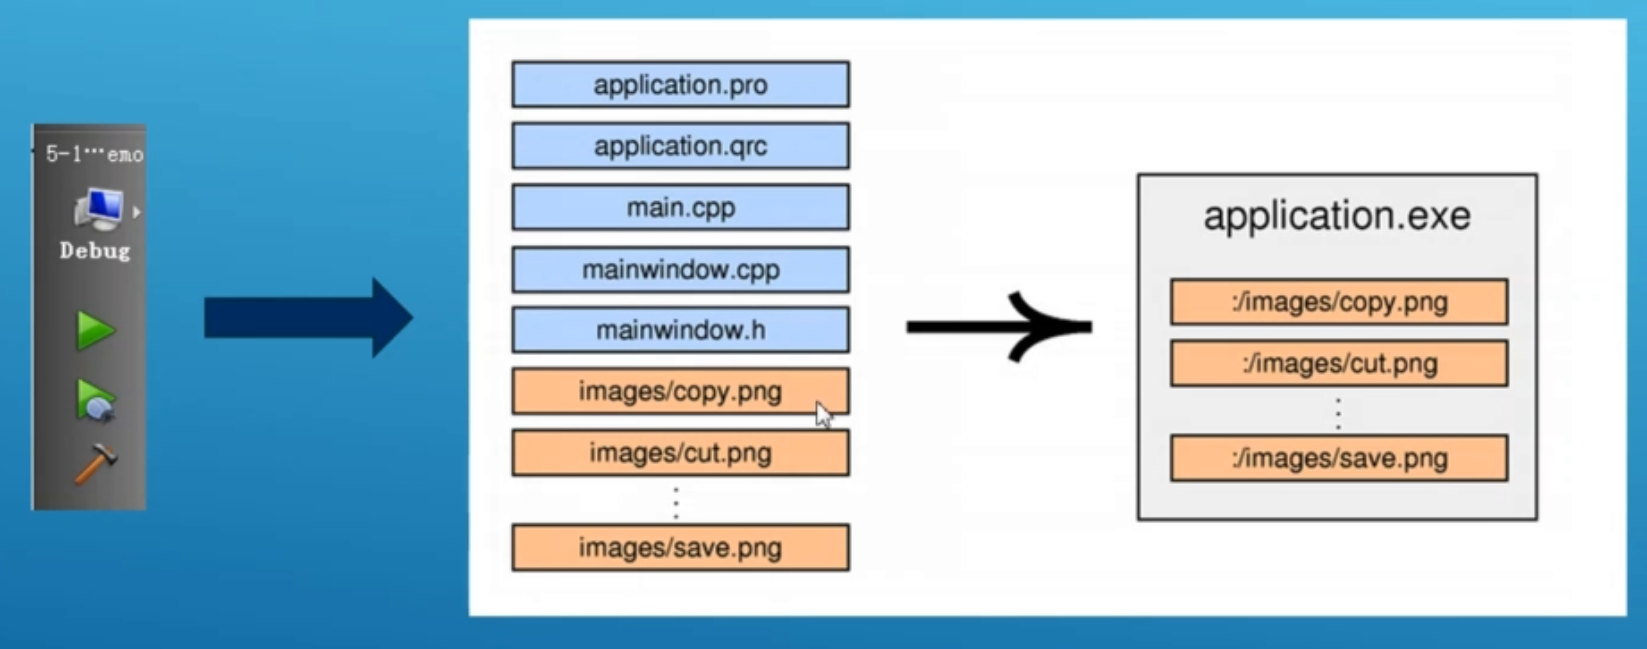
Now let's creat an MainWindow Application with A File, Edit and Help Menus and add resources to it as well as a toolbar.
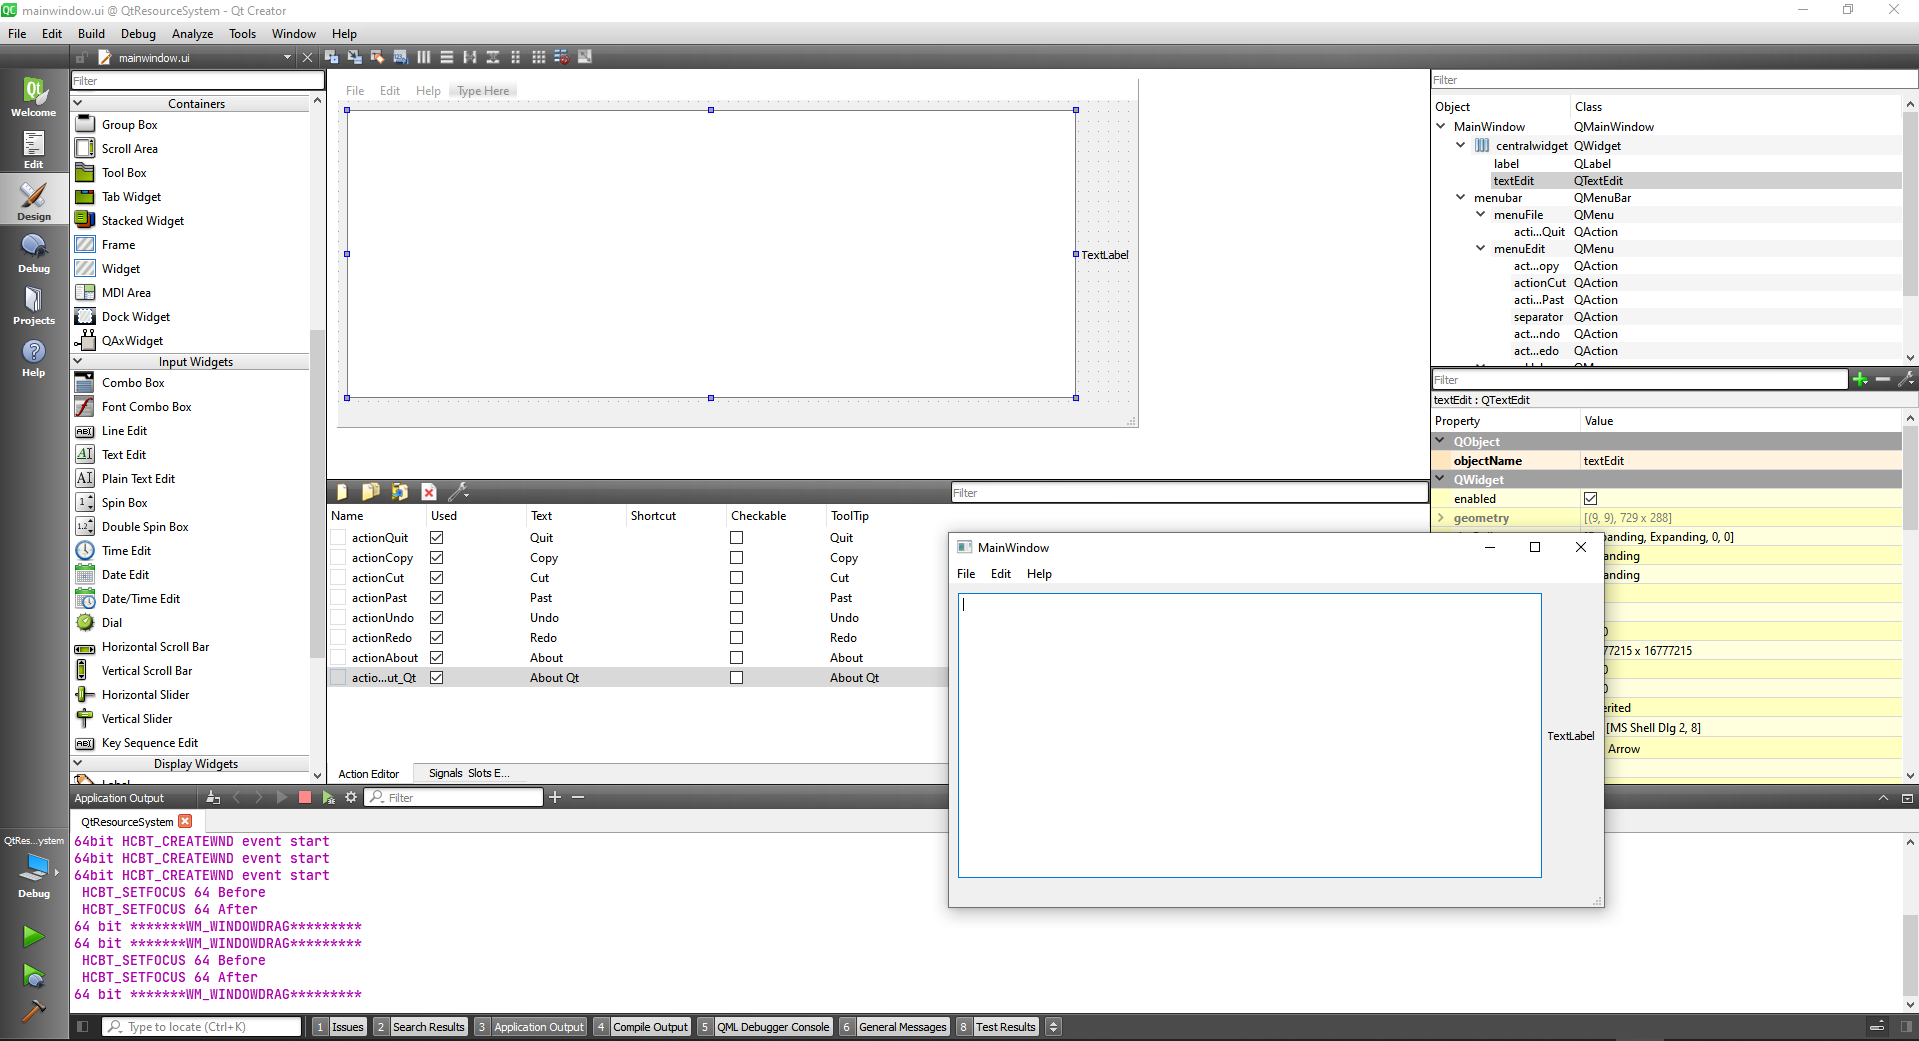
Now we can add a new resource file and add it to the cmake file, so we can start to work with it.
cmake_minimum_required(VERSION 3.5)

project(QtResourceSystem LANGUAGES CXX)

set(CMAKE_INCLUDE_CURRENT_DIR ON)

set(CMAKE_AUTOUIC ON)
set(CMAKE_AUTOMOC ON)
set(CMAKE_AUTORCC ON)

set(CMAKE_CXX_STANDARD 11)
set(CMAKE_CXX_STANDARD_REQUIRED ON)

# QtCreator supports the following variables for Android, which are identical to qmake Android variables.
# Check http://doc.qt.io/qt-5/deployment-android.html for more information.
# They need to be set before the find_package(Qt5 ...) call.

#if(ANDROID)
#    set(ANDROID_PACKAGE_SOURCE_DIR "${CMAKE_CURRENT_SOURCE_DIR}/android")
#    if (ANDROID_ABI STREQUAL "armeabi-v7a")
#        set(ANDROID_EXTRA_LIBS
#            ${CMAKE_CURRENT_SOURCE_DIR}/path/to/libcrypto.so
#            ${CMAKE_CURRENT_SOURCE_DIR}/path/to/libssl.so)
#    endif()
#endif()

find_package(Qt5 COMPONENTS Widgets REQUIRED)

if(ANDROID)
  add_library(QtResourceSystem SHARED
    main.cpp
    main,window.cpp
    mainwindow.h
    mainwindow.ui
    resource.qrc
  )
else()
  add_executable(QtResourceSystem
    main.cpp
    mainwindow.cpp
    mainwindow.h
    mainwindow.ui
    resource.qrc
  )
endif()

target_link_libraries(QtResourceSystem PRIVATE Qt5::Widgets)
2
3
4
5
6
7
8
9
10
11
12
13
14
15
16
17
18
19
20
21
22
23
24
25
26
27
28
29
30
31
32
33
34
35
36
37
38
39
40
41
42
43
44
45
46
47
Now we can create the images folder inside the project's folders and include the images there. After we add the files our resources.sqr file will look like this:
<RCC>
    <qresource prefix="/">
        <file>images/aboutIcon.jpg</file>
        <file>images/aboutQIcon.jpg</file>
        <file>images/copyIcon.jpg</file>
        <file>images/cutIcon.jpg</file>
        <file>images/minions.png</file>
        <file>images/pasteIcon.jpg</file>
        <file>images/quitIcon.jpg</file>
        <file>images/redoIcon.jpg</file>
        <file>images/undoIcon.jpg</file>
    </qresource>
</RCC>
2
3
4
5
6
7
8
9
10
11
12
13
A nice trick is to Copy Resource Path to Clipboard from the editor.
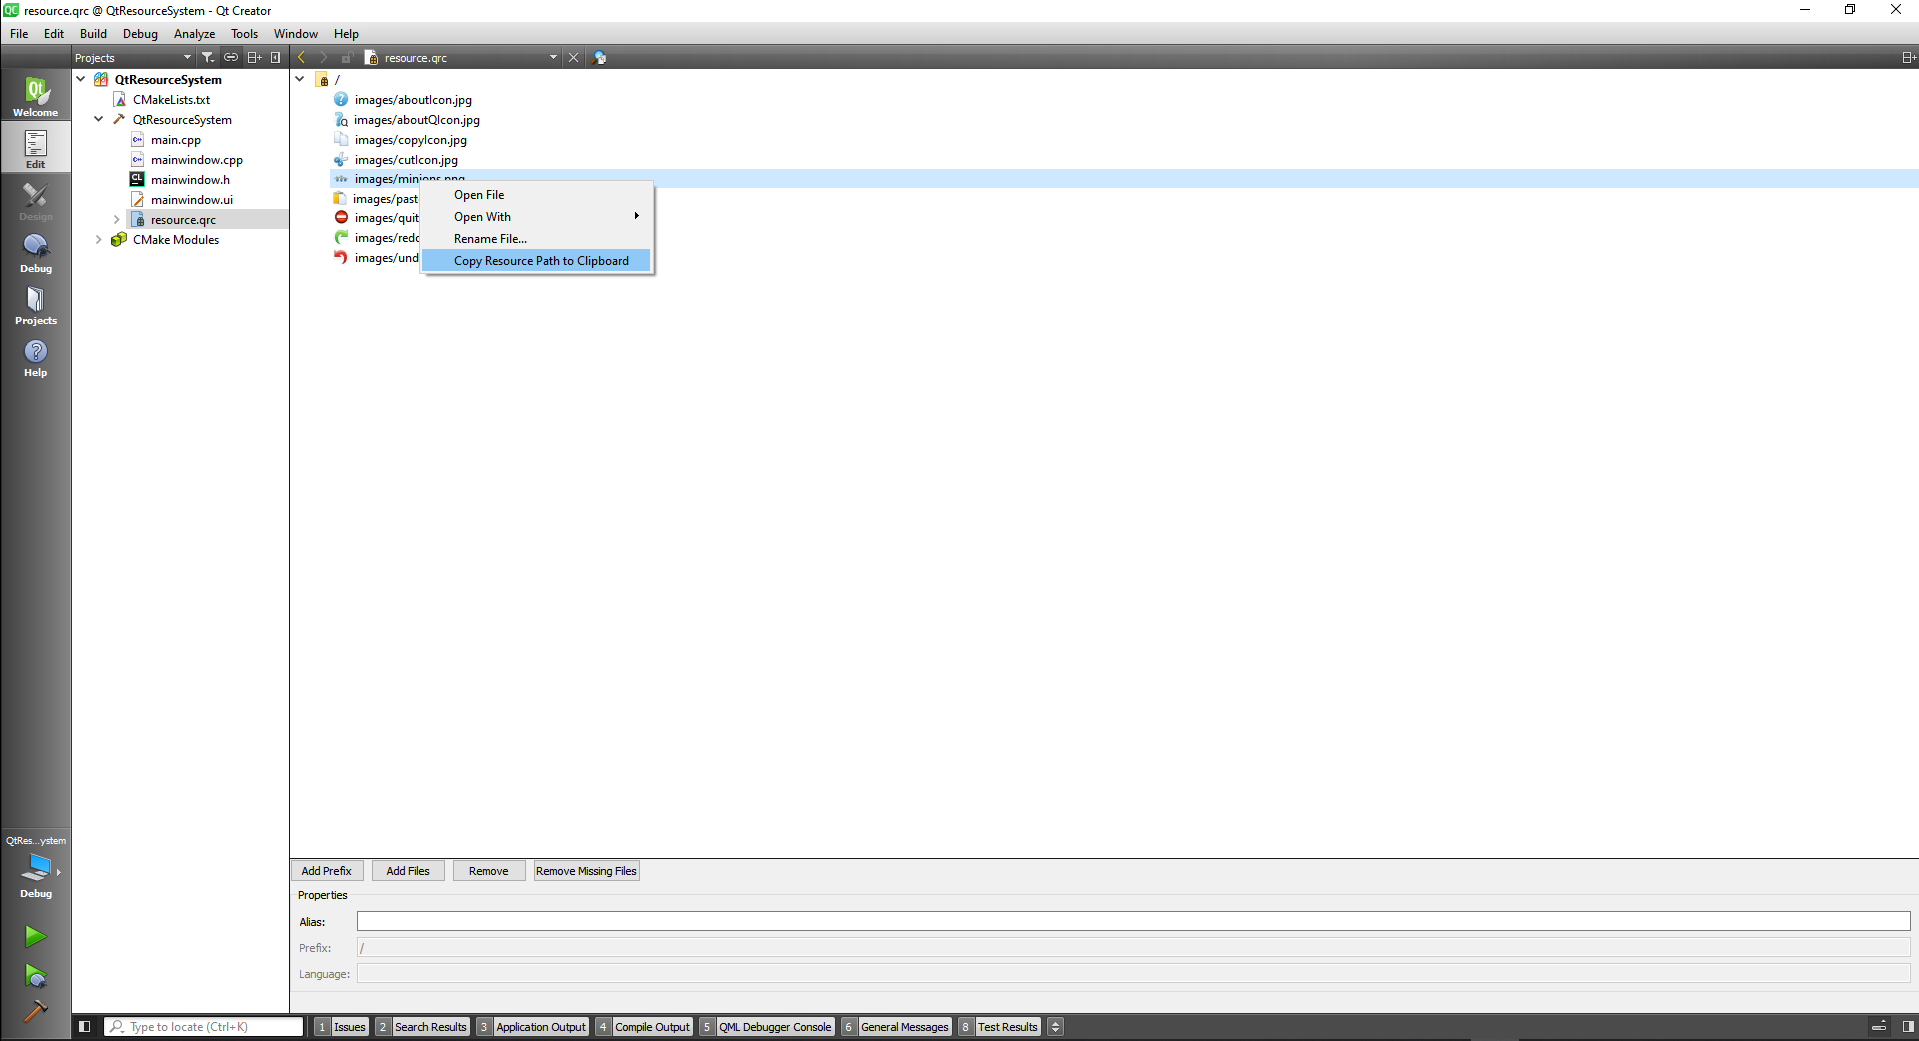
Then we can paste on the label as a Pixmap:
#include "mainwindow.h"
#include "./ui_mainwindow.h"

MainWindow::MainWindow(QWidget *parent)
    : QMainWindow(parent)
    , ui(new Ui::MainWindow)
{
    ui->setupUi(this);
    QPixmap pix("://images/minions.png");
    ui->label->setPixmap(pix.scaled(300,164));
}

MainWindow::~MainWindow()
{
    delete ui;
}
2
3
4
5
6
7
8
9
10
11
12
13
14
15
16
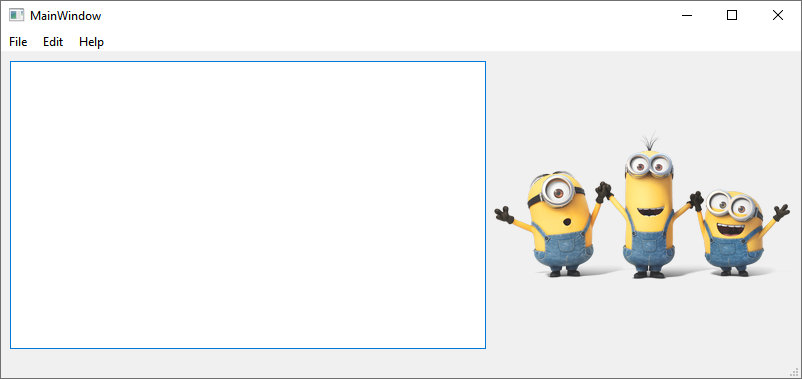
Now let's put the icons, and we do this by going to the ui and double clicking in the actions and choosing the resources.
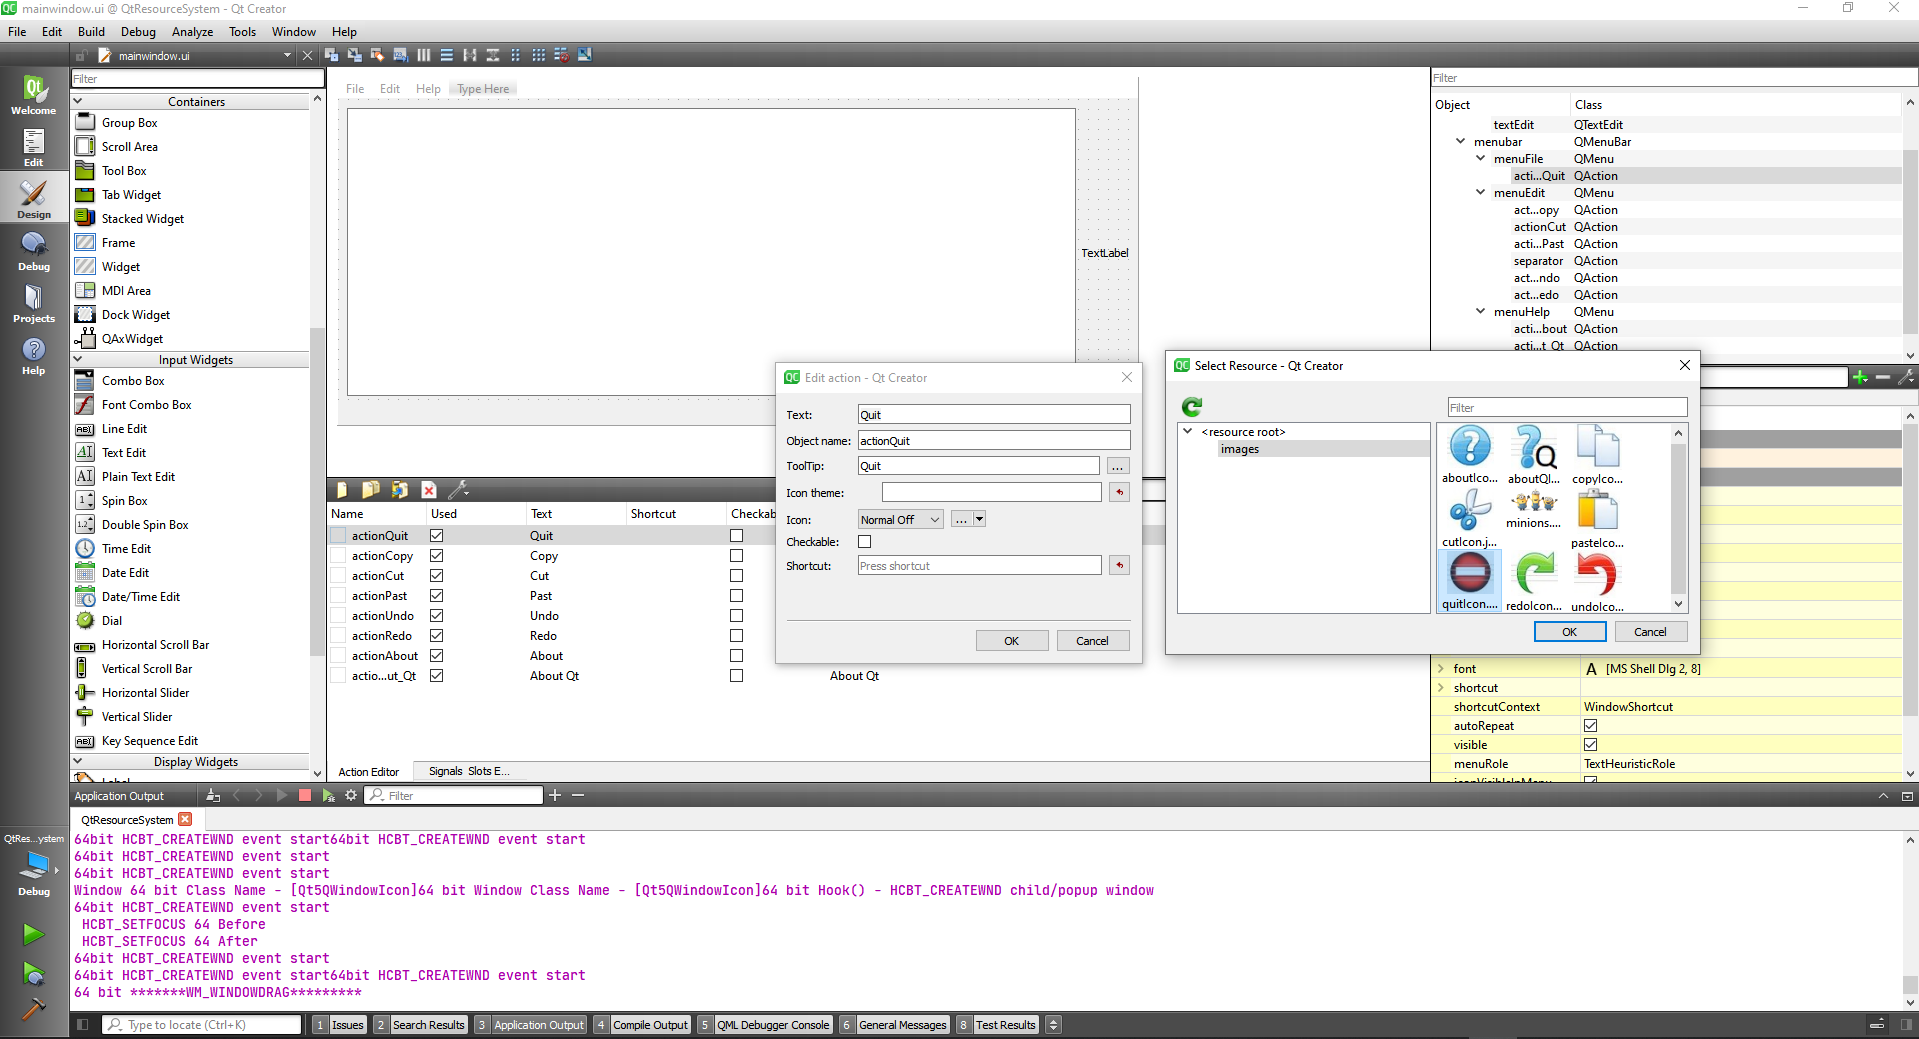
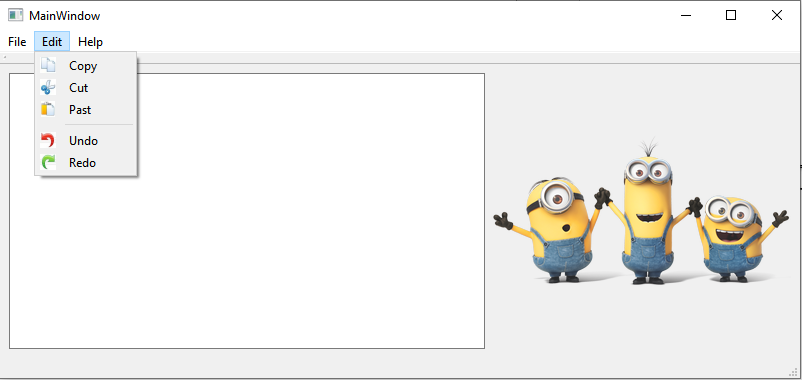
Also include them in the toolbar.

# QPalette class
The QPalette class contains color groups for each widget state.
DETAILS
A palette consists of three color groups: Active, Disabled, and Inactive. All widgets in Qt contain a palette and use their palette to draw themselves. This makes the user interface easily configurable and easier to keep consistent.
If you create a new widget we strongly recommend that you use the colors in the palette rather than hard-coding specific colors.
The color groups:
- The Active group is used for the window that has keyboard focus.
- The Inactive group is used for other windows.
- The Disabled group is used for widgets (not windows) that are disabled for some reason.
Both active and inactive windows can contain disabled widgets. (Disabled widgets are often called inaccessible or grayed out.)
In most styles, Active and Inactive look the same.
Colors and brushes can be set for particular roles in any of a palette's color groups with setColor() and setBrush(). A color group contains a group of colors used by widgets for drawing themselves. We recommend that widgets use color group roles from the palette such as "foreground" and "base" rather than literal colors like "red" or "turquoise". The color roles are enumerated and defined in the ColorRole documentation.
We strongly recommend that you use the default palette of the current style (returned by QGuiApplication::palette()) and modify that as necessary. This is done by Qt's widgets when they are drawn.
To modify a color group you call the functions setColor()and setBrush(), depending on whether you want a pure color or a pixmap pattern.
There are also corresponding color() and brush()getters, and a commonly used convenience function to get the ColorRole for the current ColorGroup: window(), windowText(), base(), etc.
You can copy a palette using the copy constructor and test to see if two palettes are identical using isCopyOf().
QPalette is optimized by the use of implicit sharing, so it is very efficient to pass QPalette objects as arguments.
Warning: Some styles do not use the palette for all drawing, for instance, if they make use of native theme engines. This is the case for both the Windows Vista and the macOS styles.
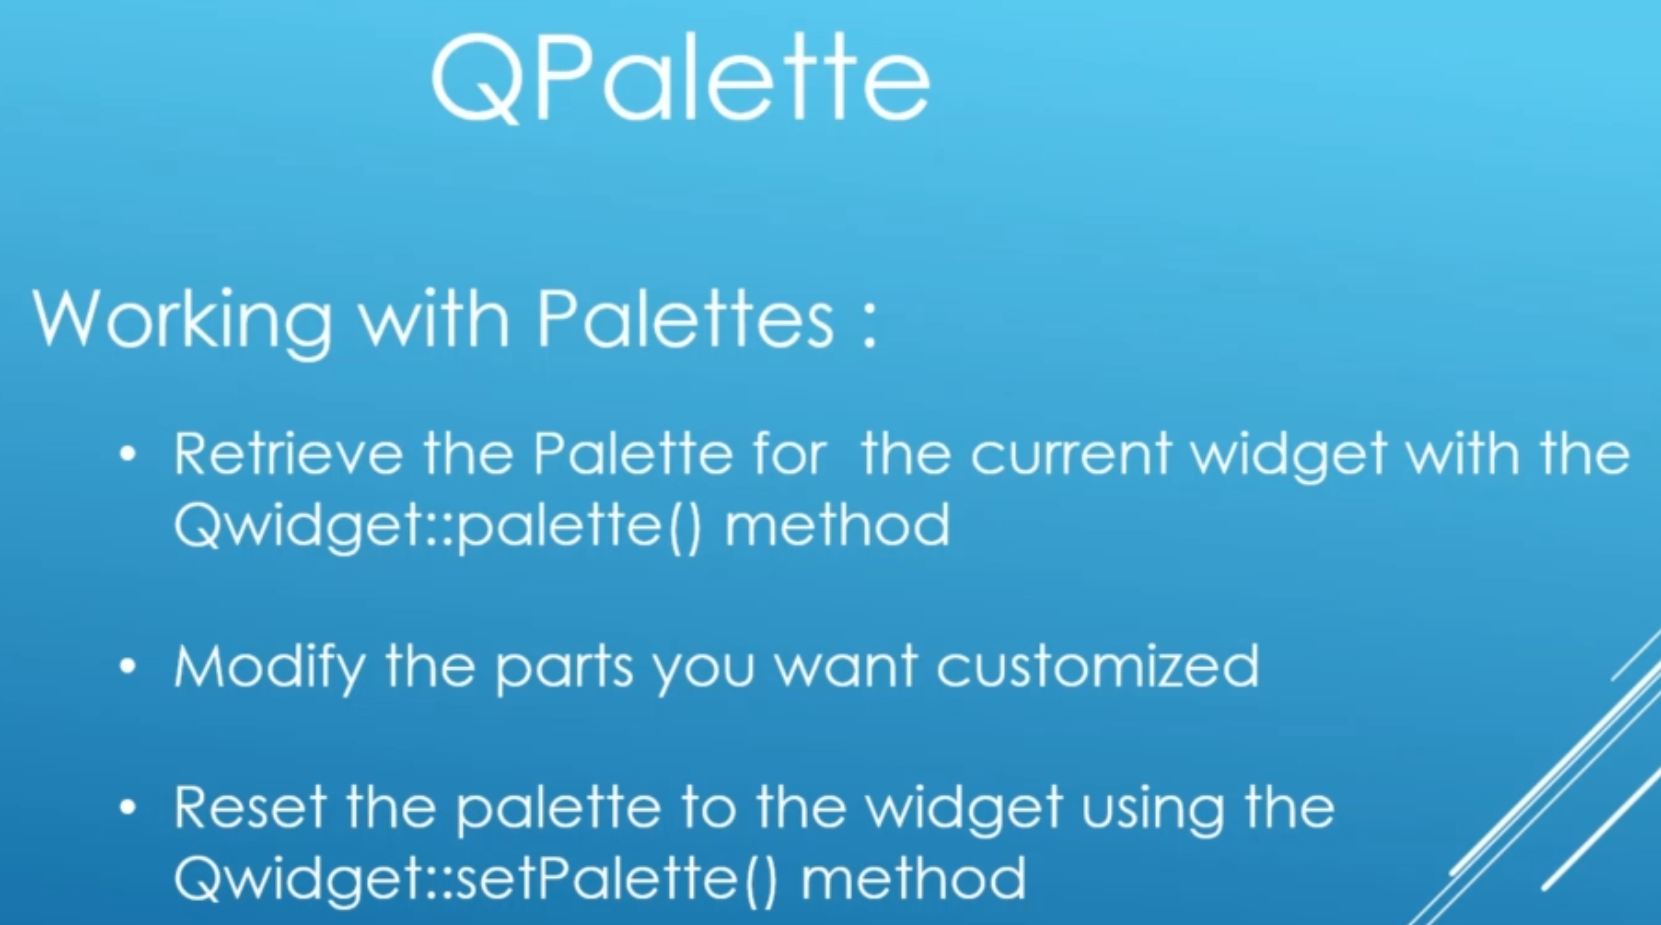
First let's create a simple application with two buttons and a label

That's out best practice routine:
- Retrieve the palette for the label
- Modify the palette with our changes
- Reset the palette to the widget
#include "widget.h"
#include "./ui_widget.h"

Widget::Widget(QWidget *parent)
    : QWidget(parent)
    , ui(new Ui::Widget)
{
    ui->setupUi(this);

    //Retrieve the palette for the label
    QPalette palette = ui->label->palette();

    ui->label->setAutoFillBackground(true);

    //Modify the palette with our changes
    palette.setColor(QPalette::Window, Qt::blue);
    palette.setColor(QPalette::WindowText, Qt::red);

    //Reset the palette to the widget
    ui->label->setPalette(palette);
}

Widget::~Widget()
{
    delete ui;
}
2
3
4
5
6
7
8
9
10
11
12
13
14
15
16
17
18
19
20
21
22
23
24
25
26

We can also detect the state of a button, if it is active or disabled
#include "widget.h"
#include "./ui_widget.h"
#include <QDebug>

Widget::Widget(QWidget *parent)
    : QWidget(parent)
    , ui(new Ui::Widget)
{
    ui->setupUi(this);

    //Retrieve the palette for the label
    QPalette palette = ui->label->palette();

    ui->label->setAutoFillBackground(true);

    //Modify the palette with our changes
    palette.setColor(QPalette::Window, Qt::blue);
    palette.setColor(QPalette::WindowText, Qt::red);

    //Reset the palette to the widget
    ui->label->setPalette(palette);
}

Widget::~Widget()
{
    delete ui;
}


void Widget::on_activeButton_clicked()
{
    QPalette::ColorGroup activeButtonColorGroup = ui->activeButton->palette().currentColorGroup();
    QPalette::ColorGroup disableButtonColorGroup = ui->disabledButton->palette().currentColorGroup();

    qDebug() << "Active button color group: " << activeButtonColorGroup;
    qDebug() << "Disabled button color group: " << disableButtonColorGroup;
}
2
3
4
5
6
7
8
9
10
11
12
13
14
15
16
17
18
19
20
21
22
23
24
25
26
27
28
29
30
31
32
33
34
35
36
37
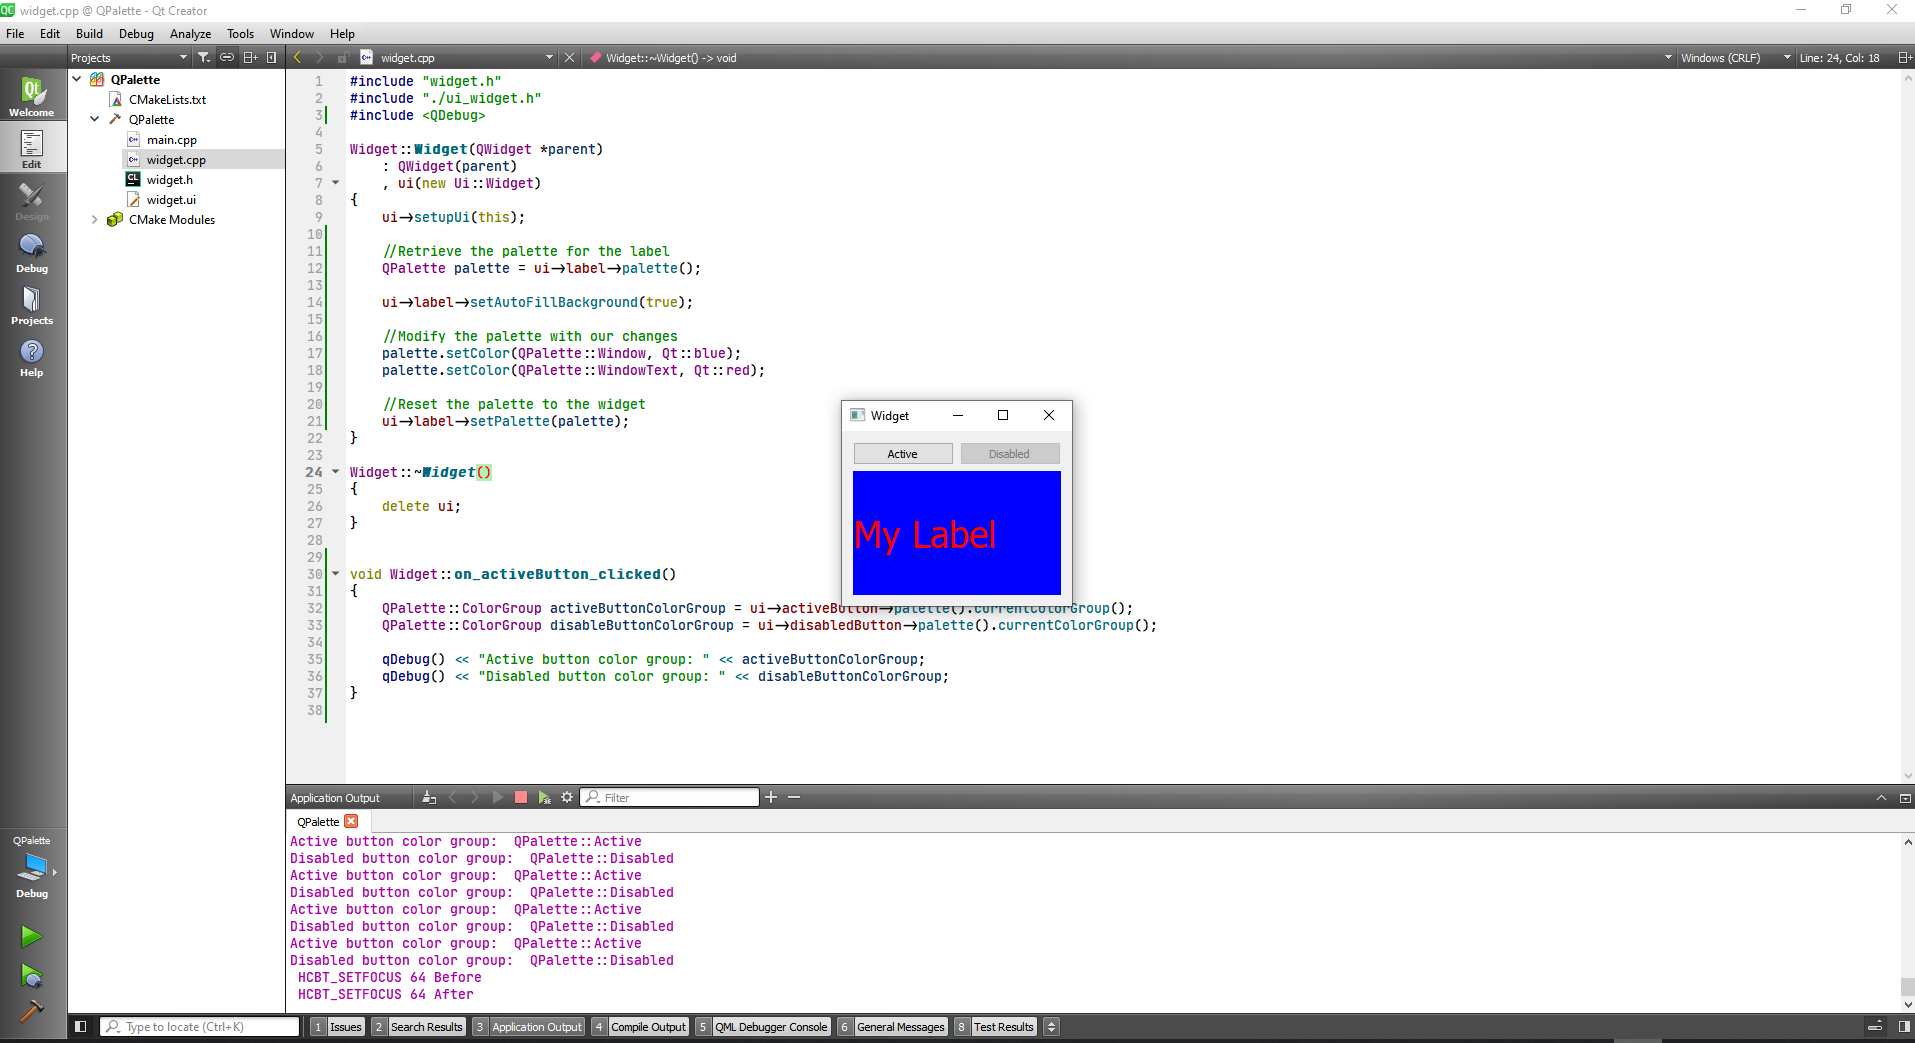
# Working with Style Sheets
First we are goingto creat a simple ui with two line text and one button.
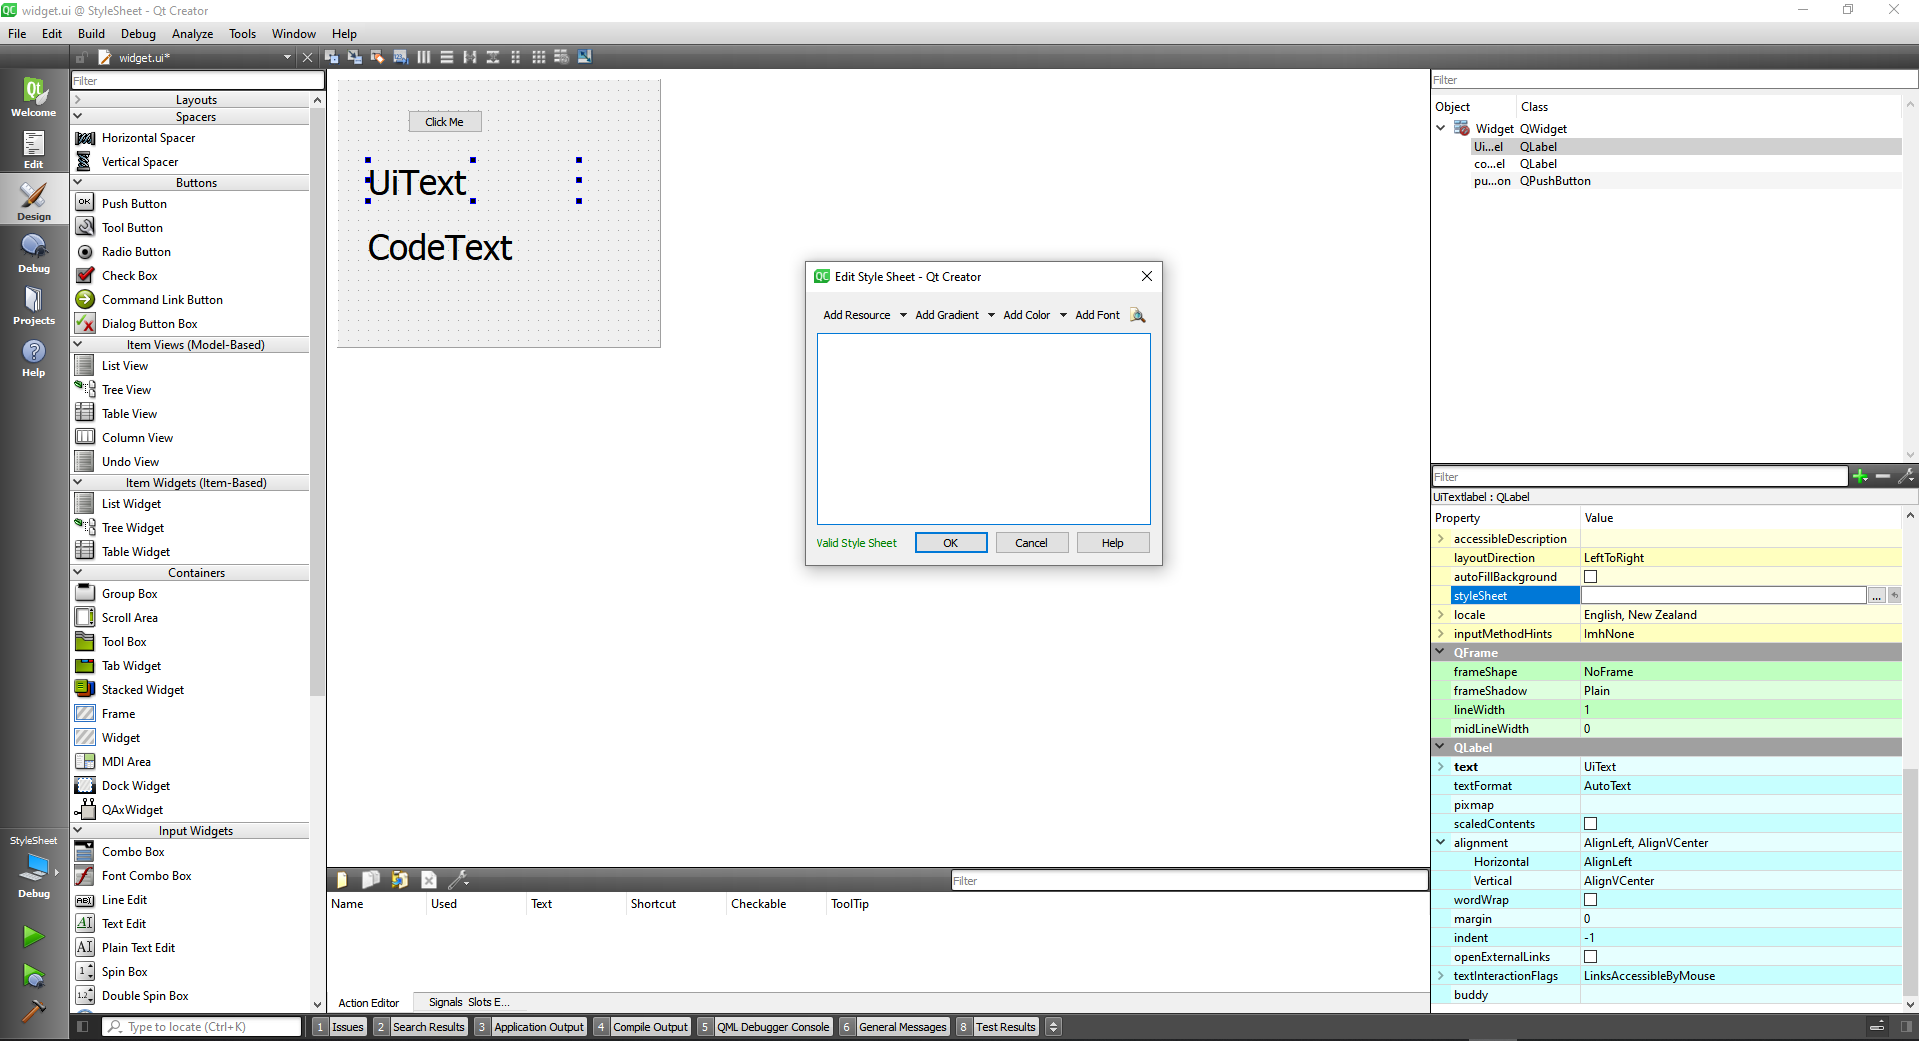


Now we can add a Dialog
#include "widget.h"
#include "./ui_widget.h"
#include "customdialog.h"


Widget::Widget(QWidget *parent)
    : QWidget(parent)
    , ui(new Ui::Widget)
{
    ui->setupUi(this);
}

Widget::~Widget()
{
    delete ui;
}


void Widget::on_pushButton_clicked()
{
    CustomDialog * dialog = new CustomDialog(this);

    dialog->exec();
}
2
3
4
5
6
7
8
9
10
11
12
13
14
15
16
17
18
19
20
21
22
23
24
And add some stylesheets at the main.cpp, for a whit background with a red color in the text.
#include "widget.h"

#include <QApplication>

int main(int argc, char *argv[])
{
    QApplication a(argc, argv);

    //Set stylesheet application wise
    a.setStyleSheet("QPushButton{color:red; background-color:white;}");

    Widget w;
    w.show();
    return a.exec();
}
2
3
4
5
6
7
8
9
10
11
12
13
14
15
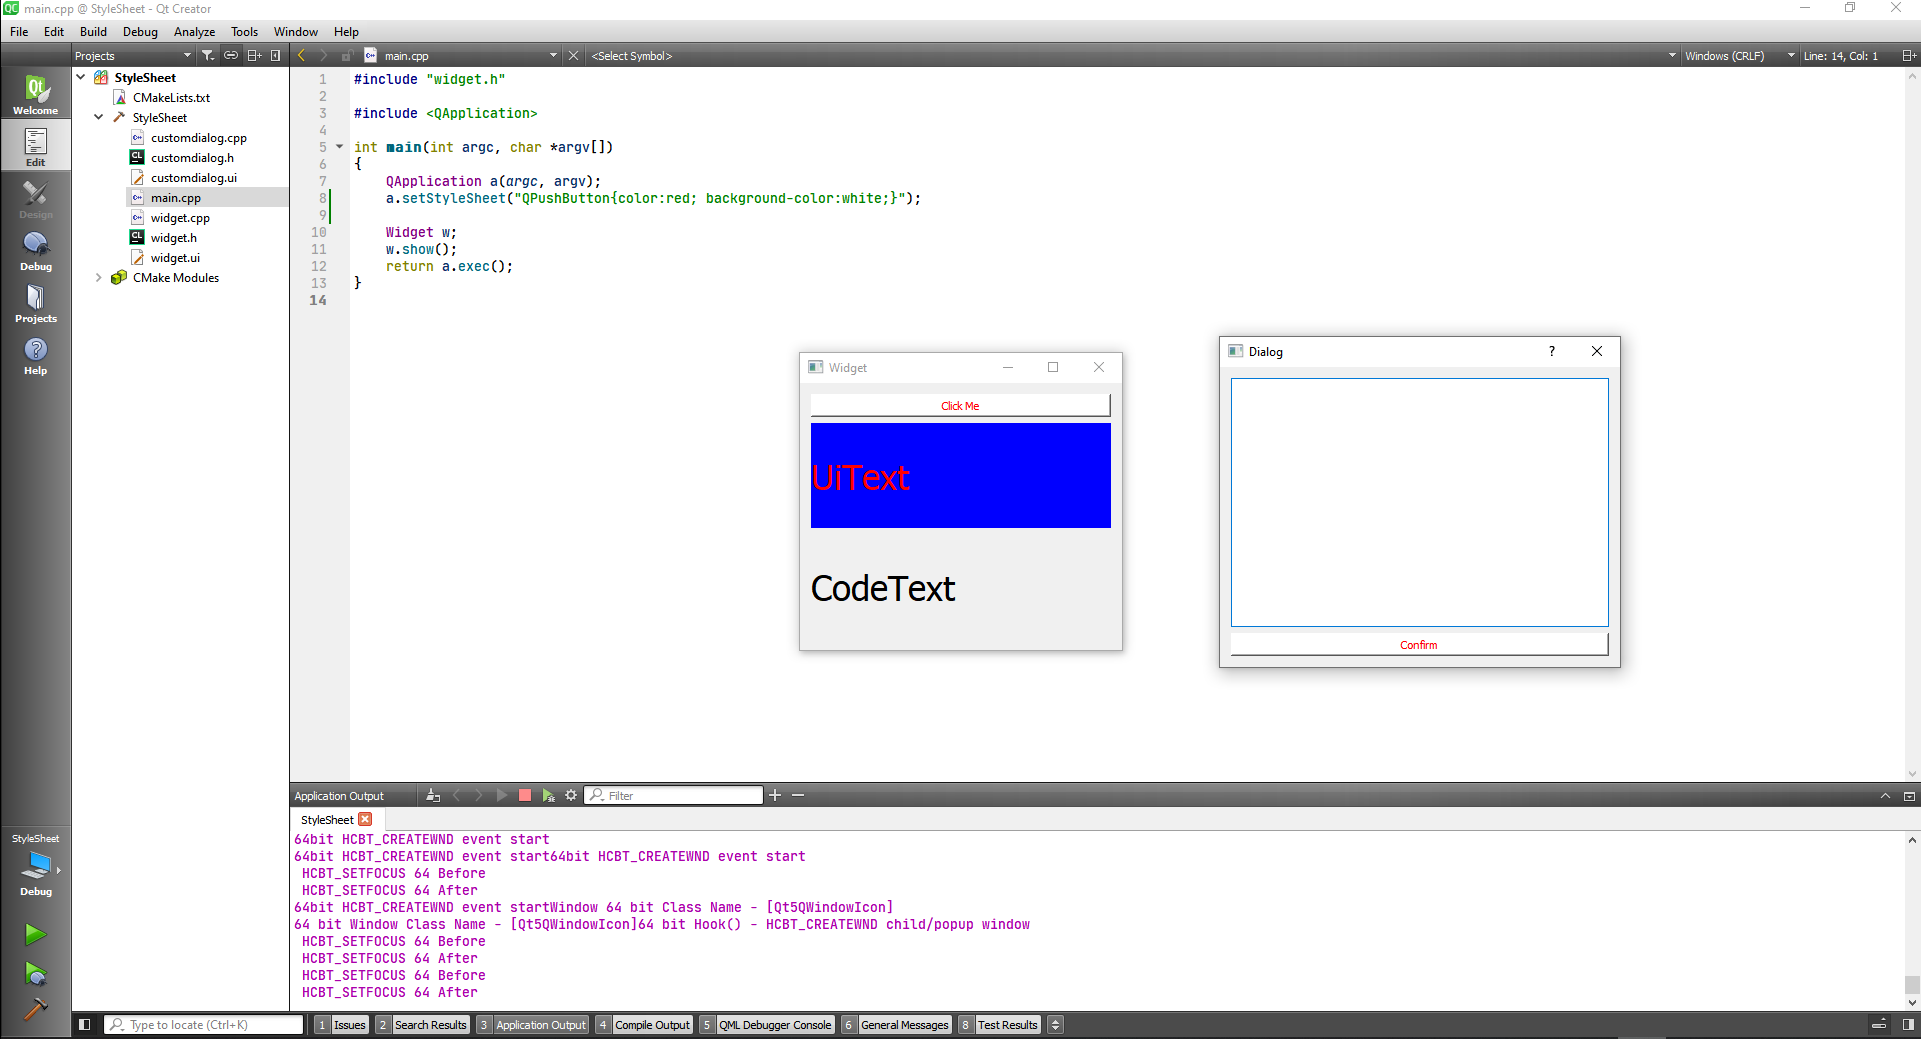
Now we are going to set an stylesheet on the dialog, at widget.cpp
#include "widget.h"
#include "./ui_widget.h"
#include "customdialog.h"


Widget::Widget(QWidget *parent)
    : QWidget(parent)
    , ui(new Ui::Widget)
{
    ui->setupUi(this);
}

Widget::~Widget()
{
    delete ui;
}


void Widget::on_pushButton_clicked()
{
    CustomDialog * dialog = new CustomDialog(this);

    //Set stylesheet on a container widget
    dialog->setStyleSheet("QPushButton{background-color:yellow; color:blue;}");

    dialog->exec();
}
2
3
4
5
6
7
8
9
10
11
12
13
14
15
16
17
18
19
20
21
22
23
24
25
26
27
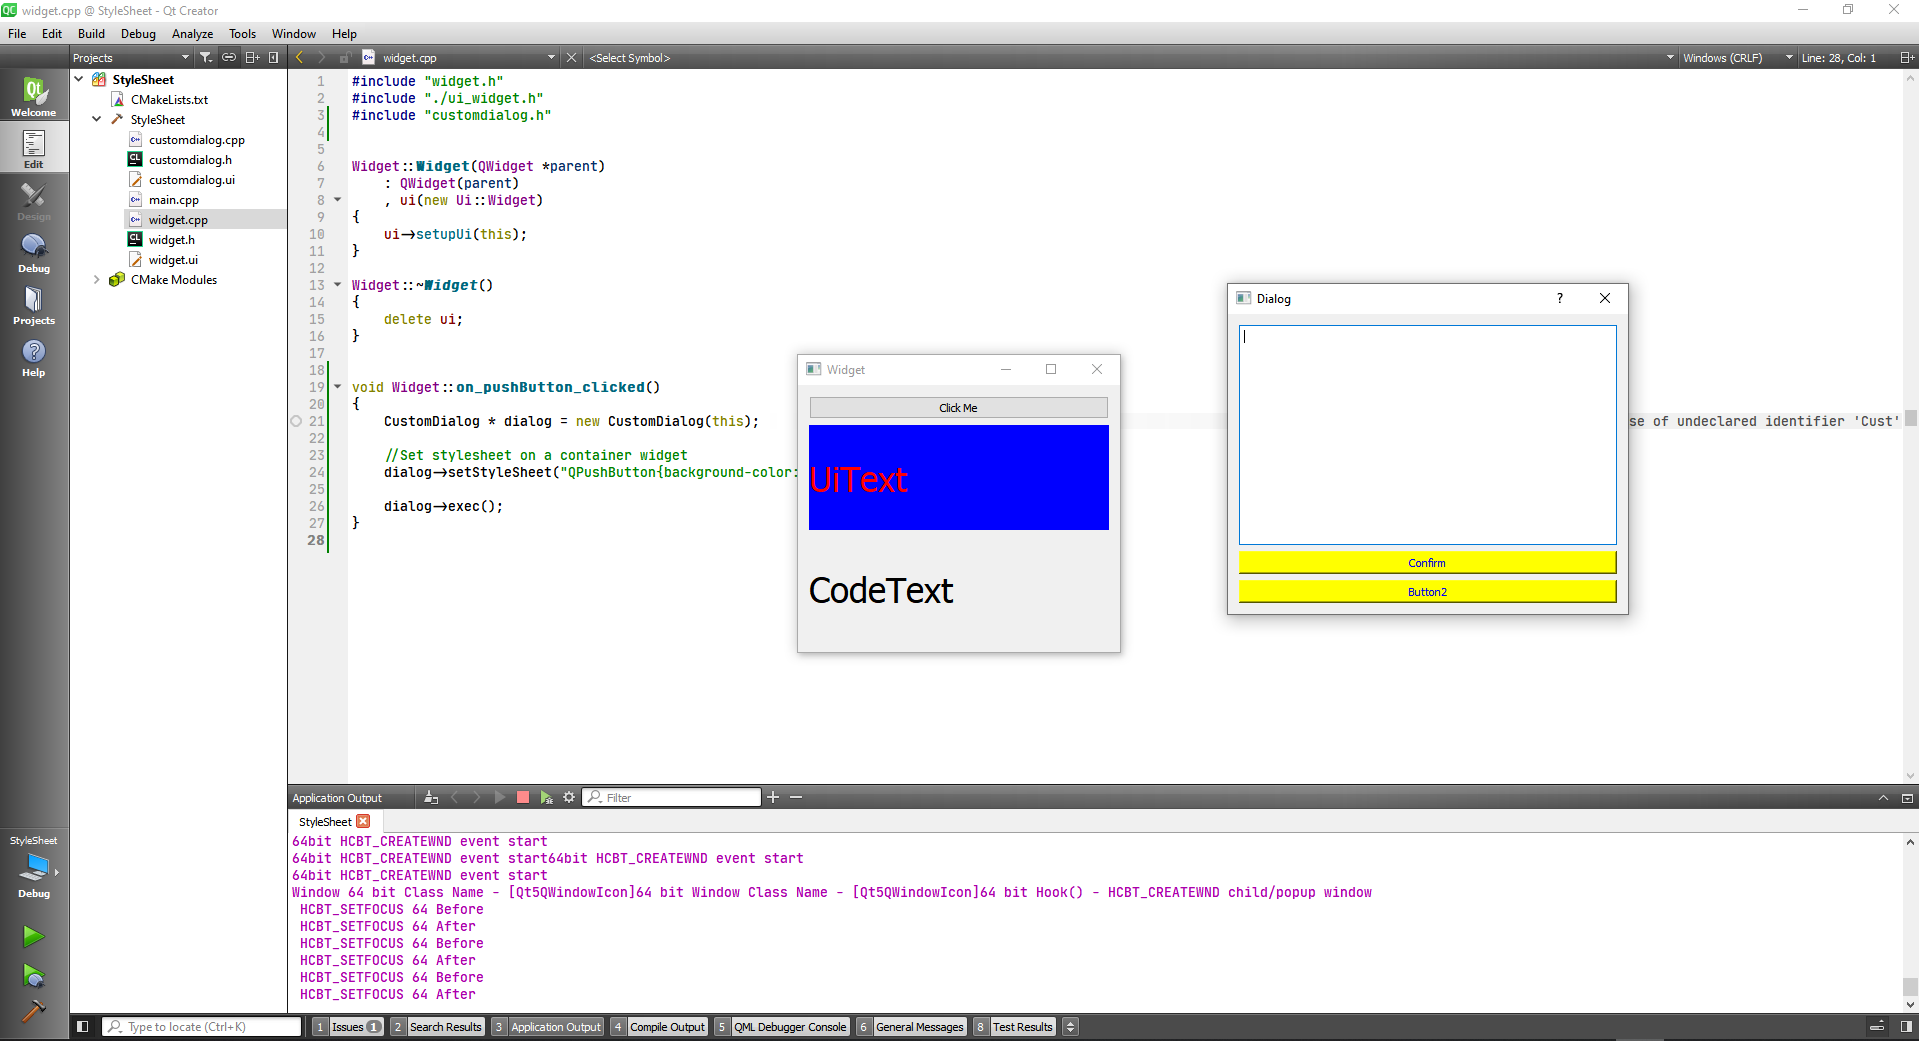
The third way to set a stylesheet is to set it to specific widget Let's set it in the custom dialog.cpp
#include "customdialog.h"
#include "ui_customdialog.h"

CustomDialog::CustomDialog(QWidget *parent) :
    QDialog(parent),
    ui(new Ui::CustomDialog)
{
    ui->setupUi(this);

    ui->pushButton->setStyleSheet("background-color:red;");
}

CustomDialog::~CustomDialog()
{
    delete ui;
}
2
3
4
5
6
7
8
9
10
11
12
13
14
15
16
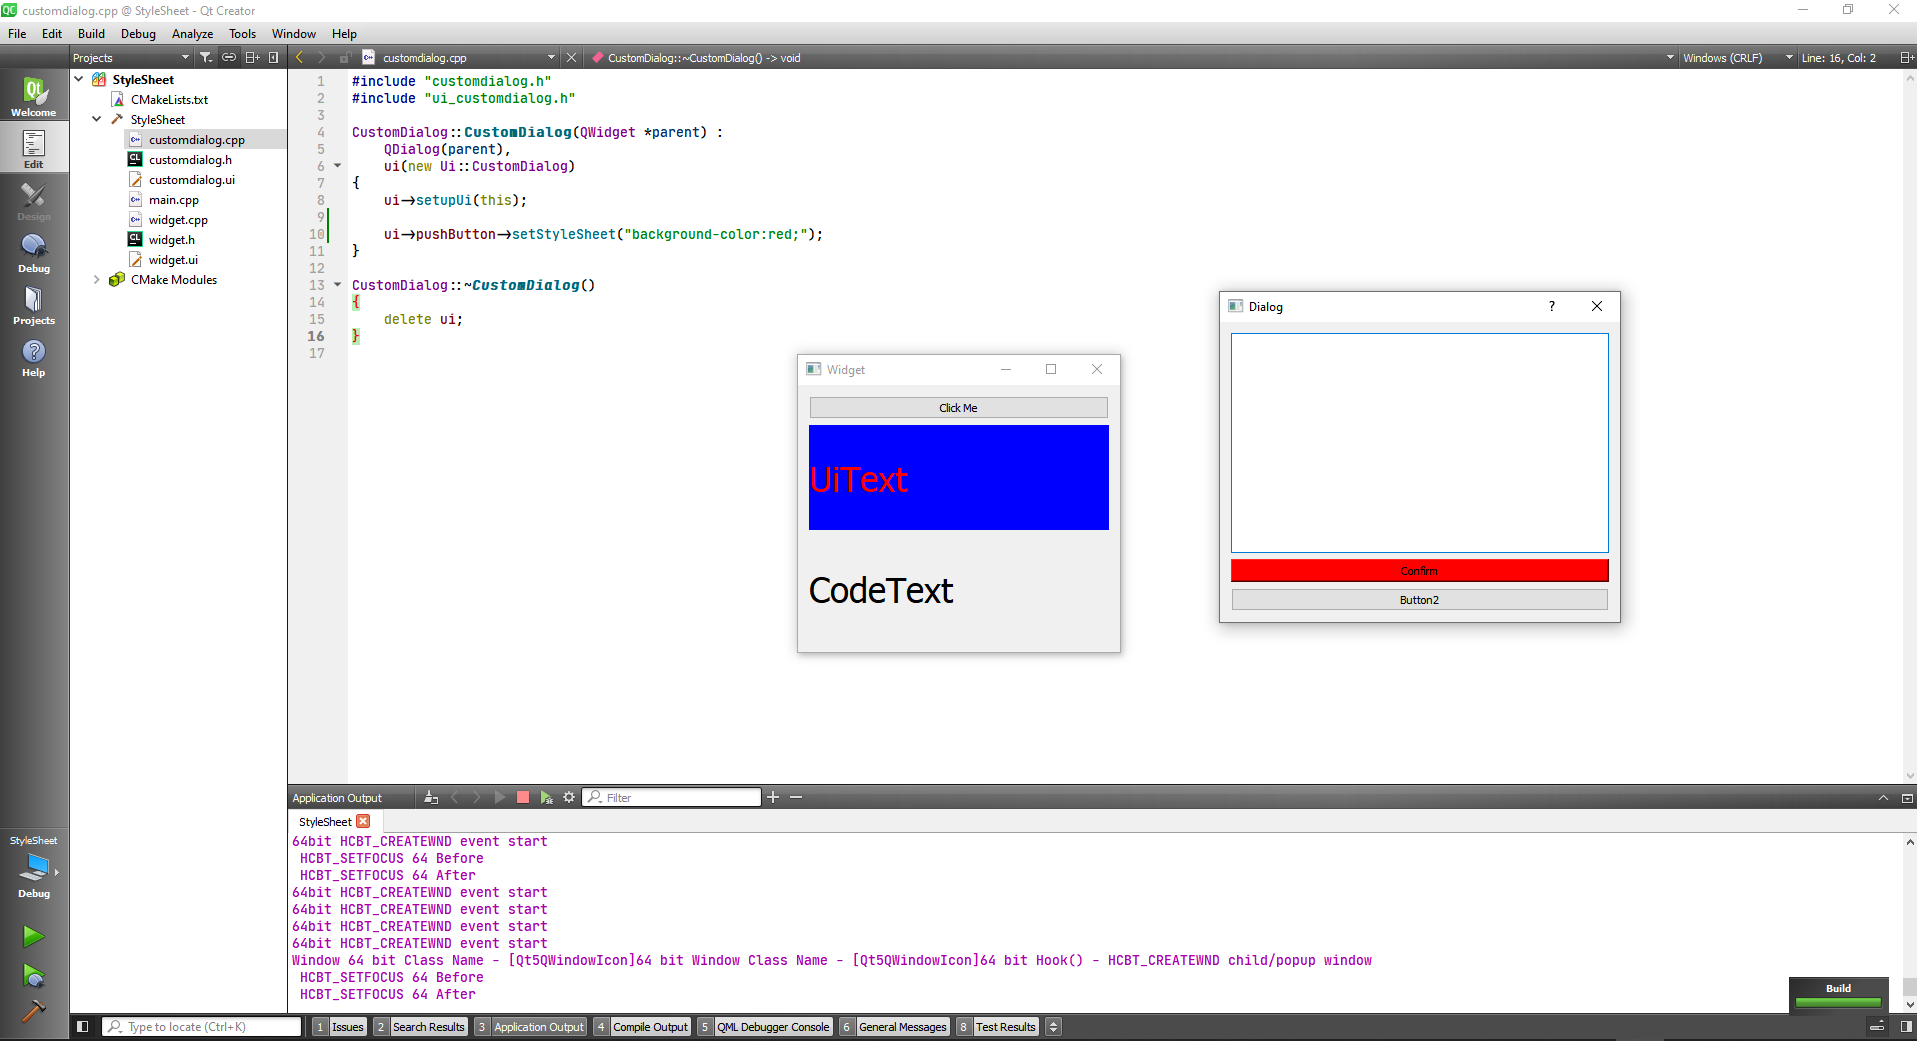
For a matter of consistency we can put the selector in the code
#include "customdialog.h"
#include "ui_customdialog.h"

CustomDialog::CustomDialog(QWidget *parent) :
    QDialog(parent),
    ui(new Ui::CustomDialog)
{
    ui->setupUi(this);

    //Set styleshht on specific widget
    ui->pushButton->setStyleSheet("QPushButton{background-color:red; color:white}");
}

CustomDialog::~CustomDialog()
{
    delete ui;
}
2
3
4
5
6
7
8
9
10
11
12
13
14
15
16
17
18
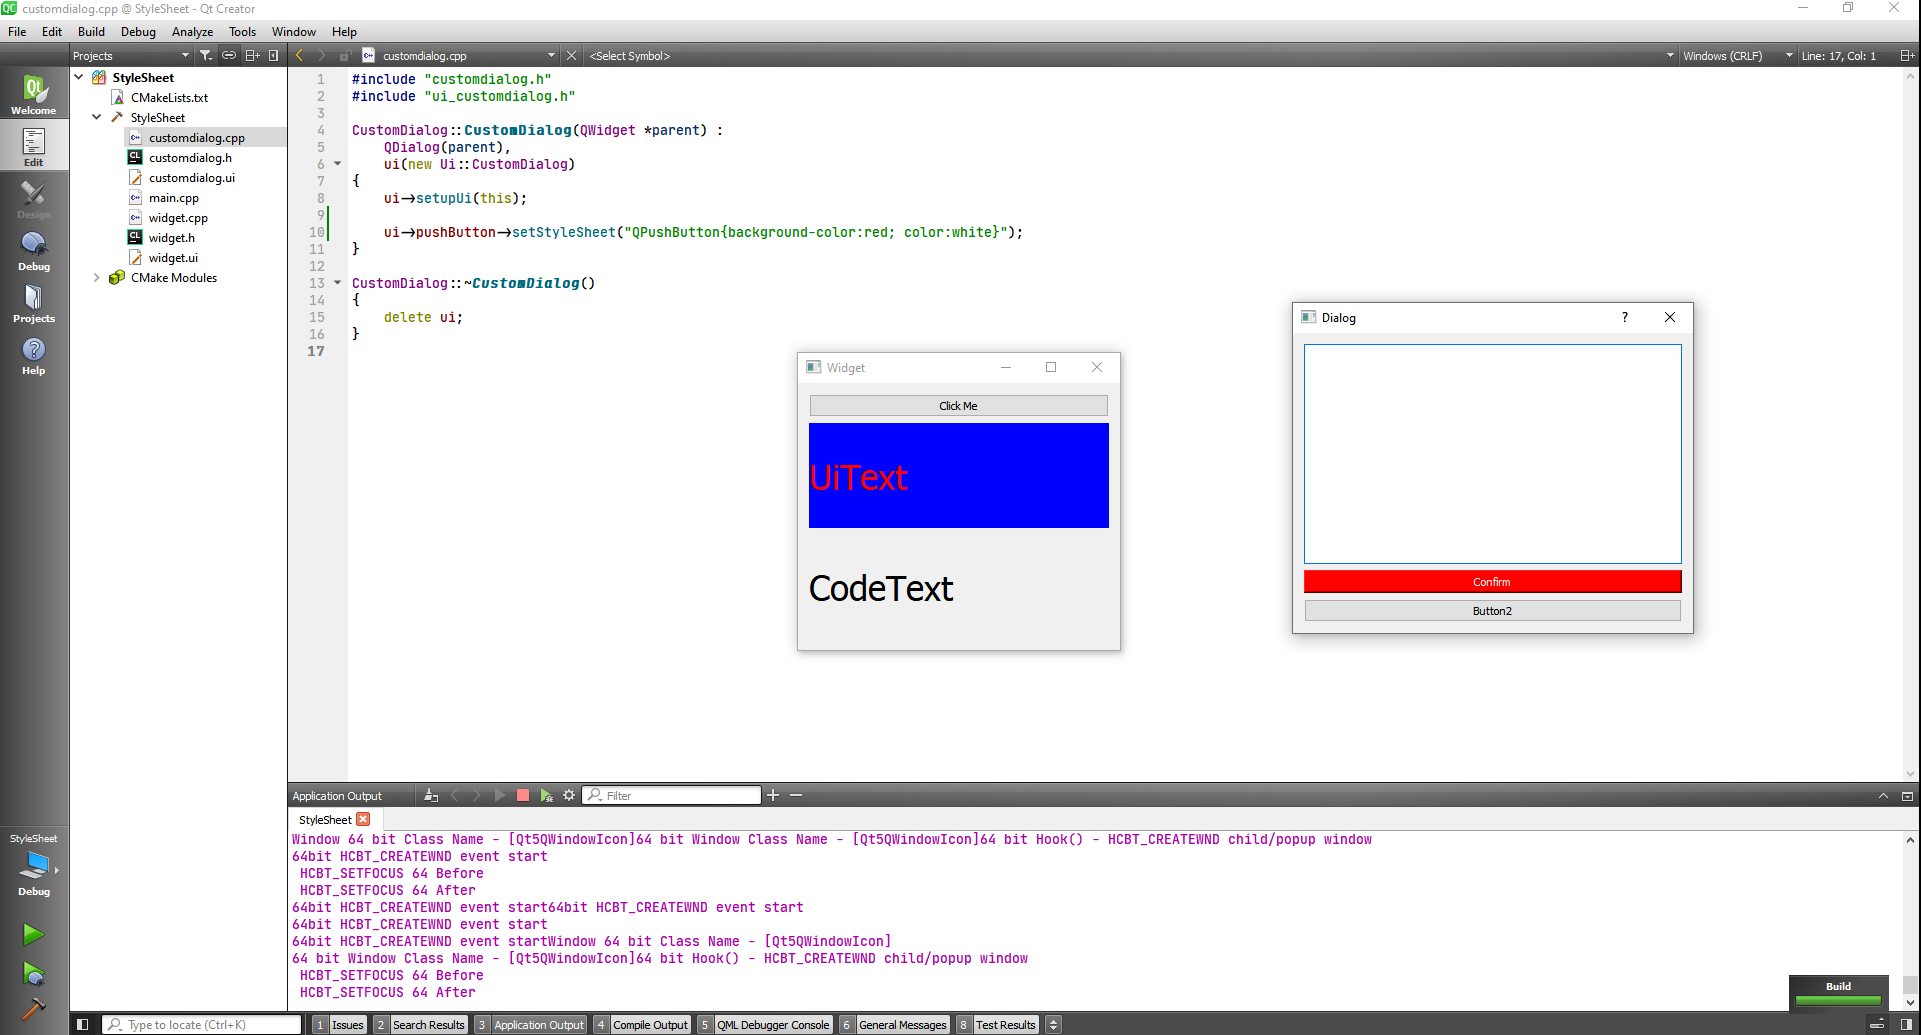
# Style Sheets with External Files
First thing we will need to do for this project is a dialog.
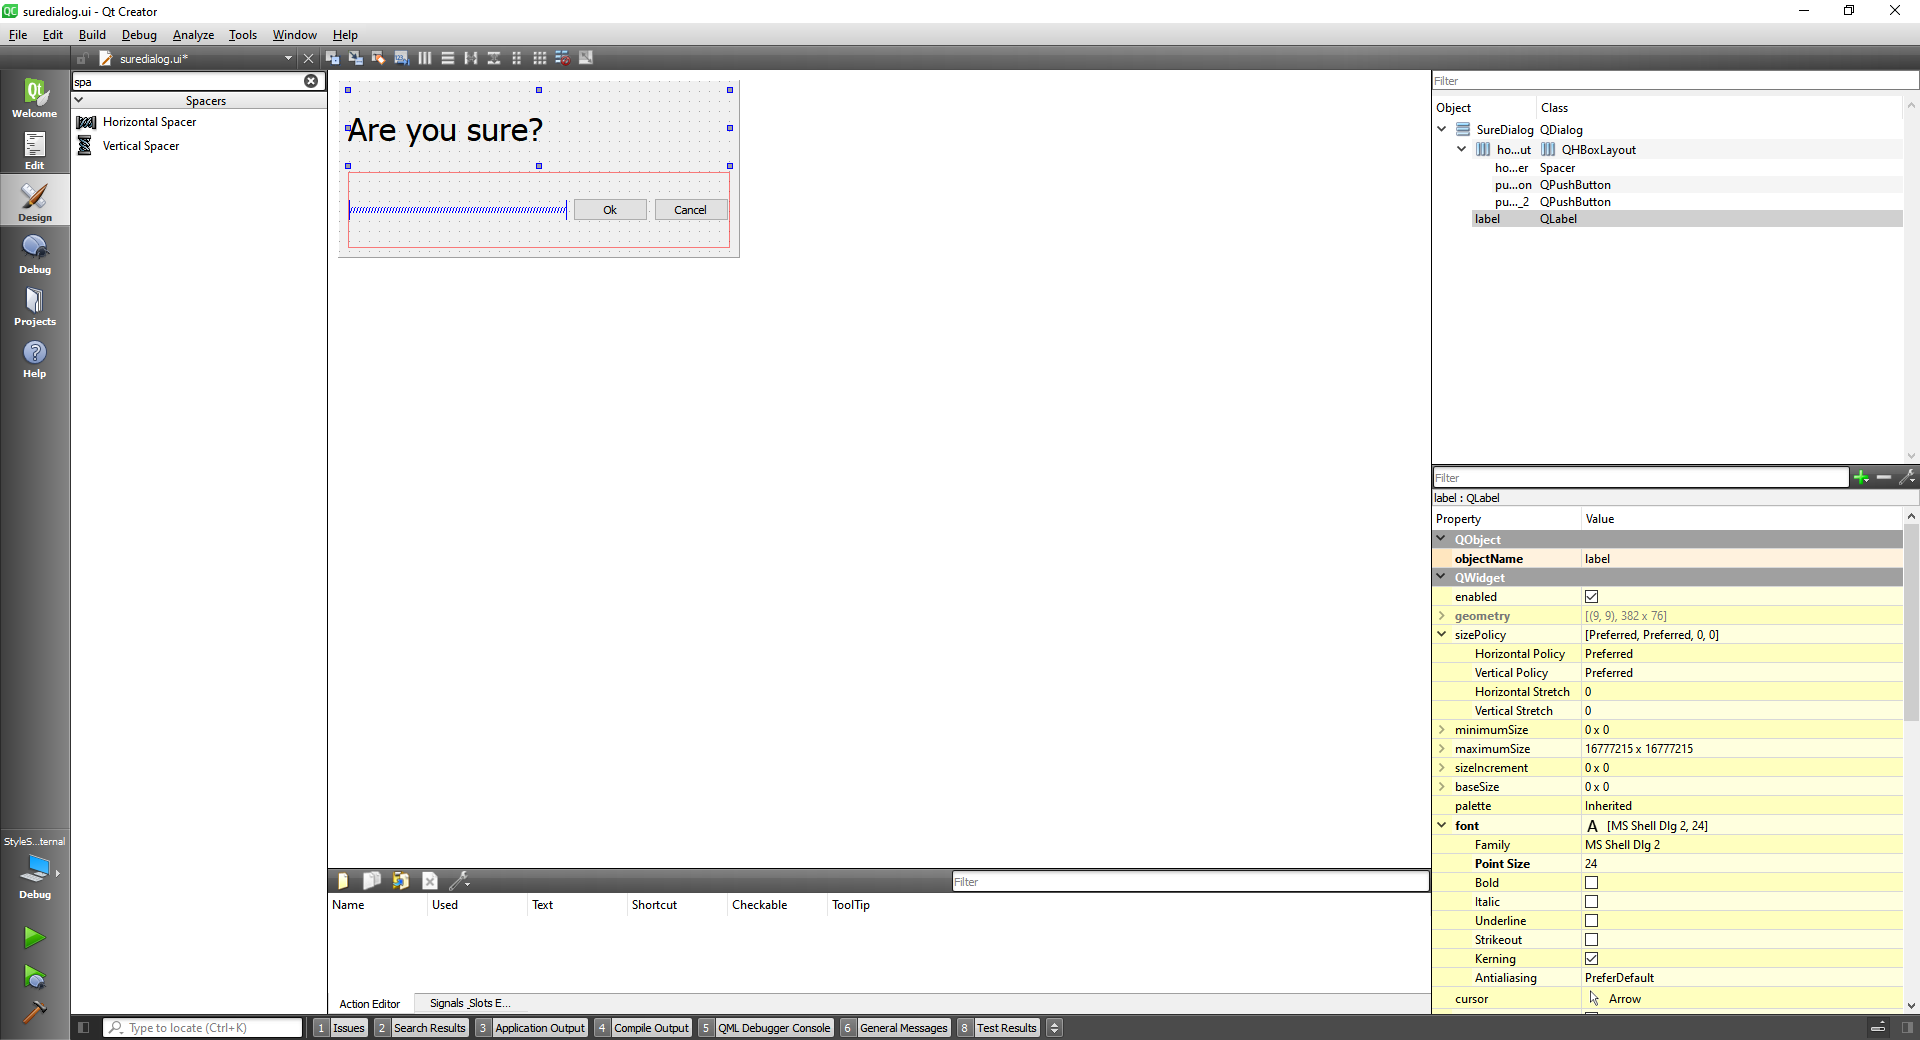
and we are going to create a widget with three line edits for firs, last names and profession.
#include "widget.h"
#include "./ui_widget.h"
#include <suredialog.h>

Widget::Widget(QWidget *parent)
    : QWidget(parent)
    , ui(new Ui::Widget)
{
    ui->setupUi(this);
}

Widget::~Widget()
{
    delete ui;
}


void Widget::on_submitButton_clicked()
{
    SureDialog * dialog = new SureDialog(this);

    dialog->exec();
}
2
3
4
5
6
7
8
9
10
11
12
13
14
15
16
17
18
19
20
21
22
23
TIP
Remember to include the files in the CMakelists.txt
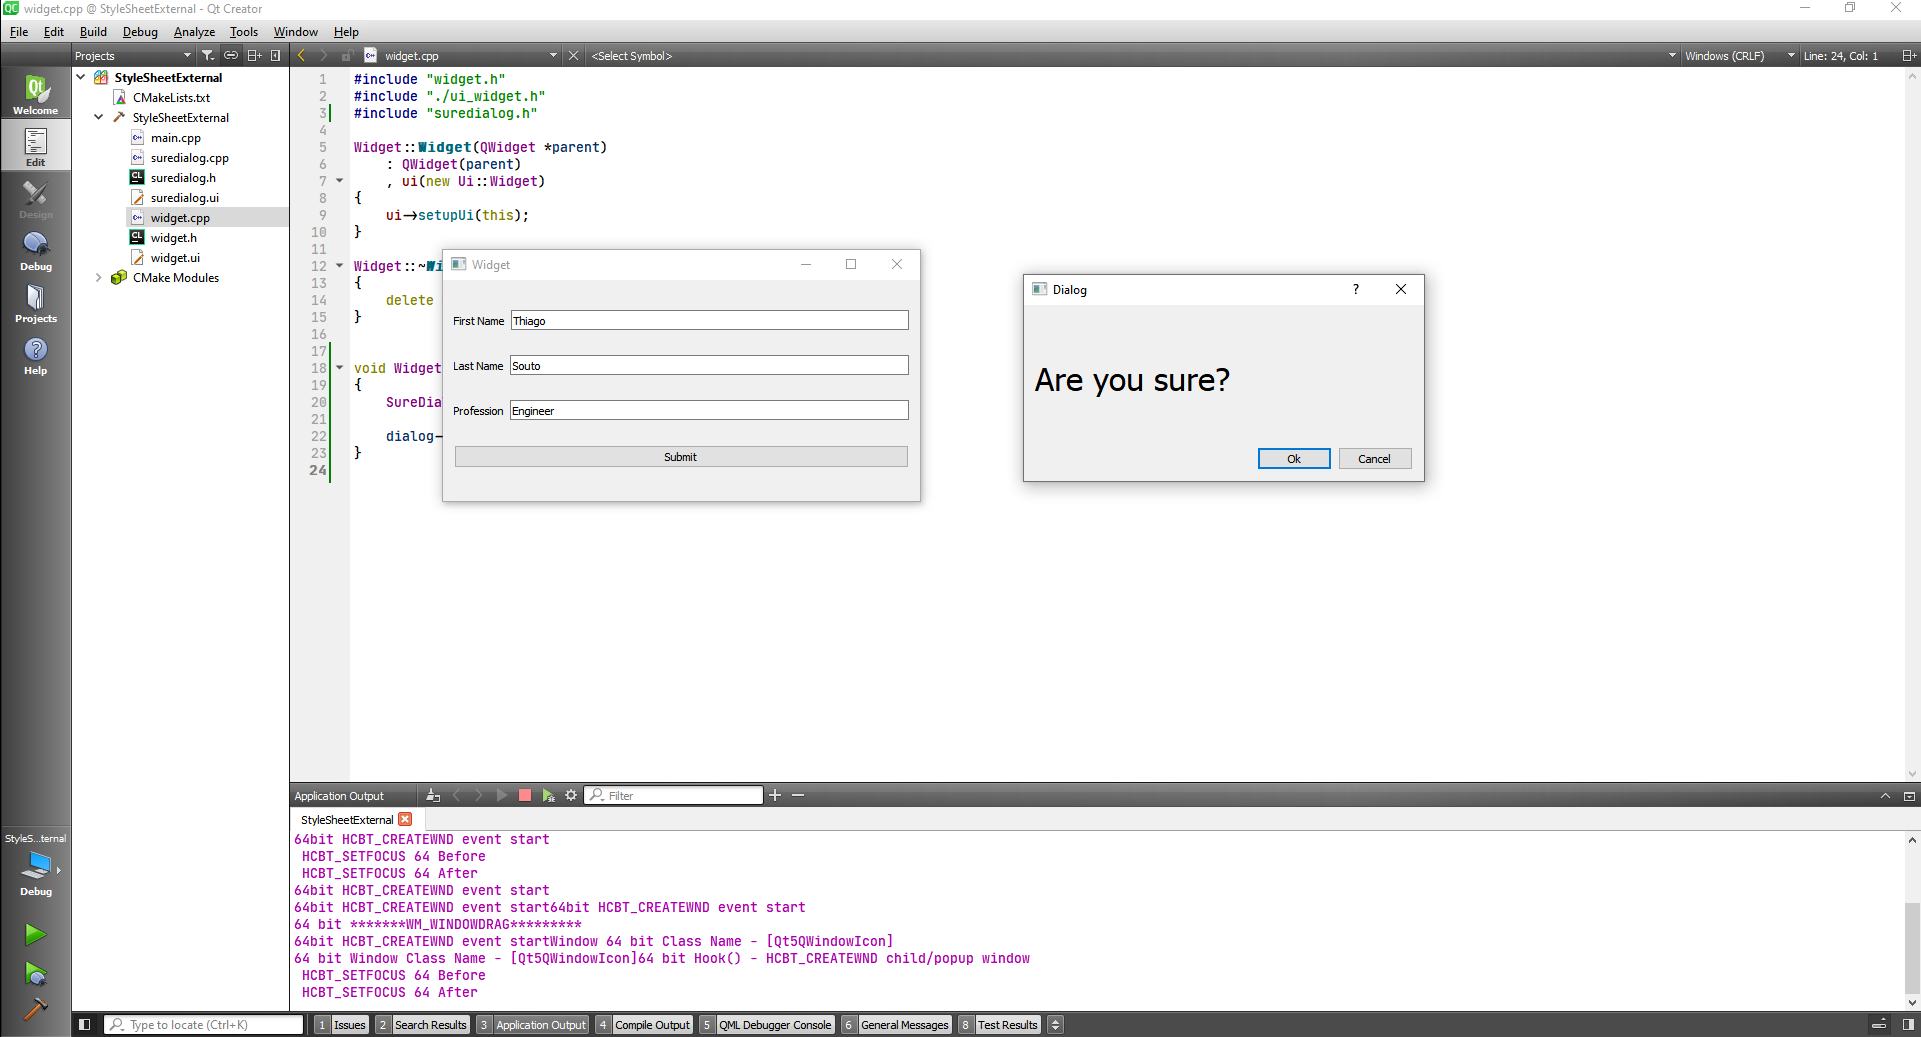
Now we are going to creat a .css file called style in the style folder in the project folder
Add a resource file, add the file to cmake and add the styles.css
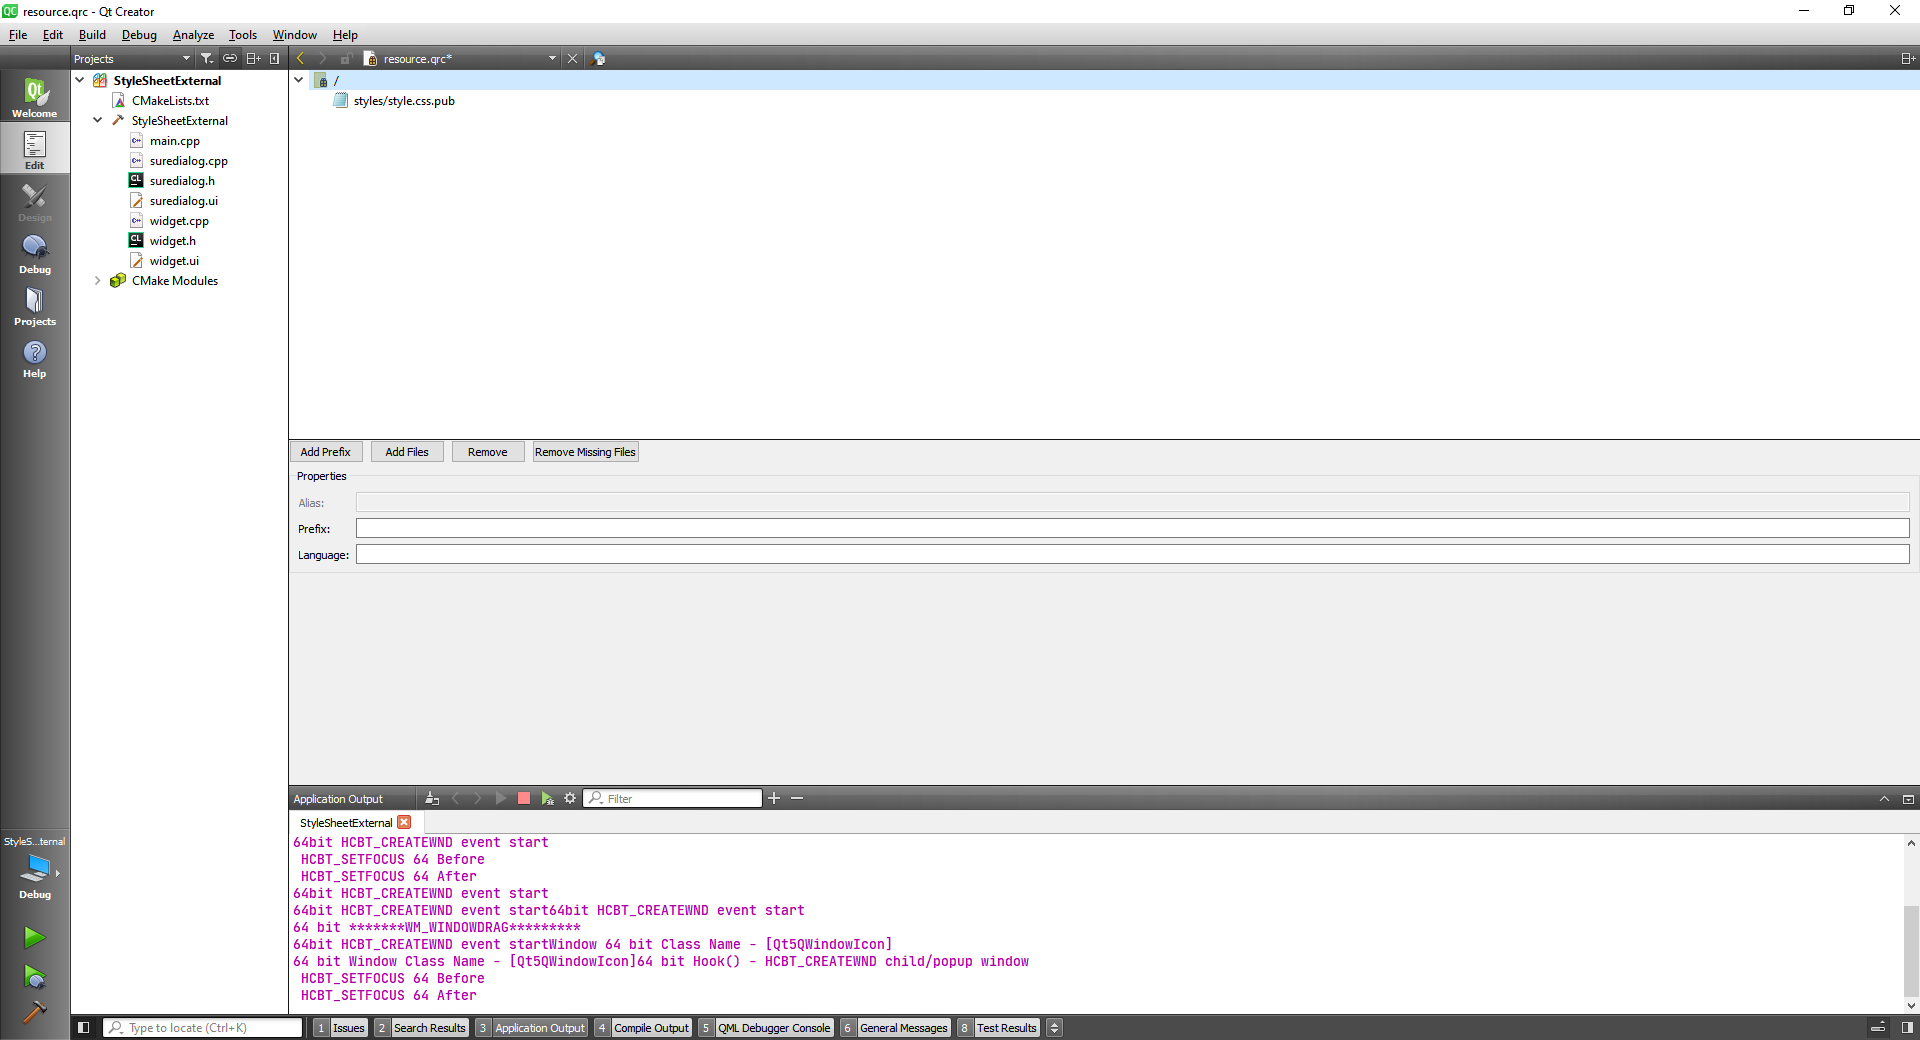
#include "widget.h"
#include <QApplication>
#include <QFile>
#include <QTextStream>

QString readTextFile(QString path) {
    QFile file(path);

    if(file.open(QIODevice::ReadOnly | QIODevice::Text)) {
        QTextStream in(&file);
        return in.readAll();
    }

    return "";
}

int main(int argc, char *argv[])
{
    QApplication a(argc, argv);

    QString css = readTextFile("://styles/style.css");

    if(css.length() > 0) {
        a.setStyleSheet(css);
    }

    Widget w;
    w.show();
    return a.exec();
}
2
3
4
5
6
7
8
9
10
11
12
13
14
15
16
17
18
19
20
21
22
23
24
25
26
27
28
29
30
Now we have to edit the file in Qt creator.
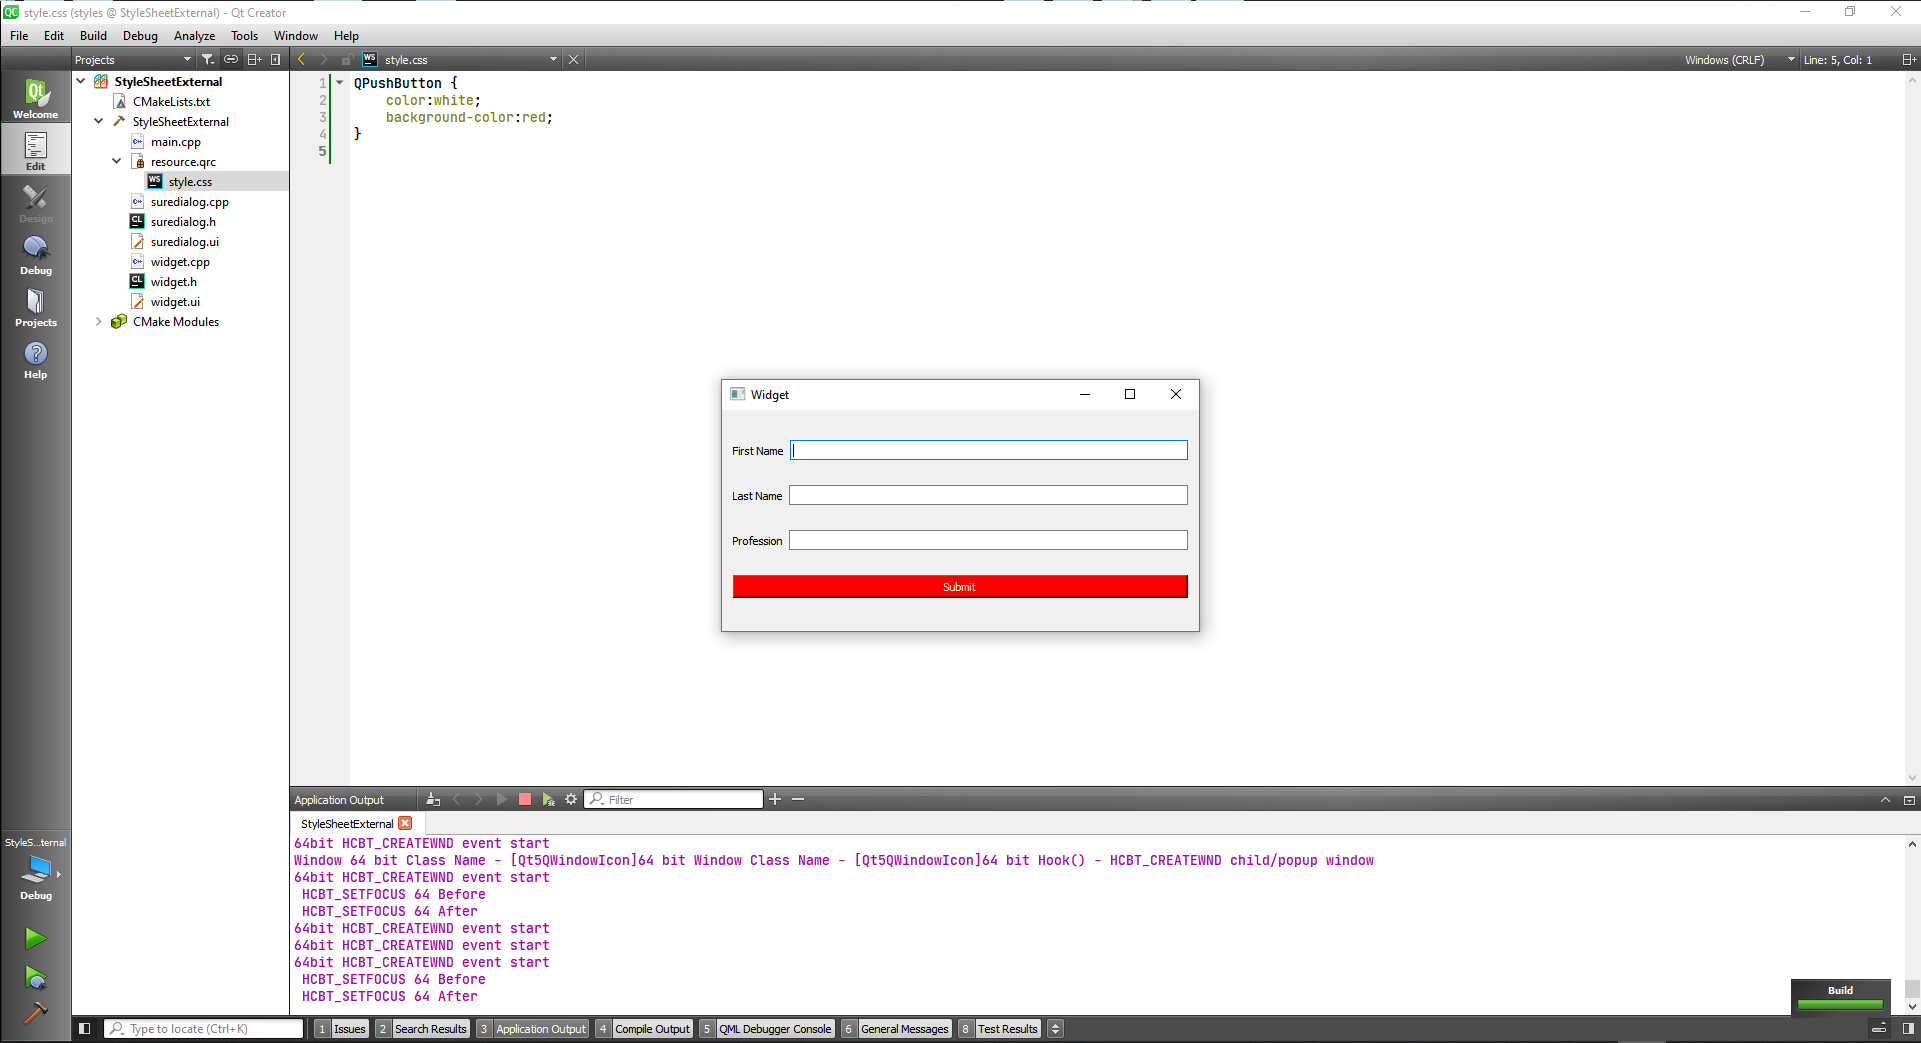
Now we can go further and target some specific properties

QPushButton[text="Submit"] {
    color:white;
    background-color:blue;
}

QPushButton#okButton {
    color:white;
    background-color:green;
}

QPushButton#cancelButton {
    color:white;
    background-color:red;
}
2
3
4
5
6
7
8
9
10
11
12
13
14
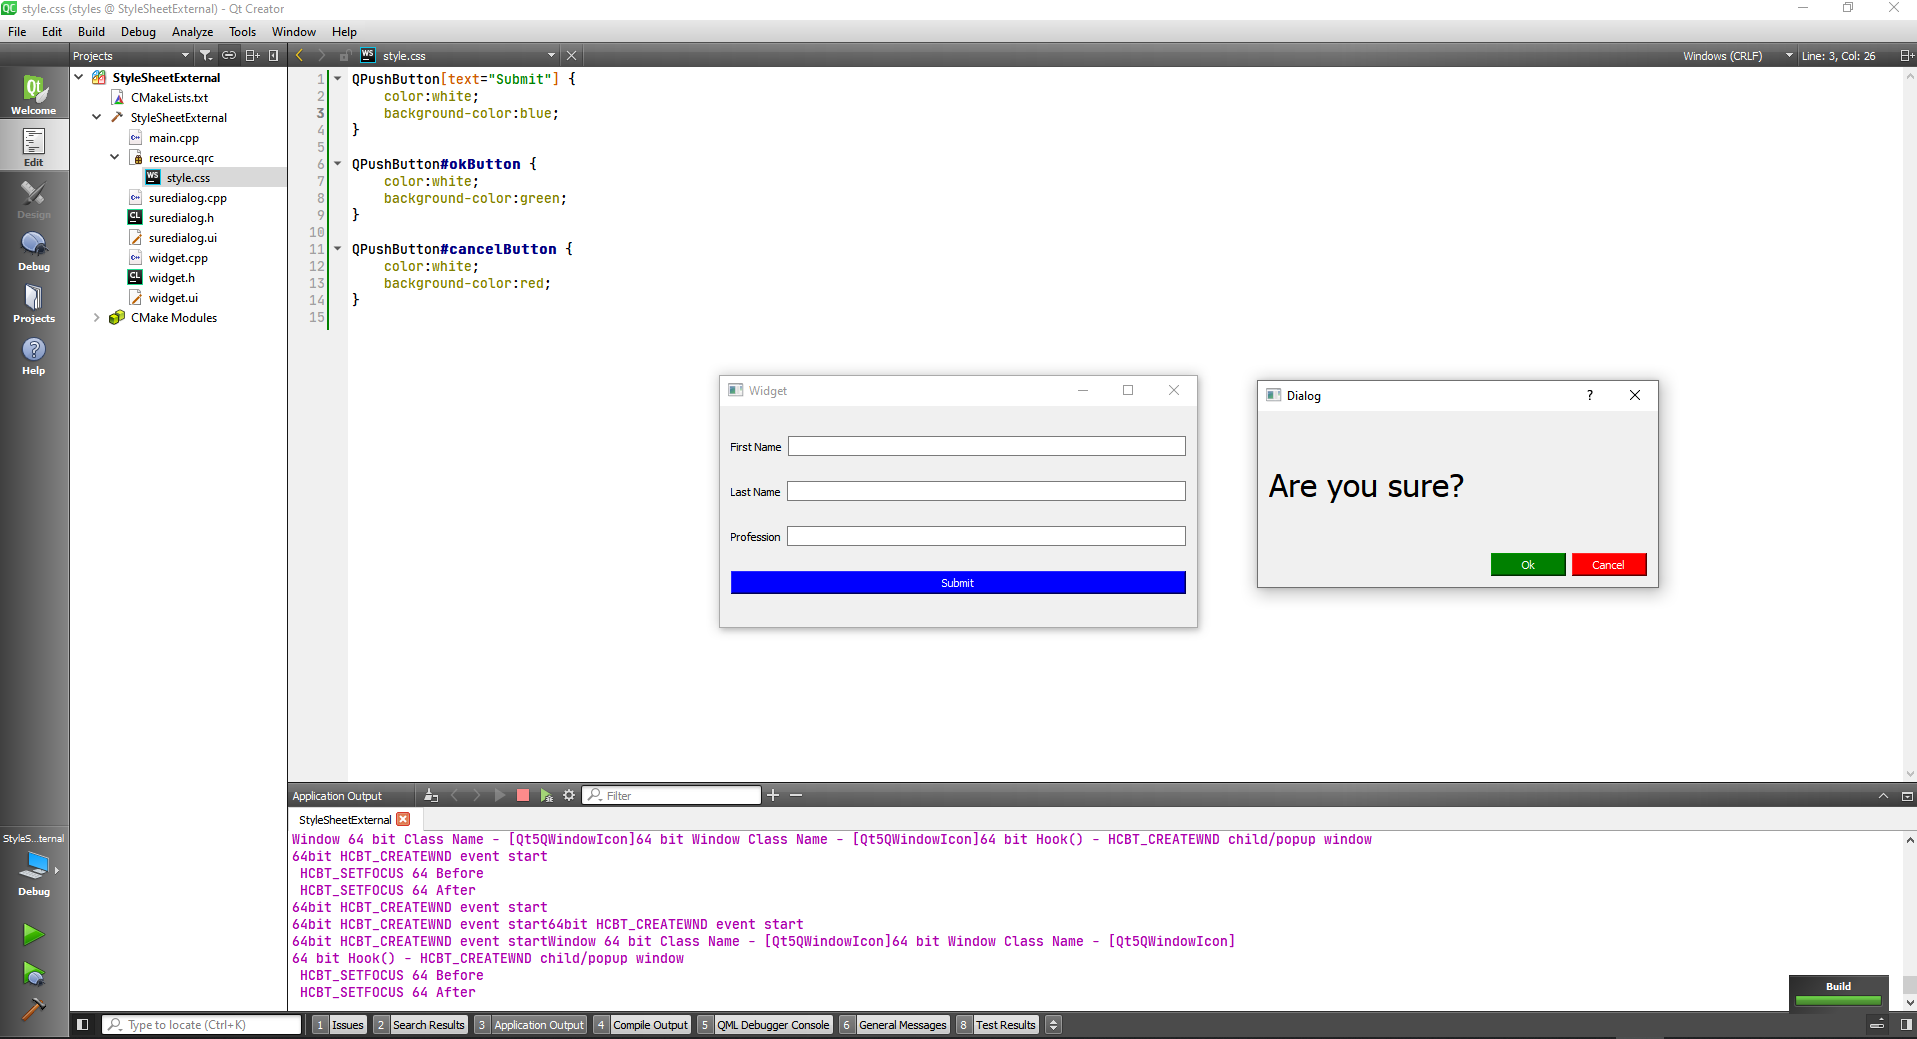
# Do more stuff with Stylesheets
Our goal:
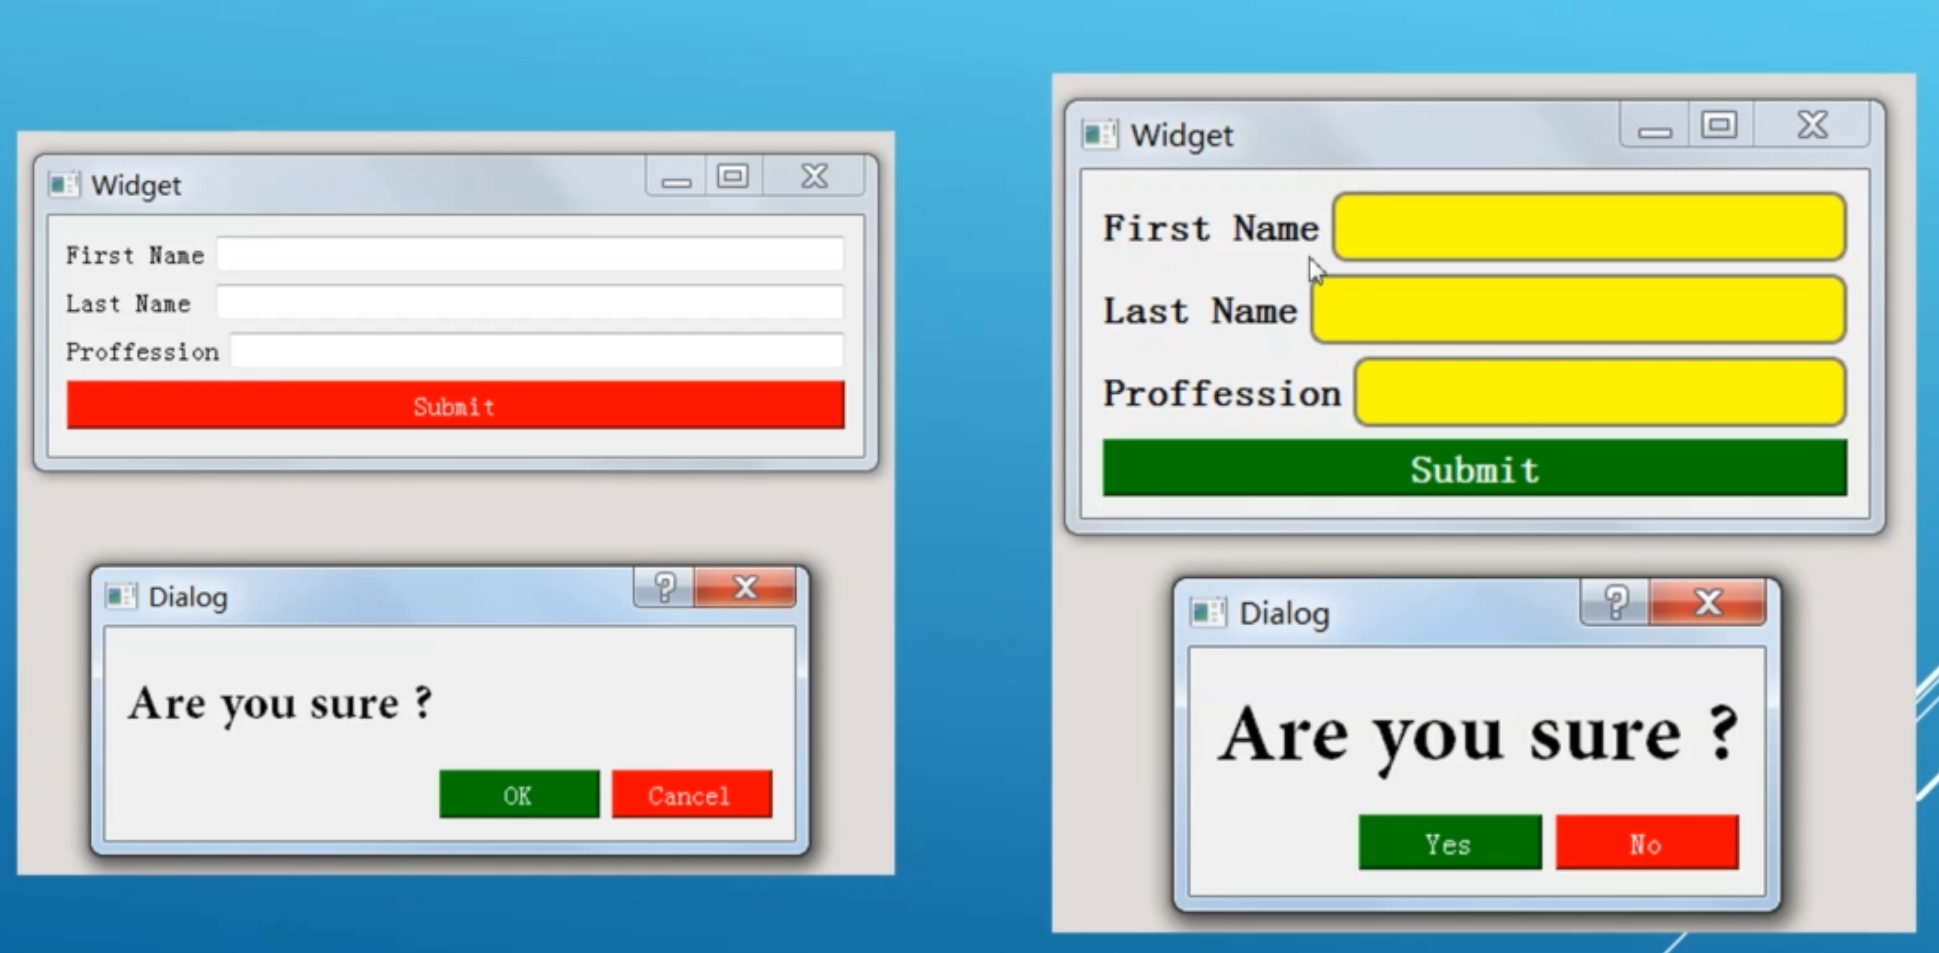
QLineEdit {
    padding: 1px;
    border: 2px solid gray;
    border-radius: 8px;
    background-color: yellow;
    height: 30px;
}

QWidget#Widget > QLabel {
    font-weight: bold;
    font-size: 20px;
}

QPushButton[text="Submit"] {
    color: white;
    background-color: gray;
}

QPushButton#okButton {
    color: white;
    background-color: green;
}

QPushButton#cancelButton {
    color: white;
    background-color: red;
}
2
3
4
5
6
7
8
9
10
11
12
13
14
15
16
17
18
19
20
21
22
23
24
25
26
27

# QSettings class
First let's build a widget with 9 in a grid + 2 buttons, and give the ui a vertical layout
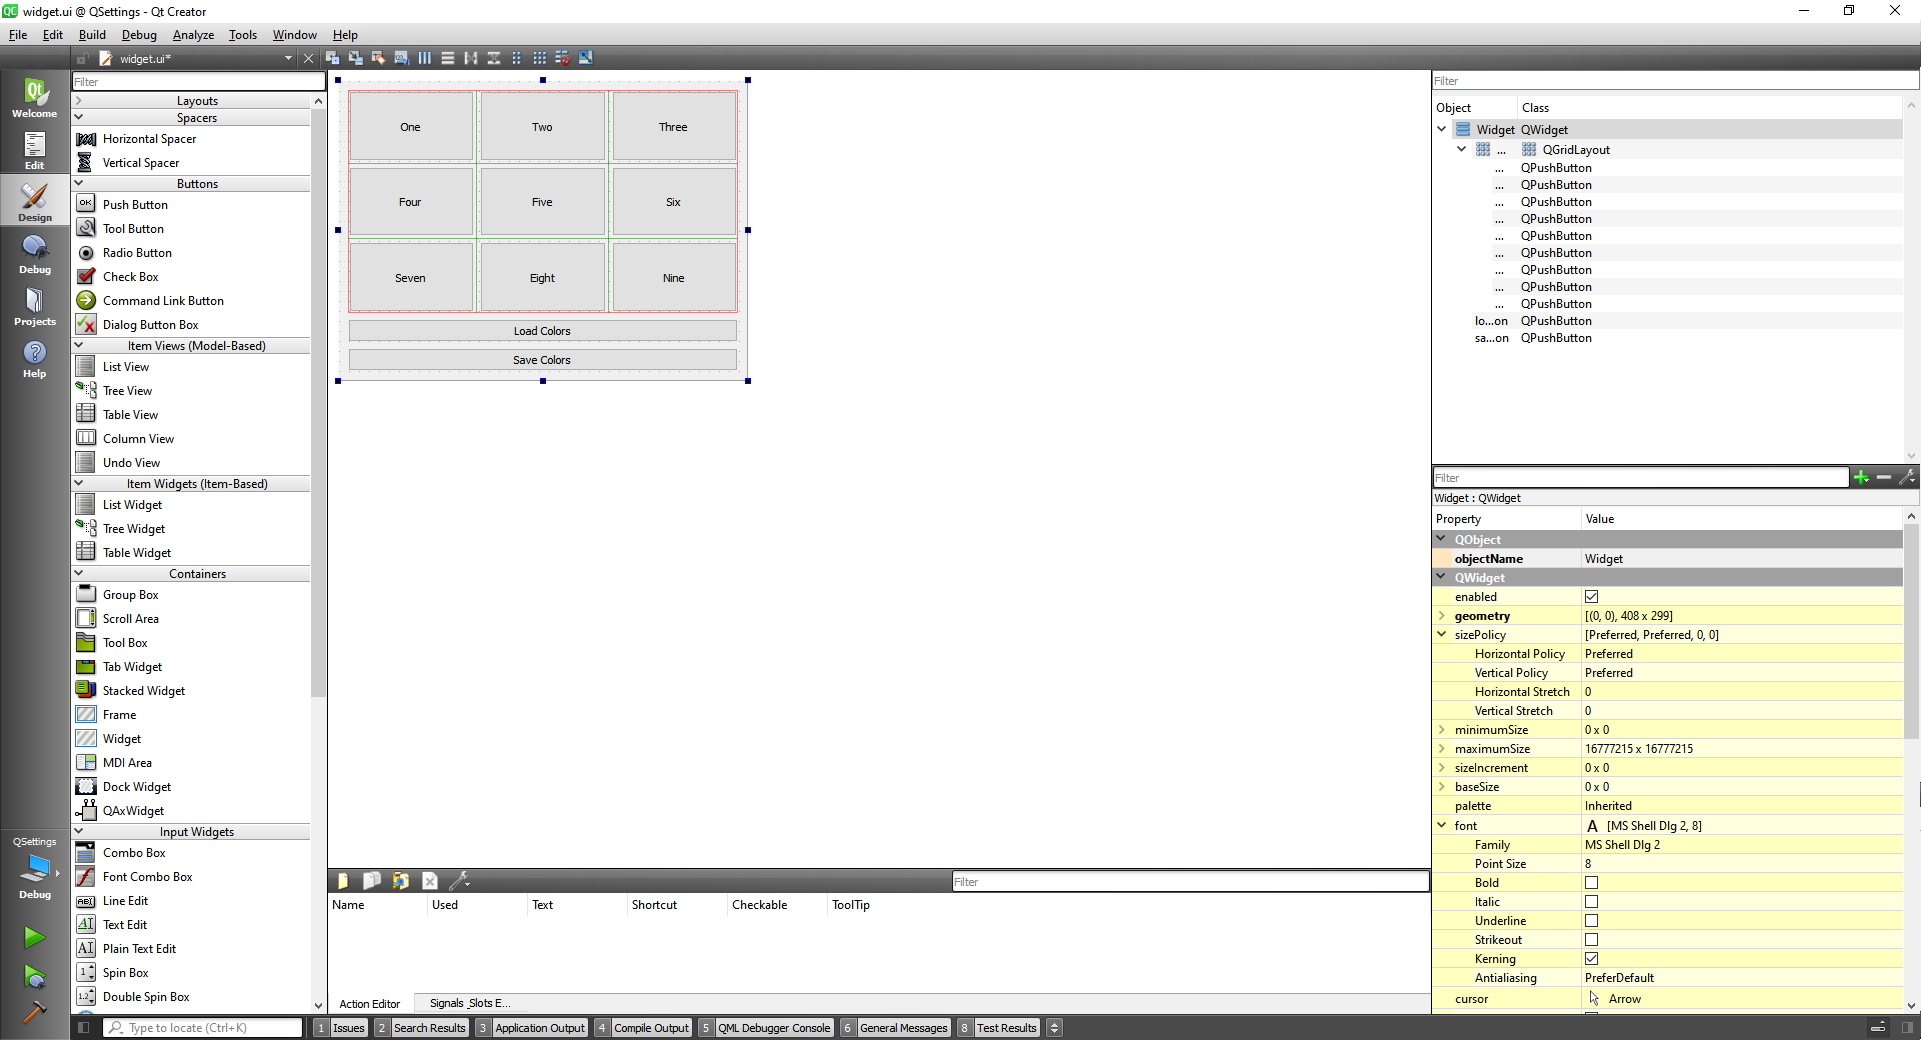
Now let's create slots for all the buttons
widget.cpp
#include "widget.h"
#include "./ui_widget.h"

Widget::Widget(QWidget *parent)
    : QWidget(parent)
    , ui(new Ui::Widget)
{
    ui->setupUi(this);
}

Widget::~Widget()
{
    delete ui;
}


void Widget::on_button1_clicked()
{

}

void Widget::on_button2_clicked()
{

}

void Widget::on_button3_clicked()
{

}

void Widget::on_button4_clicked()
{

}

void Widget::on_button5_clicked()
{

}

void Widget::on_button6_clicked()
{

}

void Widget::on_button7_clicked()
{

}

void Widget::on_button8_clicked()
{

}

void Widget::on_button9_clicked()
{

}

void Widget::on_loadPushButton_clicked()
{

}

void Widget::on_savePushButton_clicked()
{

}
2
3
4
5
6
7
8
9
10
11
12
13
14
15
16
17
18
19
20
21
22
23
24
25
26
27
28
29
30
31
32
33
34
35
36
37
38
39
40
41
42
43
44
45
46
47
48
49
50
51
52
53
54
55
56
57
58
59
60
61
62
63
64
65
66
67
68
69
70
71
widget.h
#ifndef WIDGET_H
#define WIDGET_H

#include <QWidget>

QT_BEGIN_NAMESPACE
namespace Ui { class Widget; }
QT_END_NAMESPACE

class Widget : public QWidget
{
    Q_OBJECT

public:
    Widget(QWidget *parent = nullptr);
    ~Widget();

private slots:
    void on_button1_clicked();
    void on_button2_clicked();
    void on_button3_clicked();
    void on_button4_clicked();
    void on_button5_clicked();
    void on_button6_clicked();
    void on_button7_clicked();
    void on_button8_clicked();
    void on_button9_clicked();

    void on_loadPushButton_clicked();

    void on_savePushButton_clicked();

private:
    Ui::Widget *ui;
};
#endif // WIDGET_H
2
3
4
5
6
7
8
9
10
11
12
13
14
15
16
17
18
19
20
21
22
23
24
25
26
27
28
29
30
31
32
33
34
35
36
After getting all the numbered buttons with some action we have:
#include "widget.h"
#include "./ui_widget.h"
#include <QColorDialog>


Widget::Widget(QWidget *parent)
    : QWidget(parent)
    , ui(new Ui::Widget)
{
    ui->setupUi(this);

    for(int i=0; i<9; i++) {
        colorList.append(Qt::black);
    }
}

Widget::~Widget()
{
    delete ui;
}


void Widget::on_button1_clicked()
{
    QColor color = QColorDialog::getColor(colorList[0], this, "Choose Background Color");
    if(color.isValid()) {
        //Save the color in the list in memory
        colorList[0] = color;

        //Set background color to the button
        QString css = QString("background-color: %1").arg(color.name());
        ui->button1->setStyleSheet(css);
    }
}

void Widget::on_button2_clicked()
{
    QColor color = QColorDialog::getColor(colorList[1], this, "Choose Background Color");
    if(color.isValid()) {
        //Save the color in the list in memory
        colorList[1] = color;

        //Set background color to the button
        QString css = QString("background-color: %1").arg(color.name());
        ui->button2->setStyleSheet(css);
    }
}

void Widget::on_button3_clicked()
{
    QColor color = QColorDialog::getColor(colorList[2], this, "Choose Background Color");
    if(color.isValid()) {
        //Save the color in the list in memory
        colorList[2] = color;

        //Set background color to the button
        QString css = QString("background-color: %1").arg(color.name());
        ui->button3->setStyleSheet(css);
    }
}

void Widget::on_button4_clicked()
{
    QColor color = QColorDialog::getColor(colorList[3], this, "Choose Background Color");
    if(color.isValid()) {
        //Save the color in the list in memory
        colorList[3] = color;

        //Set background color to the button
        QString css = QString("background-color: %1").arg(color.name());
        ui->button4->setStyleSheet(css);
    }
}

void Widget::on_button5_clicked()
{
    QColor color = QColorDialog::getColor(colorList[4], this, "Choose Background Color");
    if(color.isValid()) {
        //Save the color in the list in memory
        colorList[4] = color;

        //Set background color to the button
        QString css = QString("background-color: %1").arg(color.name());
        ui->button5->setStyleSheet(css);
    }
}

void Widget::on_button6_clicked()
{
    QColor color = QColorDialog::getColor(colorList[5], this, "Choose Background Color");
    if(color.isValid()) {
        //Save the color in the list in memory
        colorList[5] = color;

        //Set background color to the button
        QString css = QString("background-color: %1").arg(color.name());
        ui->button6->setStyleSheet(css);
    }
}

void Widget::on_button7_clicked()
{
    QColor color = QColorDialog::getColor(colorList[6], this, "Choose Background Color");
    if(color.isValid()) {
        //Save the color in the list in memory
        colorList[6] = color;

        //Set background color to the button
        QString css = QString("background-color: %1").arg(color.name());
        ui->button7->setStyleSheet(css);
    }
}

void Widget::on_button8_clicked()
{
    QColor color = QColorDialog::getColor(colorList[7], this, "Choose Background Color");
    if(color.isValid()) {
        //Save the color in the list in memory
        colorList[7] = color;

        //Set background color to the button
        QString css = QString("background-color: %1").arg(color.name());
        ui->button8->setStyleSheet(css);
    }
}

void Widget::on_button9_clicked()
{
    QColor color = QColorDialog::getColor(colorList[8], this, "Choose Background Color");
    if(color.isValid()) {
        //Save the color in the list in memory
        colorList[8] = color;

        //Set background color to the button
        QString css = QString("background-color: %1").arg(color.name());
        ui->button9->setStyleSheet(css);
    }
}

void Widget::on_loadPushButton_clicked()
{

}

void Widget::on_savePushButton_clicked()
{

}
2
3
4
5
6
7
8
9
10
11
12
13
14
15
16
17
18
19
20
21
22
23
24
25
26
27
28
29
30
31
32
33
34
35
36
37
38
39
40
41
42
43
44
45
46
47
48
49
50
51
52
53
54
55
56
57
58
59
60
61
62
63
64
65
66
67
68
69
70
71
72
73
74
75
76
77
78
79
80
81
82
83
84
85
86
87
88
89
90
91
92
93
94
95
96
97
98
99
100
101
102
103
104
105
106
107
108
109
110
111
112
113
114
115
116
117
118
119
120
121
122
123
124
125
126
127
128
129
130
131
132
133
134
135
136
137
138
139
140
141
142
143
144
145
146
147
148
#ifndef WIDGET_H
#define WIDGET_H

#include <QWidget>
#include <QList>
#include <QColor>

QT_BEGIN_NAMESPACE
namespace Ui { class Widget; }
QT_END_NAMESPACE

class Widget : public QWidget
{
    Q_OBJECT

public:
    Widget(QWidget *parent = nullptr);
    ~Widget();

private slots:
    void on_button1_clicked();

    void on_button2_clicked();

    void on_button3_clicked();

    void on_button4_clicked();

    void on_button5_clicked();

    void on_button6_clicked();

    void on_button7_clicked();

    void on_button8_clicked();

    void on_button9_clicked();

    void on_loadPushButton_clicked();

    void on_savePushButton_clicked();

private:
    Ui::Widget *ui;
    QList<QColor> colorList;
};
#endif // WIDGET_H
2
3
4
5
6
7
8
9
10
11
12
13
14
15
16
17
18
19
20
21
22
23
24
25
26
27
28
29
30
31
32
33
34
35
36
37
38
39
40
41
42
43
44
45
46
47

Now we can do the methods to save the colors and to load them. And now the application is completed
widget.cpp
#include "widget.h"
#include "./ui_widget.h"
#include <QColorDialog>
#include <QSettings>


Widget::Widget(QWidget *parent)
    : QWidget(parent)
    , ui(new Ui::Widget)
{
    ui->setupUi(this);

    for(int i=0; i<9; i++) {
        colorList.append(Qt::black);
    }
}

Widget::~Widget()
{
    delete ui;
}


void Widget::on_button1_clicked()
{
    QColor color = QColorDialog::getColor(colorList[0], this, "Choose Background Color");
    if(color.isValid()) {
        //Save the color in the list in memory
        colorList[0] = color;

        //Set background color to the button
        QString css = QString("background-color: %1").arg(color.name());
        ui->button1->setStyleSheet(css);
    }
}

void Widget::on_button2_clicked()
{
    QColor color = QColorDialog::getColor(colorList[1], this, "Choose Background Color");
    if(color.isValid()) {
        //Save the color in the list in memory
        colorList[1] = color;

        //Set background color to the button
        QString css = QString("background-color: %1").arg(color.name());
        ui->button2->setStyleSheet(css);
    }
}

void Widget::on_button3_clicked()
{
    QColor color = QColorDialog::getColor(colorList[2], this, "Choose Background Color");
    if(color.isValid()) {
        //Save the color in the list in memory
        colorList[2] = color;

        //Set background color to the button
        QString css = QString("background-color: %1").arg(color.name());
        ui->button3->setStyleSheet(css);
    }
}

void Widget::on_button4_clicked()
{
    QColor color = QColorDialog::getColor(colorList[3], this, "Choose Background Color");
    if(color.isValid()) {
        //Save the color in the list in memory
        colorList[3] = color;

        //Set background color to the button
        QString css = QString("background-color: %1").arg(color.name());
        ui->button4->setStyleSheet(css);
    }
}

void Widget::on_button5_clicked()
{
    QColor color = QColorDialog::getColor(colorList[4], this, "Choose Background Color");
    if(color.isValid()) {
        //Save the color in the list in memory
        colorList[4] = color;

        //Set background color to the button
        QString css = QString("background-color: %1").arg(color.name());
        ui->button5->setStyleSheet(css);
    }
}

void Widget::on_button6_clicked()
{
    QColor color = QColorDialog::getColor(colorList[5], this, "Choose Background Color");
    if(color.isValid()) {
        //Save the color in the list in memory
        colorList[5] = color;

        //Set background color to the button
        QString css = QString("background-color: %1").arg(color.name());
        ui->button6->setStyleSheet(css);
    }
}

void Widget::on_button7_clicked()
{
    QColor color = QColorDialog::getColor(colorList[6], this, "Choose Background Color");
    if(color.isValid()) {
        //Save the color in the list in memory
        colorList[6] = color;

        //Set background color to the button
        QString css = QString("background-color: %1").arg(color.name());
        ui->button7->setStyleSheet(css);
    }
}

void Widget::on_button8_clicked()
{
    QColor color = QColorDialog::getColor(colorList[7], this, "Choose Background Color");
    if(color.isValid()) {
        //Save the color in the list in memory
        colorList[7] = color;

        //Set background color to the button
        QString css = QString("background-color: %1").arg(color.name());
        ui->button8->setStyleSheet(css);
    }
}

void Widget::on_button9_clicked()
{
    QColor color = QColorDialog::getColor(colorList[8], this, "Choose Background Color");
    if(color.isValid()) {
        //Save the color in the list in memory
        colorList[8] = color;

        //Set background color to the button
        QString css = QString("background-color: %1").arg(color.name());
        ui->button9->setStyleSheet(css);
    }
}

void Widget::on_loadPushButton_clicked()
{
    setLoadedColor("button1", 0, ui->button1);
    setLoadedColor("button2", 1, ui->button2);
    setLoadedColor("button3", 2, ui->button3);
    setLoadedColor("button4", 3, ui->button4);
    setLoadedColor("button5", 4, ui->button5);
    setLoadedColor("button6", 5, ui->button6);
    setLoadedColor("button7", 6, ui->button7);
    setLoadedColor("button8", 7, ui->button8);
    setLoadedColor("button9", 8, ui->button9);
}

void Widget::on_savePushButton_clicked()
{
    saveColor("button1", colorList[0]);
    saveColor("button2", colorList[1]);
    saveColor("button3", colorList[2]);
    saveColor("button4", colorList[3]);
    saveColor("button5", colorList[4]);
    saveColor("button6", colorList[5]);
    saveColor("button7", colorList[6]);
    saveColor("button8", colorList[7]);
    saveColor("button9", colorList[8]);
}

void Widget::saveColor(QString key, QColor color)
{
    int red = color.red();
    int green = color.green();
    int blue = color.blue();

    QSettings settings("Skinny Robot", "SettingsDemo");

    settings.beginGroup("ButtonColor");
    settings.setValue(key + "r", red);
    settings.setValue(key + "g", green);
    settings.setValue(key + "b", blue);
    settings.endGroup();
}

QColor Widget::loadColor(QString key)
{
    int red;
    int green;
    int blue;

    QSettings settings("Skinny Robot", "SettingsDemo");

    settings.beginGroup("ButtonColor");

    red = settings.value(key + "r", QVariant(0)).toInt();
    green = settings.value(key + "g", QVariant(0)).toInt();
    blue = settings.value(key + "b", QVariant(0)).toInt();

    settings.endGroup();

    return QColor(red, green, blue);
}

void Widget::setLoadedColor(QString key, int index, QPushButton *button)
{
    QColor color = loadColor(key);
    colorList[index] = color;
    QString css = QString("background-color: %1").arg(color.name());
    button->setStyleSheet(css);

}
2
3
4
5
6
7
8
9
10
11
12
13
14
15
16
17
18
19
20
21
22
23
24
25
26
27
28
29
30
31
32
33
34
35
36
37
38
39
40
41
42
43
44
45
46
47
48
49
50
51
52
53
54
55
56
57
58
59
60
61
62
63
64
65
66
67
68
69
70
71
72
73
74
75
76
77
78
79
80
81
82
83
84
85
86
87
88
89
90
91
92
93
94
95
96
97
98
99
100
101
102
103
104
105
106
107
108
109
110
111
112
113
114
115
116
117
118
119
120
121
122
123
124
125
126
127
128
129
130
131
132
133
134
135
136
137
138
139
140
141
142
143
144
145
146
147
148
149
150
151
152
153
154
155
156
157
158
159
160
161
162
163
164
165
166
167
168
169
170
171
172
173
174
175
176
177
178
179
180
181
182
183
184
185
186
187
188
189
190
191
192
193
194
195
196
197
198
199
200
201
202
203
204
205
206
207
208
widget.h
#ifndef WIDGET_H
#define WIDGET_H

#include <QWidget>
#include <QList>
#include <QColor>
#include <QPushButton>

QT_BEGIN_NAMESPACE
namespace Ui { class Widget; }
QT_END_NAMESPACE

class Widget : public QWidget
{
    Q_OBJECT

public:
    Widget(QWidget *parent = nullptr);
    ~Widget();

private slots:
    void on_button1_clicked();

    void on_button2_clicked();

    void on_button3_clicked();

    void on_button4_clicked();

    void on_button5_clicked();

    void on_button6_clicked();

    void on_button7_clicked();

    void on_button8_clicked();

    void on_button9_clicked();

    void on_loadPushButton_clicked();

    void on_savePushButton_clicked();

private:
    Ui::Widget *ui;
    QList<QColor> colorList;

    void saveColor(QString key, QColor color);
    QColor loadColor(QString key);

    void setLoadedColor(QString key, int index, QPushButton * button);

};
#endif // WIDGET_H
2
3
4
5
6
7
8
9
10
11
12
13
14
15
16
17
18
19
20
21
22
23
24
25
26
27
28
29
30
31
32
33
34
35
36
37
38
39
40
41
42
43
44
45
46
47
48
49
50
51
52
53
54
# QFile class
The QFile class provides an interface for reading from and writing to files.
First let's build a simple ui.

Now we are going to write in a file with the write button.
#include "widget.h"
#include "./ui_widget.h"
#include <QFile>
#include <QFileDialog>
#include <QTextStream>
#include <QMessageBox>

Widget::Widget(QWidget *parent)
    : QWidget(parent)
    , ui(new Ui::Widget)
{
    ui->setupUi(this);
}

Widget::~Widget()
{
    delete ui;
}


void Widget::on_writeButton_clicked()
{
    //Save the file to disk
    QString filename = QFileDialog::getSaveFileName(this, "Save As");
    if(filename.isEmpty())
        return;

    QFile file(filename);

    //Open the file
    if(!file.open(QIODevice::WriteOnly | QIODevice::Text | QIODevice::Append))
        return;

    QTextStream out(&file);
    out << ui->textEdit->toPlainText() << "\n";

    file.close();
}

void Widget::on_readButton_clicked()
{

}

void Widget::on_selectFileButton_clicked()
{

}

void Widget::on_copyButton_clicked()
{

}
2
3
4
5
6
7
8
9
10
11
12
13
14
15
16
17
18
19
20
21
22
23
24
25
26
27
28
29
30
31
32
33
34
35
36
37
38
39
40
41
42
43
44
45
46
47
48
49
50
51
52
53
54
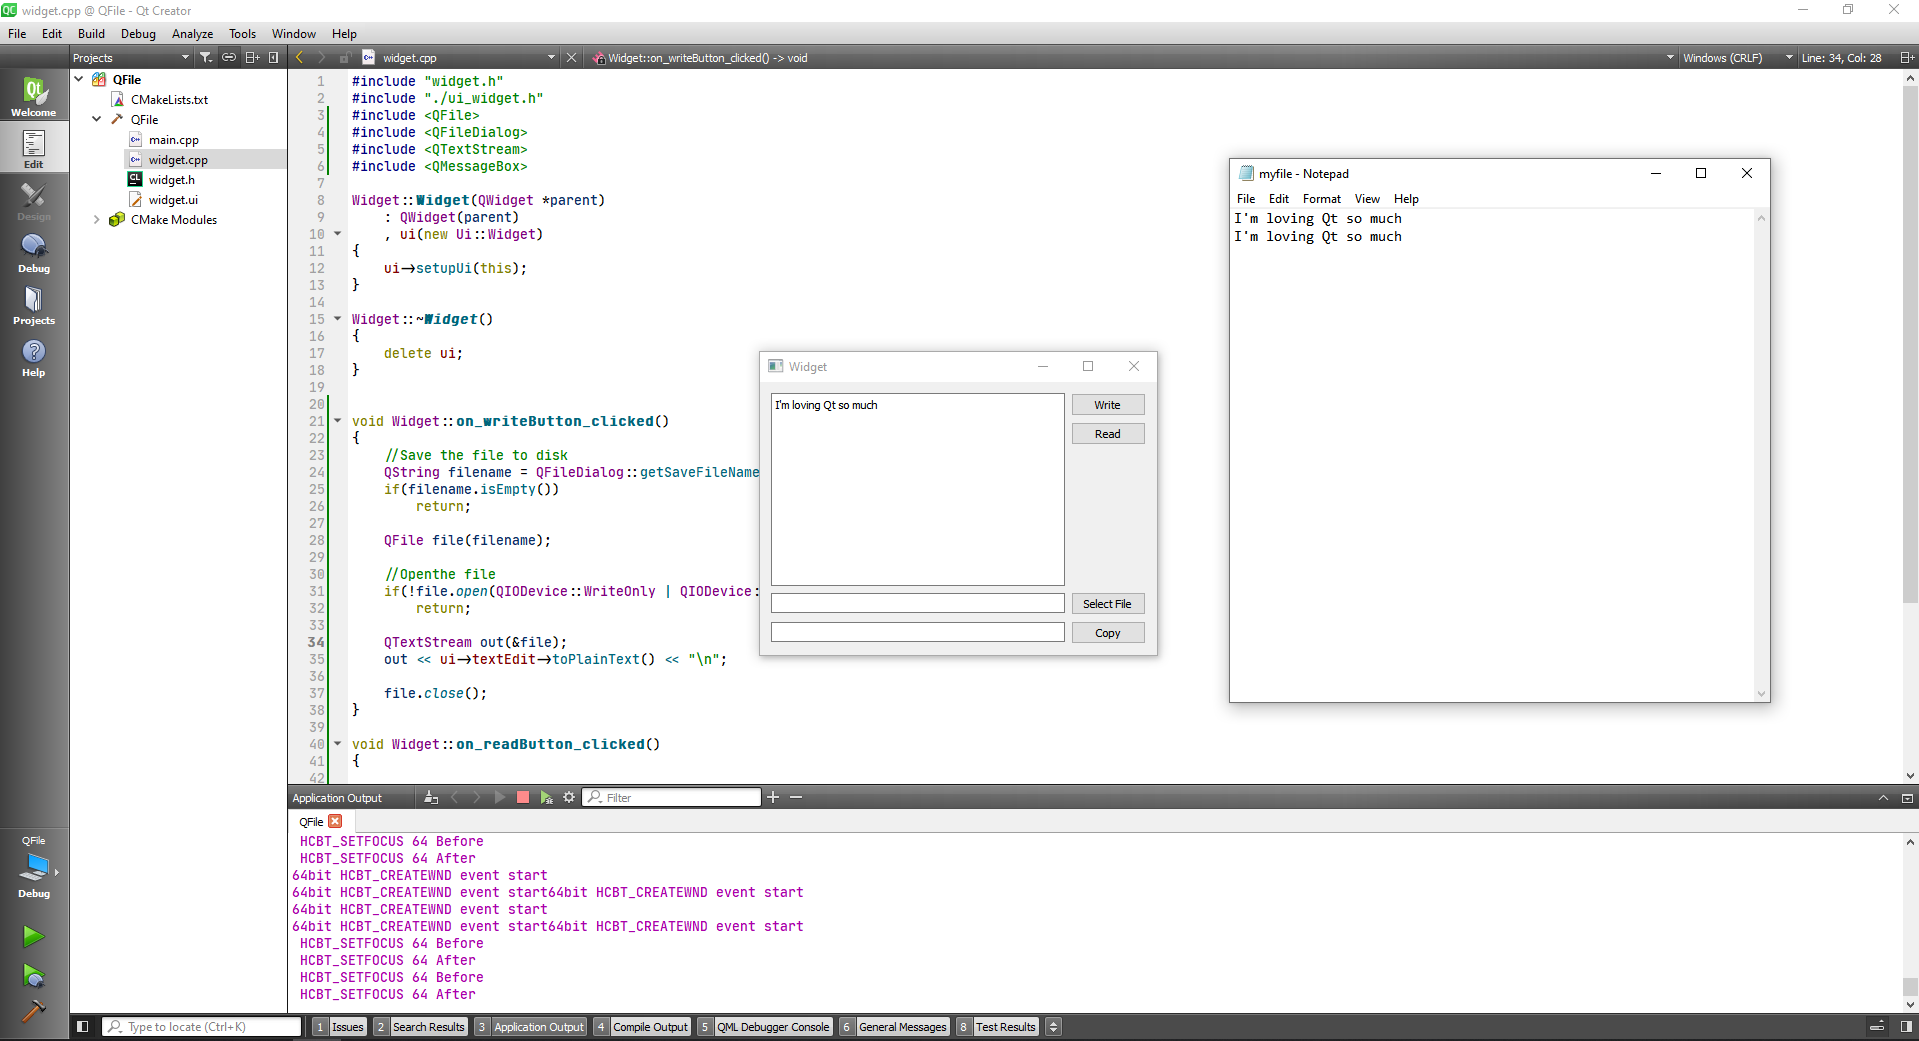
Now to read from the file we first capture the name of the file with the QDialog and check if it is not empty,
//Read the file from disk
   QString filename = QFileDialog::getOpenFileName(this, "Open File");
   if(filename.isEmpty())
       return;
2
3
4
then we atempt to read the file to read the text and if we fail we get out,
QFile file(filename);
   if(!file.open(QIODevice::ReadOnly | QIODevice::Text))
       return;
2
3
then we creat a text stream to read from the file, and read by calling the method from the stream readLine() and store into the string.
QTextStream in(&file);
QString line = in.readLine();
2
Then we check if there is still lines to be read, and when we can't read anymore we get out of the loop.
while(!line.isNull()) {
        fileContent.append(line);
        line = in.readLine();
    }
2
3
4
Then we close the file, we clear the text in the textEdit and we set our new text.
file.close();

ui->textEdit->clear();
ui->textEdit->setPlainText(fileContent);
2
3
4
The full program until now looks like this:
#include "widget.h"
#include "./ui_widget.h"
#include <QFile>
#include <QFileDialog>
#include <QTextStream>
#include <QMessageBox>

Widget::Widget(QWidget *parent)
    : QWidget(parent)
    , ui(new Ui::Widget)
{
    ui->setupUi(this);
}

Widget::~Widget()
{
    delete ui;
}


void Widget::on_writeButton_clicked()
{
    //Save the file to disk
    QString filename = QFileDialog::getSaveFileName(this, "Save As");
    if(filename.isEmpty())
        return;

    QFile file(filename);

    //Openthe file
    if(!file.open(QIODevice::WriteOnly | QIODevice::Text | QIODevice::Append))
        return;

    QTextStream out(&file);
    out << ui->textEdit->toPlainText() << "\n";

    file.close();
}

void Widget::on_readButton_clicked()
{
    QString fileContent;

    //Read the file from disk
    QString filename = QFileDialog::getOpenFileName(this, "Open File");
    if(filename.isEmpty())
        return;

    QFile file(filename);
    if(!file.open(QIODevice::ReadOnly | QIODevice::Text))
        return;

    QTextStream in(&file);
    QString line = in.readLine();

    while(!line.isNull()) {
        fileContent.append(line);
        line = in.readLine();
    }

    file.close();

    ui->textEdit->clear();
    ui->textEdit->setPlainText(fileContent);
}

void Widget::on_selectFileButton_clicked()
{

}

void Widget::on_copyButton_clicked()
{

}
2
3
4
5
6
7
8
9
10
11
12
13
14
15
16
17
18
19
20
21
22
23
24
25
26
27
28
29
30
31
32
33
34
35
36
37
38
39
40
41
42
43
44
45
46
47
48
49
50
51
52
53
54
55
56
57
58
59
60
61
62
63
64
65
66
67
68
69
70
71
72
73
74
75

Now that we can read from a file and write as well, we are going to get the address of the file, and save it as another file.
#include "widget.h"
#include "./ui_widget.h"
#include <QFile>
#include <QFileDialog>
#include <QTextStream>
#include <QMessageBox>

Widget::Widget(QWidget *parent)
    : QWidget(parent)
    , ui(new Ui::Widget)
{
    ui->setupUi(this);
}

Widget::~Widget()
{
    delete ui;
}


void Widget::on_writeButton_clicked()
{
    //Save the file to disk
    QString filename = QFileDialog::getSaveFileName(this, "Save As");
    if(filename.isEmpty())
        return;

    QFile file(filename);

    //Open the file
    if(!file.open(QIODevice::WriteOnly | QIODevice::Text | QIODevice::Append))
        return;

    QTextStream out(&file);
    out << ui->textEdit->toPlainText() << "\n";

    file.close();
}

void Widget::on_readButton_clicked()
{
    QString fileContent;

    //Read the file from disk
    QString filename = QFileDialog::getOpenFileName(this, "Open File");
    if(filename.isEmpty())
        return;

    QFile file(filename);
    if(!file.open(QIODevice::ReadOnly | QIODevice::Text))
        return;

    QTextStream in(&file);
    QString line = in.readLine();

    while(!line.isNull()) {
        fileContent.append(line);
        line = in.readLine();
    }

    file.close();

    ui->textEdit->clear();
    ui->textEdit->setPlainText(fileContent);
}

void Widget::on_selectFileButton_clicked()
{
    QString filename = QFileDialog::getOpenFileName(this, "Choose File");
    if(filename.isEmpty())
        return;
    ui->sourceLineEdit->setText(filename);
}

void Widget::on_copyButton_clicked()
{
    QString srcFileName = ui->sourceLineEdit->text();
    QString destFileName = ui->destinationLineEdit->text();

    if(srcFileName.isEmpty() || destFileName.isEmpty())
        return;

    QFile file(srcFileName);
    if(file.copy(destFileName)) {
        QMessageBox::information(this, "Success", "Copy successful");
    } else {
        QMessageBox::information(this, "Failure", "Copy failed");
    }
}
2
3
4
5
6
7
8
9
10
11
12
13
14
15
16
17
18
19
20
21
22
23
24
25
26
27
28
29
30
31
32
33
34
35
36
37
38
39
40
41
42
43
44
45
46
47
48
49
50
51
52
53
54
55
56
57
58
59
60
61
62
63
64
65
66
67
68
69
70
71
72
73
74
75
76
77
78
79
80
81
82
83
84
85
86
87
88
89
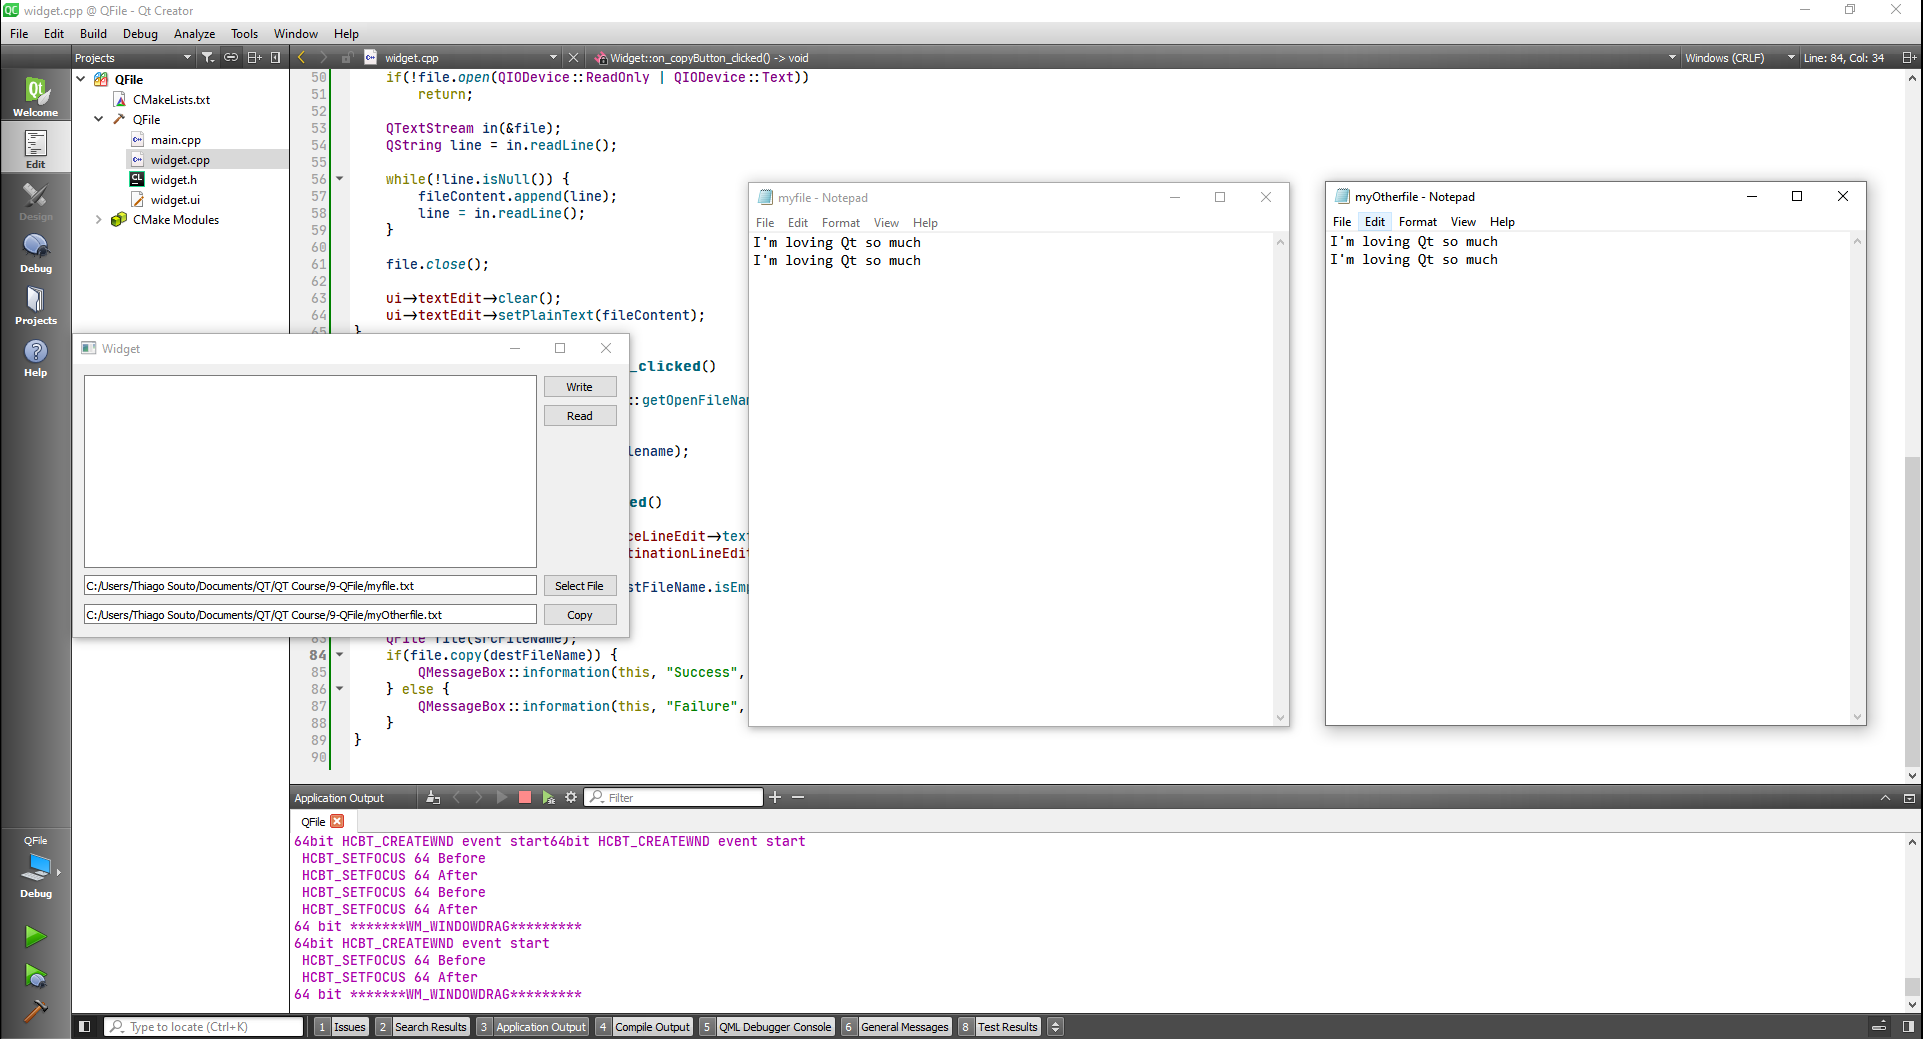
# QDir class
The QDir class provides access to directory structures and their contents.
First a simple ui

Now let's implement the Choose Dir and Create Dir buttons:
#include "widget.h"
#include "./ui_widget.h"
#include <QFileDialog>
#include <QMessageBox>

Widget::Widget(QWidget *parent)
    : QWidget(parent)
    , ui(new Ui::Widget)
{
    ui->setupUi(this);
}

Widget::~Widget()
{
    delete ui;
}


void Widget::on_chooseDirButton_clicked()
{
    QString filename = QFileDialog::getExistingDirectory(this, "Choose Folder");
    if(filename.isEmpty())
        return;
    ui->lineEdit->setText(filename);
}

void Widget::on_createDirButton_clicked()
{
    //Create a dir if doesn't exist already
    QString dirPath = ui->lineEdit->text();
    if(dirPath.isEmpty())
        return;
    QDir dir(dirPath);
    if(!dir.exists()) {
        //Create it
        if(dir.mkpath(dirPath)) {
            QMessageBox::information(this, "Message", "Directory created");
        }
    } else {
        QMessageBox::information(this, "Message", "Directory already exists");
    }
}

void Widget::on_dirExistButton_clicked()
{

}

void Widget::on_dirOrFileButton_clicked()
{

}

void Widget::on_folderContentsButton_clicked()
{

}
2
3
4
5
6
7
8
9
10
11
12
13
14
15
16
17
18
19
20
21
22
23
24
25
26
27
28
29
30
31
32
33
34
35
36
37
38
39
40
41
42
43
44
45
46
47
48
49
50
51
52
53
54
55
56
57
With these two implemented we were able to create 2 directories, mydir and mydir2.
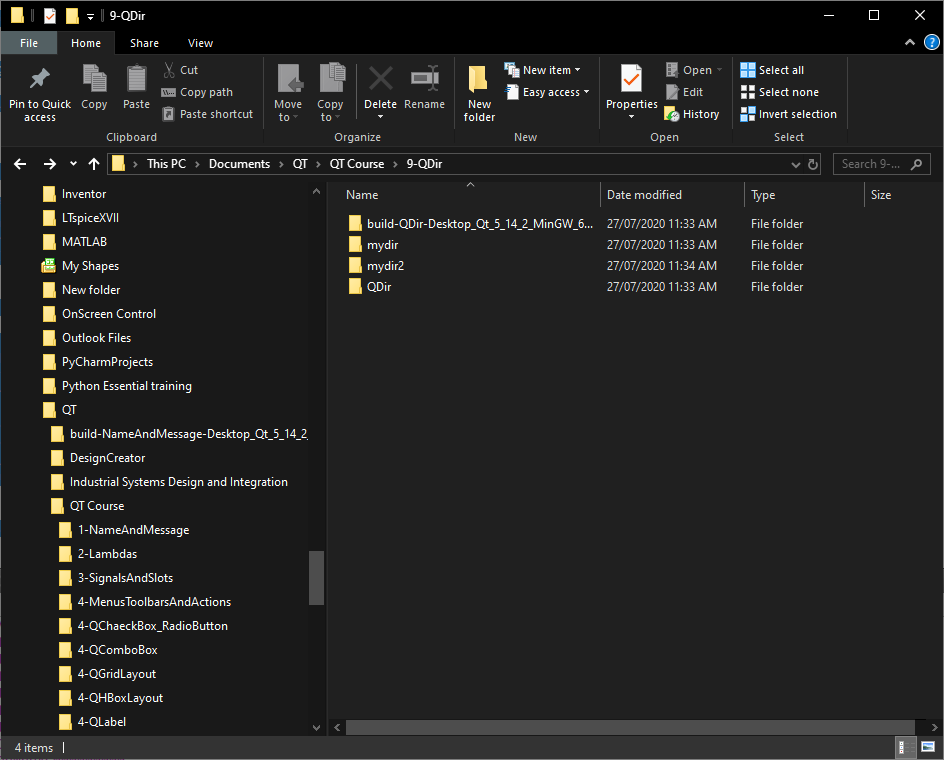
Now we are going to list the files and directories of a chosen directory:
void Widget::on_folderContentsButton_clicked()
{
    ui->listWidget->clear();
    QString dirPath = ui->lineEdit->text();
    if(dirPath.isEmpty())
        return;
    QDir dir(dirPath);

    //Get the list of files and directories in the folder
    QList<QFileInfo> fileList = dir.entryInfoList();

    for(int i=0; i < fileList.size(); i++) {
        QString prefix;
        if(fileList.at(i).isFile()) {
            prefix = "FILE: ";
        }
        if(fileList.at(i).isDir()) {
            prefix = "DIRECTORY: ";
        }
        ui->listWidget->addItem(prefix + fileList.at(i).absoluteFilePath());
    }
}
2
3
4
5
6
7
8
9
10
11
12
13
14
15
16
17
18
19
20
21
22
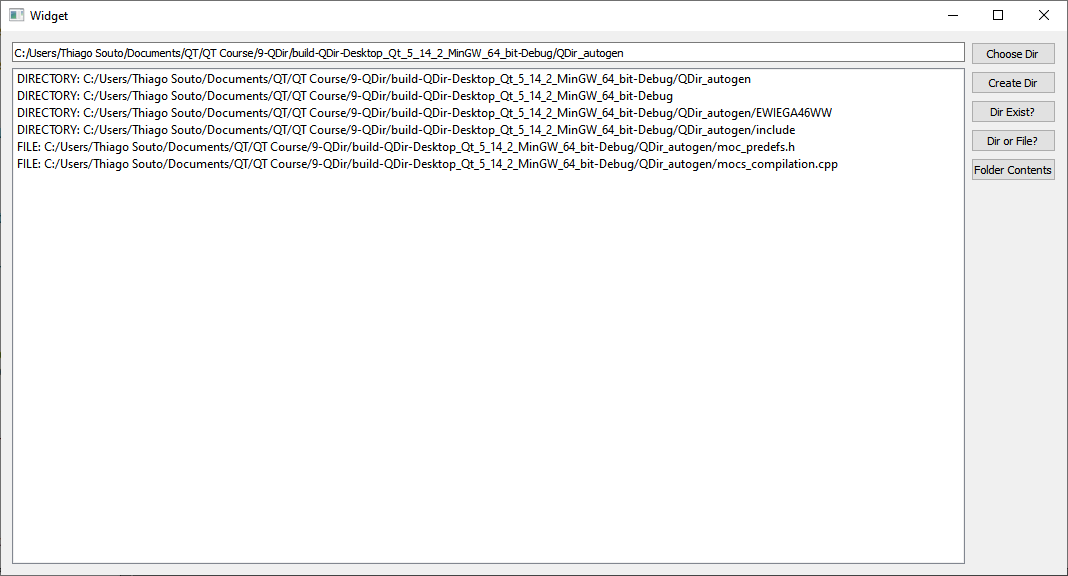
For the last button that identifies if the select is a file or a dir work we have to comment some stuff on the contents button and exclude the prefix +.
This is the full program:
#include "widget.h"
#include "./ui_widget.h"
#include <QFileDialog>
#include <QMessageBox>

Widget::Widget(QWidget *parent)
    : QWidget(parent)
    , ui(new Ui::Widget)
{
    ui->setupUi(this);
}

Widget::~Widget()
{
    delete ui;
}


void Widget::on_chooseDirButton_clicked()
{
    QString filename = QFileDialog::getExistingDirectory(this, "Choose Folder");
    if(filename.isEmpty())
        return;
    ui->lineEdit->setText(filename);
}

void Widget::on_createDirButton_clicked()
{
    //Create a dir if doesn't exist already
    QString dirPath = ui->lineEdit->text();
    if(dirPath.isEmpty())
        return;
    QDir dir(dirPath);
    if(!dir.exists()) {
        //Create it
        if(dir.mkpath(dirPath)) {
            QMessageBox::information(this, "Message", "Directory created");
        }
    } else {
        QMessageBox::information(this, "Message", "Directory already exists");
    }
}

void Widget::on_dirExistButton_clicked()
{
    //Check if directory exists
    QString dirPath = ui->lineEdit->text();
    if(dirPath.isEmpty())
        return;

    QDir dir(dirPath);
    if(dir.exists()) {
        QMessageBox::information(this, "Message", "Directory exists");
    } else {
        QMessageBox::information(this, "Message", "Directory doesn't exists");
    }
}

void Widget::on_dirOrFileButton_clicked()
{
    QFileInfo fileInfo(ui->listWidget->currentItem()->text());
    if(fileInfo.isDir()) {
        QMessageBox::information(this, "Message", "This is a Dir");
    } else if(fileInfo.isFile()) {
        QMessageBox::information(this, "Message", "This is a File");
    } else {
        QMessageBox::information(this, "Message", "This is something else");
    }
}

void Widget::on_folderContentsButton_clicked()
{
    ui->listWidget->clear();
    QString dirPath = ui->lineEdit->text();
    if(dirPath.isEmpty())
        return;
    QDir dir(dirPath);

    //Get the list of files and directories in the folder
    QList<QFileInfo> fileList = dir.entryInfoList();

    for(int i=0; i < fileList.size(); i++) {
//        QString prefix;
//        if(fileList.at(i).isFile()) {
//            prefix = "FILE: ";
//        }
//        if(fileList.at(i).isDir()) {
//            prefix = "DIRECTORY: ";
//        }
        ui->listWidget->addItem(fileList.at(i).absoluteFilePath());
    }
}
2
3
4
5
6
7
8
9
10
11
12
13
14
15
16
17
18
19
20
21
22
23
24
25
26
27
28
29
30
31
32
33
34
35
36
37
38
39
40
41
42
43
44
45
46
47
48
49
50
51
52
53
54
55
56
57
58
59
60
61
62
63
64
65
66
67
68
69
70
71
72
73
74
75
76
77
78
79
80
81
82
83
84
85
86
87
88
89
90
91
92
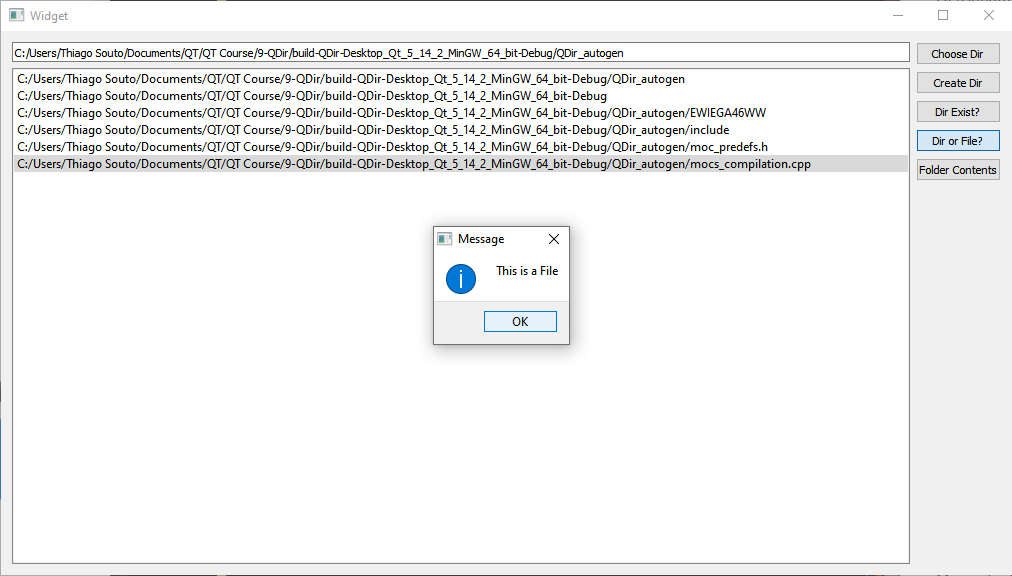
# QFileSystemModel class
The QFileSystemModel class provides a data model for the local filesystem.
This class provides access to the local filesystem, providing functions for renaming and removing files and directories, and for creating new directories. In the simplest case, it can be used with a suitable display widget as part of a browser or filter.
QFileSystemModel can be accessed using the standard interface provided by QAbstractItemModel, but it also provides some convenience functions that are specific to a directory model. The fileInfo(), isDir(), fileName() and filePath() functions provide information about the underlying files and directories related to items in the model. Directories can be created and removed using mkdir(), rmdir().
Note: QFileSystemModel requires an instance of QApplication.
#include "widget.h"
#include "./ui_widget.h"
#include <QDebug>


Widget::Widget(QWidget *parent)
    : QWidget(parent)
    , ui(new Ui::Widget)
{
    ui->setupUi(this);
    model = new QFileSystemModel(this);
    parentIndex = model->setRootPath("C:/Users/Thiago Souto/Documents/QT/QT Course/10-QModelIndex");
}

Widget::~Widget()
{
    delete ui;
}


void Widget::on_pushButton_clicked()
{
    int rowCount = model->rowCount(parentIndex);
    qDebug() << "Row count: " << QString::number(rowCount);
}
2
3
4
5
6
7
8
9
10
11
12
13
14
15
16
17
18
19
20
21
22
23
24
25
widget.h
#ifndef WIDGET_H
#define WIDGET_H

#include <QWidget>
#include <QFileSystemModel>

QT_BEGIN_NAMESPACE
namespace Ui { class Widget; }
QT_END_NAMESPACE

class Widget : public QWidget
{
    Q_OBJECT

public:
    Widget(QWidget *parent = nullptr);
    ~Widget();

private slots:
    void on_pushButton_clicked();

private:
    Ui::Widget *ui;
    QFileSystemModel * model;
    QModelIndex parentIndex;
};
#endif // WIDGET_H
2
3
4
5
6
7
8
9
10
11
12
13
14
15
16
17
18
19
20
21
22
23
24
25
26
27
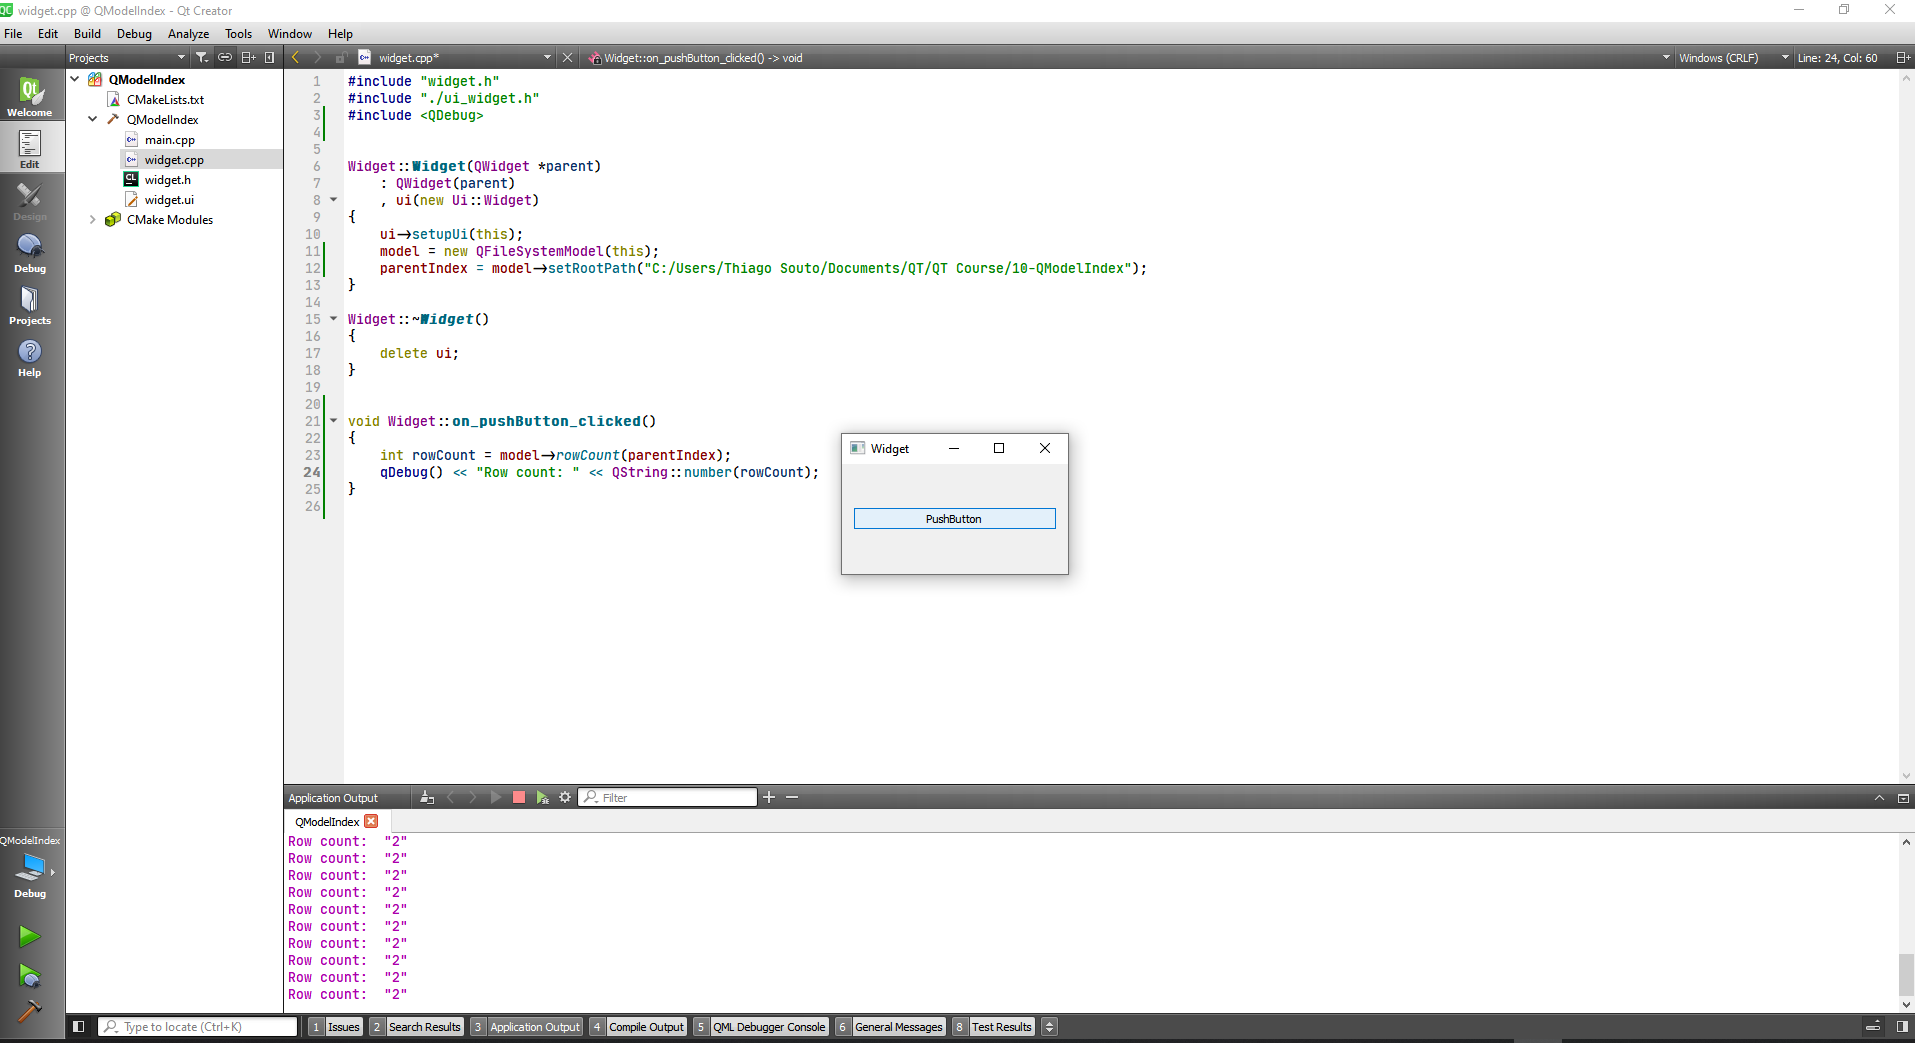
We can see that the qDebug returns 2 and we have 2 folder on our directory.
Now we are going to show the folders on the console.
#include "widget.h"
#include "./ui_widget.h"
#include <QDebug>


Widget::Widget(QWidget *parent)
    : QWidget(parent)
    , ui(new Ui::Widget)
{
    ui->setupUi(this);
    model = new QFileSystemModel(this);
    parentIndex = model->setRootPath("C:/Users/Thiago Souto/Documents/QT/QT Course/10-QModelIndex");
}

Widget::~Widget()
{
    delete ui;
}


void Widget::on_pushButton_clicked()
{
    int rowCount = model->rowCount(parentIndex);
    qDebug() << "Row count: " << QString::number(rowCount);

    for(int i=0; i<rowCount; i++) {
        QModelIndex index = model->index(i, 0, parentIndex);
        QString data = model->data(index, Qt::DisplayRole).toString();
        qDebug() << "Data item [" << QString::number(i) << "] " << data;
    }
}
2
3
4
5
6
7
8
9
10
11
12
13
14
15
16
17
18
19
20
21
22
23
24
25
26
27
28
29
30
31
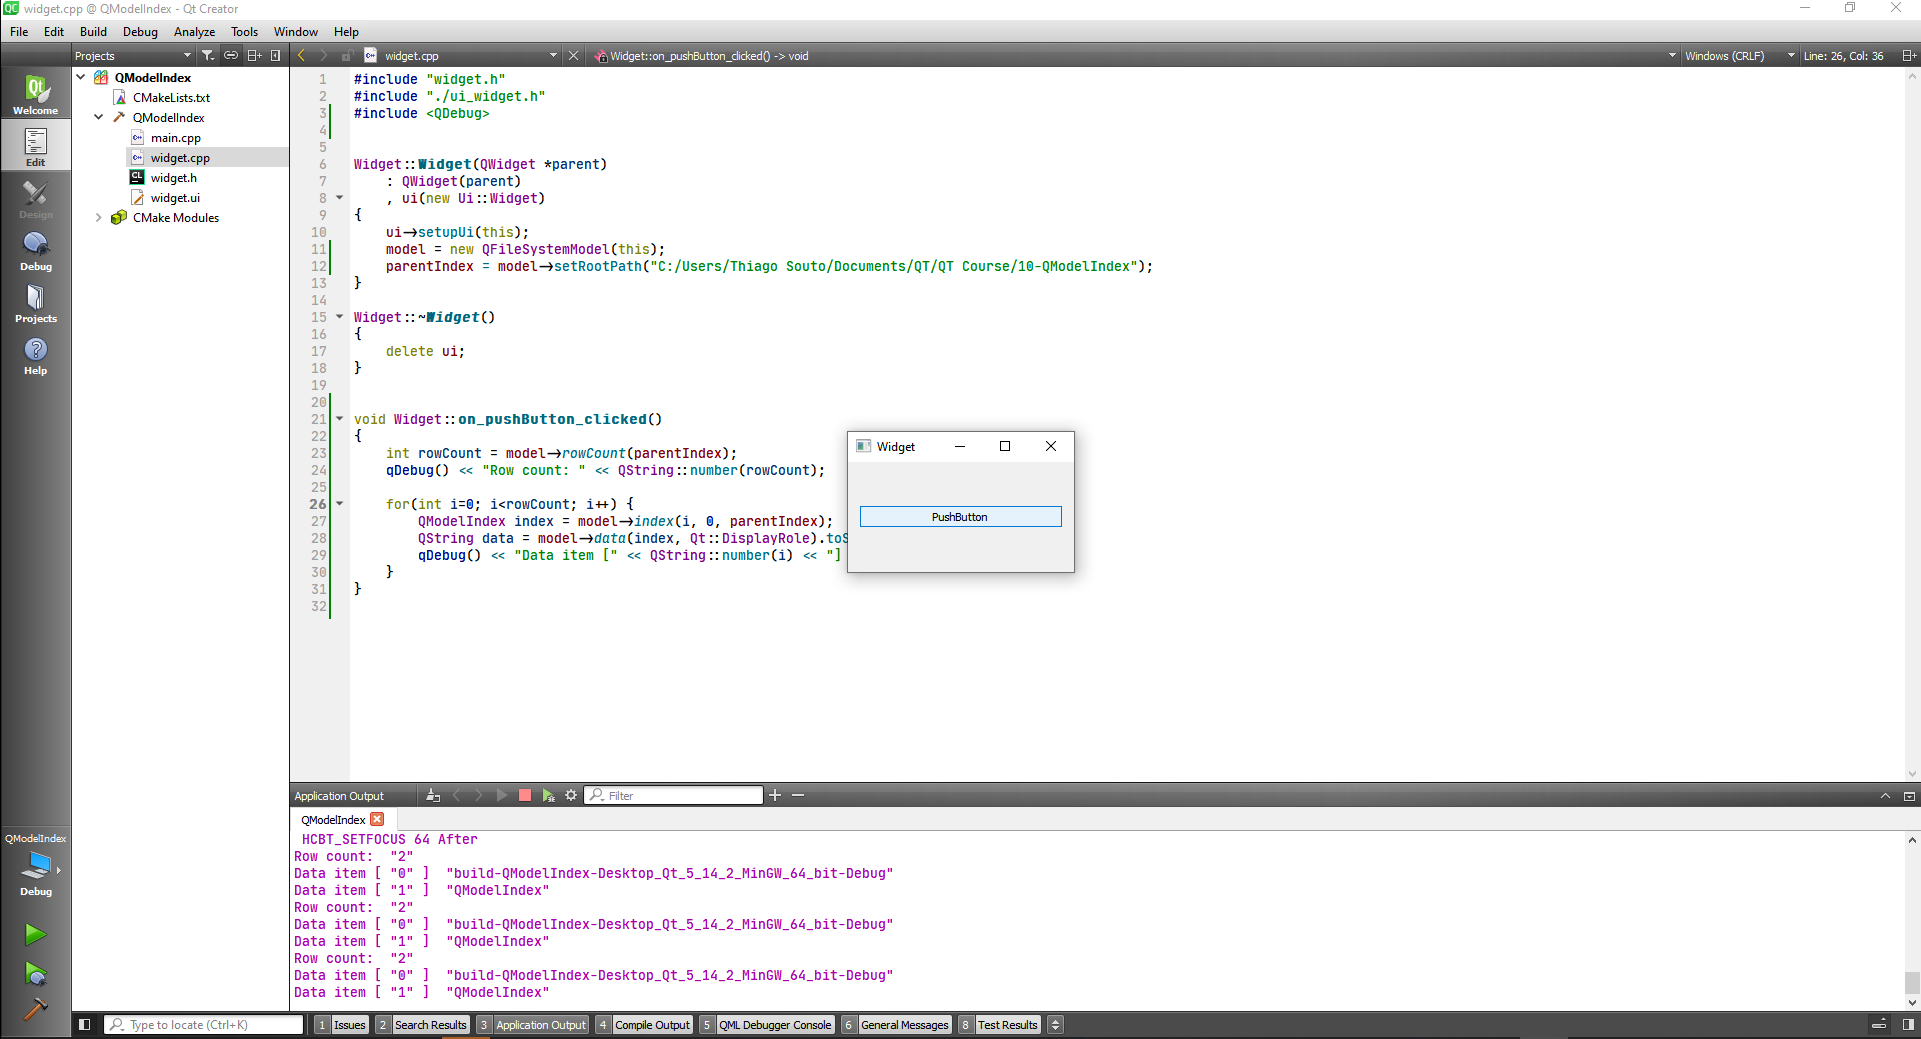
# QFileSystemModel: Standard way to use it
In this example we are going to use a tree view and a list view to display directories and files.
#include "widget.h"
#include "./ui_widget.h"
#include <QDebug>

Widget::Widget(QWidget *parent)
    : QWidget(parent)
    , ui(new Ui::Widget)
{
    ui->setupUi(this);

    QString path = "C:/";
    //Inititalize the Dir model
    dirModel = new QFileSystemModel(this);
    dirModel->setFilter(QDir::NoDotAndDotDot | QDir::Dirs);
    dirModel->setRootPath(path);
    ui->treeView->setModel(dirModel);

    //Inititalize the Files model
    filesModel = new QFileSystemModel(this);
    filesModel->setFilter(QDir::NoDotAndDotDot | QDir::Files);
    filesModel->setRootPath(path); //Required for the model to load file system info
    ui->listView->setModel(filesModel);
}

Widget::~Widget()
{
    delete ui;
}


void Widget::on_treeView_clicked(const QModelIndex &index)
{
    QString path = dirModel->fileInfo(index).absoluteFilePath();
    qDebug() << "User clicked on: " << path;
    ui->listView->setRootIndex(filesModel->setRootPath(path));
}
2
3
4
5
6
7
8
9
10
11
12
13
14
15
16
17
18
19
20
21
22
23
24
25
26
27
28
29
30
31
32
33
34
35
36
#ifndef WIDGET_H
#define WIDGET_H

#include <QWidget>
#include <QFileSystemModel>

QT_BEGIN_NAMESPACE
namespace Ui { class Widget; }
QT_END_NAMESPACE

class Widget : public QWidget
{
    Q_OBJECT

public:
    Widget(QWidget *parent = nullptr);
    ~Widget();

private slots:
    void on_treeView_clicked(const QModelIndex &index);

private:
    Ui::Widget *ui;

    QFileSystemModel * dirModel;
    QFileSystemModel * filesModel;
};
#endif // WIDGET_H
2
3
4
5
6
7
8
9
10
11
12
13
14
15
16
17
18
19
20
21
22
23
24
25
26
27
28
# QStandardItemModel class
The QStandardItemModel class provides a generic model for storing custom data.
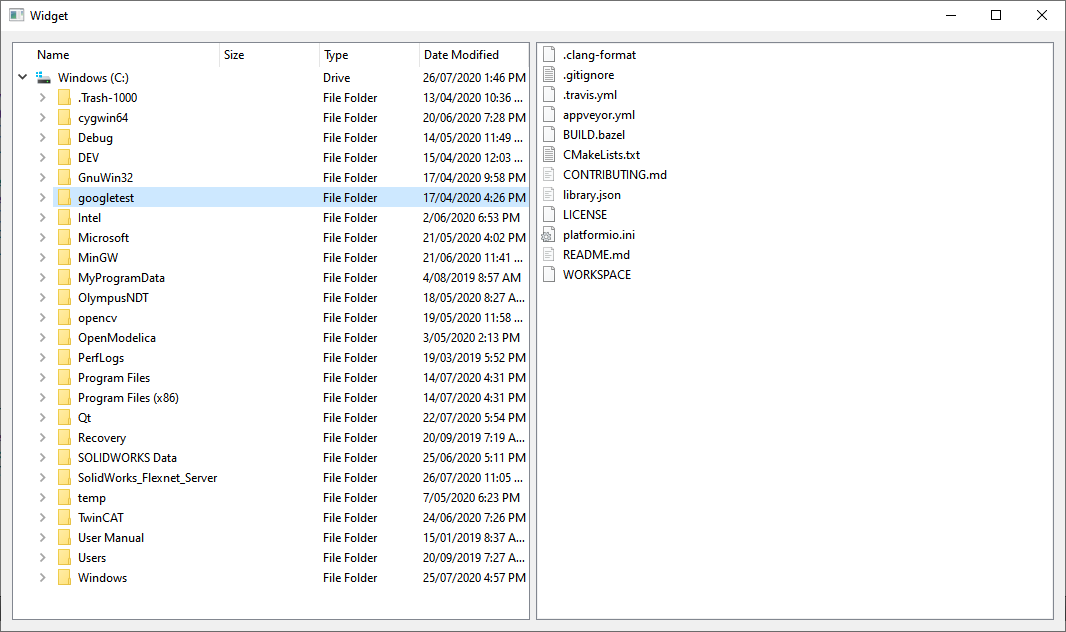
Now we are going to create a widget that displays data in a table and a tree view.
#include "widget.h"
#include "./ui_widget.h"
#include <QDebug>

Widget::Widget(QWidget *parent)
    : QWidget(parent)
    , ui(new Ui::Widget)
{
    ui->setupUi(this);

    //Tree Model
    treeModel = new QStandardItemModel(this);
    QModelIndex parentIndex = QModelIndex(); //Capture default root parent index

    for(int i=0; i<5; i++) {
        qDebug() << "Current iteration: " << QString::number(i);
        treeModel->insertRow(0, parentIndex);
        treeModel->insertColumn(0, parentIndex);

        parentIndex = treeModel->index(0, 0, parentIndex);

        QString value = QString("item %0").arg(i);

        treeModel->setData(parentIndex, QVariant::fromValue(value));
    }

    ui->treeView->setModel(treeModel);


    //TableModel
    tableModel = new QStandardItemModel(this);
    tableModel->setRowCount(3);
    tableModel->setColumnCount(5);

    for(int i=0; i<3; i++) {
        for(int j=0; j<5; j++) {
            QString data = QString("row %0, column %1").arg(i).arg(j);

            QModelIndex index = tableModel->index(i, j, QModelIndex());

            tableModel->setData(index, QVariant::fromValue(data));
        }
    }

    ui->tableView->setModel(tableModel);
}

Widget::~Widget()
{
    delete ui;
}


void Widget::on_tableView_clicked(const QModelIndex &index)
{
    QString data = tableModel->data(index, Qt::DisplayRole).toString();
    qDebug() << "The data is: " << data;
}
2
3
4
5
6
7
8
9
10
11
12
13
14
15
16
17
18
19
20
21
22
23
24
25
26
27
28
29
30
31
32
33
34
35
36
37
38
39
40
41
42
43
44
45
46
47
48
49
50
51
52
53
54
55
56
57
58
#ifndef WIDGET_H
#define WIDGET_H

#include <QWidget>
#include <QStandardItemModel>

QT_BEGIN_NAMESPACE
namespace Ui { class Widget; }
QT_END_NAMESPACE

class Widget : public QWidget
{
    Q_OBJECT

public:
    Widget(QWidget *parent = nullptr);
    ~Widget();

private slots:
    void on_tableView_clicked(const QModelIndex &index);

private:
    Ui::Widget *ui;
    QStandardItemModel * treeModel;
    QStandardItemModel * tableModel;

};
#endif // WIDGET_H
2
3
4
5
6
7
8
9
10
11
12
13
14
15
16
17
18
19
20
21
22
23
24
25
26
27
28
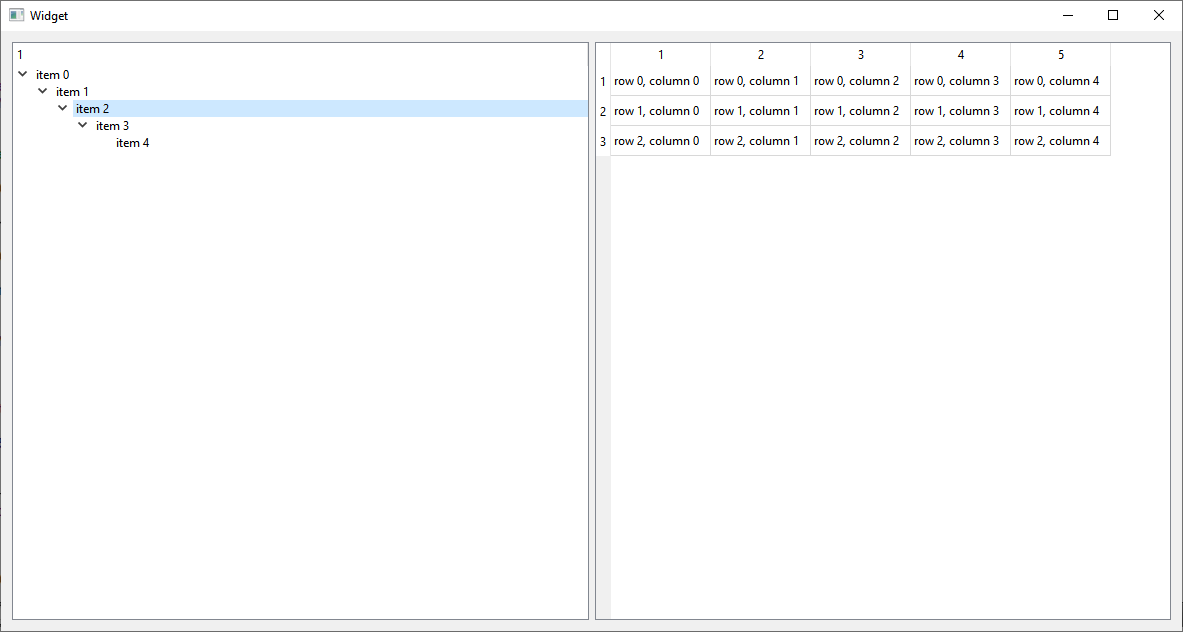
We are also displaying in the console the data that is being displayed in the table , when we click the cell.
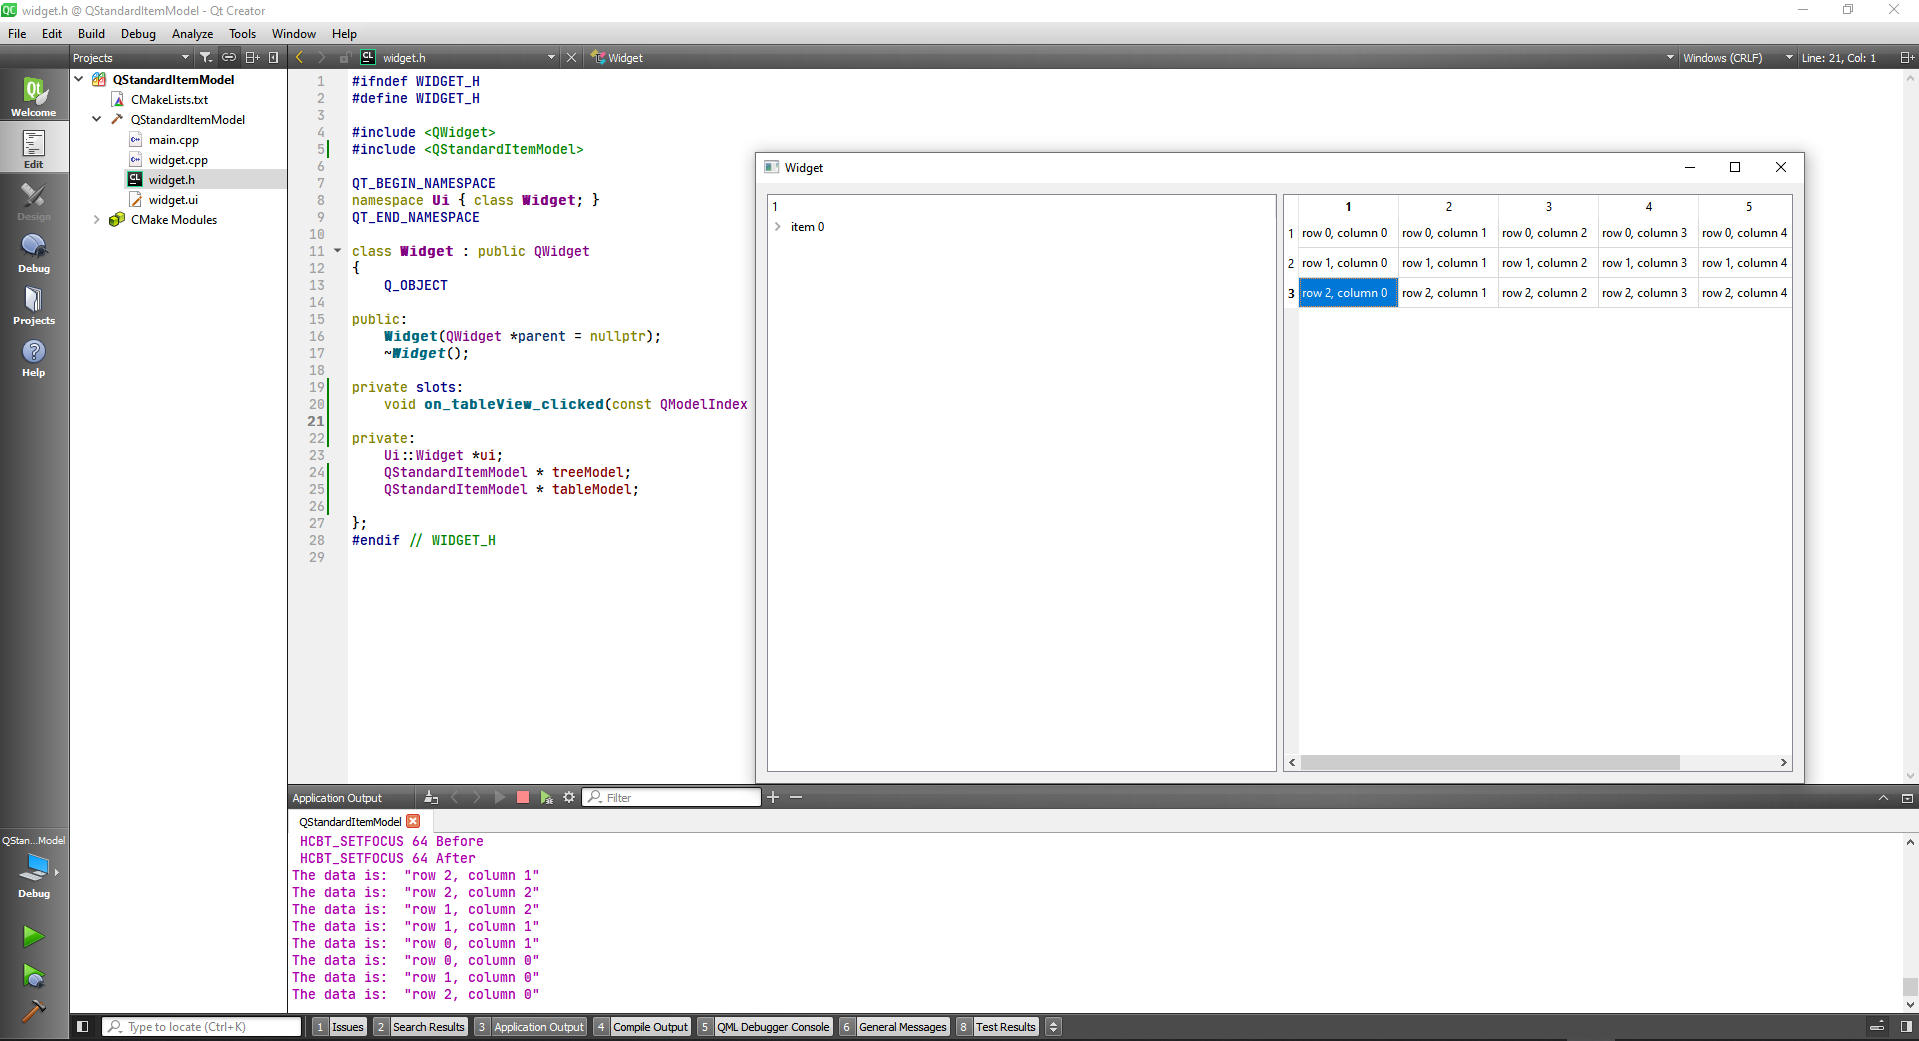
# QStringListModel class
The QStringListModel class provides a model that supplies strings to views.

widget.cpp
#include "widget.h"
#include "./ui_widget.h"

Widget::Widget(QWidget *parent)
    : QWidget(parent)
    , ui(new Ui::Widget)
{
    ui->setupUi(this);
    model = new QStringListModel(this);

    QStringList list;

    list << "Cow" << "Rooster" << "Lion" << "Hiena" << "Buffalo";

    model->setStringList(list);

    ui->listView->setModel(model);
}

Widget::~Widget()
{
    delete ui;
}
2
3
4
5
6
7
8
9
10
11
12
13
14
15
16
17
18
19
20
21
22
23
widget.h
#ifndef WIDGET_H
#define WIDGET_H

#include <QWidget>
#include <QStringListModel>

QT_BEGIN_NAMESPACE
namespace Ui { class Widget; }
QT_END_NAMESPACE

class Widget : public QWidget
{
    Q_OBJECT

public:
    Widget(QWidget *parent = nullptr);
    ~Widget();

private:
    Ui::Widget *ui;
    QStringListModel * model;
};
#endif // WIDGET_H
2
3
4
5
6
7
8
9
10
11
12
13
14
15
16
17
18
19
20
21
22
23
Now we are going to implement the button
void Widget::on_pushButton_clicked()
{
    QStringList list = model->stringList();
    qDebug() << "The current data is: " << list;
}
2
3
4
5
Note that we can edit the data.
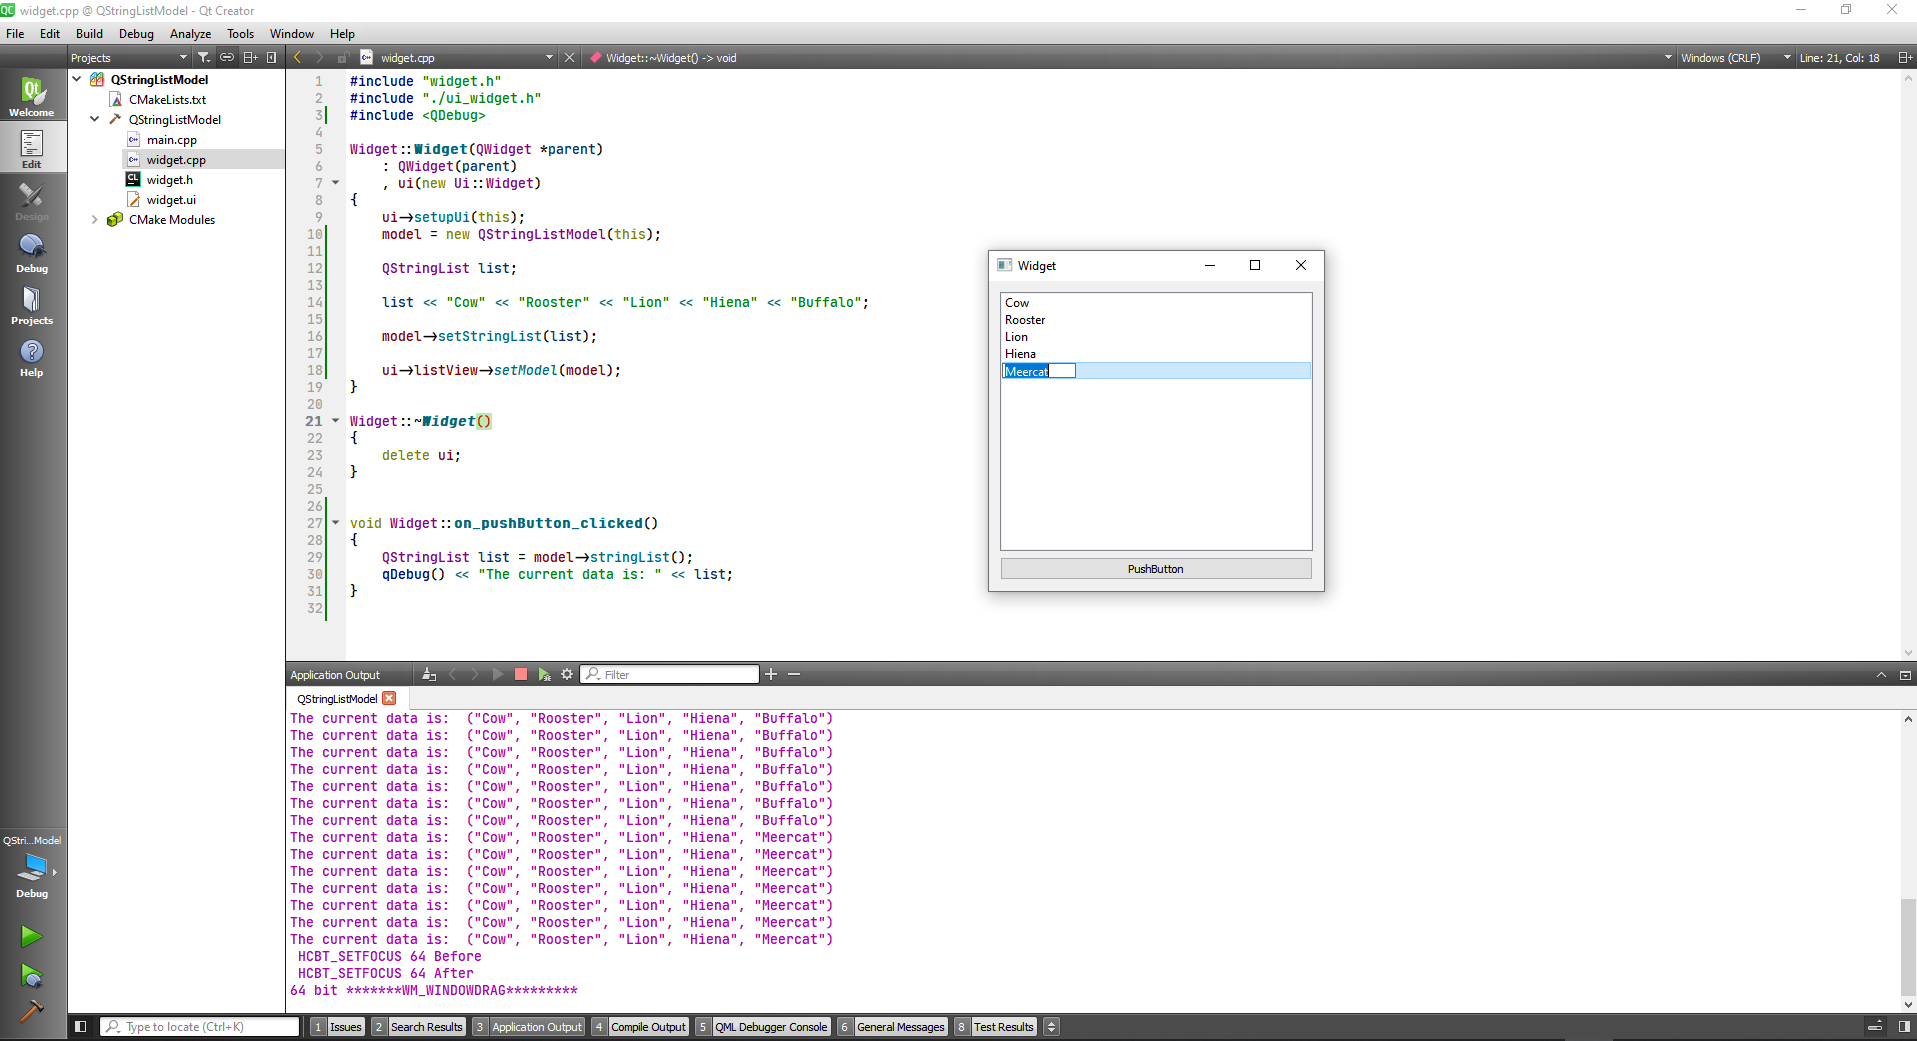
# Building Custom Models
First let's make an ui with a table tree, and create a new class called CustomTableModel.
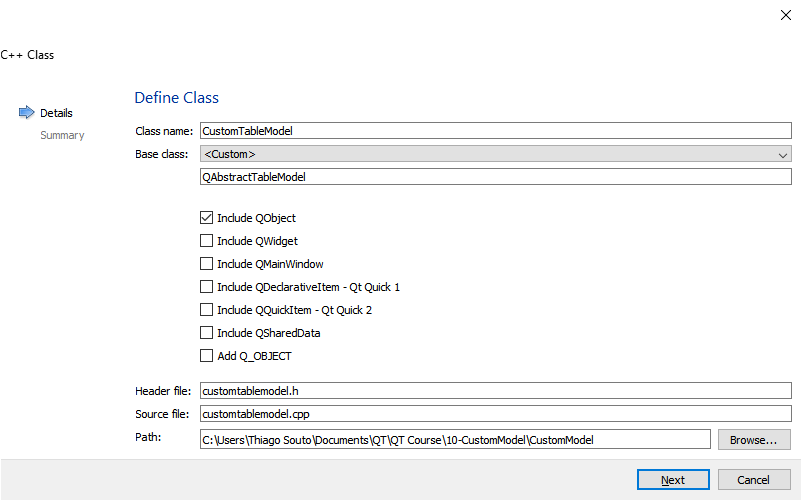
Dont forget to include the class in the cmake file:
cmake_minimum_required(VERSION 3.5)

project(CustomModel LANGUAGES CXX)

set(CMAKE_INCLUDE_CURRENT_DIR ON)

set(CMAKE_AUTOUIC ON)
set(CMAKE_AUTOMOC ON)
set(CMAKE_AUTORCC ON)

set(CMAKE_CXX_STANDARD 11)
set(CMAKE_CXX_STANDARD_REQUIRED ON)

# QtCreator supports the following variables for Android, which are identical to qmake Android variables.
# Check http://doc.qt.io/qt-5/deployment-android.html for more information.
# They need to be set before the find_package(Qt5 ...) call.

#if(ANDROID)
#    set(ANDROID_PACKAGE_SOURCE_DIR "${CMAKE_CURRENT_SOURCE_DIR}/android")
#    if (ANDROID_ABI STREQUAL "armeabi-v7a")
#        set(ANDROID_EXTRA_LIBS
#            ${CMAKE_CURRENT_SOURCE_DIR}/path/to/libcrypto.so
#            ${CMAKE_CURRENT_SOURCE_DIR}/path/to/libssl.so)
#    endif()
#endif()

find_package(Qt5 COMPONENTS Widgets REQUIRED)

if(ANDROID)
  add_library(CustomModel SHARED
    main.cpp
    widget.cpp
    widget.h
    widget.ui
    customtablemodel.cpp
    customtablemodel.h
  )
else()
  add_executable(CustomModel
    main.cpp
    widget.cpp
    widget.h
    widget.ui
    customtablemodel.cpp
    customtablemodel.h
  )
endif()

target_link_libraries(CustomModel PRIVATE Qt5::Widgets)
2
3
4
5
6
7
8
9
10
11
12
13
14
15
16
17
18
19
20
21
22
23
24
25
26
27
28
29
30
31
32
33
34
35
36
37
38
39
40
41
42
43
44
45
46
47
48
49
TIP
If you select the class and press F1 a Help window with the selected class will appear in a split window.
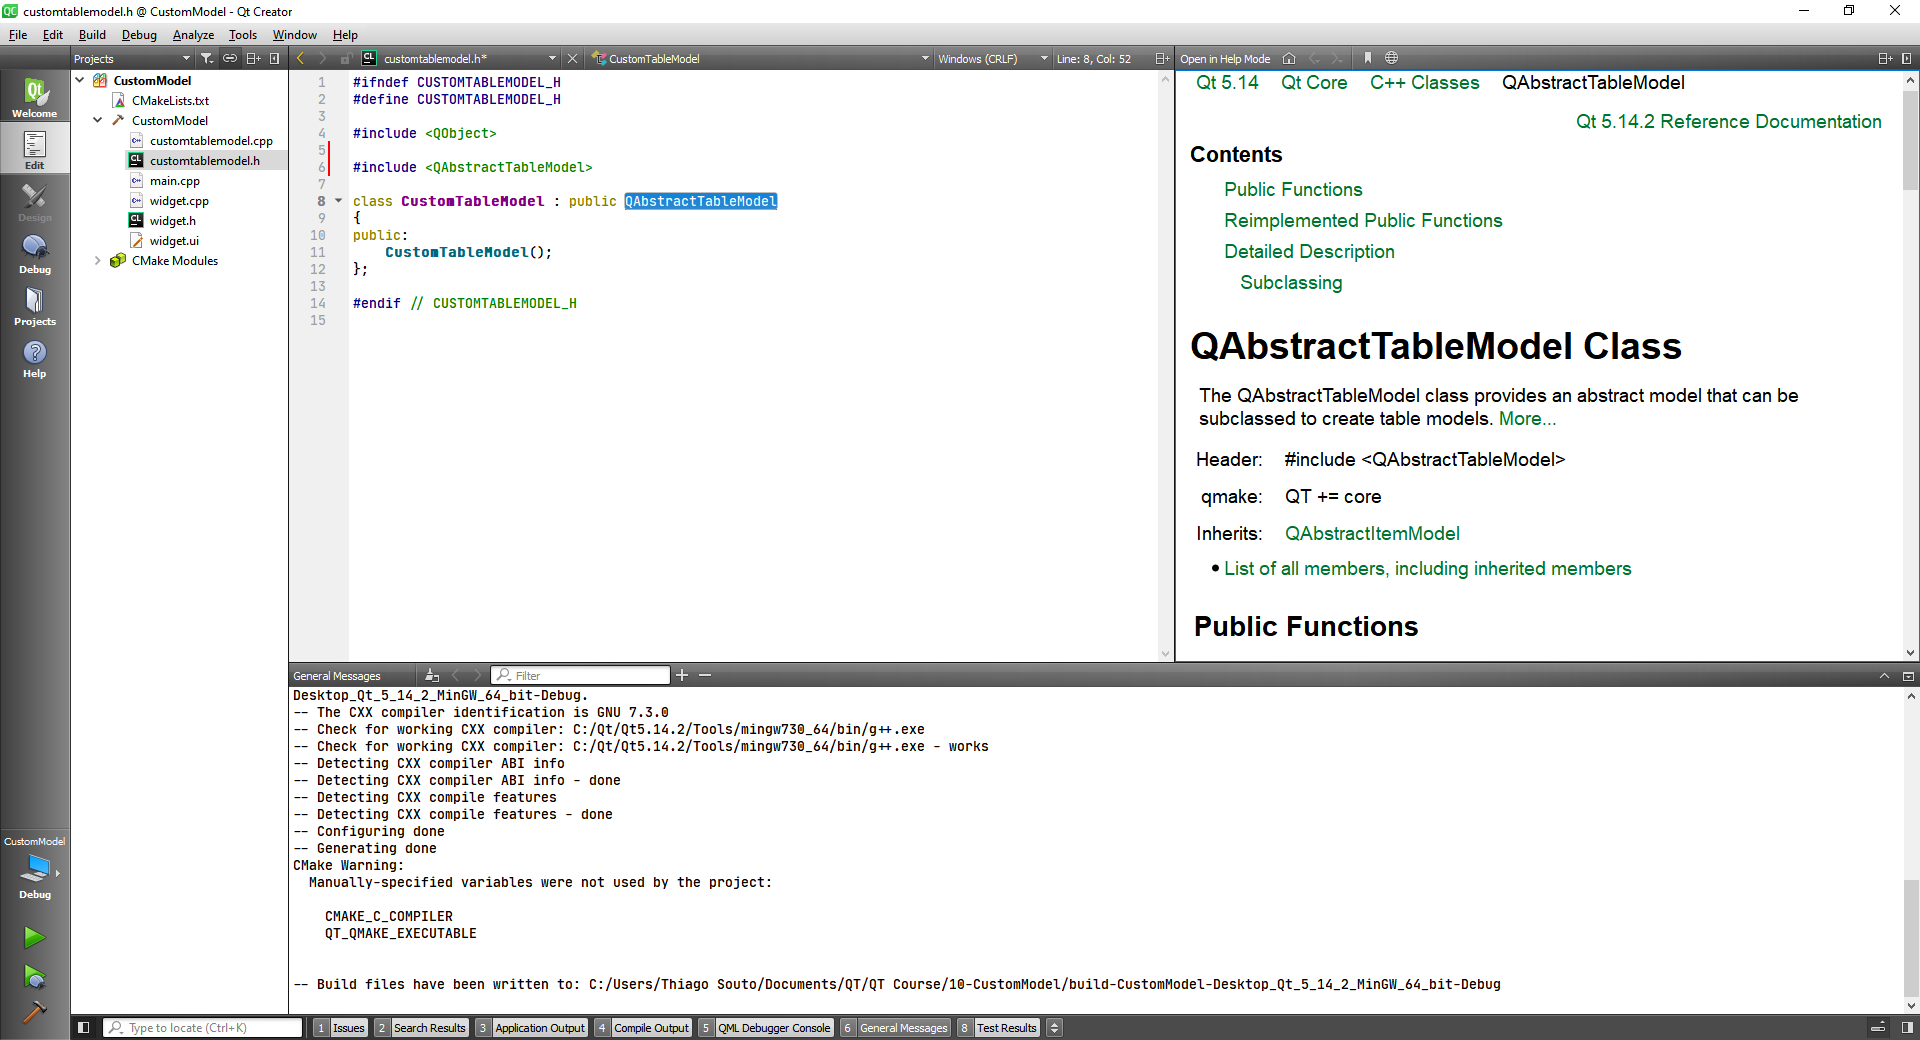
The QAbstractTableModel class provides an abstract model that can be subclassed to create table models.
We have to add the Q_OBJECT macro in the header file, this macro allows you to work with SIGNALS and SLOTS in Qt.
We are also passing a parent QObject to our model.
#ifndef CUSTOMTABLEMODEL_H
#define CUSTOMTABLEMODEL_H

#include <QObject>

#include <QAbstractTableModel>

class CustomTableModel : public QAbstractTableModel
{
    Q_OBJECT
public:
    CustomTableModel(QObject * parent);
};

#endif // CUSTOMTABLEMODEL_H
2
3
4
5
6
7
8
9
10
11
12
13
14
15
We are going to pass the parent in the implementation as well, although we should initialize the parent class as well.
CustomTableModel::CustomTableModel(QObject * parent) : QAbstractTableModel(parent)
Now, that we have the constructor, we need to define a few overrides that are going to add functionality to our model. Two of the overrides are going to specify the number of rows and columns the other is going to control the data that is going to be displayed in each cell of the model.
customtablemodel.h
#ifndef CUSTOMTABLEMODEL_H
#define CUSTOMTABLEMODEL_H

#include <QObject>

#include <QAbstractTableModel>

class CustomTableModel : public QAbstractTableModel
{
    Q_OBJECT
public:
    CustomTableModel(QObject * parent);

    int rowCount(const QModelIndex &parent) const;
    int columnCount(const QModelIndex &parent) const;

    QVariant data(const QModelIndex &index, int role) const; //Controls the data that is shown in each cell
};

#endif // CUSTOMTABLEMODEL_H
2
3
4
5
6
7
8
9
10
11
12
13
14
15
16
17
18
19
20
now we are going to implement these methods in the cpp file.
customtablemodel.cpp
#include "customtablemodel.h"

CustomTableModel::CustomTableModel(QObject * parent) : QAbstractTableModel(parent)
{

}

int CustomTableModel::rowCount(const QModelIndex &parent) const
{
    return 2;
}

int CustomTableModel::columnCount(const QModelIndex &parent) const
{
    return 3;
}

QVariant CustomTableModel::data(const QModelIndex &index, int role) const
{
    if(role == Qt::DisplayRole) {
        QString value = QString("Row %1, Col %2")
                .arg(index.row() +1)
                .arg(index.column() +1);

        return value;
    }

    return QVariant();
}
2
3
4
5
6
7
8
9
10
11
12
13
14
15
16
17
18
19
20
21
22
23
24
25
26
27
28
29
Now we should be able to display some data in the table view that we put in our ui.
widget.h
#include "widget.h"
#include "./ui_widget.h"
#include "customtablemodel.h"

Widget::Widget(QWidget *parent)
    : QWidget(parent)
    , ui(new Ui::Widget)
{
    ui->setupUi(this);

    CustomTableModel * model = new CustomTableModel(this);

    ui->tableView->setModel(model);
}

Widget::~Widget()
{
    delete ui;
}
2
3
4
5
6
7
8
9
10
11
12
13
14
15
16
17
18
19

To prove that the data is coming from the model we can alter the customtablemodel.cpp by including some dashes.
#include "customtablemodel.h"

CustomTableModel::CustomTableModel(QObject * parent) : QAbstractTableModel(parent)
{

}

int CustomTableModel::rowCount(const QModelIndex &parent) const
{
    return 2;
}

int CustomTableModel::columnCount(const QModelIndex &parent) const
{
    return 3;
}

QVariant CustomTableModel::data(const QModelIndex &index, int role) const
{
    if(role == Qt::DisplayRole) {
        QString value = QString("-----Row %1, Col %2")
                .arg(index.row() +1)
                .arg(index.column() +1);

        return value;
    }

    return QVariant();
}
2
3
4
5
6
7
8
9
10
11
12
13
14
15
16
17
18
19
20
21
22
23
24
25
26
27
28
29

Now we know that to define a custom model we start from a ore-defined Abstract model and subclassing the QAbstractTableModel
class CustomTableModel : public QAbstractTableModel the you override some methods to give functionality:
int rowCount(const QModelIndex &parent) const;
int columnCount(const QModelIndex &parent) const;

QVariant data(const QModelIndex &index, int role) const; //Controls the data that is shown in each cell
2
3
4
# Working with Roles
If we come back to the data method on the last example we notice that we are looking for the DisplayRole. Now we are going to extend on this and check for multiple roles and see how we can use them to affect the table view.
QVariant CustomTableModel::data(const QModelIndex &index, int role) const
{
    if(role == Qt::DisplayRole) {
        QString value = QString("-----Row %1, Col %2")
                .arg(index.row() +1)
                .arg(index.column() +1);

        return value;
    }

    return QVariant();
}
2
3
4
5
6
7
8
9
10
11
12
First we are going to grab the current row and current column.
int row = index.row();
int col = index.column();
2
After that we are going to switch against the role
switch(role) {
        case Qt::DisplayRole:
        if(row==0 && col==1) return QString("<--left");
        if(row==1 && col==1) return QString("right-->");

        return QString("Row %1, Col %2").arg(row).arg(col);
    }
2
3
4
5
6
7
If the role we are checking for is not found in here we should return a QVariant to avoid crash.
return QVariant();

Another case is FontRole: where (0,0) should be bold.
case Qt::FontRole:

        if(row==0 && col==0) {
            QFont font;
            font.setBold(true);
            return font;
        }
        break;
    }
2
3
4
5
6
7
8
9

Now we can put a yellow background and align the text to the right as well.
Here is the complete code:
customtablemodel.h
#ifndef CUSTOMTABLEMODEL_H
#define CUSTOMTABLEMODEL_H

#include <QObject>

#include <QAbstractTableModel>

class CustomTableModel : public QAbstractTableModel
{
    Q_OBJECT
public:
    CustomTableModel(QObject * parent);

    int rowCount(const QModelIndex &parent) const;
    int columnCount(const QModelIndex &parent) const;

    QVariant data(const QModelIndex &index, int role) const; //Controls the data that is shown in each cell
};

#endif // CUSTOMTABLEMODEL_H
2
3
4
5
6
7
8
9
10
11
12
13
14
15
16
17
18
19
20
customtablemodel.cpp
#include "customtablemodel.h"
#include <QFont>
#include <QBrush>


CustomTableModel::CustomTableModel(QObject * parent) : QAbstractTableModel(parent)
{

}

int CustomTableModel::rowCount(const QModelIndex &parent) const
{
    return 2;
}

int CustomTableModel::columnCount(const QModelIndex &parent) const
{
    return 3;
}

QVariant CustomTableModel::data(const QModelIndex &index, int role) const
{
//    if(role == Qt::DisplayRole) {
//        QString value = QString("-----Row %1, Col %2")
//                .arg(index.row() +1)
//                .arg(index.column() +1);

//        return value;
//    }

//    return QVariant();

    int row = index.row();
    int col = index.column();

    switch(role) {

        case Qt::DisplayRole:

            if(row==0 && col==1) return QString("<--left");
            if(row==1 && col==1) return QString("right-->");

            return QString("Row %1, Col %2").arg(row).arg(col);
            break;//This is just because of its a standard, because it was not necessary since we return something.

        case Qt::FontRole:

            if(row==0 && col==0) {
                QFont font;
                font.setBold(true);
                return font;
            }
            break;

        case Qt::BackgroundRole:
            if(row==1 && col==2) {
                QBrush background(Qt::yellow);
                return background;
            }
            break;

        case Qt::TextAlignmentRole:
            if(row==1 && col==1) {
                return Qt::AlignRight;
            }
            break;
    }
    return QVariant();
}
2
3
4
5
6
7
8
9
10
11
12
13
14
15
16
17
18
19
20
21
22
23
24
25
26
27
28
29
30
31
32
33
34
35
36
37
38
39
40
41
42
43
44
45
46
47
48
49
50
51
52
53
54
55
56
57
58
59
60
61
62
63
64
65
66
67
68
69
widget.h
#ifndef WIDGET_H
#define WIDGET_H

#include <QWidget>

QT_BEGIN_NAMESPACE
namespace Ui { class Widget; }
QT_END_NAMESPACE

class Widget : public QWidget
{
    Q_OBJECT

public:
    Widget(QWidget *parent = nullptr);
    ~Widget();

private:
    Ui::Widget *ui;
};
#endif // WIDGET_H
2
3
4
5
6
7
8
9
10
11
12
13
14
15
16
17
18
19
20
21
widget.cpp
#include "widget.h"
#include "./ui_widget.h"
#include "customtablemodel.h"

Widget::Widget(QWidget *parent)
    : QWidget(parent)
    , ui(new Ui::Widget)
{
    ui->setupUi(this);

    CustomTableModel * model = new CustomTableModel(this);

    ui->tableView->setModel(model);
}

Widget::~Widget()
{
    delete ui;
}
2
3
4
5
6
7
8
9
10
11
12
13
14
15
16
17
18
19
And the result:

# Notify View of Changes in Model
We are going to show the time in the table, and whenever the time changes in the model the view will be notified and show the time. So basically we are goint to view a clock in the first cell.
The first thing is show the time in the first cell. For this we are going to include in the case of Qt::DisplayRole the following:
if(row==0 && col==0) {
    return QTime::currentTime().toString();
}
2
3

Now we have to change the time, so it can be a real clock.
For this we are going into the header class and include a <QTimer> class. We are going to define a private section and create a QTimer Object.
#ifndef CUSTOMTABLEMODEL_H
#define CUSTOMTABLEMODEL_H

#include <QObject>
#include <QTimer>

#include <QAbstractTableModel>

class CustomTableModel : public QAbstractTableModel
{
    Q_OBJECT
public:
    CustomTableModel(QObject * parent);

    int rowCount(const QModelIndex &parent) const;
    int columnCount(const QModelIndex &parent) const;

    QVariant data(const QModelIndex &index, int role) const; //Controls the data that is shown in each cell

private:
    QTimer * timer;
};

#endif // CUSTOMTABLEMODEL_H
2
3
4
5
6
7
8
9
10
11
12
13
14
15
16
17
18
19
20
21
22
23
24
Now we are going to initialize the timer, we are going to set it to tick every second, and we want to connect the Signal timeout to an action(SLOT);
So whenever the timer times out we want to capture the index where we want to notify the changes.
CustomTableModel::CustomTableModel(QObject * parent) : QAbstractTableModel(parent)
{
    timer = new QTimer(this);
    timer->setInterval(1000);
    connect(timer, &QTimer::timeout, [=](){
        QModelIndex topLeft = index(0,0);

        //Notify the view of the change of the time in the model
        emit dataChanged(topLeft,topLeft);
    });
    timer->start();
}
2
3
4
5
6
7
8
9
10
11
12
So when the time changes we are going to emit the signal(emit dataChanged(topLeft,topLeft);) and the view is going to call the data method to retrieve the new time that is going to be returned her:
if(row==0 && col==0) {
    return QTime::currentTime().toString();
}
2
3
# Managing View Header Data
Here we are going to use some tricks to change the view like hiding the cloumn numbers.
On the widget.cpp file we can enter:
ui->tableView->verticalHeader()->hide();
Now we are going to show first second and third in the headers:
QVariant CustomTableModel::headerData(int section, Qt::Orientation orientation, int role) const
{
    if(role == Qt::DisplayRole) {
        if(orientation == Qt::Horizontal) {
            switch (section) {

            case 0:
                return QString("First");
                break;

            case 1:
                return QString("Second");
                break;

            case 2:
                return QString("Third");
                break;

            default:
                return QString("Default");
                break;

            }
        }
    }
    return QVariant();
}
2
3
4
5
6
7
8
9
10
11
12
13
14
15
16
17
18
19
20
21
22
23
24
25
26
27

# QStandardItemApiModel
widget.h
#ifndef WIDGET_H
#define WIDGET_H

#include <QWidget>
#include <QStandardItem>
#include <QItemSelection>

QT_BEGIN_NAMESPACE
namespace Ui { class Widget; }
QT_END_NAMESPACE

class Widget : public QWidget
{
    Q_OBJECT

public:
    Widget(QWidget *parent = nullptr);
    ~Widget();

private:
    Ui::Widget *ui;

    QStandardItemModel *model;
};
#endif // WIDGET_H
2
3
4
5
6
7
8
9
10
11
12
13
14
15
16
17
18
19
20
21
22
23
24
25
widget.cpp
#include "widget.h"
#include "./ui_widget.h"

Widget::Widget(QWidget *parent)
    : QWidget(parent)
    , ui(new Ui::Widget)
{
    ui->setupUi(this);

    model = new QStandardItemModel(this);

    //Capture the root item
    QStandardItem * rootItem = model->invisibleRootItem();

    //Defining some items
    QStandardItem *africaItem = new QStandardItem("Africa");
    QStandardItem *rwandaItem = new QStandardItem("Rwanda");
    QStandardItem *musanzeItem = new QStandardItem("Musanze");
    QStandardItem *kigaliItem = new QStandardItem("Kigali");
    QStandardItem *ugandaItem = new QStandardItem("Uganda");
    QStandardItem *kampalaItem = new QStandardItem("Kampala");
    QStandardItem *entebbeItem = new QStandardItem("Entebbe");
    QStandardItem *asiaItem = new QStandardItem("Asia");
    QStandardItem *chinaItem = new QStandardItem("China");
    QStandardItem *shanghaiItem = new QStandardItem("Shanghai");
    QStandardItem *beijingItem = new QStandardItem("Beijing");
    QStandardItem *europeItem = new QStandardItem("Europe");
    QStandardItem *franceItem = new QStandardItem("France");
    QStandardItem *parisItem = new QStandardItem("Paris");
    QStandardItem *toulouseItem = new QStandardItem("Toulouse");

    //Define the tree structure

    //Africa
    rootItem->appendRow(africaItem);
    africaItem->appendRow(rwandaItem);
    africaItem->appendRow(ugandaItem);

    rwandaItem->appendRow(kigaliItem);
    rwandaItem->appendRow(musanzeItem);

    ugandaItem->appendRow(kampalaItem);
    ugandaItem->appendRow(entebbeItem);

    //Asia
    rootItem->appendRow(asiaItem);
    asiaItem->appendRow(chinaItem);
    chinaItem->appendRow(beijingItem);
    chinaItem->appendRow(shanghaiItem);

    //Europe
    rootItem->appendRow(europeItem);
    europeItem->appendRow(franceItem);
    franceItem->appendRow(parisItem);
    franceItem->appendRow(toulouseItem);

    ui->treeView->setModel(model);

    ui->treeView->expandAll();
}

Widget::~Widget()
{
    delete ui;
}
2
3
4
5
6
7
8
9
10
11
12
13
14
15
16
17
18
19
20
21
22
23
24
25
26
27
28
29
30
31
32
33
34
35
36
37
38
39
40
41
42
43
44
45
46
47
48
49
50
51
52
53
54
55
56
57
58
59
60
61
62
63
64
65

The next thing is the selection model, where we are going to be notified if something in the tree was selected.
widget.h
#ifndef WIDGET_H
#define WIDGET_H

#include <QWidget>
#include <QStandardItem>
#include <QItemSelection>

QT_BEGIN_NAMESPACE
namespace Ui { class Widget; }
QT_END_NAMESPACE

class Widget : public QWidget
{
    Q_OBJECT

public:
    Widget(QWidget *parent = nullptr);
    ~Widget();

private slots:
    void selectionChangedSlot(const QItemSelection & oldSelection, const QItemSelection & newSelection);

private:
    Ui::Widget *ui;

    QStandardItemModel *model;
};
#endif // WIDGET_H
2
3
4
5
6
7
8
9
10
11
12
13
14
15
16
17
18
19
20
21
22
23
24
25
26
27
28
widget.cpp
#include "widget.h"
#include "./ui_widget.h"
#include <QDebug>
Widget::Widget(QWidget *parent)
: QWidget(parent)
, ui(new Ui::Widget)
{
ui->setupUi(this);
model = new QStandardItemModel(this);
//Capture the root item
QStandardItem * rootItem = model->invisibleRootItem();
//Defining some items
QStandardItem *africaItem = new QStandardItem("Africa");
QStandardItem *rwandaItem = new QStandardItem("Rwanda");
QStandardItem *musanzeItem = new QStandardItem("Musanze");
QStandardItem *kigaliItem = new QStandardItem("Kigali");
QStandardItem *ugandaItem = new QStandardItem("Uganda");
QStandardItem *kampalaItem = new QStandardItem("Kampala");
QStandardItem *entebbeItem = new QStandardItem("Entebbe");
QStandardItem *asiaItem = new QStandardItem("Asia");
QStandardItem *chinaItem = new QStandardItem("China");
QStandardItem *shanghaiItem = new QStandardItem("Shanghai");
QStandardItem *beijingItem = new QStandardItem("Beijing");
QStandardItem *europeItem = new QStandardItem("Europe");
QStandardItem *franceItem = new QStandardItem("France");
QStandardItem *parisItem = new QStandardItem("Paris");
QStandardItem *toulouseItem = new QStandardItem("Toulouse");
//Define the tree structure
//Africa
rootItem->appendRow(africaItem);
africaItem->appendRow(rwandaItem);
africaItem->appendRow(ugandaItem);
rwandaItem->appendRow(kigaliItem);
rwandaItem->appendRow(musanzeItem);
ugandaItem->appendRow(kampalaItem);
ugandaItem->appendRow(entebbeItem);
//Asia
rootItem->appendRow(asiaItem);
asiaItem->appendRow(chinaItem);
chinaItem->appendRow(beijingItem);
chinaItem->appendRow(shanghaiItem);
//Europe
rootItem->appendRow(europeItem);
europeItem->appendRow(franceItem);
franceItem->appendRow(parisItem);
franceItem->appendRow(toulouseItem);
ui->treeView->setModel(model);
ui->treeView->expandAll();
QItemSelectionModel * selectionModel = ui->treeView->selectionModel();
connect(selectionModel, SIGNAL(selectionChanged(QItemSelection, QItemSelection)), this,
SLOT(selectionChangedSlot(QItemSelection, QItemSelection)));
}
Widget::~Widget()
{
delete ui;
}
void Widget::selectionChangedSlot(const QItemSelection &oldSelection, const QItemSelection &newSelection)
{
qDebug() << "Clicked on something in the tree";
}
2
3
4
5
6
7
8
9
10
11
12
13
14
15
16
17
18
19
20
21
22
23
24
25
26
27
28
29
30
31
32
33
34
35
36
37
38
39
40
41
42
43
44
45
46
47
48
49
50
51
52
53
54
55
56
57
58
59
60
61
62
63
64
65
66
67
68
69
70
71
72
73
74
75
76
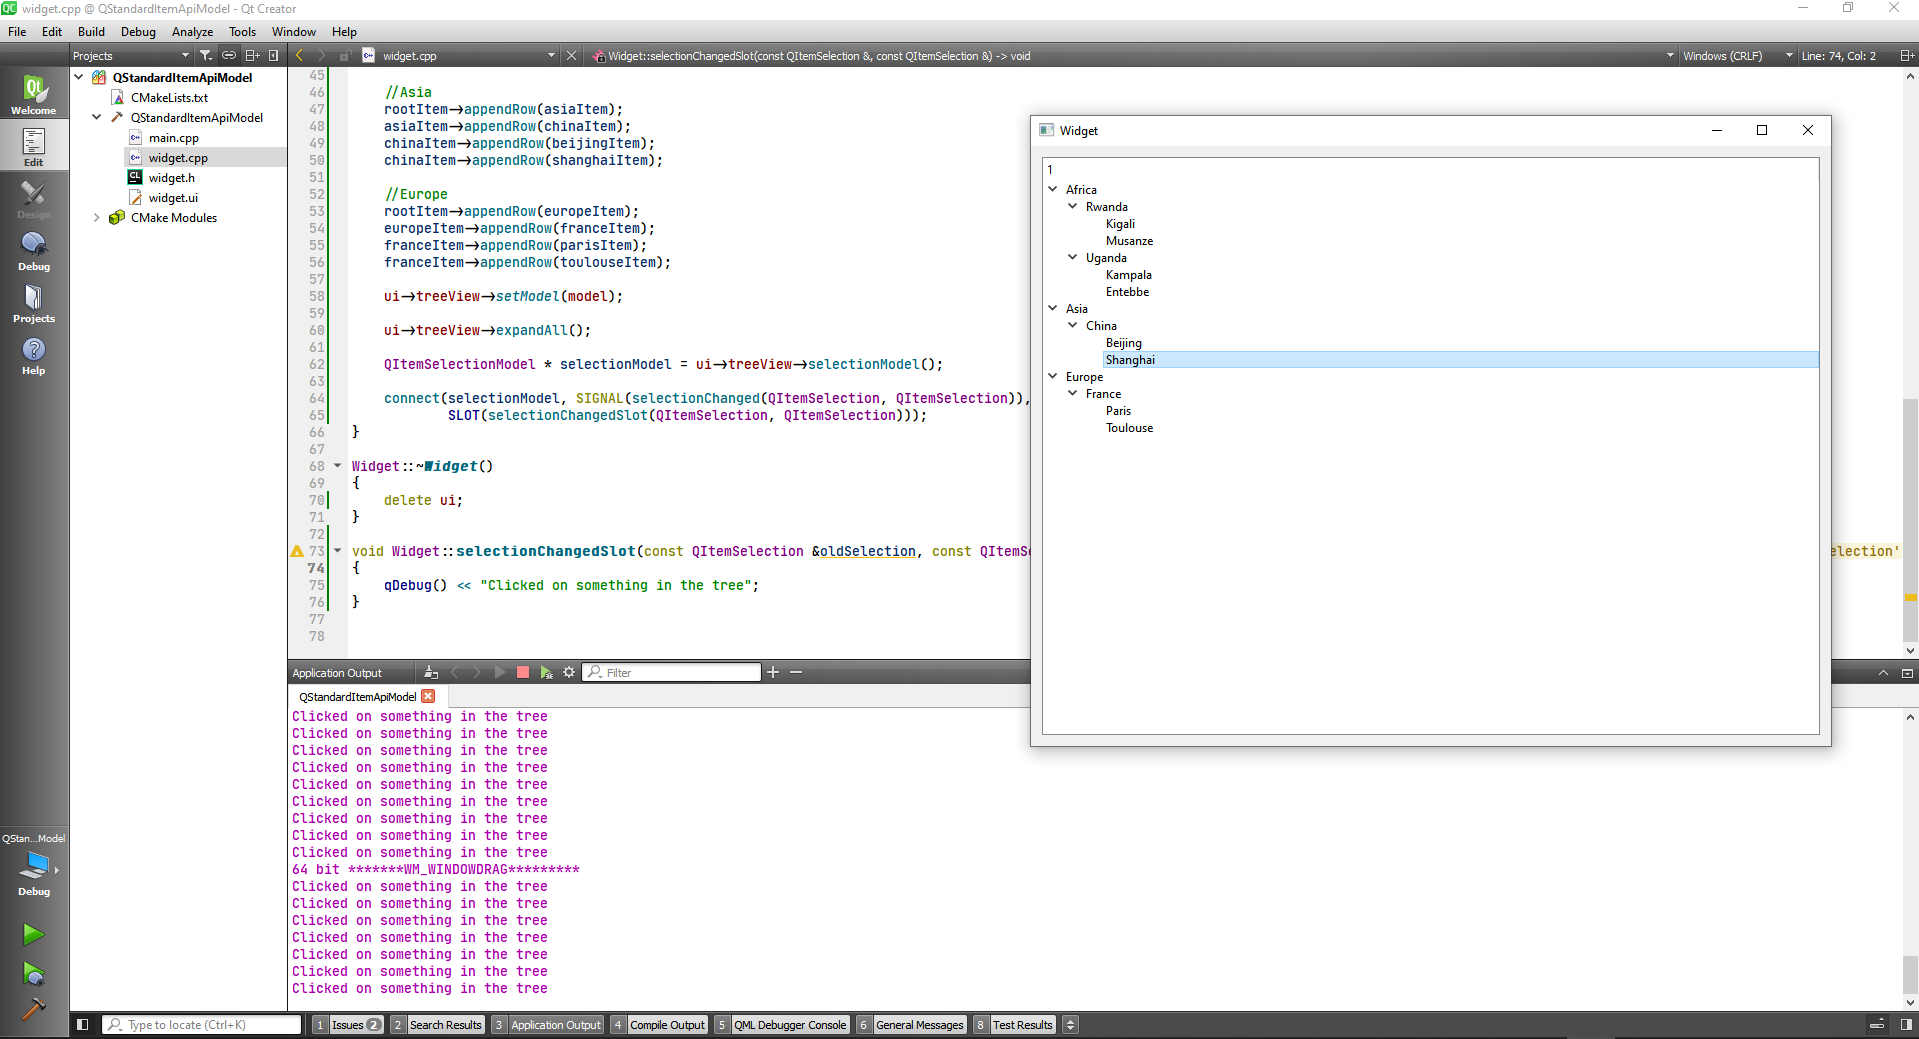
Now we are going to display what is selected in the title bar and we are going to show the level in the tree.
widget.cpp
#include "widget.h"
#include "./ui_widget.h"
#include <QDebug>
Widget::Widget(QWidget *parent)
: QWidget(parent)
, ui(new Ui::Widget)
{
ui->setupUi(this);
model = new QStandardItemModel(this);
//Capture the root item
QStandardItem * rootItem = model->invisibleRootItem();
//Defining some items
QStandardItem *africaItem = new QStandardItem("Africa");
QStandardItem *rwandaItem = new QStandardItem("Rwanda");
QStandardItem *musanzeItem = new QStandardItem("Musanze");
QStandardItem *kigaliItem = new QStandardItem("Kigali");
QStandardItem *ugandaItem = new QStandardItem("Uganda");
QStandardItem *kampalaItem = new QStandardItem("Kampala");
QStandardItem *entebbeItem = new QStandardItem("Entebbe");
QStandardItem *asiaItem = new QStandardItem("Asia");
QStandardItem *chinaItem = new QStandardItem("China");
QStandardItem *shanghaiItem = new QStandardItem("Shanghai");
QStandardItem *beijingItem = new QStandardItem("Beijing");
QStandardItem *europeItem = new QStandardItem("Europe");
QStandardItem *franceItem = new QStandardItem("France");
QStandardItem *parisItem = new QStandardItem("Paris");
QStandardItem *toulouseItem = new QStandardItem("Toulouse");
//Define the tree structure
//Africa
rootItem->appendRow(africaItem);
africaItem->appendRow(rwandaItem);
africaItem->appendRow(ugandaItem);
rwandaItem->appendRow(kigaliItem);
rwandaItem->appendRow(musanzeItem);
ugandaItem->appendRow(kampalaItem);
ugandaItem->appendRow(entebbeItem);
//Asia
rootItem->appendRow(asiaItem);
asiaItem->appendRow(chinaItem);
chinaItem->appendRow(beijingItem);
chinaItem->appendRow(shanghaiItem);
//Europe
rootItem->appendRow(europeItem);
europeItem->appendRow(franceItem);
franceItem->appendRow(parisItem);
franceItem->appendRow(toulouseItem);
ui->treeView->setModel(model);
ui->treeView->expandAll();
QItemSelectionModel * selectionModel = ui->treeView->selectionModel();
connect(selectionModel, SIGNAL(selectionChanged(QItemSelection, QItemSelection)), this,
SLOT(selectionChangedSlot(QItemSelection, QItemSelection)));
}
Widget::~Widget()
{
delete ui;
}
void Widget::selectionChangedSlot(const QItemSelection &oldSelection, const QItemSelection &newSelection)
{
qDebug() << "Clicked on something in the tree";
QModelIndex currentIndex = ui->treeView->selectionModel()->currentIndex();
QString data = model->data(currentIndex, Qt::DisplayRole).toString();
//Find the hierarchy of the selected item
int hierarchy = 1;
QModelIndex seekRoot = currentIndex;
while(seekRoot != QModelIndex()) {
seekRoot = seekRoot.parent();
hierarchy++;
}
QString dataToShow = QString("%1, level %2").arg(data).arg(QString::number(hierarchy));
setWindowTitle(dataToShow);
}
2
3
4
5
6
7
8
9
10
11
12
13
14
15
16
17
18
19
20
21
22
23
24
25
26
27
28
29
30
31
32
33
34
35
36
37
38
39
40
41
42
43
44
45
46
47
48
49
50
51
52
53
54
55
56
57
58
59
60
61
62
63
64
65
66
67
68
69
70
71
72
73
74
75
76
77
78
79
80
81
82
83
84
85
86
87
88
89
90
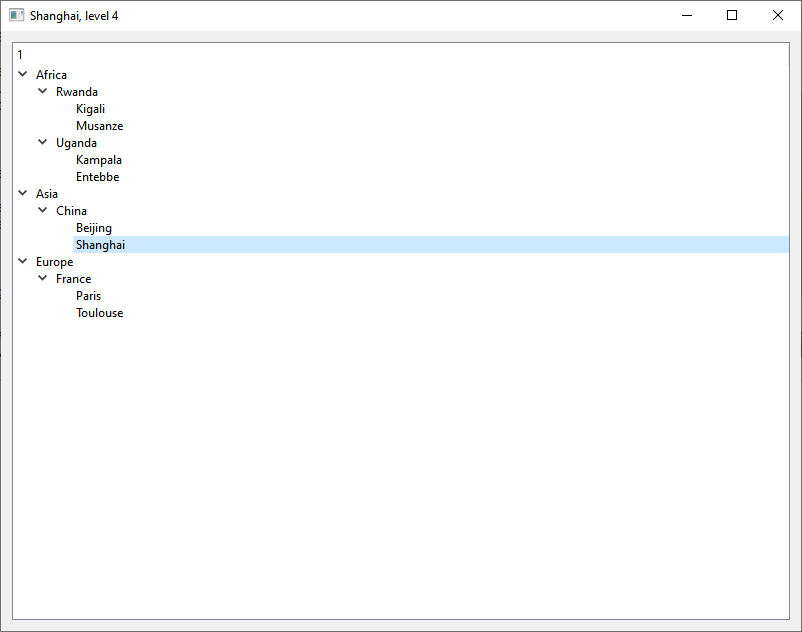
# Network


# Downloading HTML Pages in Qt applictions
# QNetworkAccessManager Class
The QNetworkAccessManager class allows the application to send network requests and receive replies.
First we have to include Network to cmake file.
cmake_minimum_required(VERSION 3.5)
project(Network LANGUAGES CXX)
set(CMAKE_INCLUDE_CURRENT_DIR ON)
set(CMAKE_AUTOUIC ON)
set(CMAKE_AUTOMOC ON)
set(CMAKE_AUTORCC ON)
set(CMAKE_CXX_STANDARD 11)
set(CMAKE_CXX_STANDARD_REQUIRED ON)
# QtCreator supports the following variables for Android, which are identical to qmake Android variables.
# Check http://doc.qt.io/qt-5/deployment-android.html for more information.
# They need to be set before the find_package(Qt5 ...) call.
#if(ANDROID)
# set(ANDROID_PACKAGE_SOURCE_DIR "${CMAKE_CURRENT_SOURCE_DIR}/android")
# if (ANDROID_ABI STREQUAL "armeabi-v7a")
# set(ANDROID_EXTRA_LIBS
# ${CMAKE_CURRENT_SOURCE_DIR}/path/to/libcrypto.so
# ${CMAKE_CURRENT_SOURCE_DIR}/path/to/libssl.so)
# endif()
#endif()
find_package(Qt5 COMPONENTS Widgets REQUIRED)
find_package(Qt5Network REQUIRED)
if(ANDROID)
add_library(Network SHARED
main.cpp
widget.cpp
widget.h
widget.ui
)
else()
add_executable(Network
main.cpp
widget.cpp
widget.h
widget.ui
)
endif()
target_link_libraries(Network PRIVATE Qt5::Widgets)
target_link_libraries(Network PRIVATE Qt5::Network)
2
3
4
5
6
7
8
9
10
11
12
13
14
15
16
17
18
19
20
21
22
23
24
25
26
27
28
29
30
31
32
33
34
35
36
37
38
39
40
41
42
43
44
45
46
47
Now we can include the #include <QNetworkAccessManager>.
widget.h
#ifndef WIDGET_H
#define WIDGET_H
#include <QWidget>
#include <QNetworkAccessManager>
QT_BEGIN_NAMESPACE
namespace Ui { class Widget; }
QT_END_NAMESPACE
class Widget : public QWidget
{
Q_OBJECT
public:
Widget(QWidget *parent = nullptr);
~Widget();
private:
Ui::Widget *ui;
QNetworkAccessManager * netManager;
QNetworkReply * netReply;
QByteArray * mDataBuffer;
};
#endif // WIDGET_H
2
3
4
5
6
7
8
9
10
11
12
13
14
15
16
17
18
19
20
21
22
23
24
25
26
27
Now we should initialize them on the constructor implementation.
#include "widget.h"
#include "./ui_widget.h"
#include <QtNetwork>
#include <QtDebug>
Widget::Widget(QWidget *parent)
: QWidget(parent)
, ui(new Ui::Widget)
{
ui->setupUi(this);
netManager = new QNetworkAccessManager(this);
netReply = nullptr;
mDataBuffer = new QByteArray;
//Define network request
QNetworkRequest request;
request.setUrl(QUrl("https://skinnyrobot.co.nz"));
netReply = netManager->get(request);
connect(netReply, &QIODevice::readyRead, this, &Widget::dataReadyToRead);
connect(netReply, &QNetworkReply::finished, this, &Widget::dataReadFinished);
}
Widget::~Widget()
{
delete ui;
}
void Widget::dataReadyToRead()
{
qDebug() << "Some data available";
mDataBuffer->append(netReply->readAll());
}
void Widget::dataReadFinished()
{
if(netReply->error()) {
qDebug() << "Error: " << QString(*mDataBuffer);
} else {
ui->textEdit->setPlainText(QString(*mDataBuffer));
}
}
2
3
4
5
6
7
8
9
10
11
12
13
14
15
16
17
18
19
20
21
22
23
24
25
26
27
28
29
30
31
32
33
34
35
36
37
38
39
40
41
42
43
44
45
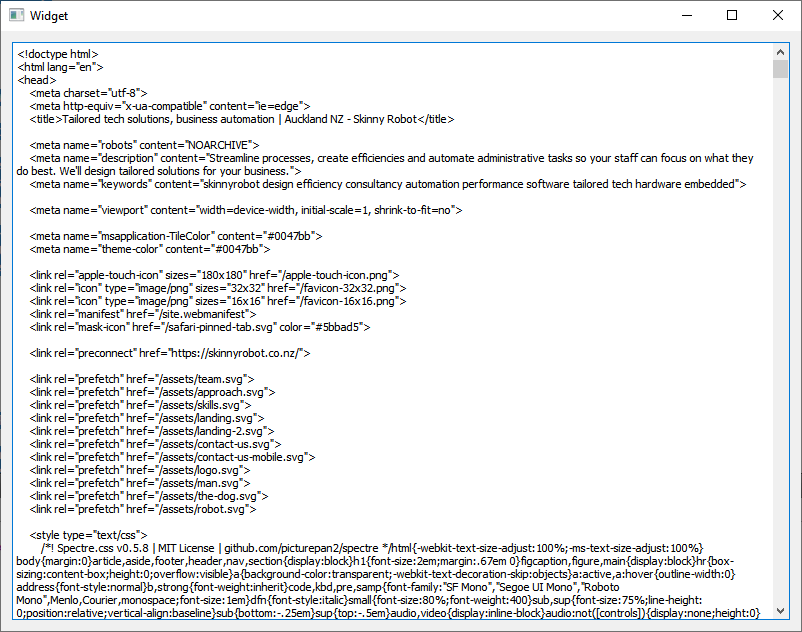
# Consuming REST Apis in Qt Applications
# JSON Support in Qt
Qt provides support for dealing with JSON data. JSON is a format to encode object data derived from Javascript, but now widely used as a data exchange format on the internet.
The JSON support in Qt provides an easy to use C++ API to parse, modify and save JSON data. It also contains support for saving this data in a binary format that is directly "mmap"-able and very fast to access.
More details about the JSON data format can be found at json.org and in RFC-4627.
# Overview
JSON is a format to store structured data. It has 6 basic data types:
- bool
- double
- string
- array
- object
- null
A value can have any of the above types. A boolean value is represented by the strings true or false in JSON. JSON doesn't explicitly specify the valid range for numbers, but the support in Qt is limited to the validity range and precision of doubles. A string can be any valid unicode string. An array is a list of values, and an object is a collection of key/value pairs. All keys in an object are strings, and an object cannot contain any duplicate keys.
The text representation of JSON encloses arrays in square brackets ([ ... ]) and objects in curly brackets ({ ... }). Entries in arrays and objects are separated by commas. The separator between keys and values in an object is a colon (:).
A simple JSON document encoding a person, his/her age, address and phone numbers could look like:
{
"FirstName": "John",
"LastName": "Doe",
"Age": 43,
"Address": {
"Street": "Downing Street 10",
"City": "London",
"Country": "Great Britain"
},
"Phone numbers": [
"+44 1234567",
"+44 2345678"
]
}
2
3
4
5
6
7
8
9
10
11
12
13
14
The above example consists of an object with 5 key/value pairs. Two of the values are strings, one is a number, one is another object and the last one an array.
A valid JSON document is either an array or an object, so a document always starts with a square or curly bracket. The JSON Classes
All JSON classes are value based, implicitly shared classes. JSON support in Qt consists of these classes:
See also JSON Save Game Example.
| QJsonArray | Encapsulates a JSON array |
|---|---|
| QJsonDocument | Way to read and write JSON documents |
| QJsonObject | Encapsulates a JSON object |
| QJsonObject::const_iterator | QJsonObject::const_iterator class provides an STL-style const iterator for QJsonObject |
| QJsonObject::iterator | QJsonObject::iterator class provides an STL-style non-const iterator for QJsonObject |
| QJsonParseError | Used to report errors during JSON parsing |
| QJsonValue | Encapsulates a value in JSON |
First thing is to include the Network on the cmake file. And make our ui.
cmake_minimum_required(VERSION 3.5)
project(JsonAPIDemo LANGUAGES CXX)
set(CMAKE_INCLUDE_CURRENT_DIR ON)
set(CMAKE_AUTOUIC ON)
set(CMAKE_AUTOMOC ON)
set(CMAKE_AUTORCC ON)
set(CMAKE_CXX_STANDARD 11)
set(CMAKE_CXX_STANDARD_REQUIRED ON)
# QtCreator supports the following variables for Android, which are identical to qmake Android variables.
# Check http://doc.qt.io/qt-5/deployment-android.html for more information.
# They need to be set before the find_package(Qt5 ...) call.
#if(ANDROID)
# set(ANDROID_PACKAGE_SOURCE_DIR "${CMAKE_CURRENT_SOURCE_DIR}/android")
# if (ANDROID_ABI STREQUAL "armeabi-v7a")
# set(ANDROID_EXTRA_LIBS
# ${CMAKE_CURRENT_SOURCE_DIR}/path/to/libcrypto.so
# ${CMAKE_CURRENT_SOURCE_DIR}/path/to/libssl.so)
# endif()
#endif()
find_package(Qt5 COMPONENTS Widgets REQUIRED)
find_package(Qt5Network REQUIRED)
if(ANDROID)
add_library(JsonAPIDemo SHARED
main.cpp
widget.cpp
widget.h
widget.ui
)
else()
add_executable(JsonAPIDemo
main.cpp
widget.cpp
widget.h
widget.ui
)
endif()
target_link_libraries(JsonAPIDemo PRIVATE Qt5::Widgets)
target_link_libraries(JsonAPIDemo PRIVATE Qt5::Network)
2
3
4
5
6
7
8
9
10
11
12
13
14
15
16
17
18
19
20
21
22
23
24
25
26
27
28
29
30
31
32
33
34
35
36
37
38
39
40
41
42
43
44
45
46
47

Now after implementing almost everything we can get the data from the website https://jsonplaceholder.typicode.com/posts.
widget.h
#ifndef WIDGET_H
#define WIDGET_H
#include <QWidget>
#include <QNetworkAccessManager>
#include <QNetworkReply>
#include <QNetworkRequest>
QT_BEGIN_NAMESPACE
namespace Ui { class Widget; }
QT_END_NAMESPACE
class Widget : public QWidget
{
Q_OBJECT
public:
Widget(QWidget *parent = nullptr);
~Widget();
private slots:
void on_fetchButton_clicked();
void dataReadyRead();
void dataReadFinished();
private:
Ui::Widget *ui;
QNetworkAccessManager * mNetManager;
QNetworkReply * mNetReply;
QByteArray * mDataBuffer;
};
#endif // WIDGET_H
2
3
4
5
6
7
8
9
10
11
12
13
14
15
16
17
18
19
20
21
22
23
24
25
26
27
28
29
30
31
32
33
34
35
widget.cpp
#include "widget.h"
#include "./ui_widget.h"
#include <QNetworkRequest>
#include <QDebug>
Widget::Widget(QWidget *parent)
: QWidget(parent)
, ui(new Ui::Widget),
mNetManager(new QNetworkAccessManager(this)),
mNetReply(nullptr),
mDataBuffer(new QByteArray)
{
ui->setupUi(this);
}
Widget::~Widget()
{
delete ui;
}
void Widget::on_fetchButton_clicked()
{
//Initialize our API data
const QUrl API_ENDPOINT("https://jsonplaceholder.typicode.com/posts");
QNetworkRequest request;
request.setUrl(API_ENDPOINT);
mNetReply = mNetManager->get(request);
connect(mNetReply, &QIODevice::readyRead, this, &Widget::dataReadyRead);
connect(mNetReply, &QNetworkReply::finished, this, &Widget::dataReadFinished);
}
void Widget::dataReadyRead()
{
mDataBuffer->append(mNetReply->readAll());
}
void Widget::dataReadFinished()
{
if(mNetReply->error()) {
qDebug() << "Error: " << mNetReply->errorString();
} else {
qDebug() << "Data fetch finished: " << QString(*mDataBuffer);
}
}
2
3
4
5
6
7
8
9
10
11
12
13
14
15
16
17
18
19
20
21
22
23
24
25
26
27
28
29
30
31
32
33
34
35
36
37
38
39
40
41
42
43
44
45
46
47
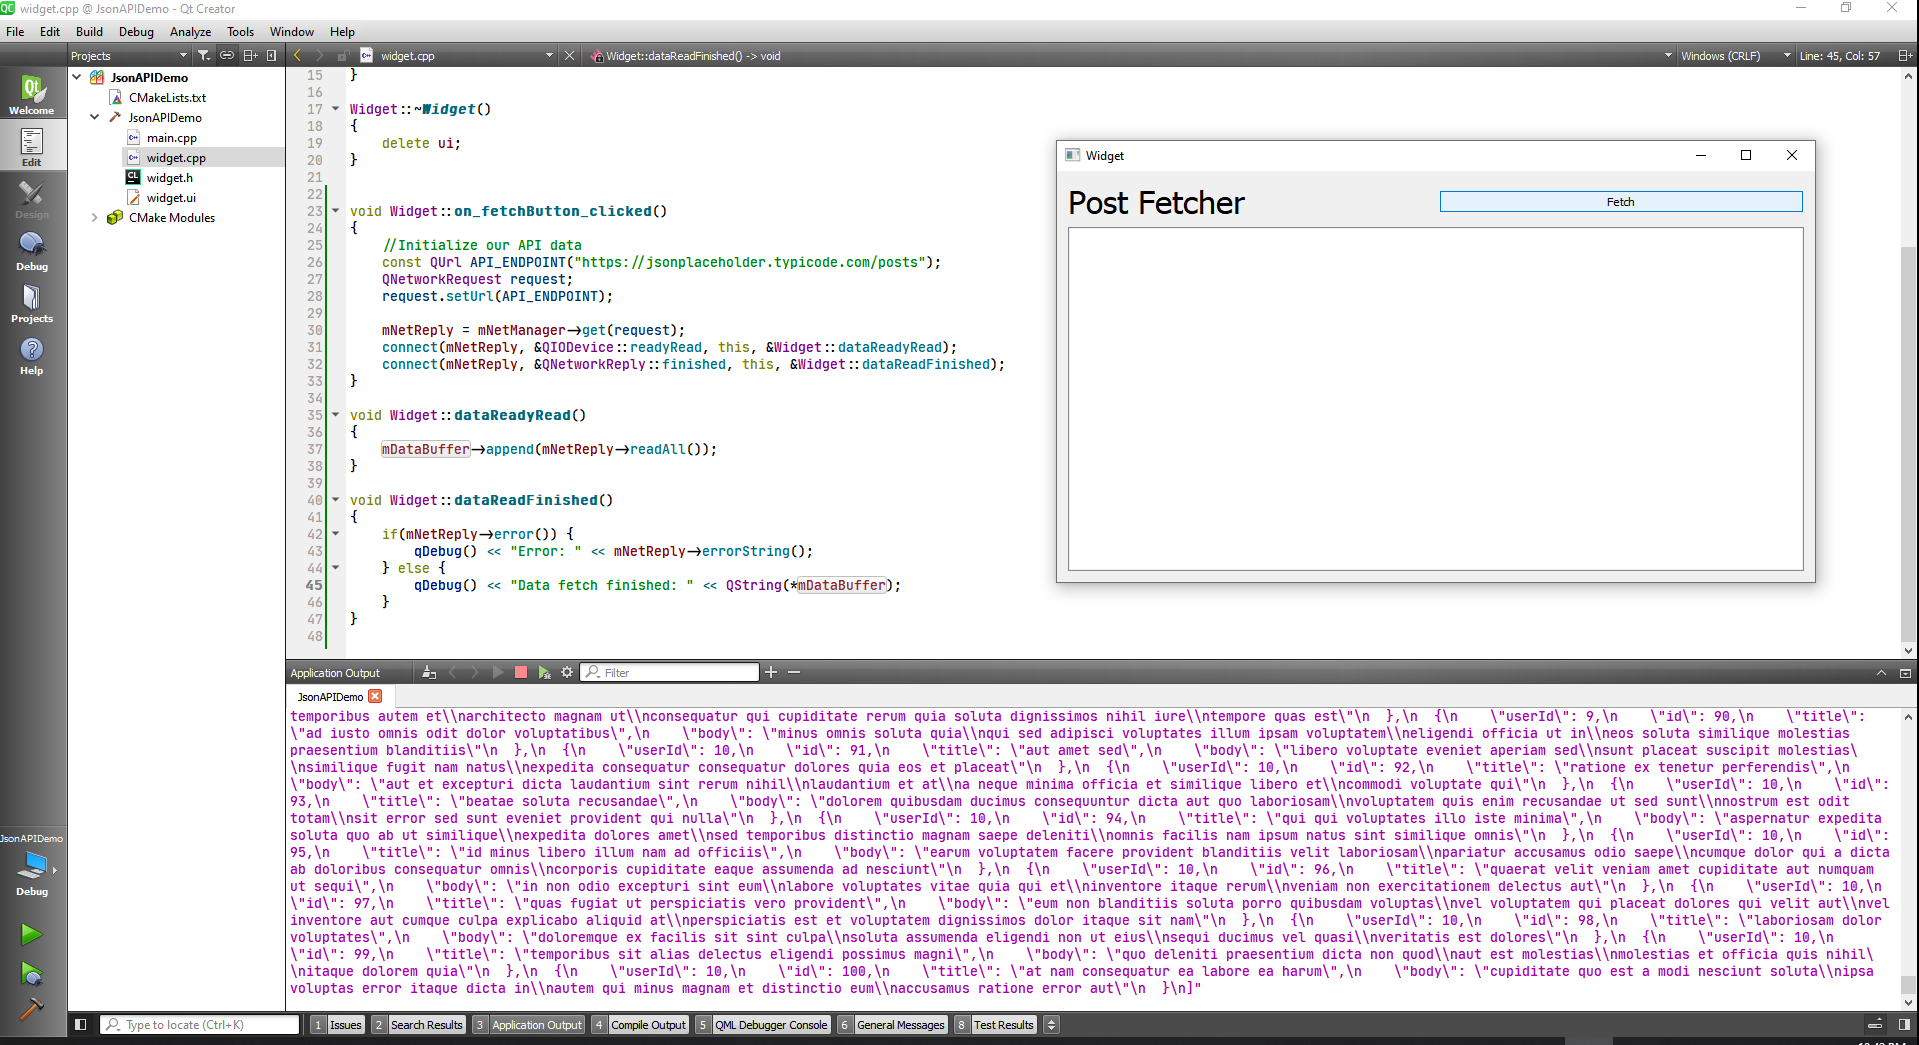
Now we have to interpret the Json file we are getting.
widget.h
#ifndef WIDGET_H
#define WIDGET_H
#include <QWidget>
#include <QNetworkAccessManager>
#include <QNetworkReply>
#include <QNetworkRequest>
QT_BEGIN_NAMESPACE
namespace Ui { class Widget; }
QT_END_NAMESPACE
class Widget : public QWidget
{
Q_OBJECT
public:
Widget(QWidget *parent = nullptr);
~Widget();
private slots:
void on_fetchButton_clicked();
void dataReadyRead();
void dataReadFinished();
private:
Ui::Widget *ui;
QNetworkAccessManager * mNetManager;
QNetworkReply * mNetReply;
QByteArray * mDataBuffer;
};
#endif // WIDGET_H
2
3
4
5
6
7
8
9
10
11
12
13
14
15
16
17
18
19
20
21
22
23
24
25
26
27
28
29
30
31
32
33
34
35
36
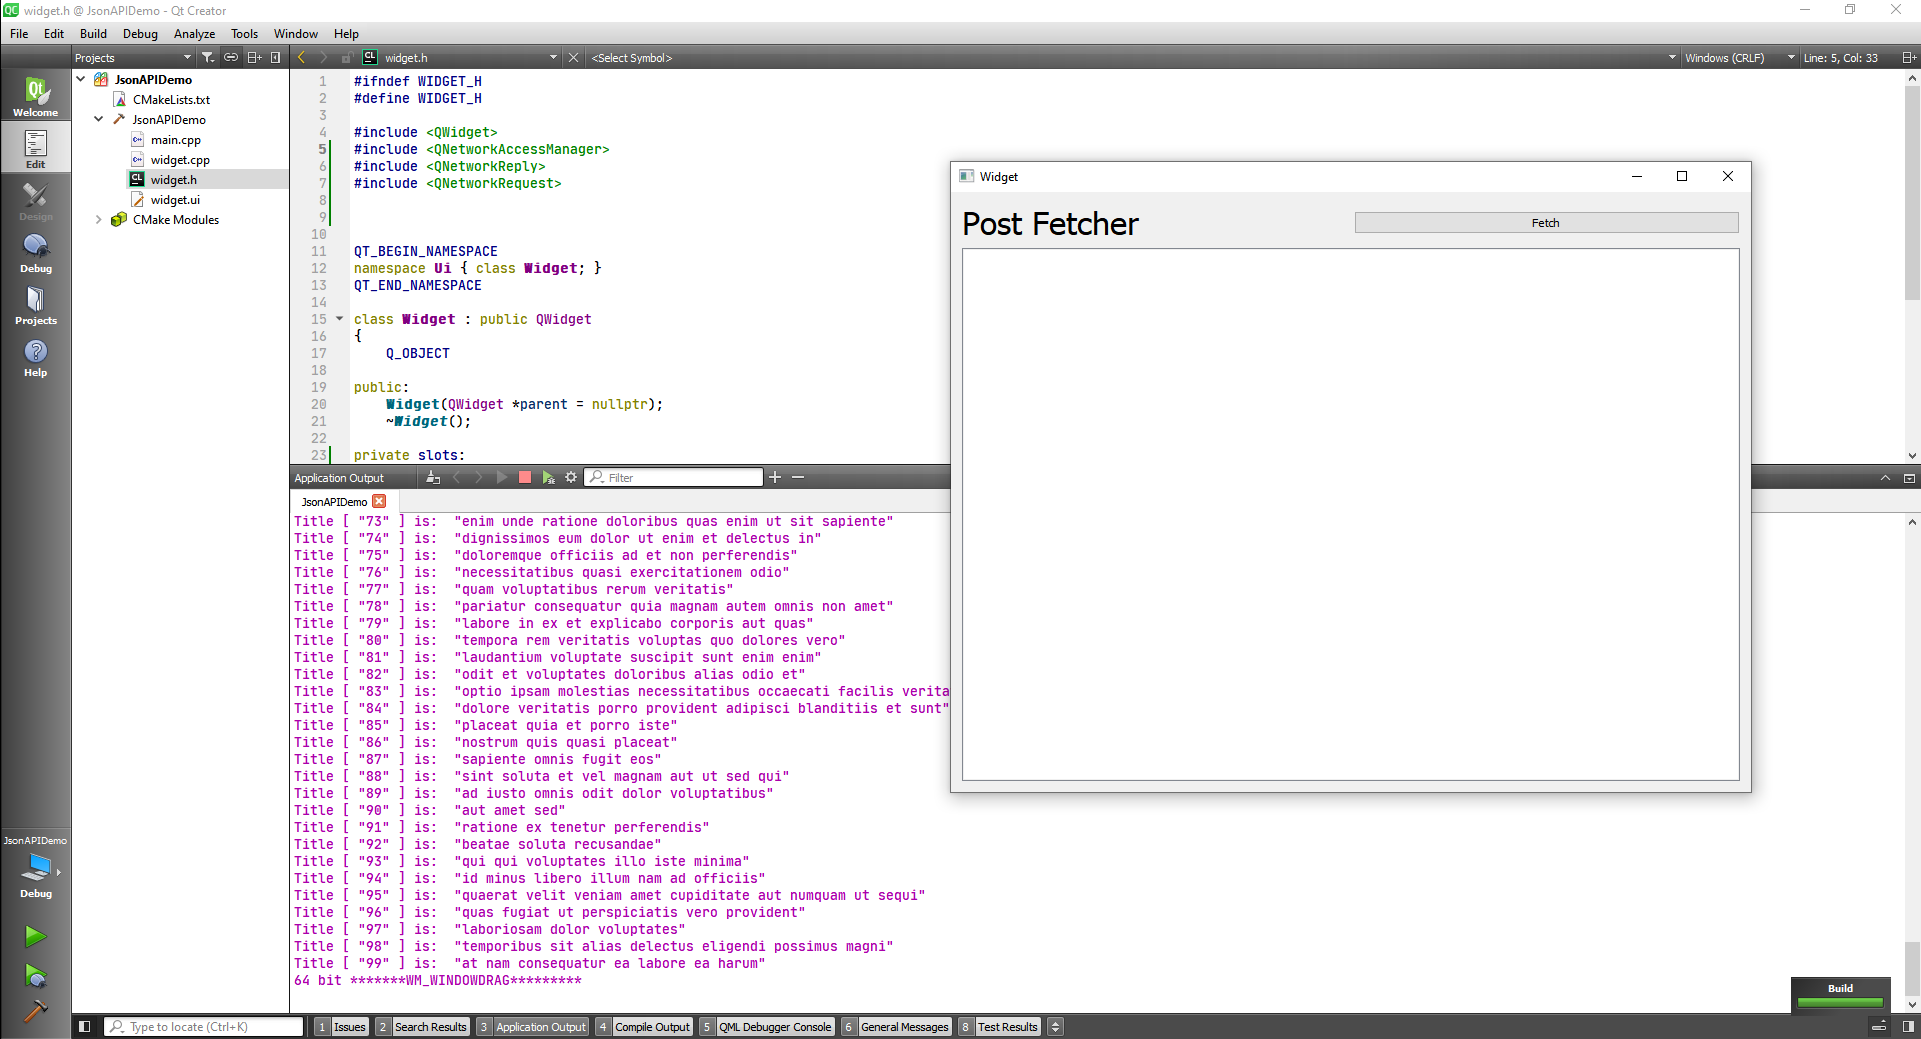
widget.cpp
#include "widget.h"
#include "./ui_widget.h"
#include <QNetworkRequest>
#include <QDebug>
#include <QJsonDocument>
#include <QJsonArray>
#include <QJsonObject>
#include <QVariantMap>
Widget::Widget(QWidget *parent)
: QWidget(parent)
, ui(new Ui::Widget),
mNetManager(new QNetworkAccessManager(this)),
mNetReply(nullptr),
mDataBuffer(new QByteArray)
{
ui->setupUi(this);
}
Widget::~Widget()
{
delete ui;
}
void Widget::on_fetchButton_clicked()
{
//Initialize our API data
const QUrl API_ENDPOINT("https://jsonplaceholder.typicode.com/posts");
QNetworkRequest request;
request.setUrl(API_ENDPOINT);
mNetReply = mNetManager->get(request);
connect(mNetReply, &QIODevice::readyRead, this, &Widget::dataReadyRead);
connect(mNetReply, &QNetworkReply::finished, this, &Widget::dataReadFinished);
}
void Widget::dataReadyRead()
{
mDataBuffer->append(mNetReply->readAll());
}
void Widget::dataReadFinished()
{
if(mNetReply->error()) {
qDebug() << "Error: " << mNetReply->errorString();
} else {
// qDebug() << "Data fetch finished: " << QString(*mDataBuffer);
//Turn the data into a Json document
QJsonDocument doc = QJsonDocument::fromJson(*mDataBuffer);
//Turn document into json array
QJsonArray array = doc.array();
for(int i=0; i<array.size(); i++) {
QJsonObject object = array.at(i).toObject();
QVariantMap map = object.toVariantMap();
QString title = map["title"].toString();
qDebug() << "Title [" << QString::number(i) << "] is: " << title;
}
}
}
2
3
4
5
6
7
8
9
10
11
12
13
14
15
16
17
18
19
20
21
22
23
24
25
26
27
28
29
30
31
32
33
34
35
36
37
38
39
40
41
42
43
44
45
46
47
48
49
50
51
52
53
54
55
56
57
58
59
60
61
62
63
64
65
66
67
68
69
70
Now we just have to send the data into the line Edit
#include "widget.h"
#include "./ui_widget.h"
#include <QNetworkRequest>
#include <QDebug>
#include <QJsonDocument>
#include <QJsonArray>
#include <QJsonObject>
#include <QVariantMap>
Widget::Widget(QWidget *parent)
: QWidget(parent)
, ui(new Ui::Widget),
mNetManager(new QNetworkAccessManager(this)),
mNetReply(nullptr),
mDataBuffer(new QByteArray)
{
ui->setupUi(this);
}
Widget::~Widget()
{
delete ui;
}
void Widget::on_fetchButton_clicked()
{
//Initialize our API data
const QUrl API_ENDPOINT("https://jsonplaceholder.typicode.com/posts");
QNetworkRequest request;
request.setUrl(API_ENDPOINT);
mNetReply = mNetManager->get(request);
connect(mNetReply, &QIODevice::readyRead, this, &Widget::dataReadyRead);
connect(mNetReply, &QNetworkReply::finished, this, &Widget::dataReadFinished);
}
void Widget::dataReadyRead()
{
mDataBuffer->append(mNetReply->readAll());
}
void Widget::dataReadFinished()
{
if(mNetReply->error()) {
qDebug() << "Error: " << mNetReply->errorString();
} else {
qDebug() << "Data fetch finished: " << QString(*mDataBuffer);
//Turn the data into a Json document
QJsonDocument doc = QJsonDocument::fromJson(*mDataBuffer);
//Turn document into json array
QJsonArray array = doc.array();
for(int i=0; i<array.size(); i++) {
QJsonObject object = array.at(i).toObject();
QVariantMap map = object.toVariantMap();
QString title = map["title"].toString();
ui->listWidget->addItem("["+ QString::number(i+1) + "] " + title);
}
}
}
2
3
4
5
6
7
8
9
10
11
12
13
14
15
16
17
18
19
20
21
22
23
24
25
26
27
28
29
30
31
32
33
34
35
36
37
38
39
40
41
42
43
44
45
46
47
48
49
50
51
52
53
54
55
56
57
58
59
60
61
62
63
64
65
66
67
68
69
70
71
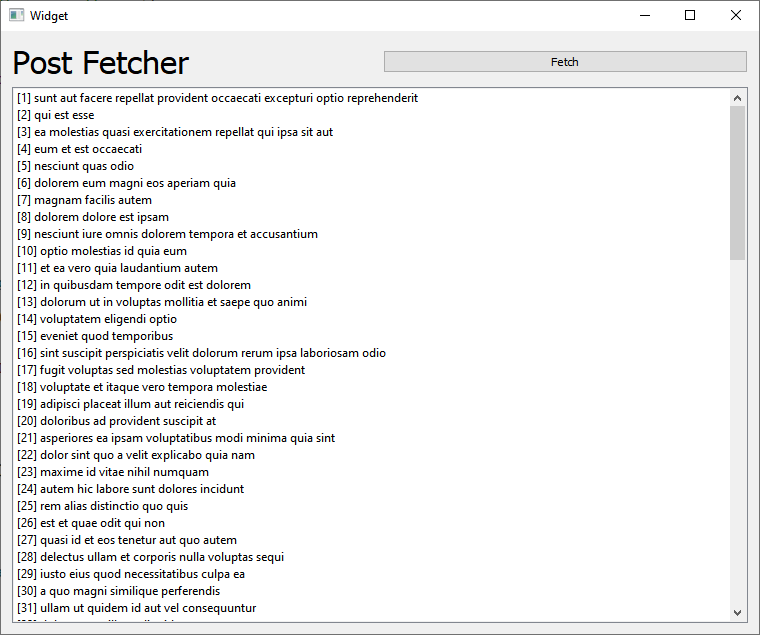
TIP
If you get an Json object use:
//What if you get an object from the server
QJsonDocument objectDoc = QJsonDocument::fromJson(*mDataBuffer);
QJsonObject obObject = objectDoc.toVariant().toJsonObject();
2
3
# Next Steps

- Model View Programming (help)
- QGraphicsView (help) - Maybe Beam tools
- Thread Support in Qt (help)
- XML
- QT Forum
# QObject
Presentation of QTWS19 on youtube about the QObject.
QObject is the base class of the most non-value classes in Qt.
- Can't copy Objects
- Gets the parent-child relationship
- Can use moc for adding the rest (Q_OBJECT macro)
- Adds about 40 bytes to an object + a vtable
#define signals public "signals:void someSignal();" #define slots "public slots: void someSignal(int foo);" #define emit "emit someSignal();"
The emit is really not necessary to write down, its more a remider for the programmer.
connect(sender, &Class::signalMethod, receiver, &Class:slotMethod);
Needs Q_OBJECT macro on both signal and slot class. Signals are implemented by moc, slots by you.
Connections can be directed or queued.
# lambda slots
This is exactly what lambda slots are for:
QNetworkRequest req("http://www.vikingsoftware.com");
QNetworkRequest* reply = QNAM::get(request);
connect(reply, &QNetworkReply::finished, this, [this, reply](){
reply->deleteLater();
doStuff(reply->readAll());
});
2
3
4
5
6
With lambda slots what you get extra over a normal slot is that you have a connection between what sent away something that needs a response and the getting that response, you have a connection between these two.
# Q_PROPERTY
Q_PROPERTY(type name READ readMethod WRITE writeMethod NOTIFY signalMethod)
- Q_PROPERTY is an empty definition
- Tells moc to generate the property handling
- Properties are visible in designer, QML and with introspection
- Doesn't increase the class object size, increase the shared meta object size
- QObject also have dynamic propoerties
TIP
Don't use dynamic properties unless you need
If you have something that is a property write it on the top of the QObject, so it can be easily seen.
# moc
moc is a code generator for the QObject technology. Generates the meta object.
- Class name and object name
- Method list of slots and Q_INVOKABLE methods
- Implements slots
- Implements cast operators
- Implements dynamic methods invocation
# QObject
What is the QObject
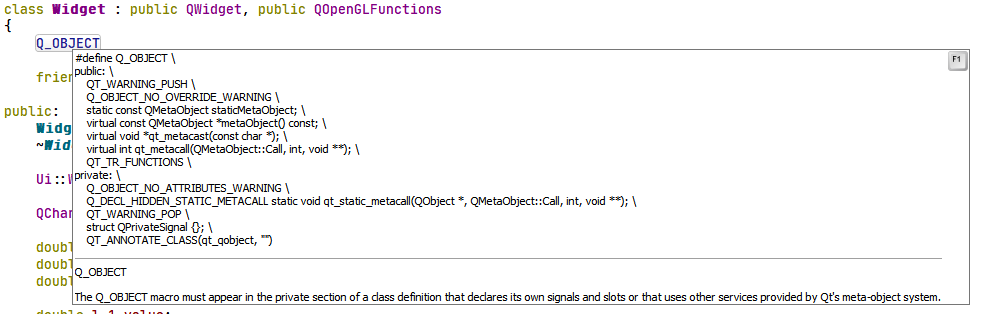
class MyObject: public QObject{
Q_OBJECT
Q_PROPERY(int count READ count WRITE setCOunt NOTIFY countChanged)
public:
explicit MyObject(QObject* parent = nullptr);
int count() const;
public slots:
void setCount(int count)
{if(count != m_count){ macount = count; emit countChanged(count);}
}
signals:
void countChanged(int count);
private:
int m_count;
2
3
4
5
6
7
8
9
10
11
12
13
14
- When a QObject is deleted, it deletes all it's children
- Set the parent with the constructor or setParent(parent);
- Search for child objects with findChildren
- Widget children are placed inside their parents view
- Don't ever put QObjects in smart pointers
- Use QPointer instead
TIP
Get used to run running Valgrind on c++ and check for memory errors of deletes of objects that you forget to delete and make sure there is no double delete.
- Value struct in Qt
- Each Q_OBJECT class has a static meta object
- Has info about class name and base class
- Can handle casts and inherits()...
- Methods handling constructors, methods, properties, slots, and signals
- Implements the connections and activate
# QML
QML is at the heart a scripting language that handles automatic connections:
property int a: 5
property bool flag: true
property int b: flag ? 42 : a * 117
in FlagChanged: {doStuff()}
2
3
4
5
QML uses the meta object heavily for porperties and method calls
# Architeture Considerations
- Use signals to decouple changes that happens putside your object
- use signals and slots to create blackbox objects
- Unless you emit a lot of signals, don't worry about performance
- Don't use introspection unless you have to
- Use Qt tolls like Q_PROPERTY even if you don't gain immediately
- Take advantage of the parent child relationship for memory correctness
- Connect signals and slots from the owning object (when it makes sense)